Table of Contents
Advertisement
WIRELESS WEATHER STATION
WITH ADVANCED FORECAST ICON
Instruction Manual
Thank You and Congratulations on selecting a La Crosse Technology Wireless
Weather Station! We are positive you will enjoy the benefits of accurate weather
readings and the precise, radio-controlled time information that our instruments
offer. La Crosse Technology introduced radio controlled clocks to the US market in
1991, and continues to be on the cutting-edge of this technology in America.
This manual will guide you step-by-step through setting up your La Crosse
Technology device. Use this manual to become familiar with your wireless weather
station and save it for future reference
42
Advertisement
Table of Contents

Related Manuals for La Crosse Technology WS-9611U


Summary of Contents for La Crosse Technology WS-9611U
- Page 1 Weather Station! We are positive you will enjoy the benefits of accurate weather readings and the precise, radio-controlled time information that our instruments offer. La Crosse Technology introduced radio controlled clocks to the US market in 1991, and continues to be on the cutting-edge of this technology in America.
- Page 2 FEATURES: The Weather clock Indoor 12 or 24 Hour Temperature Radio and Humidity Advanced Forecast Moon Phase Icon Display Sun Rise/Set Outdoor Temperature & Sun Duration for 99 Cities...
- Page 3 FEATURES: • WWVB Radio-controlled time with manual setting option • Time reception ON/OFF (user selectable) • 12/24-hour time display • Automatic daylight saving time (DST) updating • DST ON/OFF (daylight saving time) • Time zone option ±12 hours • Year, month, date, weekday calendar display •...
- Page 4 The Wireless Temperature Sensor (TX6U) • Wireless transmission of outdoor temperature to your wireless weather station by Wireless 433 MHz Temperature Sensor • Rain proof casing • Wall mounting case Mounting Case TO INSTALL AND REPLACE BATTERIES IN THE WIRELESS TEMPERATURE SENSOR The wireless temperature sensor uses 2 “AA”...
-
Page 5: Battery Change
Note: In the event of changing batteries in any of the units, all units need to be reset by following the set-up procedures. This is due to a random security code assigned by the wireless temperature sensor at start-up. This code must be received and stored by the wireless weather station in the first 3 minutes of power being supplied to the wireless temperature sensor. - Page 6 Please participate in the preservation of the environment. Return used batteries to an authorized depot. SETTING UP First, insert the batteries into the wireless temperature sensor (see “To install and replace batteries in the wireless temperature sensor”) Within 4 minutes of activating the wireless temperature sensor, insert the batteries into the wireless weather station (see “To install and replace batteries in the wireless weather station”).
- Page 7 sensors in the order of set-up, i.e. the first temperature sensor will have the temperature displayed with the number 1 against it and so on. With less than 3 temperature sensors received, the wireless weather station will try to pick up the remaining one in approximately another 3 minutes. If 3 temperature sensors are received, the wireless weather station will stop further reception.
-
Page 8: About Wwvb Radio Controlled Time
In order to establish proper communication between the display and outdoor sensor it is important that they be set up as follows: Bring any units outside, inside and place all units 3-5 feet apart with nothing in- between them. Remove batteries from all units. Press any of the buttons on the display at least 10 times to clear the memory. - Page 9 during daylight hours. The wireless weather station will search for a signal every night when reception is best. The WWVB radio station receives the time data from the NIST Atomic clock in Boulder, Colorado. A team of atomic physicists is continually measuring every second, of every day, to an accuracy of ten billionths of a second per day.
-
Page 10: Function Keys
FUNCTION KEYS: Weather clock: The Weather clock has five easy to use function keys. SNOOZE/ SUN key SET key ALM key CH/ + key MIN/ MAX key... - Page 11 SET key (Setting): • Toggle between month, day, & year; weekday, month, & day; seconds; & alarm time • Press and hold to enter manual setting modes: LCD contrast, time zone, daylight saving time ON/OFF, time reception ON/OFF, 12/24 hour display, manual time setting, calendar setting, sun rise/set city selection, snooze function, temperature °F or °C, and weather icon sensitivity setting •...
-
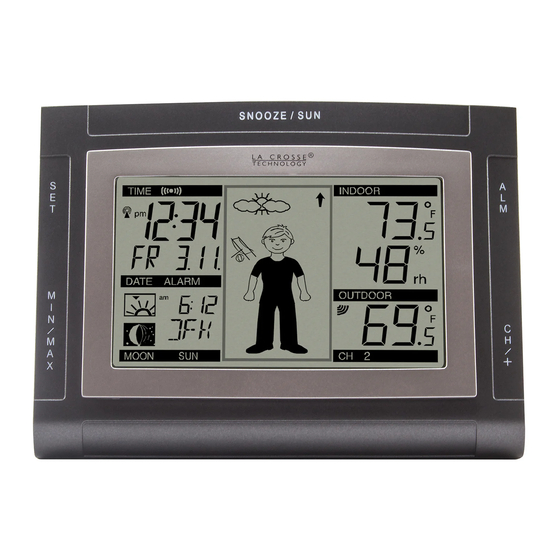
Page 12: Lcd Screen And Settings
• Stop the alarm during alarm ringing • Backlight on MIN/ MAX • Press and release to toggle between MIN/MAX and current temperature/humidity values for selected outdoor temperature channel • Stop the alarm during alarm ringing • Stop snooze mode •... - Page 13 WWVB Tower Weather Alarm icon Icon (for time Tendency icon reception) Indoor Temperature Time Calendar Indoor Relative Humidity % Outdoor Temperature Moon phase display Weather Forecast icon (Weather boy) Sunrise/ sunset Number showing Outdoor display Sensor unit Reception Signal...
-
Page 14: Manual Settings
MANUAL SETTINGS: The following manual settings can be done in the setting mode: • LCD contrast setting • Time zone setting • Daylight Saving Time (DST) ON/OFF • Time reception ON/OFF setting • 12/24-Hour setting • Manual time setting • Calendar setting (Year, Day, &... -
Page 15: Time Zone Setting
Press and hold the SET key until the digit starts flashing. Use the CH/+ key to view all levels of contrast. Select the desired LCD contrast. Confirm with the SET key and enter in the Time Zone setting. TIME ZONE SETTING: flashing The time zone default of the wireless weather station is EST –5. - Page 16 DAYLIGHT SAVING TIME (DST) ON/OFF SETTING Note: The DST default is “ON”, meaning that the received time will automatically be adjusted according to Daylight Saving Time in the spring and fall. For areas that do not recognize DST changes (Arizona and parts of Indiana) turn the DST “OFF”. WWVB Signal Reception Icon Daylight...
-
Page 17: Time Reception On/Off Setting
DST starts flashing in the top left black bar flashing in the bottom left section above the city selection. Use the CH/+ key to toggle between and select on or off. Confirm selection with the SET key and enter the Radio Controlled Time Reception ON/OFF Setting. -
Page 18: 12/24 Hour Time Display Setting
ON will start flashing on the LCD. Use the CH/+ key to turn OFF the time reception function. Confirm with the SET key and enter the 12/24-HOUR setting. Note: If the Time Reception function is turned OFF manually, the clock will not attempt any reception of the WWVB time as long as the Time Reception OFF function is activated. -
Page 19: Manual Time Setting
Note: When 24h mode display is selected, the calendar format will be date and month display. When 12h mode display is selected, the calendar format will be month and date display. MANUAL TIME SETTING In case the wireless weather station cannot detect the WWVB-signal (for example due to disturbances, transmitting distance, etc.), the time can be manually set. -
Page 20: Calendar Setting
Note: The unit will still try to receive the signal between 12:00 to 6:00 a.m. every day even if the time has been manually set and if the WWVB time reception function has been set ON. When it does receive the signal, it will change the manually set time into the received time. - Page 21 Press the SET key again to confirm and to enter the month setting. The month starts flashing. Use the CH/+ key to set the month. Press the SET key again to confirm and to enter the date setting mode. The date starts flashing.
- Page 22 The city abbreviation starts flashing. Use the CH/+ key to toggle through the 99 cities and select city closest to your location. Press the SET key to confirm selection and enter the Snooze Setting. Code City, State Code City, State Code City, Stat Alabama...
- Page 23 Durango International Rapid City Falls Grand Junction Missouri Tennessee Pueblo Jefferson City Memphis District of Columbia Mississippi Nashville Washington Jackson Knoxville D.C. Florida Montana Texas Jacksonville Billings Amarillo Miami Helena Austin Orlando North Carolina Brownsville Tallahassee Charlotte Dallas/Ft. Worth Tampa Raleigh El Paso Georgia...
- Page 24 Evansville Las Vegas West Virginia Indianapolis Reno Charleston Kansas New York Wisconsin Dodge City Buffalo Green Bay Wichita New York City La Crosse West Virginia Topeka Syracuse Ohio Charleston Cleveland Wyoming Columbus Casper CANADA CITY LIST Code City Code City...
-
Page 25: Snooze Setting
SNOOZE SETTING: The snooze time can be set from OFF to a maximum time of 30 minutes (default is 10 minutes): flashing Use the CH/+ key to set the snooze time. Each pressing of the key will increase the snooze time by 5 minutes. The snooze can also be set OFF when the OFF digit is being displayed. - Page 26 Use the CH/+ key to toggle between °F or °C. Confirm with the SET key and enter the Weather forecasting icon sensitivity setting. WEATHER FORECASTING ICON SENSITIVITY SETTING For locations with rapid changes of weather conditions, the weather icons can be set to a different level for faster display of weather conditions.
-
Page 27: Alarm Setting
Use the CH/+ key to set the weather sensitivity level. There are 3 levels of setting: 1, 2 and 3; level 1 is the most sensitive setting; level 3 is the slowest recording setting (default setting is 2). Confirm with the SET key and exit the Manual settings. ALARM SETTING: Alarm icon flashing... -
Page 28: Weather Forecast Icons
Note: The maximum alarm ring duration is 2 minutes. The alarm setting can be activated or deactivated manually by pressing the ALM key. The alarm icon will be displayed on the LCD if the setting is activated SNOOZE SETTING AND STOPPING THE ALARM: The snooze function can be activated when the alarm is ringing by pressing the SNOOZE key. - Page 29 Note: After initial set up, allow 48-60 hours for your Wireless Weather Station to acclimate to the local pressure. For every sudden or significant change in the air pressure, the weather icons will update accordingly to represent the change in weather. If the icons do not change, then it means either the air pressure has not changed or the change has been too slow for the wireless weather station to register.
- Page 30 weather station will be more accurate compared to use in areas where the weather is stagnant most of the time (for example mostly sunny). If the wireless weather station is moved to another location significantly higher or lower than its initial standing point (for example from the ground floor to the upper floors of a house), discard the weather forecast for the next 12-24 hours.
- Page 31 ADVANCED FORECAST ICONS: A total of 15 Advanced Forecast icon combinations can be displayed depending on outdoor temperature and air pressure recorded from outdoor sensor 1 only. The Wireless Weather Station will display 15 unique Advanced Forecast Icons depending upon outdoor temperature and recorded air pressure...
- Page 32 ≥ 78.8ºF 50 - 66ºF 32 – 49.8ºF 66.2 – 78.6ºF < 32ºF (0 – 9.9°C) (26°C) (10-18.9°C) (19– 25.9°C) (0°C) Sunny Cloudy Rainy...
-
Page 33: The Moon Phase
THE MOON PHASE The Moon icon of the Weather clock will also display 12 different Moon phases according to the set calendar. Note: In the southern hemisphere, the phases of the moon are same but the shape of the moon is mirror inverted. New Moon Full Moon Large Waning Gibbous... -
Page 34: Display Of Indoor Temperature And Humidity Reading
The moon phase for any date may be found by selecting a different date through the sun rise/set moon rise/set programming section. DISPLAY OF INDOOR TEMPERATURE AND HUMIDITY READING: The indoor temperature and humidity data are automatically updated and displayed on the fourth section of the LCD. - Page 35 The last LCD section shows the outdoor temperature, a reception symbol and a channel number under the temperature will also show if more than one sensor has been used. TOGGLING AND RESETTING THE MIN/MAX READINGS: To toggle between the MIN/MAX data for indoor temperature and humidity and outdoor temperature press and release the MIN/MAX key.
-
Page 36: To Exit The Manual Setting Mode
TO EXIT THE MANUAL SETTING MODE To exit the manual setting mode anytime during the manual setting modes, press the SNOOZE key anytime or wait for automatic timeout. The mode will return to normal time display. LED BACKLIGHT The backlight is automatically switched ON when any keys are pressed. The backlight will be switched on for approximately 10 seconds before automatically switching OFF. - Page 37 Using other electrical products such as headphones or speakers operating on the same signal frequency (433MHz) may prevent correct signal transmission and reception. Neighbors using electrical devices operating on the 433MHz signal frequency can also cause interference. Note: When the 433 MHz-signal is received correctly, do not re-open the battery cover of either the temperature sensor or wireless weather station, as the batteries may spring free from the contacts and force a false reset.
- Page 38 To wall mount: Fix a screw into the desired wall, leaving the head extended out the by about 5mm. Using the Weather clock’s hanging hole, carefully hang it onto the screw. Note: Always ensures that the unit locks onto the screw head before releasing.
-
Page 39: Care And Maintenance
CARE AND MAINTENANCE : • Extreme temperatures, vibration and shock should be avoided as these may cause damage to the unit and give inaccurate forecasts and readings. • When cleaning the display and casings, use a soft damp cloth only. Do not use solvents or scouring agents as they may mark the LCD and casings. -
Page 40: Liability Disclaimer
Relative humidity measuring range: Indoor 1% to 99% with 1% resolution (displays “- -” when lower than 1 %; displays "99" % if higher than 99 %) Indoor temperature checking interval every 15 seconds Indoor humidity checking interval every 20 seconds Outdoor temperature reception every 5 minutes Transmission range... -
Page 41: Warranty Information
La Crosse Technology, Ltd or La Crosse Technology, Ltd’s authorized service center. La Crosse Technology, Ltd will repair or replace this product, at our option and at no charge as stipulated herein, with new or reconditioned parts or products if found to be defective during the limited warranty period specified above. - Page 42 Crosse Technology, Ltd. Replacement parts and products assume the remaining original warranty, or ninety (90) days, whichever is longer. La Crosse Technology, Ltd will pay all expenses for labor and materials for all repairs covered by this warranty. If necessary repairs are not covered by this warranty, or if a product is examined which is not in need or repair, you will be charged for the repairs or examination.
- Page 43 LA CROSSE TECHNOLOGY, LTD WILL NOT ASSUME LIABILITY FOR INCIDENTAL, CONSEQUENTIAL, PUNITIVE, OR OTHER SIMILAR DAMAGES ASSOCIATED WITH THE OPERATION OR MALFUNCTION OF THIS PRODUCT. THIS PRODUCT IS NOT TO BE USED FOR MEDICAL PURPOSES OR FOR PUBLIC INFORMATION. THIS PRODUCT IS NOT A TOY.
- Page 44 Questions? Please see instruction video at: www.lacrossetechnology.info/9611 All rights reserved. This handbook must not be reproduced in any form, even in excerpts, or duplicated or processed using electronic, mechanical or chemical procedures without written permission of the publisher. This handbook may contain mistakes and printing errors. The information in this handbook is regularly checked and corrections made in the next issue.
- Page 45 Evansville Las Vegas West Virginia Indianapolis Reno Charleston Kansas New York Wisconsin Dodge City Buffalo Green Bay Wichita New York City La Crosse Topeka Syracuse West Virginia Ohio Charleston Cleveland Wyoming Columbus Casper CANADA CITY LIST Code City Code City...
Need help?
Do you have a question about the WS-9611U and is the answer not in the manual?
Questions and answers