Table of Contents
Advertisement
Quick Links
Advertisement
Table of Contents

Related Manuals for Sangean FATBOX


Summary of Contents for Sangean FATBOX
- Page 1 FATBOX Version 1...
-
Page 2: Important Safety Instructions
Important Safety Instructions 1. Read these instructions. 2. Keep these instructions. 3. Heed all warnings. 4. Follow all instructions. 5. Do not use this apparatus near water. 6. Clean only with dry cloth. 7. Do not block any ventilation openings. Install in accordance with the instructions. - Page 3 12. Use only with the cart, stand, tripod, bracket, or table specified by the manufacturer, or sold with the apparatus. When a cart is used, use caution when moving the cart/apparatus combination to avoid injury from tip-over. 13. Unplug this apparatus during lightning storms or when unused for long periods of time.
-
Page 5: Lcd Display
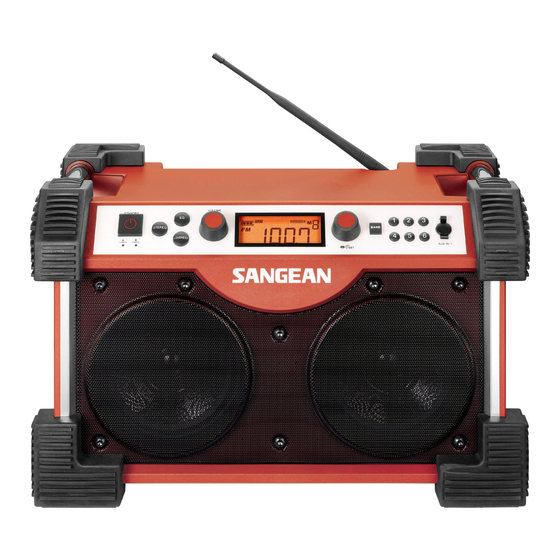
Controls Power On/Off Charge LEDS Stereo/Mono switch EQ ( Equalizer ) Loudness On/Off Volume Control LCD display Tuning Control/Time Set Band Selection Preset Stations Aux In 1 socket Aux In 2 socket/MP3 player compartment Back up battery compartment Main battery compartment Alkaline/NiMH/NiCad Rechargeable battery switch 10-14V DC In socket Power cord... -
Page 6: Power The Radio
Power the radio A. Battery operation 1. Installing the batteries, first turn battery cover fixtures anti-clockwise to loosen and pull down the battery cover. Note: Before you insert the batteries, if you use non-rechargeable batteries, make sure the NiMH/NiCad/Alkaline switch which located inside the battery compartment is switched to Alkaline position. - Page 7 4. Close the battery cover and fasten the fixture by turning clockwise. If the radio is not to be used for any extended period of time, it is recommended that the batteries are removed from the radio. Reduced power, distortion and a “ stuttering sound “ or low battery sign is flashing on the display are all signs that the batteries need replacing or recharging ( see below Charging the batteries ).
-
Page 8: Charging The Batteries
B. AC operation Before plug the AC power cord into the AC socket, be sure the voltage is correct. If you have batteries in the radio and connect the AC power cord into the AC socket, the batteries will automatically be disconnected. -
Page 9: Setting The Clock
Charge new batteries fully the first time before first use. This can take longer depending on the capacity of the rechargeable batteries. Do not use a mix of old and new rechargeable batteries. Do not use a mix of full and empty rechargeable batteries. Do not use batteries that have a different mAh capacity. -
Page 10: Radio Operation
Radio Operation 1. Press the Power button to turn on the radio. 2. Select the required waveband by pressing the Band button. 3. Stand up the FM rubber antenna properly to get best reception. For AM ( MW ) band, rotate the radio to get best signal. 4. -
Page 11: Recall Stations From Preset Memories
Recall stations from preset memories 1. Press the Power button to turn on the radio. 2. Select the required waveband. 3. Momentarily press the required Preset button, the preset number and M also station frequency will appear in the display. Display backlight Press any button except Power button will illuminate the LCD display for approx. -
Page 12: Aux In Socket
24H/12H format After tuning step change is completed, display will show 12H or 24H for current hour format. Rotate Tuning Control knob to change time format and press band button again to complete hour format change. Aux In socket There are 2 Aux In sockets in this radio to connect audio sources like MP 3 player or CD walkman to listen the audio program via the speakers of this radio. -
Page 13: Loudness On/Off
Equalizer function ( EQ ) The sound on your radio can be adjusted to suit your personal taste for the songs you are listening to. It has six preset equalizer modes. Press the EQ button to cycle through the various modes. a. -
Page 14: Specifications
Specifications Frequency Coverage: FM 87.50 – 108 MHz AM ( MW ) 520 – 1710 kHz ( 10 kHz ) 522 – 1629 kHz ( 9 kHz ) AC Power: AC 120V/60Hz/50 W ( USA ) AC 230V/50Hz/50 W ( Europe ) Batteries: ALKALINE battery 8 X D size(UM-1)for main battery...
Need help?
Do you have a question about the FATBOX and is the answer not in the manual?
Questions and answers