Table of Contents
Advertisement
Quick Links
Digital Slave Strobe
Operation Manual
1
2
3
4
How to synchronize your Automatic/Manual Digital Camera and Slave Strobe
A) Setting:
You must perform the following test to determine the correct setting of the Slave Strobe for your own digital camera:
Step 1:
Place your digital camera and the Slave
Strobe face to face approximately 1 meter
apart.
B) Tips for the Slave Strobe Synchronization:
1. Every time you use the same digital camera with the Slave Strobe use the same relevant Flash Mode Switch setting.
2. When the Slave Stobe works underwater with the Housing, in some instances, it is possible for the varying light
conditions underwater to cause the Slave Strobe to synch at a different setting to the setting determined on land. If you
think the flash is not at the correct synch setting when underwater, try to re-do the synch test with the Housing
underwater.
II
For Fully Automatic Digital Cameras
A) Setting:
1. Set the camera flash mode into "Auto Flash", "Forced Flash" or "Slow Flash"
2. Cancel the red-eye reduction function & any pre-flash setting.
3. Set the Slave Strobe's Flash Mode Switch to
a)For standard digital camera flash, set
b)For digital camera with one time pre-flash, set
c)For digital camera with two times pre-flash, set
d)If you don't know your digital camera flash type, please follow the steps in
Automatic/Manual Digital Camera and Slave Strobe
B) Tips for using the Slave Strobe
1. Always shoot pictures with the
2. If the subject in the picture looks too dark, try to (i) adjust the Flash Output Control Switch to MED or MAX, or (ii) move your
camera closer to your subject, or (iii) set your camera zoom lens into more wide angle.
3. If the subject in the picture looks too bright, try to (i) adjust the Flash Output Control Switch to MED or MIN, or (ii) move
your camera further away from the subject , or (iii) set your camera zoom lens into more Tele. (iv) You can also use an
Adjustable Arm or Multi-angle Stand to tilt the Slave Strobe to an angle to enable softer reflection of light from the Slave
Strobe onto the subject. (v) The supplied diffuser panels can also be used to soften reflection from the strobe on the subject.
5
6
8
7
Step 2:
Take 3 Flash pictures of the Slave Strobe
with its Flash Mode Switch setting at
2
and
3
respectively
1
,
2
or
3
1
2
3
READY
indicator lamp fully lit up.
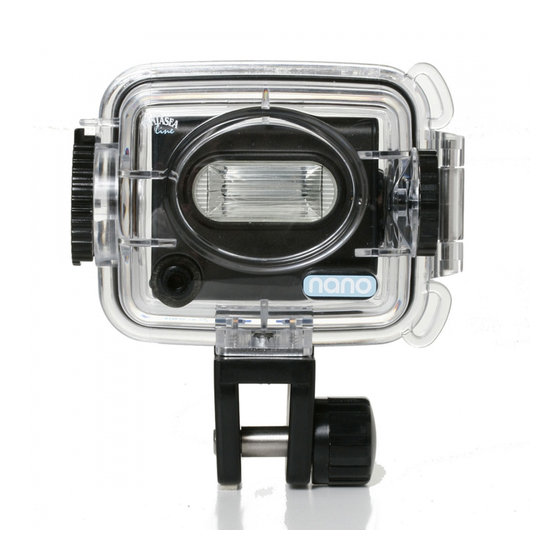
1. FLASH LIGHT SENSOR
2. FLASH
3. FLASH SYNC. SENSOR
4. FLASH MODE SWITCH
5. FLASH READY LIGHT
6. BATTERY DOOR
7. FLASH TRIGGER OVERRIDE SWITCH
8. FLASH OUTPUT CONTROL SWITCH
Step 3:
Compare the 3 pictures. The Slave Strobe
1
,
picture which is overexposed (white out)
has been taken in the correct Flash Mode
Switch setting.
How to synchronize your
Advertisement
Table of Contents

Subscribe to Our Youtube Channel
Related Manuals for Fantasea Cool flash nano


Summary of Contents for Fantasea Cool flash nano
- Page 1 Digital Slave Strobe Operation Manual 1. FLASH LIGHT SENSOR 2. FLASH 3. FLASH SYNC. SENSOR 4. FLASH MODE SWITCH 5. FLASH READY LIGHT 6. BATTERY DOOR 7. FLASH TRIGGER OVERRIDE SWITCH 8. FLASH OUTPUT CONTROL SWITCH How to synchronize your Automatic/Manual Digital Camera and Slave Strobe A) Setting: You must perform the following test to determine the correct setting of the Slave Strobe for your own digital camera: Step 1:...
-
Page 2: Specifications
For Digital Camera with Manual Setting A) Setting 1. Set the camera setting to "Manual" mode 2. Set the camera ISO light sensitivity setting to 100, 200 or 400 3. Set the camera lens aperture F value to "2.8" or closest to this value. 4.
Need help?
Do you have a question about the Cool flash nano and is the answer not in the manual?
Questions and answers