Table of Contents
Advertisement
Advertisement
Table of Contents

Related Manuals for Sanyo DS25230


Summary of Contents for Sanyo DS25230
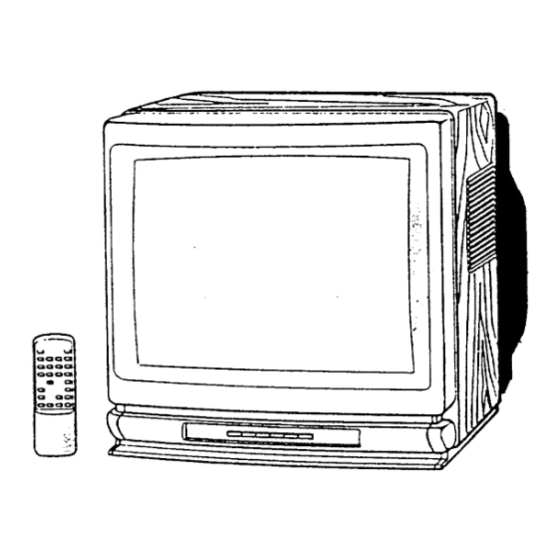
- Page 1 • Remote Control _" Color Televnsnon Model DS25230 Owner's Manual...
- Page 2 CAUTION CAUTION: TO REDUCE THE RISK OF ELECTRIC SHOCK, DO NOT REMOVE COVER (OR BACK). NO USER-SERVICEABLE PARTS INSIDE. REFER SERVICING TO QUALIFIED SERVICE PERSONNEL. THIS SYMBOL INDICATES THAT THERE ARE OUS VOLTAGE CONSTITUTING A RISK OF IMPORTANT OPERATING MAIN- ELECTRIC SHOCK IS PRESENT WITHIN THIS TENANCE INSTRUCTIONS IN THE LITERA- THIS SYMBOL INDICATES THAT DANGER-...
- Page 3 IMPORTANT SAFEGUARDS CAUTION: PLEASE READ AND OBSERVE ALL WARNINGS AND INSTRUC- TIONS CONTAINED HEREIN AND THOSE ON YOUR APPLIANCE. RETAIN THIS UTERATURE FOR REFERENCE. Electrical energy can perform many useful functions. This unit has been engineered and manufactured to assure your personal safety.
- Page 4 LIGHTNING PROTECTION FOR YOUR ANTENNA AND SET AS PER NATIONAL ELECTRICAL CODE INSTRUCTIONS. 6. If an outside antenna is connected to the receiver, be sure the antenna sys- tem is grounded so as to provide some protection against voltage surges and built up static charges.
- Page 5 10. For added protection during a lightning storm, or when the set is left unat- tended and unused for long periods of time, unplug it from the wall outlet and disconnect the antenna. This will prevent damage to the set due to lightning or power line surges.
- Page 6 TO THE OWNER As the owner of a Sanyo Remote Control Color Television, you are probably eager to try out your television. Before you do, we suggest that you spend a little time reading this manual to familiarize yourself with the operating proce-...
-
Page 7: Table Of Contents
TABLE OF CONTENTS Connecting Antennas ........Front Control Panel ........Using the Remote Control ........Setup and Initial Operation ........Adjusting the Picture ........Setting the Sleep Timer Feature ......Cable Operation ..........Helpful Hints - Problems/Solutions ......Warranty and Service ........Maintenance ........ -
Page 8: Connecting Antennas
CONNECTING ANTENNAS The proper type of antenna is required to obtain the best possible picture on this television. If you plan to install your own outdoor antenna, see pages 3-5 "Important Safeguards." If you are using an existing outdoor antenna, inspect the antenna and the lead-in wire for weathering effects. - Page 9 Cable Television (CATV) Connect the cable system's 75.Q cable directly to the 75_ antenna input jack on back of the "IV. A Converter Box may be required to descramble the signals. UHF/VHF Combination Antenna with 75_ Lead-in Cable Connect the antenna's 75_ lead-in cable directly to the 75_ antenna input jack on back of the TV.
-
Page 10: Front Control Panel
FRONT CONTROL PANEL Channel Scanning Keys Press the A (up) key to scan programmed channels larger in Power Key numerical value than the current Press Once to switch on the TV; channel. Press the • (down) key to press again to switch off the "IV. scan programmed channels smaller in numerical value than the current channel. -
Page 11: Using The Remote Control
USING THE REMOTE CONTROL The Remote Control allows you to control the TV from as far away as thirty feet, The remote control unit must be pointed directly at the front of the TV without any objects between the unit and the TV that could block the invisible (infrared) light beam. - Page 12 REMOTE CONTROL KEYS Power Key Channel Selection Keys Press once to switch on the keys must pressed press again to switch off the TV. select a channel. For channels numbered between press first. (For example, to select channel 6: Press 0, then 6.) For channels numbered...
- Page 13 Channel Scanning Keys Press A (up) key to scan Sleep Key programmed channels larger in numerical value than the current Use this key with the "0" key to set channel. Press the V (down) key the Sleep Timer feature to switch off the TV automatically.
-
Page 14: Setup And Initial Operation
SETUP AND INITIAL OPERATION This "iV is designed with an on-screen menu system to select and adjust certain features. In order to properly set up the "iV and enjoy these features you should proceed through the menu system. Press the Power key. After a few seconds, the picture will appear... - Page 15 CHANGING THE CHANNEL TUNING MEMORY Use these procedures to add desired channels to the channel tuning system or delete unwanted channels from the channel tuning system. • Select the channel. NOTE: When adding new channels, use the Channel Selection keys on the Remote Control to enter the desired channel number.
-
Page 16: Adjusting The Picture
ADJUSTING THE PICTURE Your TV is designed with an on-screen control system for adjusting the picture quality. Use the Menu Contro/keys, on the Remote Control, to easily adjust the picture to your personal preference. The on-screen displays will remain for a few seconds after any adjustments are made. -
Page 17: Setting The Sleep Timer Feature
SETTING THE SLEEP TIMER FEATURE Use the Sleep key and the Channel Selection "0" key, on the Remote Control, to set the Sleep Timer feature to switch off the TV automatically. This feature can switch off the TV after 30 minutes, 1 hour, 1 hour and 30 minutes, or 2 hours. -
Page 18: Cable Operation
CABLE OPERATION Ask your Cable Company about any special adapters that are required and the channels available in your area. Use the chart below for channel identification. (The numbers may vary between cable companies.) The TV is designed to receive a total of 178 channels (including cable channels). -
Page 19: Helpful Hints- Problems/Solutions
HELPFUL HINTS- Problems/Solutions BEFORE REQUESTING SERVICE CHECK THE FOLLOWING CHART. Problem: Check these Conditions: Try these Solutions: • Press Power key. "IV turns off • TV will automatically switch off. • Unplug TV momentarily. automatically. (Refer to pages 8 and 17.) •... - Page 20 HELPFUL HINTS - Problems/Solutions (Continued) BEFORE REQUESTING SERVICE CHECK THE FOLLOWING CHART. Problem: Check these Conditions: Try these Solutions: Cannot select • Reset channel memory. • Check antenna connections. or scan some (Refer to page 14.) • Channel may be deleted from channels.
-
Page 21: Warranty And Service
ONE-YEAR LIMITED WARRANTY THIS LIMITED WARRANTY IS VALID ONLY ON SANYO PRODUCTS PURCHASED AND USED IN THE UNITED STATES OF AMERICA, EXCLUDING ITS TERRITORIES PROTECTORATES. THIS LIMITED WARRANTY APPLIES ONLY ORIGINAL PURCHASER, ANO DOES NOT APPLY TO PRODUCTS USED INDUSTRIAL OR COMMERCIAL PURPOSES. -
Page 24: Maintenance
Helpful Hints Chart and try the possible solutions marked for each problem. Sanyo Manufacturing Corp. 3333 Sanyo Road, Forrest City, AR 72335 Service Code: 610 237 2984 Printed in U.S.A. SI_IC 2/92 Part No. 4JC6P100016 - -...
Need help?
Do you have a question about the DS25230 and is the answer not in the manual?
Questions and answers