
Subscribe to Our Youtube Channel
Related Manuals for Extron electronics SI 3 System INTEGRATOR


Summary of Contents for Extron electronics SI 3 System INTEGRATOR
- Page 1 User’s Guide SI 3 System INTEGRATOR ™ Compact Full Range Surface Mount Speakers 68-1261-01 Rev. A 11 07...
-
Page 2: Packaging Information
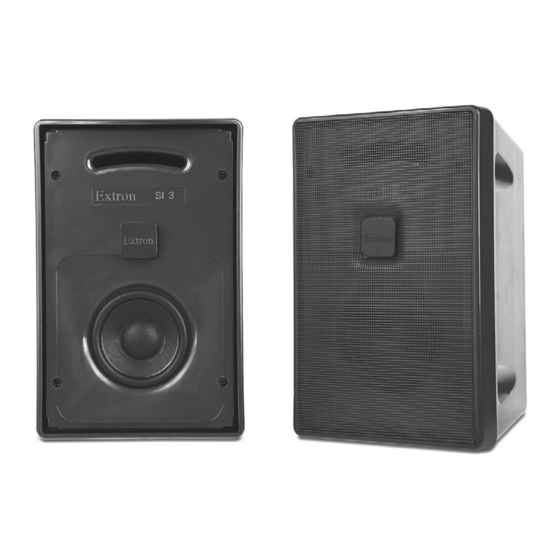
2 0 rt N X - X - 0 1 3 3 -X X -0 Figure 1 — SI 3 speaker packaging details SI 3 Speakers • Packaging i l i n a k e Hex Tool (plastic wrapped) - Page 3 • 16 watts continuous pink noise • 32 watts continuous program • Internal driver overload protection circuit Figure 2 — SI 3 speakers (with front grille removed) Refer to packaging information for location. Carefully remove and check contents before installation.
- Page 4 Back cover for use when speakers are not wall mounted Hex tool Extron logo (fits in grill to cover locking port access) Front grill retaining screws (2) SI 3 Speakers • Features (22.2 cm H x 14.6 cm W x 14.24 cm D) system included ™...
-
Page 5: Installation
Installation Installing the SI 3 Speakers The Extron SI 3 speakers can be mounted on a surface, such as a wall or post, or mounted in a bookcase, or on a shelf, and can be used with any Extron product supporting audio. - Page 6 Mounting Holes Figure 6 — Mounting holes on the rear plate SI 3 Speakers • Installation Before starting installation, ensure that the wall and wall material are capable of supporting the combined weight of the speakers and the wall mount assemblies.
- Page 7 Figure 7 — Installing the wall mount assembly Extron recommends that the wiring installation be performed by a professional audio equipment installer. Approximate Stud Line Behind Wall Wall Speaker Mounting Assembly SI 3 Speakers • Installation...
- Page 8 (see figure 9). Anchor the other end to a suitable secure point above the speaker wall assembly mount. SI 3 Speakers • Installation Do not strip and connect the wire at this time. Line of Stud...
- Page 9 Figure 9 — Attaching a seismic safety cable to the rear of the speaker Mounting the SI 3 speaker onto the wall mount assembly Carefully lift the speaker above the wall mount assembly and gently slide the speaker box bracket down into the V-Lock groove (see figure 10) until it locks into place.
-
Page 10: Wiring The Speakers
(see figure 12), taking care not to damage the front grill or the logo. Figure 12 — Removing the logo from the front grill SI 3 Speakers • Installation terminal and negative wire to Do not connect the speaker wires from one channel in parallel (together) with wires of the other channel on the same terminal. -
Page 11: Service Access
The Extron logo can be fitted either horizontally or vertically Remove these screws to remove grill. SI 3 Speakers • Installation... -
Page 12: Troubleshooting Tips
Try simplifying the system by eliminating components that may have introduced or complicated the problem. SI 3 Speakers • Troubleshooting Tips If the speaker makes the grill vibrate and creates unwanted noise when in use, it can be secured to the speaker enclosure using the supplied pack of putty. - Page 13 Check polarity between speakers. Incorrect polarity (out of polarity) results in low frequencies cancelling each other out. Reverse polarity for each speaker in turn until a greater low frequency is obtained. SI 3 Speakers • Troubleshooting Tips...
-
Page 14: Specifications
Warranty ... 5 years parts and labor All nominal levels are at ±10%. Specifications are subject to change without notice. SI 3 Speakers • Specifications 32 W continuous program 10% to 90%, noncondensing Operating: +32 to +122 °F (0 to +50° C) /... - Page 15 Extron Electronics warrants this product against defects in materials and workmanship for a period of five years from the date of purchase. In the event of malfunction during the warranty period attributable directly to faulty workmanship and/or materials, Extron Electronics will, at its option, repair or replace said products or components, to whatever extent it shall deem necessary to restore said product to proper operating condition, provided that it is returned within the warranty period, with proof of purchase and description of malfunction to:...
- Page 16 Extron Electronics, USA 1230 South Lewis Street Anaheim, CA 92805 800.633.9876 714.491.1500 FAX 714.491.1517 www.extron.com Extron Electronics, Europe Beeldschermweg 6C 3821 AH Amersfoort, The Netherlands +800.3987.6673 +31.33.453.4040 FAX +31.33.453.4050 © 2007 Extron Electronics. All rights reserved. Extron Electronics, Asia Extron Electronics, Japan 135 Joo Seng Rd.
Need help?
Do you have a question about the SI 3 System INTEGRATOR and is the answer not in the manual?
Questions and answers