Nokia E71 User Manual
E series
Hide thumbs
Also See for E71:
- User manual (345 pages) ,
- Quick start manual (11 pages) ,
- Specification sheet (2 pages)
Table of Contents
Advertisement
Quick Links
Advertisement
Table of Contents

Related Manuals for Nokia E71


Summary of Contents for Nokia E71
- Page 1 Nokia E71 User Guide Issue 6.0...
- Page 2 Nokia Corporation. Other product and company names mentioned herein may be trademarks or tradenames of their respective owners. Reproduction, transfer, distribution, or storage of part or all of the contents in this document in any form without the prior written permission of Nokia is prohibited.
- Page 3 ANY THIRD-PARTY PATENTS, COPYRIGHTS, TRADEMARKS, OR OTHER RIGHTS. The availability of particular products and applications and services for these products may vary by region. Please check with your Nokia dealer for details and availability of language options. This device may contain commodities, technology or software subject to export laws and regulations from the US and other countries. Diversion contrary to law is prohibited.
-
Page 4: Table Of Contents
Screen saver clock..............24 Remote configuration...............9 Memory..................24 Update software using your PC..........10 Write text.................25 Further information..............10 Nokia Ovi Suite.................26 Nokia E71 in brief..........11 New from Eseries..........27 Key features................11 Access tasks quickly..............27 Keys and parts................12 Home screen................27 Set up your device..........14 One-touch keys................28 Nokia Calendar for Eseries............29... - Page 5 Call divert..................38 Maps..................69 Call barring................39 GPS data..................77 Bar net calls................39 Landmarks................77 Send DTMF tones..............39 Nokia Office Tools..........79 Voice mail.................40 Voice aid...................40 Active notes................79 Voice commands..............40 Calculator..................79 Push to talk................42 File manager................80 Log....................43 Quickoffice................80 Converter..................81 Messaging............45 Zip manager................81 Messaging folders..............45 PDF reader................81 Organise messages..............46...
- Page 6 Customise profiles..............97 General settings..............118 Personalise the home screen..........98 Telephone settings..............121 Change the display theme............98 Connection settings...............122 Download a theme..............99 Application settings..............127 3-D ringing tones..............99 Shortcuts............128 Connectivity.............100 General shortcuts..............128 Fast downloading..............100 Glossary............130 PC connections...............100 Data cable................100 Troubleshooting..........133 Infrared...................101 Bluetooth................101 Product and safety information.......135 SIM access profile..............104 Wireless LAN................104 Index..............142...
-
Page 7: Safety
Only qualified personnel may install or repair this party sites. These are not affiliated with Nokia, and Nokia product. does not endorse or assume liability for them. If you access ACCESSORIES AND BATTERIES such sites, take precautions for security or content. -
Page 8: Network Services
Your service provider can explain what charges will apply. Some networks may have limitations that affect how you can use some © 2010 Nokia. All rights reserved. -
Page 9: Find Help
— Enter the unique ID to identify the • • Update your device software. configuration server. If your issue remains unsolved, contact Nokia for repair Server password — Enter a password to identify your • options. Go to www.nokia.com/repair. Before sending your device to the server. -
Page 10: Update Software Using Your Pc
> Tutorial. > your PC Nokia Software Updater is a PC application that enables you to update your device software. To update your device software, you need a compatible PC, broadband internet access, and a compatible USB data cable to connect your device to the PC. -
Page 11: Nokia E71 In Brief
Read and reply to your e-mail while on the move. Move your contact and calendar information from a previous device to your Nokia E71 with Switch. Stay up-to-date and plan your meetings with When you see this icon in the home screen, Calendar. -
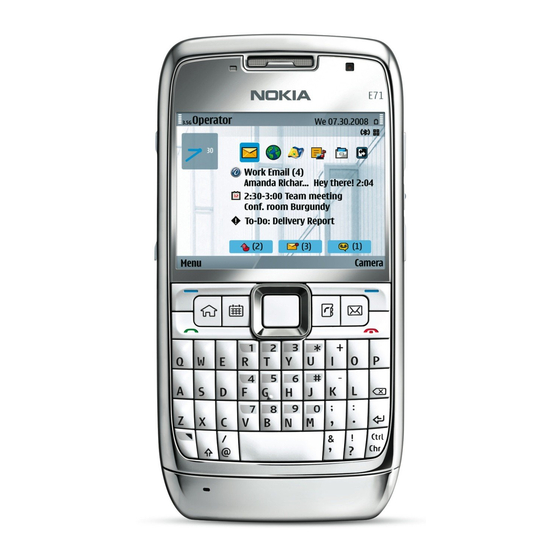
Page 12: Keys And Parts
To enter only the characters printed at the top of keys, — Microphone press the function key twice quickly. — Charger connector — Shift key. To switch between the different character — Power key cases, press the shift key. — Camera (video calls only) © 2010 Nokia. All rights reserved. - Page 13 — Voice key. Press this key to mute and unmute the active call. This key is also used in the Voice commands and PTT applications. — Volume down key — Infrared port — Memory card slot — Micro-USB connector © 2010 Nokia. All rights reserved.
-
Page 14: Set Up Your Device
Set up your device Set up your Nokia E71 following these instructions. Insert the SIM card and battery 1. Press the release buttons and lift the back cover off. 3. Insert the SIM card. Make sure that the contact area on the card is facing the connectors on the device and that the bevelled corner is facing the top of the device. -
Page 15: Charge The Battery
To reach the full operation time, charge the battery until it has been fully charged according to the battery level indicator. Tip: If you have old compatible Nokia chargers, you can use them with the Nokia E71 by attaching the CA-44 Charge the battery charger adapter to the old charger. -
Page 16: Eject The Memory Card
Contact with antennas affects the communication quality and may cause a higher power level during operation and may reduce the battery life. © 2010 Nokia. All rights reserved. - Page 17 © 2010 Nokia. All rights reserved.
-
Page 18: Get Started
• to select the correct country, because and calendar entries, from a compatible Nokia device. scheduled calendar entries may change if "Transfer content between devices", p. 20. you change the country later and the new E-mail settings helps you configure e-mail settings. -
Page 19: Home Screen
Video sharing — Configure video sharing settings. • card. If you are not able to use Settings wizard, visit the Nokia The menu contains phone settings web site. applications and folders, which are groups of... -
Page 20: Transfer Content From Other Devices
> Grid. > You can transfer content, such as contacts, from a compatible Nokia device to your new Eseries device using different To view the memory consumption of different applications connectivity methods. The type of content that can be and data stored on the device or memory card and to check transferred depends on the device model. -
Page 21: Display Indicators
You have selected the Silent profile, and the device Synchronise data with a compatible device if the other does not ring for an incoming call or message. device supports synchronisation. With synchronisation, you can keep the data up-to-date in both devices. © 2010 Nokia. All rights reserved. - Page 22 If the icon is , the connection is on hold. Your device is synchronising. You have set the device to scan for WLANs, and a You have an ongoing push-to-talk connection. WLAN is available. © 2010 Nokia. All rights reserved.
-
Page 23: Common Actions In Several Applications
To send a file, select Options > Send. You can send a file in Settings General Security Phone and SIM card > > > > an e-mail or multimedia message, or using different Keypad autolock period. connectivity methods. © 2010 Nokia. All rights reserved. -
Page 24: Volume Control
Volume control files may use large amounts of memory and prevent you from storing other files. To maintain sufficient memory, use Nokia PC Suite to back up installation files to a compatible PC, then To adjust the earpiece volume during a phone call or the use the file manager to remove the installation files from the volume of the media applications, use the volume keys. -
Page 25: Write Text
Traditional text input system. Your Nokia device supports the FAT16 and FAT32 file system for memory cards. Your device has a full keyboard. You can enter punctuation MicroSDHC marks by pressing the corresponding key or a combination of keys. This device uses microSD and microSDHC memory cards. -
Page 26: Nokia Ovi Suite
Removable Disk. 4. Open the root of the memory card drive with the Windows Nokia Ovi Suite is a set of applications that you can install to file browser, and select the Ovi Suite installation file. a compatible PC. Ovi Suite groups all available applications in 5. -
Page 27: New From Eseries
Scroll to the desired contact. This feature may not be available messages. in all languages. To call the contact, press the call key. © 2010 Nokia. All rights reserved. -
Page 28: One-Touch Keys
Leaving applications running in the background increases the demand on battery power and reduces the battery life. One-touch keys With the One-touch keys you can access applications and tasks quickly. Each key has been assigned an application and © 2010 Nokia. All rights reserved. -
Page 29: Nokia Calendar For Eseries
To change the default view, select Options Settings > > Nokia Calendar for Default view. Eseries Select Menu Office > Calendar. > Create and view scheduled events and appointments, and switch between different calendar views. © 2010 Nokia. All rights reserved. -
Page 30: Create Calendar Entries
Calendar settings To create a calendar entry, scroll to a date, select Options > New entry and the entry type. Select Options > Settings. To change the alarm tone, select Calendar alarm tone. © 2010 Nokia. All rights reserved. -
Page 31: Nokia Contacts For Eseries
To copy a contact's information from the memory card, select To organise contacts directories, select Options Organise > Options Copy From memory card. > > contact lists and a directory. Scroll up to move it to the desired place. © 2010 Nokia. All rights reserved. -
Page 32: Multitasking
To remove the assigned ringing tone, select Default tone Open Ovi from the list of ringing tones. Ovi is your door to different Nokia services. Change contacts settings For a tour and more information, see www.ovi.com. Select Options > Settings. -
Page 33: About Ovi Contacts
Ovi.com. You must have a Nokia Account to use the service. Create an account on your mobile device, or visit www.ovi.com on your Using Ovi Contacts may involve the transmission of large amounts of data through your service provider's network. -
Page 34: Phone
Enter the first letters of the name, scroll to the name, and press the call key. See "Nokia Contacts for Eseries", p. 31. Note: The actual invoice for calls and services from your service provider may vary, depending on network features, To make a call using the log, press the call key to view up to rounding off for billing, taxes, and so forth. -
Page 35: Video Calls
SIP server. To make a video call, enter the phone number or select the recipient of the call from Contacts, and select Options > © 2010 Nokia. All rights reserved. -
Page 36: Net Calls
SIP profile you just your net call provider. Due to the established nature of created. cellular telephony, you should use cellular networks for © 2010 Nokia. All rights reserved. -
Page 37: Make Net Calls
This option is shown only if there are services that WLANs, the device periodically scans for WLANs, which have not been configured. increases the demand on battery power and reduces the battery life. © 2010 Nokia. All rights reserved. -
Page 38: Speed Dialling
Options Check status. > Call divert To stop diverting calls, scroll to the diverting option, and select Options > Cancel. Select Menu Tools Settings Phone Call divert. > > > > © 2010 Nokia. All rights reserved. -
Page 39: Call Barring
DTMF tones only after you select current code, then the new code twice. The barring password Send DTMF during a call, enter w. must be four digits long. For details, contact your service provider. 3. Select Done. © 2010 Nokia. All rights reserved. -
Page 40: Voice Mail
To hear the entries in your contacts list, select Contacts. Do not use this option if you have more than 500 contacts. © 2010 Nokia. All rights reserved. -
Page 41: Change Profiles
To switch off the synthesiser that plays recognised voice (business). commands in the selected device language, select Options > Settings Synthesiser > Off. > To reset voice recognition learning when the main user of the device has changed, select Remove voice adapts.. © 2010 Nokia. All rights reserved. -
Page 42: Push To Talk
Created PTT calls from the provider of the PTT service. Select Options PTT log Created PTT, and a call. > > To make a PTT call to a contact, select Options Talk 1 to > © 2010 Nokia. All rights reserved. -
Page 43: Log
To invite a user to a channel, select Options Send > To view the approximate duration of calls to and from your invitation. device, select Call duration. © 2010 Nokia. All rights reserved. -
Page 44: Monitor All Communications
Options > Filter, and select the desired filter. To erase the contents of the log, recent calls register, and messaging delivery reports permanently, select Options > Clear log. © 2010 Nokia. All rights reserved. -
Page 45: Messaging
The device may recognise the SIM card provider and automatically configure some of the message settings. If not, you may need to define the settings manually; or contact your service provider to configure the settings. © 2010 Nokia. All rights reserved. -
Page 46: Organise Messages
Sort > Language. To download additional languages to your by. You can sort the messages by Date, Sender, Subject, or device, visit the Nokia web site. Message type. To set the speaking voice, select Voice. The voice is language- To view the properties of a message, select the message and dependent. -
Page 47: Nokia Messaging
The Nokia Messaging service automatically pushes e-mail internet e-mail providers, such has Google e-mail services. from your existing e-mail address to your Nokia E71. You can Nokia Messaging pushes the new e-mails to your device as read, respond to, and organise your e-mails on the go. The long as the Nokia Messaging application is open. - Page 48 Regular POP or IMAP e-mail Use of the Mail for Exchange is limited to over-the-air synchronisation of PIM information between the Nokia Your device can download e-mails from a POP or IMAP e-mail device and the authorised Microsoft Exchange server.
-
Page 49: Connect To A Remote Mailbox
To set the sending time for the e-mail message, select synchronise. Options Sending options Send message. Select > > Immediately, or select When conn. avail. if you are working offline. © 2010 Nokia. All rights reserved. -
Page 50: Text Messages
Delete Phone and server. > > that can be sent in a single message. To cancel the deleting, select Options > Restore. 1. To write a text message, select New message Text > message. © 2010 Nokia. All rights reserved. -
Page 51: Sending Options For Text Messages
To save a message in a different folder, select Options > into these other formats. Contact your service provider. Move to folder. To add the sender of the message to Contacts, select Options Save to Contacts. > © 2010 Nokia. All rights reserved. -
Page 52: Multimedia Messages
See "Multimedia message slides in your message, select Options > Move. settings", p. 59. 6. To preview a multimedia message before sending it, select Options > Preview. 7. Select Options > Send. © 2010 Nokia. All rights reserved. -
Page 53: Create Presentations
Multimedia presentations may only be viewed in compatible devices that support presentations. They may appear Create presentations different in different devices. Creating multimedia presentations is not possible if the creation mode setting is set to Restricted. To change the © 2010 Nokia. All rights reserved. -
Page 54: Send A Sound Clip
To view the name and size of an attachment, open the 4. Select Options > Send. message, and select Options > Objects. To save a multimedia object, select Options > Objects, the object, and Options > Save. © 2010 Nokia. All rights reserved. -
Page 55: Instant Messaging
IM service. Service providers may application, select On app. start-up. To connect to the server differ in their support of features. manually, select Manual and log into the server in the IM © 2010 Nokia. All rights reserved. -
Page 56: Start A Conversation
Add to IM contacts. > or enter the ID of the user. IM users with editing rights can edit group settings and invite other users to join the group or ban them from the group. © 2010 Nokia. All rights reserved. -
Page 57: Special Message Types
— Show your online status to all • or e-mail account settings. other IM users or your IM contacts only, or hide your online To save the contents of these messages, select Options > status. Save. © 2010 Nokia. All rights reserved. -
Page 58: Cell Broadcast
Must be defined or with a red Select Menu Communic. Messaging Options > > > > asterisk. Cell broadcast. Your device may recognise the SIM card provider and configure the correct text message, multimedia message, © 2010 Nokia. All rights reserved. -
Page 59: Multimedia Message Settings
Manual Preferred connection — Select the preferred method of retrieve multimedia messages from the message centre • connection when sending text messages from your device. © 2010 Nokia. All rights reserved. -
Page 60: User Settings
Include signature — Select whether you want to attach • a signature to your e-mail messages. The settings available for editing may vary. Some settings may be preset by your service provider. © 2010 Nokia. All rights reserved. -
Page 61: Retrieval Settings
Save sent messages — Select whether to store sent • E-mail notifications — Receive notifications on received • messages in the Sent folder. e-mail. © 2010 Nokia. All rights reserved. - Page 62 — Select where to save your messages. • You can save messages to the memory card only if a memory card is inserted. Folder view — Define how you want the messages in • Inbox to be shown. © 2010 Nokia. All rights reserved.
-
Page 63: Internet
Press the scroll key to open the link. On a web page, new links usually appear If the security indicator ( ) is displayed during a connection, the data transmission between the device and the internet © 2010 Nokia. All rights reserved. -
Page 64: End A Connection
Privacy contains settings related to your privacy. • To empty the cache, select Options Clear privacy data > > Web feeds contains settings related to web feeds and • Clear cache. blogs. © 2010 Nokia. All rights reserved. -
Page 65: Browse The Intranet
The password is often case-sensitive and provided by the service provider. Authentication — Select Secure to send your • password always encrypted, or Normal to send your password encrypted when possible. © 2010 Nokia. All rights reserved. - Page 66 WPA/WPA2 (Wi-Fi protected access), you must also its users. These servers may provide additional security configure the relevant additional settings. and speed up access to the service. © 2010 Nokia. All rights reserved.
-
Page 67: Connect Pc To Web
— The channel is usually chosen • automatically. To enter the channel number (1-11) manually, select User defined. Proxy server address — Enter the proxy server address. • Proxy port number — Enter the proxy server port • number. © 2010 Nokia. All rights reserved. -
Page 68: Travelling
Menu GPS data Position Options > > > > > © 2010 Nokia. All rights reserved. -
Page 69: Positioning Settings
To select a positioning server, select Positioning server. parties independent of Nokia. The content may be inaccurate and incomplete to some extent and is subject to availability. Maps Never rely solely on the aforementioned content and related services. - Page 70 To avoid mobile data transfer costs, download the latest maps and voice guidance files to your computer using the Nokia Ovi Suite application, and then transfer and save them to your device. To download and install Nokia Ovi Suite on your compatible computer, go to www.ovi.com.
-
Page 71: Find Places
Problems with your internet The trip meter has limited accuracy, and rounding errors may connection may also affect results when searching online. occur. Accuracy can also be affected by availability and quality of GPS signals. © 2010 Nokia. All rights reserved. -
Page 72: View Location Details
If you need to delete places or routes, or add a route to a 2. Go to the location. To search for an address or place, select collection, go to the Ovi Maps internet service at Search. www.ovi.com. © 2010 Nokia. All rights reserved. -
Page 73: Get Voice Guidance
To synchronise places, routes, or collections between your available for your language. mobile device and the Ovi Maps internet service, you need a Nokia account. If you do not have one, in the main view, select Change the voice guidance language — In the main view, Options... -
Page 74: Get Traffic And Safety Information
Select Menu Maps and Drive. > > View traffic events on the map — During drive navigation, select Options Traffic info. The events are displayed as > triangles and lines. © 2010 Nokia. All rights reserved. -
Page 75: Plan A Route
Some Create a route jurisdictions prohibit or regulate the use of speed camera location data. Nokia is not responsible for the accuracy, or the 1. Go to your starting point. consequences of using speed camera location data. -
Page 76: Maps Shortcuts
General shortcuts To view the dashboard, press 9. To zoom in or out on the map, press * or #. To return to your current location, press 0. To change the map type, press 1. © 2010 Nokia. All rights reserved. -
Page 77: Gps Data
Options Stop navigation. > > To show the landmark on the map, select Options Show > map. To save your current position as a landmark, select Navigation or Position, and Options Save position. > © 2010 Nokia. All rights reserved. -
Page 78: Landmark Categories
To create a new category, select Options Edit > categories Options category. > > To change to which categories a landmark belongs, open the landmarks tab. Scroll to the landmark, and select Options > © 2010 Nokia. All rights reserved. -
Page 79: Nokia Office Tools
Nokia Office Tools Nokia Office Tools support mobile business and enable To link a note to a contact, select Options Link note to > effective communication with work teams. call contacts. You can see the note on the display of >... -
Page 80: File Manager
You can open, create, move, copy, rename, files. send, and search for files and folders. Copyright protection Not all file formats or features are supported. may prevent sending some files. Open the device tab or the memory card tab. © 2010 Nokia. All rights reserved. -
Page 81: Converter
The rate of the base settings, such as zoom level and page views; and send PDF currency is always 1. The base currency determines the files using e-mail. conversion rates of the other currencies. © 2010 Nokia. All rights reserved. -
Page 82: Printing
The maximum length of the header and footer is Orientation — Select the orientation. • 128 characters. Paper size — Select the paper size. • Media type — Select the media type. • Colour mode — Select the colour mode. • © 2010 Nokia. All rights reserved. -
Page 83: Clock
To remove the alarm, select Options Remove alarm. Select Menu Office > Notes. > > You can create and send notes to other compatible devices, and save received plain text files (.txt format) to Notes. © 2010 Nokia. All rights reserved. -
Page 84: Nokia Wireless Keyboard
Nokia Wireless Keyboard Wireless keyboards are available as separate enhancements. To set up the Nokia Wireless Keyboard or other compatible wireless keyboard supporting the Bluetooth Human Interface Devices (HID) profile for use with your device, use the Wireless keyboard application. -
Page 85: Media
Scroll to a toolbar item and press the scroll To copy the settings of another scene, select Based on scene key. mode and the desired scene. © 2010 Nokia. All rights reserved. -
Page 86: Capture Images In A Sequence
— Set the image quality. The better the • To add the image to a contact, select Options Set as > image quality, the more memory the image consumes. contact call img. Assign to contact. > © 2010 Nokia. All rights reserved. -
Page 87: Nokia Podcasting
PCs. To change the video mode settings, select Options > With the Nokia Podcasting application, you can search, Settings and from the following: discover, subscribe, and download podcasts over the air; and Video quality —... -
Page 88: Search Podcasts
To add a new directory or folder, select Options > > Web directory or Folder. Select a title, URL of the .opml To edit the connection settings, select Options Settings > > (outline processor markup language) file, and Done. Connection. © 2010 Nokia. All rights reserved. -
Page 89: Music Player
To pause playback, press the scroll key; to resume, press the Nokia Music Store is not available in all regions and countries. scroll key again. To stop playback, scroll down. To find more music in the different categories, select... -
Page 90: Share Online
You can use the following methods to transfer music: Options Reset to defaults. > • To install Nokia Ovi Player to manage and organise your To create your own frequency setting, select Options > music files, download the PC software from preset. -
Page 91: Recorder
To pause the playback of a recorded clip, select Pause. viewer. Playback resumes when you select Play. Work with media files and folders To open a file or a folder, select the file or folder. © 2010 Nokia. All rights reserved. -
Page 92: Realplayer
90 degrees, or select Left To play a video clip or audio file, select Options Open > > rotate the image counterclockwise by 90 degrees. Most recent clips to play one of the six clips you most © 2010 Nokia. All rights reserved. -
Page 93: Flash Player
To optimise the use of Flash Player, insert a memory card in Options > Send. Select the sending method. your device. To play a flash file, scroll to it, and press the scroll key. © 2010 Nokia. All rights reserved. -
Page 94: Radio
OK. To search for a station, select . To set the frequency manually, select Options Manual tuning. > To view available stations based on location, select Options Station directory (network service). > © 2010 Nokia. All rights reserved. -
Page 95: Internet Radio
> > To search for radio stations in the Nokia Internet Radio service by their name, select Search. Enter a station name or the first letters of it in the search field, and select Search. © 2010 Nokia. All rights reserved. -
Page 96: Internet Radio Settings
To select the default access point to connect to the network, select Options Settings Default access point. Select > > Always ask if you want the device to ask for the access point every time you open the application. © 2010 Nokia. All rights reserved. -
Page 97: Personalisation
If you have two alternate phone lines and using these features. in use, you can specify a ringing tone for each line. © 2010 Nokia. All rights reserved. -
Page 98: Personalise The Home Screen
To change the theme used in all applications, select the cannot be renamed. General folder. To change the theme used in the main menu, select the Menu view folder. To change the theme for a particular application, select the application-specific folder. © 2010 Nokia. All rights reserved. -
Page 99: Download A Theme
To select the speed at which sound moves from one direction to another, select Trajectory speed. This setting is not available for all effects. To adjust the amount of echo, select Reverberation and the desired effect. © 2010 Nokia. All rights reserved. -
Page 100: Connectivity
Unplug or Eject Hardware wizard in Windows) to avoid damaging the memory card. To use Nokia Ovi Suite with your device, install Nokia Ovi Suite on your PC, connect the data cable, and select Suite. -
Page 101: Infrared
Several Bluetooth connections can be active at a time. For example, if your device is connected to a headset, you can © 2010 Nokia. All rights reserved. - Page 102 A Bluetooth connection is disconnected automatically after device and the name you entered can now be seen by sending or receiving data. Only Nokia PC Suite and some other users with devices using Bluetooth technology. enhancements such as headsets may maintain a connection 4.
-
Page 103: Security Tips
To give a nickname to the paired device, select Options Bluetooth My phone's visibility > Hidden. > > Assign short name. The nickname is only displayed in your Do not pair with an unknown device. device. © 2010 Nokia. All rights reserved. -
Page 104: Sim Access Profile
To end the remote SIM access connection from your device, For more information about car kit devices and compatibility select Menu Connectivity Bluetooth Remote SIM with your device, see the Nokia web site and your car kit user > > > mode > Off. guide. -
Page 105: See Wlan Availability
Tip: To check the unique media access control (MAC) To disconnect the active connection to the WLAN, select address that identifies your device, for example to Options Disconnect WLAN. > configure the MAC address of your device to a WLAN © 2010 Nokia. All rights reserved. -
Page 106: Modem
Menu Connectivity > Modem. > Together with a compatible computer, you can use your device as a modem to connect to the web, for example. Before you can use your device as a modem © 2010 Nokia. All rights reserved. -
Page 107: Connection Manager
View and end active • You need an appropriate data communications software on your computer, such as Nokia PC Suite. For more connections information, see the Nokia PC Suite guide. • You must subscribe to the appropriate network services To see the open data connections, select Active data from your service provider or internet service provider. -
Page 108: Security And Data Management
Menu Tools destroys all data stored on the card. > > Settings General Security Phone and SIM card > > > > Allow remote lock > Yes. Enter the remote lock message © 2010 Nokia. All rights reserved. -
Page 109: Encryption
2. Select Options Activate fixed dialling. You need your > PIN2 code to activate and deactivate fixed dialling or edit © 2010 Nokia. All rights reserved. -
Page 110: Certificate Manager
Tip: When you add a new certificate, check its in order to benefit from increased security. The existence of authenticity. a certificate does not offer any protection by itself; the certificate manager must contain correct, authentic, or © 2010 Nokia. All rights reserved. -
Page 111: Security Modules
General Security > > > > > and use Nokia PC Suite to back up data. Security module. Application manager View and edit security modules To view or edit a security module, scroll to it, and press the Select Menu Installations App. - Page 112 If another software package depends on the software package that you removed, the other software package may stop working. Refer to the documentation of the installed software package for details. © 2010 Nokia. All rights reserved.
-
Page 113: Java Security Settings
Not allowed — Prevent the Java application from using • connection to the network. the functionality. Messaging — Allow the application to send messages. • Application auto-start — Allow the application to start • automatically. © 2010 Nokia. All rights reserved. -
Page 114: Activation Keys
Some activation keys may be connected to a specific SIM card, To access these files, open the group rights folder. and the protected content can be accessed only if the SIM card is inserted in the device. © 2010 Nokia. All rights reserved. -
Page 115: Data Synchronisation
Connection settings > > define the following settings: There is a Nokia PC Suite synchronisation profile available in Server version — Select the SyncML version you can use • your device. You do not need to edit it if you synchronise your with the remote server. -
Page 116: Mobile Vpn
VPN the server, select No. policies. A policy server refers to a Nokia Security Service Manager (NSSM), which is not necessarily required. Network authentication — To authenticate your device •... -
Page 117: Barcode Reader
2. If you are using legacy authentication, enter your VPN To view previously saved, decoded information, select Saved user name and passcode or password. If the SecurID token data in the main view. has become out of synchronisation with the clock of the © 2010 Nokia. All rights reserved. -
Page 118: Settings
To set how quickly the display dims after the last keypress, Date and time — Change the date and time. • select Display Light time-out. > Enhancement — Define the settings for your • enhancements. Security — Define the security settings. • © 2010 Nokia. All rights reserved. -
Page 119: Language Settings
One-touch key, select the key and Options > Open. Tones Vibrating alert. > To restore the preset applications and tasks, select Restore To set the volume level of the device keypad tones, select defaults. Tones Keypad tones. > © 2010 Nokia. All rights reserved. -
Page 120: Enhancement Settings
Codes Common enhancement settings are shown as asterisks. When you change a code, enter the current code, then the new code twice. With most enhancements, you can do the following: © 2010 Nokia. All rights reserved. -
Page 121: Telephone Settings
To restore the original device settings, select Factory notification. settings. To do this, you need your device lock code. After resetting, the device may take a longer time to power on. Documents, contact information, calendar entries, and files are unaffected. © 2010 Nokia. All rights reserved. -
Page 122: Connection Settings
To set the device to indicate when it is used in Micro Cellular Access points Network (MCN), select Cell info display > On. Select Menu Tools Settings Connection Access > > > > points. © 2010 Nokia. All rights reserved. -
Page 123: Wlan Settings
Select Access point and enter the access point name provided by your service provider to use the © 2010 Nokia. All rights reserved. -
Page 124: Wep Key Settings
Select as the WLAN security mode. The wired equivalent privacy (WEP) encryption method Select WLAN security settings and from the following: encrypts data before it is transmitted. Access to the network © 2010 Nokia. All rights reserved. -
Page 125: Wpa Security Settings
Wireless LAN plugins > plug-in for network authentication after attempting to use other plug-ins. Select Menu Tools Settings Connection Access > > > > See the device help for more information on EAP plugins. points. © 2010 Nokia. All rights reserved. -
Page 126: Edit Sip Proxy Servers
— Enter the host name or IP Registration — Select the registration mode. • • address of the registrar server in use. Use security — Select if security negotiation is used. • Realm — Enter the registrar server realm. • © 2010 Nokia. All rights reserved. -
Page 127: Application Settings
Select an application from the list to adjust its settings. servers. To delete configurations for a trusted server, select Options > Delete. The configuration settings for other applications provided by this server are also deleted. © 2010 Nokia. All rights reserved. -
Page 128: Shortcuts
You must first activate speed Scroll right in the zoomed image. dialling at Menu Tools > > Scroll up in the zoomed image. Settings Phone Call Speed > > > dialling > On. © 2010 Nokia. All rights reserved. - Page 129 Scroll down in the zoomed image. Rotate clockwise. Rotate counterclockwise. Switch between the full screen size and normal view. © 2010 Nokia. All rights reserved.
-
Page 130: Glossary
Domain name service. An internet service that translates domain names such as www.nokia.com into IP addresses such as 192.100.124.195. Domain names are easier to remember but this translation is needed because the internet is based on IP addresses. - Page 131 POP3 Post office protocol, version 3. A common network. mail protocol that can be used for accessing HTTP Hypertext transfer protocol. A document your remote mailbox. transfer protocol used in the web. © 2010 Nokia. All rights reserved.
- Page 132 Wi-Fi Protected Access. Security method for possible while simultaneously speaking on WLAN. the phone. WPA2 Wi-Fi Protected Access 2. Security method UPIN PIN code used in UMTS network. for WLAN. © 2010 Nokia. All rights reserved.
-
Page 133: Troubleshooting
Q: How do I switch WLAN off on my Nokia device? A: The WLAN on your Nokia device switches off when you are not trying to connect, not connected to another access point, © 2010 Nokia. All rights reserved. - Page 134 To further reduce check the security mode the network uses, select Menu > battery consumption, you can specify that your Nokia device Connectivity Conn. mgr. Active data connections > > > does not scan, or scans less often, for available networks in Options >...
-
Page 135: Product And Safety Information
In particular, use of unapproved chargers or batteries may present a risk of fire, explosion, leakage, or other hazard. Warning: Use only batteries, chargers, and accessories approved by Nokia for use with this particular model. The use © 2010 Nokia. All rights reserved. -
Page 136: Battery And Charger
A device with a hot or cold battery may not work temporarily. Your device is powered by a rechargeable battery. The battery Battery performance is particularly limited in temperatures intended for use with this device is BP-4L. Nokia may make well below freezing. additional battery models available for this device. This device is intended for use when supplied with power from Do not short-circuit. - Page 137 • Do not use or store the device in dusty, dirty areas. Its moving parts and electronic components can be damaged. © 2010 Nokia. All rights reserved.
-
Page 138: Additional Safety
Check product environmental damage electronic circuit boards. information and how to recycle your Nokia products at • Do not attempt to open the device other than as instructed www.nokia.com/werecycle, or nokia.mobi/werecycle. -
Page 139: Medical Devices
Persons who have such dangerous and may invalidate your warranty. Check regularly devices should: that all wireless device equipment in your vehicle is mounted and operating properly. Do not store or carry flammable © 2010 Nokia. All rights reserved. -
Page 140: Potentially Explosive
3. Enter the official emergency number for your present vicinity. location. Emergency numbers vary by location. 4. Press the call key. When making an emergency call, give all the necessary information as accurately as possible. Your wireless device © 2010 Nokia. All rights reserved. - Page 141 Use of device accessories may result in different SAR values. SAR values may vary depending on national reporting and testing requirements and the network band. Additional SAR information may be provided under product information at www.nokia.com. © 2010 Nokia. All rights reserved.
-
Page 142: Index
63 e-mail 49 making a net call 37 multimedia messages 54 muting the ringing tone 34 sound clips 54 net call alert 121 cable 100 audio files PTT 42 details 93 rejecting 34 © 2010 Nokia. All rights reserved. - Page 143 83 e-mail key settings 120 computer connections 100 data connections data connections See also PC connectivity 100 plug-in settings 125 conference calls 34 date using an EAP plug-in 125 configuration messages 127 settings 120 © 2010 Nokia. All rights reserved.
- Page 144 SIM card 14 settings 66 landmarks installation log 112 settings 123 categories 78 installing creating 77 applications 112 editing 78 internet 63 headset receiving 78 ending connections 64 connecting 16 sending 78 internet calls 37 © 2010 Nokia. All rights reserved.
- Page 145 46 Favourites 72 barring 39 messages 45 finding locations 71 connecting 37 call rejection messages 121 navigating 73, 75 making a call 37 cell broadcast settings 61 organising places 72 profiles 36, 127 © 2010 Nokia. All rights reserved.
- Page 146 43 vibrating alert 119 memory card password 25, 80 created calls 42 PDF reader 81 creating a channel 43 personalisation 98 exiting 43 satellite signal strength 77 changing language 119 logging in 42 © 2010 Nokia. All rights reserved.
- Page 147 112 software updates 10 applications 127 RealPlayer 93 sound clips Calendar 30 recorder 91 calls 121 restoring 121 recording 91 camera 86 service messages 61 sending 54 Speech 46 cell broadcast 61 SIP 126 © 2010 Nokia. All rights reserved.
- Page 148 120 access points 105 Voice aid 40 tones 119 advanced access point voice commands settings 119 settings 67 changing profiles 41 toolbar advanced settings 123 launching an application 41 camera 85 availability 105 © 2010 Nokia. All rights reserved.
- Page 149 MAC address 105, 123 searching for networks 107 security settings 124 settings 123 WEP keys 124 WPA security settings 125 WLAN wizard 105 world clock 83 WPA security settings 125 writing 25 Zip manager 81 © 2010 Nokia. All rights reserved.
Need help?
Do you have a question about the E71 and is the answer not in the manual?
Questions and answers