Table of Contents
Advertisement
Quick Links
Advertisement
Table of Contents

Subscribe to Our Youtube Channel
Related Manuals for Gaggenau ED 220-610


Summary of Contents for Gaggenau ED 220-610
- Page 1 Operating and assembly instructions ED 220/221-6.. Built-in steam oven...
-
Page 2: Table Of Contents
ED 220/221-6.. Reface Important safeguards Page Important instructions Page 1. Important notes Page 1.1 Fo_ your safety Page 1.2 About use Page 2. Appliance and accessories Page 2.1 Appliance description Page 2.2 Display Page 2.3 Accessories / special accessories Page 3. - Page 3 Preface With your steam oven you can experience modern professional cooking technology your own household. The steam oven offers the following advantages: - Cooking with steam allows gentle preparation. The valuable substances contained in the foodstuffs you prepare are retained almost completely.
-
Page 4: Important Safeguards
Important safeguards Read all instructions. 14. To reduce the risk of fire, do not mount unit over or near any portion of a heating or cool<ing Do not touch hot surfaces. Use handles appliance. l<nobs. is. Save these instructions. To protect against electrical shock do not... -
Page 5: Important Instructions
Important instructions 1. a) Proper installation - Be sure your appliance d) Use caxe when using meat probe, is properly installed and grounded by a that it does not contact any heating elements. qualified electrician. e) Placement of oven racks - Always place oven racks in desired location while oven is... -
Page 6: Important Notes
Fire risk! Do not store any combustible cannot be removed. Lamp must be replaced objects in your appliance. When operating by Gaggenau after-sales service. appliance, only ever leave the inner parts inside Repairs may only be carried out by authorised cooking... -
Page 7: About Use
If the problem has nothing your household on the appliance. do with the power or water supply, please contact your specialist dealer or your local Gaggenau after- sales service. -
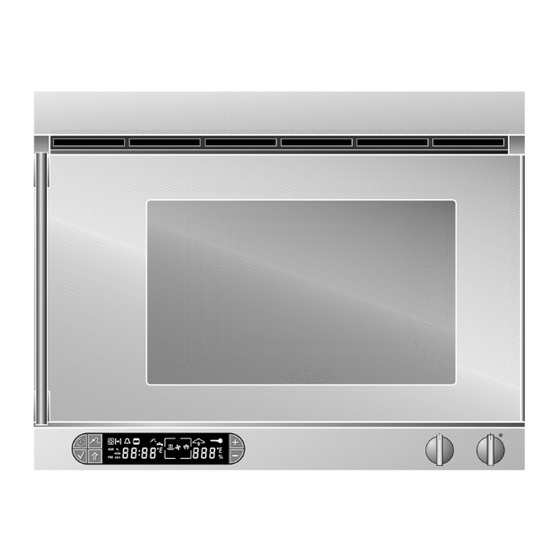
Page 8: Appliance And Accessories
2. Appliance and accessories 2.1 Appliance description 1 Grease filter 2 Air flap 3 Slide-in grills 4 "Temperature" control 1,mob 5 "Moisture level" control 1,mob 6 Core temperature sensor 7 Base strainer with siphon trap 8 Side plate 9 Display Fig, 2 2.2 Display Timer key... -
Page 9: Accessories / Special Accessories
2.3 Accessories / special accessories As standard, the appliance comes with the following accessories: - Stainless steel cooking insert GN 2/3, unperforated, 40 mm / ll/s ""deep (Fig. 5) Fig, 5 - Stainless steel cooking insert GN 2/3, perforated, 40 mm / 1Vs'" deep (Fig. -
Page 10: Operating For The First Time
3. Operating for the first time 3.1 Important notes Before operating the appliance for the first time, please pay attention to the following notes: Read through these instructions attentively before Every appliance is subjected to a thorough check operating the appliance for the first time. -
Page 11: What To Do When
The appliance automatically cools the oven below 40 °C / 104°F and re-starts the calibration. F 61 or F 6_. lights on the display Check the power and water supply If these are functioning correctly call the Gaggenau after-sales service. -
Page 12: Determining Water Hardness
3.4 Determining water hardness Water hardness range 4 has been pre-entered Please also note that different designations the appliance. If the hardness of the water in your used outside Germany to describe the hardness water. household should deviate from this value, the correct water hardness range... -
Page 13: Entering The Water Hardness
3.5 Entering the water hardness If the hardness of the water in your household deviates from the value that is set at the worl_ Options menu (water hardness range 4), you must enter the right water hardness in the options menu for Temperature commencing... -
Page 14: Switchin 9 On And Off
4. Operation 4.1 Switching on and Switching on - Turn the "Temperature" control knob by one Switching latching position to the right (Fig. 12). The lighting goes - Turn the "Moisture level" control knob to the moisture level you require. - Turn the "Temperature"... -
Page 15: Operating Modes
4.3 Operating modes Moisture . Temperature. Display Particularly Principle Remarks suitable for... " 100% 150 - 230°C _4" Bread Steam baking: 300 - 450 oF poultry, high moisture prevents the food from drying out. puff pastry Thanks to the high temperature, surface become... -
Page 16: Operating The Fimar
4.4 Operating timer The required moisture level and temperature The longer you press the + or - key when be set before and after time programming programming a time, the faster the time elapses turning the "Temperature" or "moisture level" knob. the display As long as one or several symbol(s) - Page 17 Setting the time of day Proceed as follows: - Press the _ (Timer) key 3 times. The _,, (Time unit) symbol flashes on the display The time display shows the currently set time of day (Fig. 18). - You can select the required time by pressing the + or - key...
- Page 18 Short time You can program a period of time with the short time function without automatic activation deactivation. You can use this mode of operation even when the appliance is switched off as an egg timer, for example. The range that can be set is between ten seconds...
- Page 19 Programming a duration The appliance for a specific period of operated time. The range that can be set is between minute (00:01) and 23 hours and 59 minutes (23:59). Proceed as follows: - Press the G. (Timer) key once. The H (Duration) symbol and the _ (Cooking time) symbol...
- Page 20 Programming a switch-off time The appliance switches off automatically at a time that you have chosen. The starting point is the time of day set on the appliance. Proceed as follows: - Press the 5. (Timer) key twice. The -I (End) and (Cooldng time) symbols flash.
- Page 21 5. Special functions 5.1 Child lock The child lock prevents inadvertent activation of the steam oven. Proceed as follows: Switching - Turn the "Temperature" control l_ob to the right to any temperature position (not light). - Press the ,/(Confirm) key and keep it pressed.
-
Page 22: Options Menu
5.2 Options menu With the aid of the Options menu, you can - choose between 0(3 and °F on the temperature display - choose between 12h and 24h on the time display - turn the timer on and off. - start calibration. - reset the descaling display Proceed... -
Page 23: Core Temperature Sensor
5.3 Core temperature sensor Using the core temperature sensor, during cooking process you can measure the core temperature of the food you are preparing exactly between I°C / 5°F and 99°C / 210°F. The sensor measures the temperature in the interior of the meat. - Page 24 Recommended core temperature values An audible signal sounds as soon as the Beef programmed core temperature has been reached. Roast beef / fillet of beef The oven switches off automatically The J'_ (Core rare 45-50 °C/115-120 °F temperature sensor) and -I (End) symbols flash on medium-rare 55-65°C/130-150°F...
-
Page 25: Steaming
You have a possibility of deliberately adding more 5.4 Steaming moistttre to the food you are cooking (e.g. bread, bread rolls). Note: steaming is only possible at the "Convection" stage (0%) or with 30% moisture (0%). Proceed as follows: (Steaming /Condensing) key - Press the_"... -
Page 26: Temperature
5.6 Display of the current cooking When you press the _/(Confirmation) key the current temperature in the cooking compartment compartment temperature and the moisture level appears on the display (ThermoTest) a few seconds (Fig. 28). Note: ff the appliance is operated for a prolonged period unavoidable... - Page 27 6. Further uses Low-temperature cooking Fermenting Vigorously browned meat matures over a longer Raising yeast dough, self-raising flour and sour time at a lower temperature. dough mixtures - Preheat the appliance to 70 -80°C / 160 - 175°F - Place the bowl containing the dough on the wire (depending...
- Page 28 Thawing - After 1-2 minutes, remove the cooldng receptacle Thawing deep frozen products gently and in a short from the oven again and place the vegetables time. iced water to cool them. - Place the frozen foodstuff in the perforated - Allow the food to drip off well.
-
Page 29: Cooking Table, Baking Table
7. Cooking table VEGETABLES ** Leaf Spinach perforated / unperforated Cauliflower perforated 1 head Cauliflower and carr0ts perforated together appr0x. 1kg Broccoli perforated 1 kg Peas perforated/unpefforated 1 kg Stuffed vegetables (courgette, aubergine, peppers) unperforated Green be_ perforated Kohlrabi perforated 1 kg Carrots perforated... - Page 30 whole 100°(3 / 210°F 100% 20 - 30 in roses / in slices 100 C/210 100 0 20-25 • " in roses 100°C / 2 IO°F 100% 10 - 15 100)/o 12-18 " 160- 180°0/320-355°F 80- 100% 20-30 whole IOOQC/ 210°F 100% 20:35 in slices...
- Page 31 Cooking table I__EAT Fillet in puff pastry perforated with halting paper 111,5 kg Roast pork with rind wire grill, unpefforated 1,5 kg Leg Oflamb (Low-tempera_re cooking)perforated Roast beef (Low-temperature cooking) perforated 1,5 - 2,5 kg R0ast p0rk (C011ar/Shoulder) wire grill, unpefforated 1,Skg Boiled fillet of beef unperforated...
- Page 32 see recipe book 180 L200°C/355 : 390°F 80 L 100% 50-60 cut the rind between 1) 100°C / 210°F 100% step 1 and 2 and season 2) 160 - 170°C / 320 - 340°F 60 - 80% 80-85°C/175 - 185°F 50- 60 3) 210°C / 410°F first brown vigorously 0nhob...
- Page 33 Baking table Apple tart 170 - 190°C / 340 - 375°F 30 - 45 Swiss roil t90,210oc/375-410oF 0_30% Small flaky pastry cakes 180 - 200°C / 355 - 390°F 80 - 100% 15 - 25 Bread (1 200/165 C-390/330 80- 100 0 50- 55 Bread rolls ** 200 - 220°C / 390 - 430°F...
-
Page 34: Tips Andtricks
8.Tips andtricks General: Tips on how to save energy and protect environment: - The appliance does not need long to heat up. - Give good thought to what foods you can cool< at It therefore operates in an extremely energy the same time. -
Page 35: Cleaning And Care
9. Cleaning and care 9.1 Manual cleaning You should thoroughly clean the appliance before Caution: do not clean this appliance with a steam operating it for the first time and after every cleaning unit or with water pressure - risk of short- circuits! use. -
Page 36: Cleaning The Side Plate
9.2 Cleaning side plate - Allow the appliance to cool down completely before cleaning - Be careful that no small parts fall into the base strainer. - Pull out the left shelf after undoing the knurled on the front side. - The grease filter can be detached in the upward... -
Page 37: Cleaning Aid
9.3 Cleaning Stubborn soiling canbe loosened bymeansof the cleaning aid andmay then be removed more easily. You should not detach the grease filter. It protects the fan against cleaning agent residues. You can then clean the grease filter and shelves in a dishwasher. -
Page 38: Cleaning Aid
- By pressing the _ (Clock) key you can query remaining time. An audible signal sounds once the cleaning aid has finished. - Press the ,/(Confirmation) key to switch off the signal. Do not turn the control l_obs. - Immediately clean the inside of the oven with a... -
Page 39: Maintenance
If the power and water supply is functioning correctly, but your appliance still does not work, please contact your Gaggenau dealer who will provide you with the address and telephone number of your nearest manufacturer's... -
Page 40: Descaling
The water evaporates behind the side plate. 10.3 Descaling Scaling therefore drops out there and is washed into the oven compartment. Scale can be wiped away with a moist cloth. The inlet pipe must be descaled at regular inter- vals. The oven is equipped with a device which counts... -
Page 41: Disassembly Of The Front Window
10.4 Disassembly of the front window Proceed as follows: - Remove the bottom screw from the door handle. - Remove the top screw from the door handle detach the door handle. - Hold the front window with one hand and lightly shake the door to and fro. -
Page 42: Remedying Small Malfunctions Yourself
- Switch off the steam oven and isolate the appliance from the mains. - Shut off the water supply. - Do not open the housing of the appliance. - Call Gaggenau after-sales service. What to do if,.. ? The cause solution! ... The display... - Page 43 GAGGENAU HAUSGERATE GMBH 5551McFADDEN AVENUE P,O, BOX 1002 50 ' 80076 MONCHEN HUNTINGTON BEACH, CA 92649 GERMANY (089) 45 90-03 %_(800) 828-9165-FAX(714)901-0979 FAX (089) 45 90-23 47 www,gaggenau-usa,com...
Need help?
Do you have a question about the ED 220-610 and is the answer not in the manual?
Questions and answers