BLUE EMBER GRILLS FGQ65079 Use & Care Manual
Outdoor gas barbeque/grill propane or natural gas series assembly manual
Hide thumbs
Also See for FGQ65079:
- Assembly manual and use and care (40 pages) ,
- Assembly manual and use and care (99 pages) ,
- Owner's manual (41 pages)
Table of Contents
Advertisement
[[
\
\
\
,<,
Outdoor Gas
Barbeque/Grill
Assemblymanual/ Use
& Care
i
i
ii ii ii ii ii ii ii iii
%
ii
i
i
_i i
i _
ii
i
(Propaneo
Hazardous Fire or Explosionmayresultif these
instructions are ignored.
It is the user's responsibilityto seethat this barbecueis properly
assembled,installed,maintainedand caredfor. Failureto follow
instructions in this manualcould result in serious bodily injury
and/or property damage.Anymodificationto the grill is
dangerous and is not permitted.
some parts may contain sharp edges -especially if noted in the
manual. Wear protective gloves if necessary.
WARRANTY I NFORMATION
Full Model No. from outer carton:
Date Purchased:
Serial Number
(from rating plate):
SAVETHIS MANUALFUR FUTUREREFERENCE
Installermustleaveinstructionswith the consumer f or future reference.
KEEPYOUR RECEIPTAS PROOF OF PURCHASETO VALIDATE
THE WARRANTY.ATTACHYOUR RECEIPTTO THE INSIDE
COVEROFTHIS MANUAL FOR EASYREFERENCE.
IF YOUSMELLGAS:
1. Shut off gas supply to appliance.
2. Extinguish any open flame.
3. Open lid.
4. If odour continues, keep away from the appliance and
immediately call your gas supplier or your fire department.
•
Do not store use gasolineor other flammable liquids or
vapours in the vicinity of this or any other appliance.
•
An LP cylinder not connectedfor use shall not be stored in
the vicinity of this or any other appliance.
www.blueemberc
Manufactured for
in CANADA:
1-888-267-2159
FiestaBarbequesA Division ofWolfedale E
2 Walker Drive Brarnpton Ontario, LCT5E1
in USA: 1-800-396-3838
FiestaGas Grills, LLC.
One Fiesta Drive Dickson, TN.
Made in China
Advertisement
Table of Contents

Related Manuals for BLUE EMBER GRILLS FGQ65079


Summary of Contents for BLUE EMBER GRILLS FGQ65079
- Page 1 Installermustleaveinstructionswith the consumer f or future reference. 2 Walker Drive Brarnpton Ontario, LCT5E1 in USA: 1-800-396-3838 KEEPYOUR RECEIPTAS PROOF OF PURCHASETO VALIDATE THE WARRANTY.ATTACHYOUR RECEIPTTO THE INSIDE FiestaGas Grills, LLC. COVEROFTHIS MANUAL FOR EASYREFERENCE. One Fiesta Drive Dickson, TN. Made in China...
-
Page 2: Safety Symbols
THANK YOUFOR FORRESIDENTIAL USEONLY. PURCHASING T HISBARBEQUE DONOTUSEFORCOMMERCIAL COOKING. We are dedicated to creating the ultimate barbeque experience by providing you with all the right tools, starting with this Combustionby-products producedwhen manual. It is important to read through the entire booklet prior to usingthis product containchemicals known to the state of Californiato causecancer,birth using your barbeque to ensure you fully understand all of the... - Page 3 DONOTUSE YOUR BARBEQUE UNTIL YOUHAVE I Li_il READ ANDUNDERSTOOD ALLTHE INFORMATIONIN THISMANUAL. ITIS EXTREMELYIMPORTANT TOBESURETHAT: BEFORE YOUUSETHIS APPLIANCE • Ensureyour barbeque is properly assembled. • Ensurethereare no leaksin the gassupply system(see'LeakTesting section). • Ensurethe burner is properly assembledwith the venturi tubes seated over the valve outlets (Figure 1) and there are no blockages VENTURI present in the venturi tubes (see CleaningVenturi Tubes' Section).
-
Page 4: Electrical Caution
PROVIDING POWER TOYOURBARBEQUE ELECTRICAL CAUTION To provide power to the barbecue, plug grounded electrical cord into • If any accessory installed on this barbeque requires an external rear electrical box as shown. (page 34 Fig.17) electrical power source, it must be electrically grounded in accordancewith local laws or in the absence of local laws,with Plug electrical cord into properly grounded the CanadianElectricalCode CSA022.1 or in the U.S., with the... - Page 5 TRANSPORTATION ANDSTORAGE: ALTHOUGHIT IS SAFEWHENUSED PROPERLY,CARELESS HANDLINGOF THE PROPANEGASCYLINDERCOULDRESULTIN FIRE, EXPLOSION, A ND/OR SERIOUSINJURY. PROPANE GASIS HEAVIER THANAIR, ANDWILLCOLLECT IN LOW AREAS,INCREASING THEABOVERISKS.THEREFORE: • ALWAYS use the cylinder cap provided with your cylinder whenever the cylinder is not connected to your barbeque. (Figure4) •...
-
Page 6: Hose & Regulator
NOTE:IMPROPER LIGHTING PROCEDURES C ANCAUSE THEFLOW HOSE & REGULATOR CONTROL T OACTIVATE,RESULTING IN REDUCED HEATOUTPUT. IF THISIS SUSPECTED, RESET THEFLOWCONTROL BYSHUTTING OFFALLBURNER CONTROLS A NDTHECYLINDER VALVE.WAIT WARNING: INDICATES A NPOTENTIALLY 30 SECONDS, THENTURNTHECYLINDER VALVEONEXTREMELY HAZARDOUS SITUATION WHICH,IF NOTAVOIDED, SLOWLY - WAIT 5 SECONDS ANDTURNTHE BURNER VALVEON COULD RESULT IN DEATH ORSERIOUS I NJURY. -
Page 7: Performa Leaktest
To keepyour barbeque working at its peakefficiencyas wellas contribute DONOTIGNITE THEBURNERS W HILEPERFORMING THELEAK CHECK. to the safeoperationof this unit, performall of theoperationsbelowat 2. Brush your soap and water solution on all connections and leastoncea year- preferably at the startof eachcookingseason. components as outlined above. -
Page 8: Your Appliance
CLEANING O THER PARTS OF CASTINGINTERIORANDWARMING RACK: At least oncea year remove all components from inside your barbeque. YOUR APPLIANCE Loosen any cooking residue with a scraping tool for large particles and a brass barbeque brush for smaller particles. Scrub with hot water and a GeneralGrill Cleaning: Do not mistake brown or black accumulation of strong detergent, then rinse thoroughly or spray barbeque degreaser grease and smoke for paint. -
Page 9: In This Manual
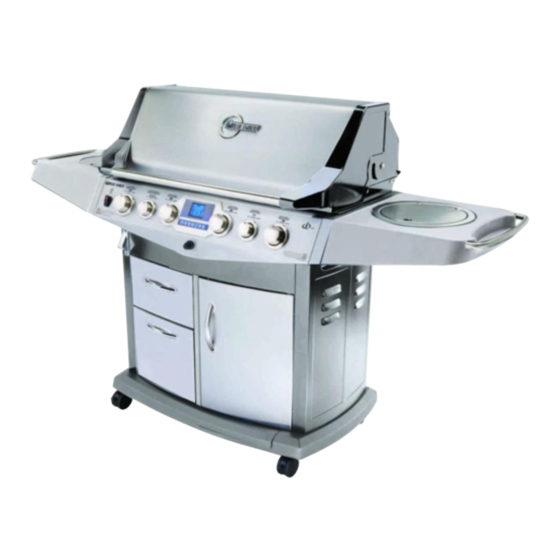
BEFORE USING YOUR APPLIANCE READ ALL INSTRUCTIONS IN THIS MANUAL AND IQUEINSTRUCTION MANUAL USER GUIDE. WARNING: E NSURE SIDEBURNER LID IS UP BEFORE LIGHTING SIDEBURNER. *INTERNAL LIGHT LEFTBURNER *ROTISSERIEBURNER CENTERLEFTBURNER CENTERRIGHT MODEL MAYNOTBE BURNER EXACTLY AS SHOWN. *SIDE BURNER *PARTSOPTIONAL (READWARNING) DEPENDING ON MODEL PURCHASED... -
Page 10: Main Burners
LIGHTING IF LIGHTING MAIN BURNERSONLY, ENSURESIDE BURNERKNOB Prior to lighting your barbeque,visually check all hoses before each IS IN THE OFF POSITION. use for nicks, cracking, abrasions or cuts. If the hose is found to be damaged in any way, DONOT USEYOUR BARBEQUE. A replacementhose and regulator is required (see 'PARTS LIST' in Assembly Brochure). - Page 11 SIDEBURNER (OPTIONAL) USINGTHE IGNITOR 1. RAISESIDE BURNERLID. 2. Push in and turn the side burner control knob to 'HIGH'. 3. Depressignitor. Repeat if necessary (Figure 12A). 4. If burner does not light immediately (within five seconds), turn the burner control knob off, and wait 5 minutes to clear the gas.
- Page 12 REAR ROTISSERIE B URNER (OPTIONAL) USINGTHEIGNITOR 1. OPENTHE LID BEFORE LIGHTING. 2. Push in and turn the rotisserie control knob to 'HIGH'. 3. Depressignitor. Repeat if necessary (see Figure 12D). 4. If burner does not light immediately (within five seconds), turn the burner control knob off, and wait 5 minutes to clear the gas.
-
Page 13: Cooking Techniques
COOKING TEMPERATURES SHUTTING DOWN YOUR HIGHSetting: Use the HIGHsetting to preheat the barbeque,sear BARBEqUE meat such as steak, & to burn off any cooking residue from the grids after cooking your meal. HIGH is rarely used for extended 1. Shut off L.P. cyl nder valve. cooking. -
Page 14: Providing Power Toyourbarbeque
PROVIDING POWER TOYOURBARBEQUE To provide power to the barbecue, plug grounded electrical cord into rear electrical box as shown. (Fig.15) Plug electrical cord into properly grounded GFI(Ground Fault Interrupt) receptacle. If use of an extension cord is required, be sure that it is a minimum 16 AWG, 3 wire well insulated cord, marked for OUTDOOR USEONLYand properly grounded. - Page 15 • Blockedventuri tubes BurnerWill Not Light (match or ignitor) • Cleanout blockage (Page7) or Burners Not Hot Enough • Cylinderor gas supply valveturned off • Open cylinder or gas supply valve • Venturi tubes not properly seatedover valve • Ensure proper venturi assembly (Page3) orifices •...
-
Page 16: Limited Warranty
Fiesta shall not be responsible for any indirect or consequential damages arising as a result of any defect in the barbeque whether such defect is covered by warranty or not. This limited warranty does not apply to and IN CANADA - Fiesta Barbeques A Division of Wolfedale Engineering Ltd. or in USA - Fiesta Gas Grills, LLC. - Page 17 If you purchased your barbeque pre-assembled, please refer to this page for caster & tank caddy assembly. The assembly instructions for the door and shelves are located on page 18. Otherwise please proceed to page 19 for full assembly procedures. TOOLSREQUIRED"...
- Page 18 If you purchased your barbeque pre-assembled, please refer to page 17 for caster and tank caddy assembly. The assembly instructions for the door and self are located on this page. Other wise please proceed to page 19 for full assembly procedures. Please refer to FIG.
-
Page 19: Tools Required
FIG.1 NOTE: Somegrill parts shownin the assembly steps may differ slightly in appearancefrom those on your particular grill model. However, the methodof assembly remainsthe same. TOOLS REQUIRED: • ExtraCommonNuts & Bolts are supplied. • Refer to diagrams to assembleyour grill. •... - Page 20 • Attach Cabinet side panels to base as shown. • Attach bottle opener to left panel as shown. Assembled View SP53-16 1/4-20 NUT HEX HD FLANGED SP83-18 1/4"-20X.50" ill® Left hand CARRIAGEBOLT Panel Right hand Panel SP84-18 1/4-20 X .5 HEX HD BOLT ..
- Page 21 Assembled • Attach rear panel by sliding notches over screws on side panels as View shown. Tighten screws. • Install Electrical box with Screws and Nuts as shown. Ensure Electrical box is installed so outlet covers open upwards. • Install Transformer box into rear panel holes as shown. INSTALLSO OUTLET COVERSOPEN UPWARDS --...
- Page 22 • Attach top trim panel as shown. Tighten screws. • Attach center support as shown. Tighten screws. SP83-21 #10-24 SCREW SP83-18 1/4"-20X.50" CARRIAGEBOLT SP53-16 1/4-20 SP83-21 NUT HEXHD FLANGED_ @ "' #10-24 SCREW Front Trim Panel SP74-16 #10-24 K-Lock HEX Center Support SP84-18 1/4-20 X .5...
- Page 23 • Attach left and right drawer rail brackets as shown. Tighten screws. Shelf Side Panels SP83-21 #10-24 SCREW SP83-21 #10-24 SCREW (8) FIG.6...
- Page 24 Step 1 Install drawer handles as shown Step 2 SP71-21 8-32 X .313 FLAT HEAD Attach drawers to drawer slides as shown, tighten screws. SP41-16 #10-24 FLANGEDHEXNUT (4) SP71-21 8-32 X .313 FLAT HEAD (8) Step 2 Shelf Side Rails SP41-16 #10-24 FLANGED HEXNUT HANDLE...
- Page 25 Assembled Attach lower heat shield as shown. Tighten screws. View Heat Shield SP43-21 IO-B X .375 SCREW SELFTAP SP43-21 IO-B X .375 SCREW SELFTAP (5) FIG.8...
- Page 26 • Install door handles as shown. • Slide top pins on doors into upper holes as shown. • A) Drop locking pins through lower holes in door into base assembly. • B) Once in position rotate pins into locked position as shown. HANDLE SP41-16 #10-24 FLANGEDHEXNUT (2)
- Page 27 REGARDING IMPROPERASSEMBLY OF HOSE ON PROPANE ANDNATURAL GASFG/FGQ650MODELS DURING THE ASSEMBLY PROCESS OF THE BASE ASSEMBLY STEP, THE CUSTOMER NEEDS TO ENSURE THAT THE HOSE IS UNTIED FROM BURNER BEFORE FINAL ASSEMBLY. CUSTOMER SHOULD RELEASE THE TIE AND PASS THE HOSE THROUGH THE GAP BETWEEN HEAT SHIELD AND FRONT PANEL BEFOREASSEMBLING THE FIREBOX (BASE) TO THE CART (CABINET).
- Page 28 FIG.1 1 DANGER: DONOTPASSHOSE ABOVE SHIELD HOSE MUSTNOT TOUCH ANYPARTOFTHEBASE WARNING: ENSURE HOSE ASSEMBLY DOES NOTCONTACT T HE CASTING, O RANYOTHER PARTS WHICHWILLGETHOT, SP53-16 (4) 1/4-20 NUT HEX HD FLANGED SP86-18 (4) 1/4"-20 X .75" NOTE MACHINE SCREW NATURALGAS OR IMPORTANT PROPANEHOSE CENTERTABS...
- Page 29 FIG.12 Secure base casting as shown. Plug wiring harness with jack into tank sensor connector found at back of tank caddy IMPORTANT: For N G models,directthehosethrough the hole in thebaseas shown. Assembled View DANGER: DONOTPASSHOSE ABOVE SHIELD HOSE MUSTNOT TOUCH ANYPARTOFTHEBASE WARNING: ENSURE HOSE ASSEMBLY DOES NOTCONTACT T HE CASTING, ORANYOTHER PARTS WHICHWILLGETHOT,...
- Page 30 FIG.13 SOME PARTS MAY HAVE SHARP EDGES OR BURRS. HANDLE WITH CARE. Step 2 Step 1 Step 3 Step 5 Step Step 1 Step 6 • Rest the ends of heat plates & searing burner cover into notches inside casting as shown. Step 2 •...
- Page 31 FIG.14 Assembled View Position side shelves onto shelf brackets as shown (A). Lift shelf and drop into locking position (B). Insert wingbolt into middle hole in bracket to lock shelf in position (C). • Position ice/wine bucket & condiment tray as shown.
- Page 32 Position hose into end of side burner venturi tube until grooves line up (A). Snap clip into the groove on side burner tube to secure parts (B). Check hose to ensure it is securely positioned in tube end. Attach side burner Ignitor wire to terminal on side burner bracket. Ensure you read and understand warning below before proceeding.
- Page 33 SP43-21 IO-B X .375 FIG.16 • Assemble grease pan with brackets as shown SCREW SELFTAP using 10-b x .375 screw self tap screw.(IF NOT FACTORY INSTALLED) • Slide in grease pan and Grease tray as shown fully forward. Grease Pan •...
- Page 34 Step Plug the factory supplied, three prong plug for the transformer into the receptacle box at the back _ of the unit. Transformer Cord Light Switch Wires Transforme Step IMPORTANT: Assemble light switch wires to Internal Transformer box as shown. Grounded Electrical Cord Step...
- Page 35 • Position tank into tank support as shown. THIS BARBECUE IS DESIGNED TO BEUSEDONLYWITH A 20LB (9.1KG) PROPANECYLINDER FIG.18 WARNING: Beforeproceedingwith the following steps, ensureyou have read: * L.P. Gas Cylinder * Hoseand Regulator Sections of the USEANDCAREINSTRUCTIONSlocatedat the front of this manual. The L.P. gas cylinder, if supplied with your grill, has been shipped empty for safety reasons.
- Page 36 FIG.21 Remove warming rack and cooking grills as needed. Slide rotisserie motor into bracket and assemble on the left side of the casting with 2 bolts and 2 nuts as shown. Assemble Rotisserie kit as shown. Plug the factory supplied, three prong plug for the rotisserie into the the receptacle box at the back of the unit.
- Page 37 NOTE:UNPLUG ALL POWER TO GRILL BEFORE REPLACING LIGHT. 1. Loosen two nuts. 2. Press tab on top of Glass Bezel. Light Rain Guard Reflector BULB Glass Gasket 4. Hold the Light Rain Guard, 3. Hold the Light Rain Guard, slowly remove GLASS BEZEL, GLASS remove the light BULB.
- Page 38 Gas Barbeque Grill: ITEM QTY. SP PART DESCRIPTION SP37-33C Cover Cast. End Cap LH - Charcoal Model FGQ65079 SP38-33C Cover Cast. End Cap RH - Charcoal SP336-9B Cover Panel - Black HOW TO ORDER SP70-33 Cover Plug SP69-19 Handle SPARE PARTS: SP8-25 Cover Post Stop...
- Page 39 ITEM QTY. SP PART DESCRIPTION SP74-16 #10-24 K-Lock Hex Nut Gas Barbeque Grill: SP168-6 Drawer Bracket Assembly (Left Hand) Model FGQ65079 SP170-6 Drawer Slide Assembly SP172-6 Drawer Bracket Assembly (Right Hand) HOW TO ORDER SP266-9B Bottom Pan Resin - Black SP28-22 Tank Caddy Wheels SPARE...
-
Page 40: Before Operating
BEFORE OPERATING THE BARBECUE FOR THE FIRST TIME Grillinq Safety Checklist Read and understand owners manual. Never overfill LP cylinder. Overfilled cylinders may cause freeze-up of regulator. Check tubes for spider webs. Ensure valves are correctly installed in burner tubes. Always ensure control knobs are in OFF position and regulator is attached to tank BEFOREopening tank valve to avoid low flames.
Need help?
Do you have a question about the FGQ65079 and is the answer not in the manual?
Questions and answers