Electrolux EW30IS65JSC Use & Care Manual
Hide thumbs
Also See for EW30IS65JSC:
- Installation instructions manual (36 pages) ,
- Installation instructions manual (12 pages)
Table of Contents
Advertisement
Advertisement
Table of Contents

Related Manuals for Electrolux EW30IS65JSC


Summary of Contents for Electrolux EW30IS65JSC
- Page 1 Care Guide Electric Slide-ln Range Electrolux 318 205 835 (1201) %',/,A...
-
Page 2: Makea Recordfor Futureuse
For toll-free telephone support in the U.S. and Canada: 1-877-4ELECTROLUX (1-877-,435-3287) For online support and internet product information: www.eiect roluxappliances,com @2010 Electrolux Home Products, Inc. 10200 David Taylor Drive, Charlotte, NC 28262, USA All rights reserved. Printed in Canada... -
Page 3: Table Of Contents
Finq ing Information TABLE OF CONTENTS ConvectionBroiling .......... 30 FindingInformation ..........2 Makea Recordfor FutureUse ......2 KeepWarm............31 SlowCook............32 Modeland SerialNumberLocation....2 Questions? ............Dehydrating............. 33 Tableof Contents ..........3 Defrosting............33 Bread Proofing ..........34 Safety..............PerfectTurkey..........35 ImportantSafetyInstructions ...... - Page 4 afety iMPORTANT SAFETY BN RUCTION8 Tip Over Hazard • A child or adult can tip the range and be killed. Verify the anti-tip device has been installed to floor or wall. . Ensure the anti-tip device is re-engaged to floor or wall when the range is moved. Do not operate the range without the anti-tip device in place and engaged.
- Page 5 Safety ,5 Stepping, leaning or sitting on the door or drawer of this appliance can result in serious injuries and may also cause damage to the appliance. Do not allow children to climb or play around the appliance. The weight of a child on an open door may cause the appliance to tip, resulting in serious burns or other injury.
- Page 6 afety IMPORTANTINSTRUCTIONSFOR USINGYOUR COOKTOP Knowwhich knob controls each surface heating unit. Use Proper Pan Size--This appliance is equipped with one or more surface units of different sizes. Select utensils having flat bottoms large enough to cover the surface unit. The use of undersized utensils will expose a portion of the surface heating unit to direct contact and may result in ignition of clothing.
-
Page 7: Safety 7
Safety 7 Do not use a broiler pan without its insert. The broiler pan and grid allow dripping fat to drain and be kept away from the high heat of the broiler. Do not cover your broiler or warmer drawer (if equipped) grid with aluminum foil. -
Page 8: Feature Overview
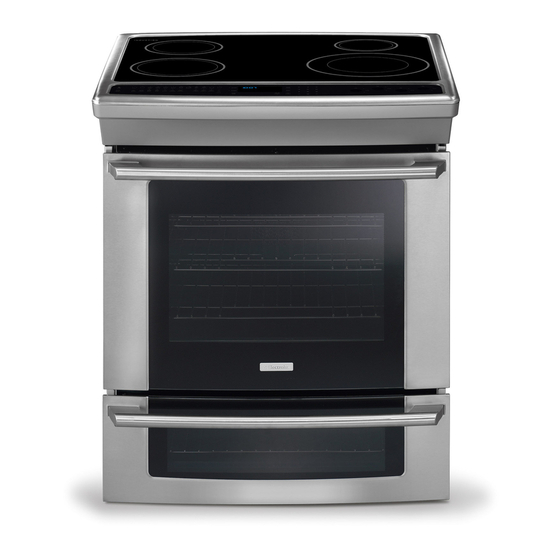
Feature Overview YOURSL(DEo(N RANGE CERAMICGLASS COOl<TOP TOUCHACTIVATED GLASS CONTROLPANEL LARGEMETAL HANDLE CURVEDGLASS OVENDOOR LOWEROVEN DOOR -- WINDOWGLASS OVENVENT DOORLATCH BROILINGELEMENT RACK SUPPORT CONVECT(ON FAN HALOGENOVENLIGHT SLIDEABLEOVENPACKS LOWEROVENPACK CONVECTIONROASTING RACK BROILERPANGRID ....BROILER. PAN... - Page 9 Feature Overview (NDUCT(ON COOKTOPFEATURES READ THESE INSTRUCTIONS CAREFULLY BEFORE USING THE COOKTOP A COOLER COOKTOP- A unique feature of the Induction Cooktop is whether turned ON or OFF, the cooktop surface remains cooler than standard ceramic cooktops. A CAUT(ON The CookingZones may appearto be cod while turned ON and after they havebeen turnedOFF.The glass surfacemay be HOTfrom residualheattransferredfrom the cookwareand burns mayoccur.
- Page 10 Feature Overview OVEN SUPPORTS & OVEN VENTS installing Oven Rack Supports ALWAYS INSTALL 0 VEN RACK SUPPORT BEFORE TURNING ON THE 0 VEN (WHEN THE 0 VEN IS COOL). To install oven rack support, insert the supports by pushing them downward into the two brackets on each side of the oven interior, as shown below.
-
Page 11: Removingand Replacingoven Racks
Feature Overview REMOVING AND REPLACINGOVEN CKS Removing Sliding Oven Racks 1. With the rack in its closed position; grasp the rack and the sliders at once. 2. Slightly lift the rack and sliders and pull it to clear the first bracket. 3. - Page 12 Feature Overview OVENCONTROLPAD FUNCT(ON8 "1 Light Pad- Used to turn the oven light on and off. Bake Pad- Used to enter the normal baking mode temperature. Broil Pad- Used to select the variable broil mode. Convection Bake Pad- Used to select the convection baking mode. Convection Roast Pad- Used to select the convection roasting mode.
- Page 13 Feature Overview OVEN CONTROL PAD FUNCT(ON8 (coNTmNuEm Defrost Pad- Used to select the defrost mode. Dehydrate Pad- Used to select the dehydrate mode. Bread Proof Pad- Used to select the bread proof mode. Clean Pad- Used to select the self-cleaning mode.
- Page 14 Feature Overview COOKTOP CONTROL PAD FUNCTEONS • ON / OFF Pad- Used to toggle ON and OFF the associated induction element. HI + Pad- Used to select the "Power Boost" temperature or raise the temperature currently displayed. MED Pad- Used to select the medium temperature. LO - - Used to select the lowest temperature or lower the temperature currently...
-
Page 15: Settingclockat Powerup
Gettin rted SETTINGCLOCKAT POWERUP When the unit is first plugged in, or when the power supply to the range has been interrupted, the timer in the display wilt flash with "12:00". The clock cannot be set when the oven is on. -
Page 16: Ovenlight
6 Gettin Starte OVENL)GHT Your appliance includes "theater" style oven lighting feature that gradually lights both the upper and lower oven interiors to full brightness. The upper oven is equipped with 2 halogen lights and the lower oven is equipped with 1 incandescent light. -
Page 17: Setting Surface Controls
Settin Surface Contro ABOUT THE CERAMEC GLASS COOKTOP The ceramic cooktop has inductor elements located below the surface of the glass. The design of the ceramic cooktop outlines the area of the inductor element underneath. Make sure the diameter of the pan matches the diameter of the element outline on the cooktop. Only flat-bottom cookware should be used. -
Page 18: Cookwarerecommendations
Settin Surface Contro COOKWARE RECOMMENDATIONS INCORRECT CORRECT • Cookware not centered on Cooking • Cookware centered correctly on Zone surface. Cooking Zone surface. __Win ..• Curved or warped pan bottoms or • Flat pan bottom & straight sides. sides. Min. - Page 19 etting urface Contro USEQUALiTYCOOKWA JNGOODCOND(T)ON The coole4vare used with the induction Cooktop should have flat bottoms that make good contact with the entire surface of the Cooking Zone. Check for flatness by rotating a ruler across the bottom of the cookware (See FigM1). Be sure to follow all the recommendations for using cookware.
-
Page 20: Settingthe Cooktop
Settin Surface Contro SETTINGTHE COOKTOP The cooktop control provides 4 digital display windows to help set power levels for the heating zones located on the cooktop. These settings work the same way as normal knob settings except the settings are displayed in LCD style displays. Available cooktop settings... -
Page 21: Settingthe Cooktop
etting urface Contro SETTINGTHE COOKTOP(CONT NUED Setting cooktop elements , If needed, wake the control panel. Touch the ON OFF key for the desired heating zone. Press the desired power level key (hi+, reed or Io-) or for more precise level settings use the hi+ or Io- keys to make specific level changes. -
Page 22: Settingpowerboostfeature
Settin Surface Contro SETTINGPOWERBOOSTFEATURE Your induction cooktop is equipped with a Power Boost feature on each cooking zone. The Power Boost feature is used to bring large quantities of water or food to cooking temperature at the fastest speed possible. The Power Boost feature will give you up to 139% power output for a maximum of 10 minutes. -
Page 23: Setting The Lower Oven
Settin the Lower Oven LOWEROVENOPERATION The lower oven providesthree basic modes, baking, stow cooking and warming. The lower oven is ideal for cooking foods such as pizza, casseroles, baked potatoes and frozen convenience foods. Use the keep warm feature to keep hot cooked foods at serving temperature. lower oven can only be used with some cooking modes;... -
Page 24: Cooking Modes
Cookin Modes This mode is best used for your standard recipes. The hidden bake element is used to heat the air and maintain temperature. The temperature probe can be used in this cooking mode. The upper oven can be programmed to bake at any temperature from 170°F to 550°F with a default temperature of 350°E The lower oven can be programmed to bake at any temperature from 170°F to 450°F with a default temperature of 350°R... -
Page 25: Cooktime
Cookin Modes COOKTiME Cook Time allows the oven to be set to cook for a set length of time and shut off automatically. The time remaining will always be shown in the timer section of the display. The oven will shut off and will beep when the countdown is finished. -
Page 26: Broiling
Cookin Modes This mode is best for meats, fish and poultry up to 1" thick. Broiling is a method of cooking tender cuts of meat by direct heat under the broil element of the oven. The high heat cooks quickly and gives a rich, brown outer appearance. The temperature probe cannot be used with this mode. -
Page 27: Convection Baking
Modes 27 Cookin CONVECTION BAKING This mode of cooking enables you to obtain the best culinary results when baking with multiple pans and racks. Multiple rack baking may slightly increase cook time for some foods but the overall result is time saved. Most foods cooked in a standard oven will cook faster and more evenly with Convection Bake. -
Page 28: Convection Convert
Cookin Modes CONVECTION CONVERT The Convection Convert pad is used to automaticalUy convert a standard baking recipe for convection baking. When set properly, this feature is designed to display the actual converted (reduced) temperature inthe display. Convection Convert may ONLY be used with a Convection Bake cooking mode. -
Page 29: Convection Roasting
Cookin Modes CONVECTION ROASTING This mode is best for cooking tender cuts of beef, lamb, pork and poultry. Use this mode when cooking speed is desired. The Convection Roasting gently' browns the exterior and seals in the juices. Convection roasting uses the hidden bake element, the hidden convection element, the broil element and a fan to circulate the oven's heat evenly and continuously within the oven. -
Page 30: Convectionbroiling
Cookin Modes CONVECTMON B ROILING Use this mode for thicker cuts of meat, fish and poultry. The Convection Broiling gently browns the exterior and seals in the juices. Convection broiling uses the broil element and a fan to circulate the oven's heat evenly and continuously within the oven. The temperature probe cannot be used in this cooking mode. -
Page 31: Keepwarm
Cookin Modes KEEPWARM This mode is best for keeping oven baked foods warm for serving after cooking has finished. The Keep Warm feature uses the hidden bake element to maintain the temperature within the oven. The Keep Warm feature may be used with Multi-Stage (refer to its section for directions) if you wish to have the Keep Warm feature turn ON automatically when cooking has finished. -
Page 32: Slowcook
:32 Cookin Modes SLOW COOK This mode may be used to cook foods more slowly, at lower oven temperatures and provide cooking results much the same way as a Slow Cooker or Crock-Pot. The Slow Cook feature is ideal for roasting beef, pork & poultry: Stow Cooking meats may result in the exterior of meats becoming dark but not burnt. -
Page 33: Dehydrating
Cookin Modes DEHYDRATING This mode dries foods with heat from the bake and the convection element. The heat is circulated throughout the oven by the convection fan. Dehydrating is used to dry andlor preserve foods such as fruits, meats, vegetables and herbs. This mode holds an optimum low temperature while circulating the heated air to slowly remove moisture. -
Page 34: Bread Proofing
:34 Cookin Modes BREAD PROOFING Proofing bread prepares the dough for baking by activating the yeast. This feature is ideal for proofing, or rising bread dough. The oven can be programmed for Bread Proofing at any temperature between 85°F to 100°F with a default temperature of 100°E The temperature visual display is not available for this function. -
Page 35: Perfectturkey
Cookin Modes This mode uses the temperature probe to control precisely the cooking of a perfect turkey. The convection system gently browns the turkey's exterior and seals in the juices. The temperature probe is required with this cooking mode (read its section on next page for more details). - Page 36 Cooking Modes TEMPE TURE PROBE many foods, especially roasts poultry, testing internal temperature is the best method to insure properly cooked food. Temperature Probe gets exact temperature desire without having to guess. This feature be used with Bake, Convection Bake, Convection Roast Perfect...
-
Page 37: Multi Stage
Modes 3;' Cookin MULT!STAGE This feature enables you to perform sequential cooking at the touch of a button. Its purpose is to program a queue of up to three coo king modes with individual cooking time and temperatures in a sequence: Thisfeature can be usedwith most cooking modes; Baking, Broiling, Convection Baking, Convection Roasting, Convection Broiling, Keep Warm and Bread Proof. -
Page 38: Multi Stage
Cookin Modes MULT(STAGE (CONT(NUED) Stage 3 14. Press KEEP WARM [_= "170" will start flashing in the display prompting to enter a temperature. 15. Enter a temperature using the numeric pads (_/to _g_i/. 16. Press ,START _. "00:00" will start flashing in the display prompting to enter a cook time. 17. -
Page 39: User Preferencemenu
E ctronic Control Settin s 39 USERPREFERENCES The User Preferences menu includes all user defined options. This feature enables you to control the various options of the electronic controls. This menu features the Time of Day, Celsius or Fahrenheit display mode, Continuous Bake or 12 Hour Energy Saving modes, Clock display or No-Clock display, 12 Hours Time of Day or 24 Hours Time of Day, Audio Control, and Adjusting the oven temperature. -
Page 40: Electronic Control Settings
Electronic Control Settings USERPREFERENCES (CONTINUED) SETTING CLOCK DmSPLAY--ON OR OFF The oven control c an be programmed todisplay thetimeof day or not The oven has been presetatthefactory t odisplay thetimeofday. Changingclock display b etweenON and OFF: menu page. I. Press USER PREF _ until y ou gettothe CLO ÷... -
Page 41: Audio Control
Electronic Control Settin s USERPREFERENCES (CONTINUED) SETTMNG T EMPERATUREDISPLAY-- FAHRENHEIT OR CELSIUS The oven control can be programmed to display temperatures in Fahrenheit or Celsius, The oven has been preset at the factory to display in Fahrenheit. To change display from Fahrenheit to Celsius or Celsius to Fahrenheit: Press USER PREF _(_ until you get to the F-C F menu page. -
Page 42: Oven Controls
Oven Controls MY FAVORITES The Favorites settings allows you to save your most frequently used or most complex cooking sequences. This feature will save the cooking mode, the target temperature the cooktime (if any). The oven can recall up to six cooking sequences from its internal memory, three for each oven, which are easily accessible from a one touch button. -
Page 43: Sabbathfeature
Oven Contro SABBATHFEATURE (FORUSEON THEJEWISHSABBATH& HOLIDAYS) The HI hi and LO _o pads are used to set the Sabbath feature. The Sabbath feature may only be used with the BAKE _ pad. The oven temperature may be set higher or lower after setting the Sabbath feature (the oven temperature adjustment feature should be used only during Jewish Holidays), however the display will not visibly show or provide any audible tones indicating whether the change occurred correctly. -
Page 44: Sabbathfeature
Oven Contro SABBATHFEATURE (CONTINUED) + key pad will Note: You may change the oven temperature once baking has started. The HI hi increase the temperature by 5°F (2°C) at each key press. The LO Io key pad will decrease the temperature by 5°F (2°C) at each key press. - Page 45 Care & Cleanin USING THE SELF-CLEANFEATURE Adhere to the Following Cleaning Precautions: . Allow the oven to cool before cleaning. . Wear rubber gloves when cleaning any exterior parts of the oven manually. During the self=cleaning cycle, the outside of the oven can become very' hot to the touch. DO NOT leave small children unattended near the appliance.
- Page 46 Care & Cleanin START(NGSELF-CLEANCYCLE A self-cleaning oven cleans itself with high temperatures (well above cooking temperatures) which eliminate soil completely or reduce it to a fine powdered ash you can whisk away with damp cloth. If you are planning to use the oven directly after a self-clean cycle remember to allow time for the oven to cool down and the oven door to unlock.
- Page 47 Care & Cleanin GENE L CLEANING Cleaning Various Parts of Your appliance Before cleaning any part of the appliance, be sure all controls are turned OFF and the appliance isCO©L REMOVE SPILLOVERSAND HEAVYSOILINGAS SOONAS POSSIBLE REGULAR CLEANINGS WILL REDUCE THE NUMBER OF MAJOR CLEANINGS LATER...
-
Page 48: Care & Cleaning
Care & Cleaning CARE AND CLEANING OF STAINLESS STEEL Special care and cleaning are required for maintaining the appearance of stainless parts. Please refer to the table provided at the beginning of the General Care & Cleaning section in this Use & Care Manual. TO REMOVEAND REPLACE OVEN DOOR Open the door to the fully opened position. -
Page 49: Ovenlight
Care & Cieanin OVENLIGHT An interior oven light will turn on automatically when the oven door is opened. The oven light may be turned on when the door is closed by using the oven light switch located on the control panel. The lamp is covered with a glass shield. - Page 50 General Care Cleaning COOKTOPCLEAN)NGAND MA(NTENANCE Consistentand proper cleaning is essential to maintaining your ceramic glass cooktop Priorto us! ng your cooktop for the first time, apply the recommended Cleaning Creme to the ceramic surface. A sample of that cleaning creme is supplied with your cooktop and it is available in most hardware stores.
-
Page 51: Cleaningrecommendations F Or The Ceramicglasscooktop
General Care & Cleanin CLEANING RECOMMENDATIONS FORTHECE MIC GLASS COOKTOP(co.TINuED/ CAUTION Damageto the ceramicglass cooktopmay occurif you use scrubpad. Plastic or foods with a high sugar content: These types of soils must be removed immediately if spilled or melted onto the ceramic cooktop surface. -
Page 52: Bakingproblems
Solutions to Common Pro Baking Problems For best cooking results pre-heat the oven when baking cookies, breads, cakes, pies or pastries, etc. There is no need to preheat the oven for roasting meats or baking casseroles. The cooking times and temperatures needed to bake a product may vary... - Page 53 olutions to Common (eros Before calling for service, review this list. it may save you both time and expense. This list includes common experiences that are not the result of defec_ve workmanship or material in your cooktop. OVEN CONTROLBEEPSAND D)SPLAYSAN "F" ERRORCODE •...
- Page 54 olutions to Common Pro SELFoCLEAN(NG CYCLE DOES NOTWORK • Make sure the oven door is closed. , Make sure you have removed the oven racks and the oven rack supports from the oven. o Controls not set properly. Follow instructions under "Using the Self-Clean Feature". OVEN S_,IOKES EXCESS(VELY DUR(NGBRO)UNG •...
- Page 55 olutions to Common Problems SURFACEELEMENTDOESNOT HEAT No power to appliance. Check/reset breaker or replace fuse. If the problem is a circuit overload, or improper connection of the armored cable supplied with the appliance, have this situation corrected by a qualified electrician. o Too tow heat setting.
-
Page 56: Ceramicglasscooktop
olutions to Common Pro lerns BROWNSTREAKSAND SPECKSON CERAMICGLASSCOOKTOP SURFACE ° Boilovers have cooked onto surface+ Use razor blade scraper to remove soil. See instructions under General Care & Cleaning. + Cleaning materials not recommended for ceramic-glass cooktop have been used. Use recommended cleaners and cleaning method. - Page 57 Your appliance is covered by a one year limited warranty. For one year from your original date of purchase, Electrolux will repair or replace any parts of this appliance that prove to be defective in materials or workmanship when such appliance is installed, used, and maintained in accordance with the provided instructions.
-
Page 58: Notes
Notes... - Page 59 otes...