Table of Contents
Advertisement
Advertisement
Table of Contents

Related Manuals for Electrolux EW30DS65GB5


Summary of Contents for Electrolux EW30DS65GB5
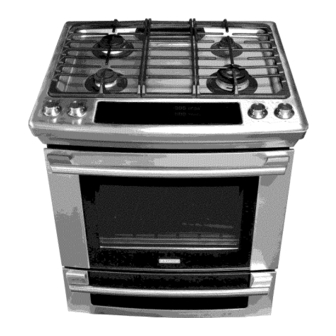
- Page 1 Care Guide Slide--1 _ Ravage...
-
Page 2: Findinginformation
Finding Information MAKEA RECORDFORFUTURE Brand Purchase Date Model Number Serial Number MODELAND SERmAL NUMBER LOCATION For toll-free telephone support in the U.S. and Canada: 1-877-4ELECTROLUX (1-877-435-3287) For online support and internet product information: www.electroluxappliances.com @2010 Etectrolux Home Products, Inc. Post Office Box 212378, Augusta, Georgia 30917, USA All rights reserved. -
Page 3: Table Of Contents
Fin ing information TABLE OF CONTENTS FindingInformation ..........2 SlowCook ............Makea Recordfor FutureUse......2 Dehydrating ............. Modeland Serial NumberLocation....2 Defrosting ............Questions? ............BreadProofing..........Tableof Contents ..........PerfectTurkey ..........32 Temperature Probe.......... 33 Safety..............Multi Stage..........34-35 ImportantSafetyInstructions ......4-7 Electronic Control Settings ....... -
Page 4: Safety
Safety MPORTANT SAFETY NSTRUCT ONS Please read all safety instructions before using your new Electrolux range. if the information in this manual is not • All ranges can tip. followed exactly, a fire or explosion may result causing • Injury to persons could... - Page 5 Safety Stepping, leaning or sitting on the door or drawer of this appliance can result in serious injuries and may also cause damage to the appliance. Do not allow children to climb or play around the appliance. The weight of a child on an open door may cause the appliance to tip, resulting in serious burns or other injury.
-
Page 6: Settingthe Clock- Timeof Day
Safety Electronic controllers can be damaged by cold temperatures. When you use your appliance for the first time, or if it has not been used for a long period of time, make sure that it has been exposed to a temperature above 0°C/32°F for at least 3 hours before connecting it to the power supply. - Page 7 Safety IMPORTANTINSTRUCTIONS FOR USINGYOUR OVEN • Use Care When Opening Door or Drawer--Stand to the side of the appliance when opening the door of a hot oven. Let hot air or steam escape before you remove or replace food in the oven/warmer drawer. o Keep Oven Vent Ducts Unobstructed.
-
Page 8: Featureoverview
Feature Overview YOUR SUDEqN RANGE PORCELAIN GRATES DEEP DRAWN COOKTOP TOUCHACTIVATED GLASS CONTROL PANEL LARGE METAL HANDLE CURVED GLASS OVEN DOOR WARMER DRAWER DOOR WINDOW GLASS SIMMER BURNER POWER BURNER 5 000 BTU 14 000 BTU DUAL FLAME REGULAR BURNER BURNER 9 500 BTU 18 000 BTU... - Page 9 Feature Overview YOUR SL(DEo(NRANGE OVEN DOOR LATCH OVEN VENT BROILING ELEMENT RACK SUPPORT SLIDEABLE OVEN RACKS CONVECTION FAN OVEN LIGHT RACK SUPPORT BRACKETS LOWER OVEN RACK BROILER PAN BROILER PAN GRID CONVECTION ROASTING RACK...
-
Page 10: Ovenracksupportsand Ovenvents
Feature Overview RACKSUPPORTS & OVENVENTS OVEN Installing Oven Rack Supports ALWAYS INSTALL OVEN RACK SUPPORT BEFORE TURNING ON THE OVEN (WHEN THE OVEN IS COOL). To install oven rack support, insert the supports by pushing them downward into the two brackets on each side of the oven interior, as shown below. -
Page 11: Removingand Replacingovenracks
Feature Overview REMOVINGAND REPLACING OVEN RACKS Removing Sliding Oven Racks 1. With the rack in its closed position; grasp the rack and the sliders at once. 2. Slightly lift the rack and sliders and pull it to clear the first bracket. 3. -
Page 12: Ovencontrolpadfunctions
Feature Overview OVEN CONTROL PAD FUNCTIONS Light Pad- Used to turn the oven light on and off. Bake Pad- Used to enter the normal baking mode temperature. Broil Pad- Used to select the variable broil mode. Convection Bake Pad- Used to select the convection baking mode. Convection Roast Pad- Used to select the convection roasting mode. - Page 13 Feature Overview OVEN CONTROL PAD FUNCTIONS (CONT NUEm Keep Warm Pad- Used to select the keep warm mode. Slow Cook Pad- Used to select the slow cook mode, Clean Pad- Used to select the self-cleaning mode. Upper Oven Pad- Used to activate the upper oven for cooking operation, My Favorite 2 Pad- Used to save or recall the favorite 2 cooking mode, My Favorite 3 Pad- Used to save or recall the favorite 3 cooking mode, Lite Pad- Used to start a 2 hours self-clean cycle,...
-
Page 14: Getting Started
Gettin Started T NG CLOCK AT POWER UP When the unit is first plugged in, or when the power supply to the range has been interrupted, the timer in the display will flash with "12:00". The clock cannot be set when the oven is on. -
Page 15: Ovenlight
_i)iiiiil)iiiiiiii_i!!i,_ _i_i_i_F_!ii!_i!_i_i_ iiiii!:)i!i!ii!_!i_i!iiiii!iiiii),!iiil))k_ !ili)i):)i):)i):)i_i_'_"'%)i!i)_)i!i) Getting Started Yourapplianceincludes"theater"styleoven lightingfeaturethatgraduallylightsboth theupperandloweroveninteriorstofullbrightness. Theupperovenisequippedwith2 halogen lights and the lower oven is equipped with 1 incandescent light. The oven lights _=,f will turn on automaticallywhen the oven dooris opened. The oven light may be turned on when the door is closed by using the oven light pad located on the control panel. -
Page 16: Surface Cooking
Surface Cookin LOCATIONS OF THE BURNERS The cooktop is equipped with different sized burners. The surface burners are located on the cooktop as follows (See Figure): a 5 000 BTU (natural gas) burner located at the right rear position; a 18 000 BTU (natural gas) burner located at the right front position;... -
Page 17: Surfacecookingutensils
urface Cookin SURFACECOOK(NGUTENS(LS *GOOD POOR • Curved and warped pan bottoms. , iiiiiii! i :i i !ii i !i:!i ii !iii )i! i )ii ¸iiii ii!iiill • Pan overhangs unit by more than o Fiat bottom and straight sides. 2.5 cm (1"). •... -
Page 18: Settingsurfacecontrols
Surface Cookin SETTINGSURFACECONTROLS Your cooktop may be equipped with any combination of the following burners: Simmer Burner: best used for simmering delicate sauces, etc. Standard Burner: used for most all surface cooking needs. Large Burner: best used when bringing large quantities of liquid to temperature and when preparing larger quantities of food. -
Page 19: Usingthe Griddle
urface Cookin US(NGTHE GR)DDLE [] m The griddle is intended for direct food cooking and can be used on both sides. Do not use pans or other cookware on the griddle. Doing so could damage the finish. With the grate in position over the burner, set the griddle on top of the grate positioning the notches in the griddle over the grate fingers (refer to figures 1... -
Page 20: Setting The Loweroven
Setting the Lower Oven LOWER OVEN OPERATION The lower oven provides two basic modes, cooking and warming. The lower oven is ideal for cooking foods such as pizza, casseroles, baked potatoes and frozen convenience foods. Use the keep warm feature to keep hot cooked foods at serving temperature. The lower oven can only be used with some cooking modes;... -
Page 21: Cooking Modes
Cookin Modes BAKING This mode is best used for your standard recipes. The hidden bake element is used to heat the air and maintain temperature. The temperature probe can be used in this cooking mode. The upper oven can be programmed to bake at any temperature from 170°F to 550°F with a default temperature of 350°F. -
Page 22: Cooktime
odes Cooking Cook Time allows the oven to be set to cook for a set length of time and shut off automatically. The time remaining will always be shown in the timer section of the display. The oven will shut off and will beep when the countdown is finished. This feature can be used with Bake, Convection Bake, Convection Roast, Slow Cook, Keep Warm, Defrost, Bread Proof, Dehydrate and Perfect Turkey cooking modes. -
Page 23: Broiling
Cookin Modes BRO UNG This mode is best for meats, fish and poultry up to 1" thick. Broiling is a method of cooking tender cuts of meat by direct heat under the broil element of the oven. The high heat cooks quickly and gives a rich, brown outer appearance. -
Page 24: Convection Baking
odes Cooking CONV T ON BAKmN This mode of cooking enables you to obtain the best Convection Bake culinary results when baking with multiple pans and Air Flow racks. Multiple rack baking may slightly increase cook time for some foods but the overall result is time saved. Most foods cooked in a standard oven will cook faster and more evenly with Convection Bake. -
Page 25: Convectionconvert
Cookin Modes CONVECTIONCONVERT The Convection Convert pad is used to automatically convert a standard baking recipe for convection baking. When set properly, this feature is designed to display the actual converted (reduced) temperature in the display. Convection Convert may ONLY be used with a Convection Bake cooking mode. -
Page 26: Convection Roasting
odes Cooking CONV T)ONROAST)NG This mode is best for cooking tender cuts of beef, lamb, pork and poultry. Use this mode when cooking speed is desired. The Convection Roasting gently browns the exterior and seals in the juices. Convection roasting uses the hidden bake element, the hidden convection element, the broil element and a fan to circulate the oven's heat evenly and continuously within the oven. -
Page 27: Convection Broiling
Cookin Modes CONVECTIONBROI.U.NG Use this mode for thicker cuts of meat, fish and poultry. The Convection Broiling gently browns the exterior and seals in the juices. Convection broiling uses the broil element and a fan to ......17.,;I circulate the oven s heat evenly and continuously within the oven. The temperature probe cannot be used in this cooking mode. -
Page 28: Keepwarm
odes Cooking KEEP WARM This mode is best for keeping oven baked foods warm for serving after cooking has finished. The Keep Warm feature uses the hidden bake element to maintain the temperature within the oven. The Keep Warm feature may be used with Multi-Stage (refer to its section for directions) if you wish to have the Keep Warm feature turn ON automatically when cooking has finished. -
Page 29: Slowcook
Cookin Modes SLOWCOOK This mode may be used to cook foods more slowly, at lower oven temperatures and provide cooking results much the same way as a Slow Cooker or Crock-Pot. The Slow Cook feature is ideal for roasting beef, pork & poultry. Slow Cooking meats may result in the exterior of meats becoming dark but not burnt. -
Page 30: Dehydrating
odes Cooking DEHYDRATING This mode dries foods with heat from the bake and the convection element. The heat is circulated throughout the oven by the convection fan. Dehydrating is used to dry and/or preserve foods such as fruits, meats, vegetables and herbs. This mode holds an optimum low temperature while circulating the heated air to slowly remove moisture. -
Page 31: Breadproofing
Cookin Modes BREADPROOF(NG Proofing bread prepares the dough for baking by activating the yeast. This feature is ideal for proofing, or rising bread dough. The oven can be programmed for Bread Proofing at any temperature between 85°F to 100°F with a default temperature of 100°F. The temperature visual display is not available for this function. -
Page 32: Perfectturkey
odes Cooking PERFECTTURKEY This mode uses the temperature probe to control precisely the cooking of a perfect turkey. The convection system gently browns the turkey's exterior and seals in the juices. The temperature probe is required with this cooking mode (read its section on next page for more details). -
Page 33: Temperatureprobe
Cookin Modes TEMPERATUREPROBE For many foods, especially roasts and poultry, testing the internal temperature is the best method to insure properly cooked food. The Temperature Probe gets the exact temperature you desire without having to guess. This feature can be used with Bake, Convection Bake, Convection Roast and Perfect Turkey cooking modes. -
Page 34: Multi Stage
odes Cooking MULT)STAGE This feature enables you to perform sequential cooking at the touch of a button. Its purpose is to program a queue of up to three cooking modes with individual cooking time and temperatures in a sequence. This feature can be used with most cooking modes; Baking, Broiling, Convection Baking, Convection Roasting, Convection Broiling, Keep Warm and Bread Proof. -
Page 35: Multi Stage
Cookin Modes STAGE _ULT( (CONT)NUED) Stage 3 14. Press KEEP WARM [_. "170" wil( start flashing in the display prompting to enter a temperature. 15. Enter a temperature using the numeric pads (0_ to _. 16. Press START <_. "00:00" will start flashing in the display prompting to enter a cook time. -
Page 36: Electronic Control Settings
Electronic Control Settings USER PREFERENCES The User Preferences menu includes all user defined options. This feature enables you to control the various options of the electronic controls. This menu features the Time of Day, Celsius or Fahrenheit display mode, Continuous Bake or 12 Hour Energy Saving modes, Clock display or No-Clock display, 12 Hours Time of Day or 24 Hours Time of Day, Audio Control, and Adjusting the oven temperature. -
Page 37: Settingclockdisplay- On Or Off
Electronic Control Settings USER PREFERENCES (CONTINUED) SETTINGCLOCK D_SPLAY- ON OR OFF The oven control can be programmed to display the time of day or not. The oven has been preset at the factory to display the time of day. Changing clock display between ON and OFF: Press USER PREF _:_,,,,) u ntil you get to the CLO on menu page. -
Page 38: Settingtemperature Display- Fahrenheit Or Celsius
Electronic Control Settings USER PREFERENCES (CONT)NUED) SETT(NGTEMPERATURE D)SPLAY _ FAHRENHE)T OR CELS)U8 The oven control can be programmed to display temperatures in Fahrenheit or Celsius. The oven has been preset at the factory to display in Fahrenheit. To change display from Fahrenheit to Celsius or Celsius to Fahrenheit: Press USER PREF _,_ until you get to the F-C F menu page. -
Page 39: Oven Controls
Oven Controls MY FAVOR)T The Favorites settings allows you to save your most frequently used or most complex cooking sequences. This feature will save the cooking mode, the target temperature and the cooktime (if any). The oven can recall up to six cooking sequences from its internal memory, three for each oven, which are easily accessible from a one touch button. -
Page 40: Sabbathfeature
Oven Controls SABBATH FEATURE(FOR USE ON THE JEW(SH SABBATH & HOLIDAYS) The HI h_and LO _opads are used to set the Sabbath feature. The Sabbath feature may only be used with the BAKE [] pad. The oven temperature may be set higher or lower after setting the Sabbath feature (the oven temperature adjustment feature should be used only during Jewish Holidays), however the display will not visibly show or provide any audible tones indicating whether the change occurred correctly. -
Page 41: Care & Cleaning
Cleanin Care USINGTHE SELF-CLEANFEATURE Adhere to the Following Cleaning Precautions: • Allow the oven to cool before cleaning. • Wear rubber gloves when cleaning any exterior parts of the oven manually. During the self-cleaning cycle, the outside of the oven can become very hot to the touch. DO NOT leave small children unattended near the appliance. -
Page 42: Startingthe Self-Cleancycle
Cleanin STARTING SELF-CLEANCYCLE Aself-cleaning oven cleans itself with high temperatures (well above cooking temperatures) which eliminate soil completely or reduce it to a fine powdered ash you can whisk away with damp cloth. If you are planning to use the oven directly after a self-clean cycle remember to allow time for the oven to cool down and the oven door to unlock. -
Page 43: Generalcleaning
Cleanin Care GENERAL CLEANmNG Cleaning Various Parts of Your appliance Before cleaning any part ofthe appliance, be sure all controls are turned OFF and the appliance is COOL. REMOVE SPILLOVERSAND HEAVY SOILINGAS SOONAS POSSIBLE. REGULAR CLEANINGS WILL REDUCE THE NUMBER OF MAJOR CLEANINGS LATER... -
Page 44: Careand Cleaningof Stainlesssteel
Cleanin CARE AND CLEANmNG OF STAmNLESS STEEL Special care and cleaning are required for maintaining the appearance of stainless parts. Please refer to the table provided at the beginning of the General Care & Cleaning section in this Use & Care Manual. TO REMOVEAND REPLACE OVEN DOOR Open the door to the fully opened position. -
Page 45: Ovenlight
Cleanin Care OVEN UGHT An interior oven light will turn on automatically when the oven door is opened. The oven light may be turned on when the door is closed by using the oven light switch located on the control panel. The lamp is covered with a glass shield. -
Page 46: Burnercapsand Burnerheads
General Care Cleaning CLEANING COOKTO_ BURNER GRATES, BURNER CAPS AND BURNER HEADS [] _ [] _ [] [] _ [] _ [] _ [] [] _ [] [] [] [] The cooktopisdesignedtomake cleaning easier. B ecause thegas burneraresealed, cleanupsareeasy when spillovers arecleanedup immediately. Cleaning the cooktop If a spill occurs on or in the recessed or countered areas, blot up spill with an absorbent... - Page 47 General Care Cleanin BURNER CLEANING COOKTO BURNER GRATES, CAPS AND BURNER HEADS [] [] [] [] [] [] [] [] [] [] [] [] [] [] [] [] Burner Caps Should you ever need to remove the burner caps for cleaning lift the burner cap off the burner head.
-
Page 48: Bakingproblems
Solu ions to Common Problems Baking Problems For best cooking results pre-heat the oven when baking cookies, breads, cakes, pies or pastries, etc. There is no need to preheat the oven for roasting meats or baking casseroles. The cooking times and temperatures needed to bake a product may vary slightly... -
Page 49: Solutions To Commonproblems
Solutions to Common Problems Before ca[ling for service, review this list. it may save you both time and expense. This list includes common experiences that are not the resuR of defective workmanship or material in your cooktop. • Electronic control has detected a fault condition Push CANCEL pad to clear the display and stop the display from beeping... -
Page 50: Solutions
Solutions to Common Problems SOiL NOT COMPLETELYREMOVEDAFTER SELF-CLEANINGCYCLE _S • Failure to clean bottom, from top of oven, frame of oven or door area outside oven seal. These areas are not in the self-cleaning area, but get hot enough to burn on residue. Clean these areas before the self-cleaning cycle is started. -
Page 51: Warranty Information
14. Damages to the finish of appliance or home incurred during transportation or installation, including but not limited to floors, cabinets, walls, etc. 15. Damages caused by:services performed by unauthorized service companies; use of parts other than genuine Electrolux partsor parts obtained from persons other than authorized service companies;... - Page 52 ii ii ii ii ii ii ii ii ii ii ii ii ii ii ii ii ii ii ii ii ii ii ii ii ii ii ii ii ii ii ii ii ii ii ii ii il...