Table of Contents
Advertisement
Available languages
Available languages
Quick Links
Installation
&
Operation
Guide
£PA
DOE
(D40A / D50A/ D65A)
DEHUMIDIFIER
MODELS
115 Volts • D30A. D40A • D50A • D65A
Register Your Dehumidifier
Model information can be found on the name plate on the front of the
unit behind the condensate bucket.
To register your dehumidifier, complete and mail the enclosed
registration card, or register on-line at www.friedrich, com (USA only).
For your future convenience, record the model information here.
MODEL NUMBER
SERIAL NUMBER
PURCHASE DATE
920-154-00
(01/03)
Advertisement
Chapters
Table of Contents

Related Manuals for Friedrich D30A


Summary of Contents for Friedrich D30A
- Page 1 Model information can be found on the name plate on the front of the unit behind the condensate bucket. To register your dehumidifier, complete and mail the enclosed registration card, or register on-line at www.friedrich, com (USA only). For your future convenience, record the model information here. MODEL NUMBER...
-
Page 2: Table Of Contents
FOR YOUR RECORDS ........ 2 AUTOMATIC SHUT OFF ......9 READ THIS MANUAL ........2 REMOVING AND EMPTYING THE WATER BUCKET ........9 PRECAUTION ..........MAINTENANCE .......... Safety Precautions ........Grille and case ........ELECTRICAL REQUIREMENTS ....5 Air filter ........... OPERATION .......... -
Page 3: Safety Precautions
READ ALL INSTRUCTION BEFORE USING. • To prevent injury to the user or other people and property damage, the following instructions must be followed. • Incorrect operation due to ignoring instructions will cause harm or damage; the seriousness is classified by the following indications. - Page 4 • It may damage the dehumidifier orcause o ther damage orinjury. • It may cause e lectrical shock. • Itshould w ithstand around • Low temperatures could cause 90Ibs(40kg) weight. coils tofrost a ndunit m ay not start. •Thedehumidifier must b e •...
-
Page 5: Electrical Requirements
OBSERVE ALL LOCAL CODES AND ORDINANCES. DO NOT, UNDER ANY CIRCUMSTANCES, REMOVETHEPOWERSUPPLYCORD GROUND PRONG. ELECTRICAL GROUND IS REQUIRED ON THIS APPLIANCE. A 115-volt 60 Hz, AC only, 15A fused and Electrical Shock Hazard properly grounded electrical supply is required. Plug into a grounded 3 prong outlet. A time delay fuse or time delay circuit breaker Do not remove ground prong. -
Page 6: Operation
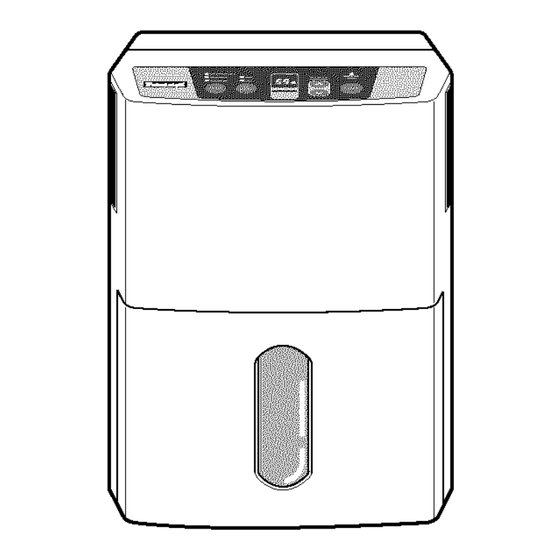
FEATURES To reduce the risk of fire, electric shock, or injury to persons, read the important SAFETY instructions section before operating this appliance. 1. Control panel 2. Front grille 3. Power cord 4. Cabinet 5. Air filter 6. Water bucket IMPORTANT: When unit is first plugged in or after a power outage, there will be a two minute... -
Page 7: Control Panel
CONTROL PANEL Your dehumidifier control panel contains a Bucket Full indicator, a Humidity indicator, a Power Control, Humidity Control, Fan Speed Control and Timer Control. Bucket Full indicator ---This light glows when the water bucket is full and needs to be emptied. Power --- Operation starts when this button is pressed and stops when the button is pressed again. -
Page 8: Installing Your Dehumidifier
• Install the dehumidifier on a level floor strong enough to support the unit with a full bucket of water. • For best performance, allow at least 12-18 inches of 12~18" air space on all sides of the unit for good air circulation. -
Page 9: Automatic Shut Off
When the bucket is full, or when the bucket is not in the proper position> the Bucket Full light turns on and the unit automatically shuts off. Also> when bucket is out of position>the unit will beep 3 times. The bucket must be replaced in the proper position for the dehumidifier to work. -
Page 10: Maintenance
GRILLE AND CASE To clean the case: Use water and a mild detergent. Do not use bleach or an abrasive cleaner. To clean the grille: Use a vacuum with an attachment or brush. AIR FILTER The air filter is on the back of the dehumidifier. It should be checked and cleaned at least every 2 weeks or more often if necessary. -
Page 11: Troubleshooting
Dehumidifier The dehumidifier power • Make sure the dehumidifier plug is pushed does not start cord is unplugged completely into the outlet. The fuse is blown or circuit • Check the house fuse or circuit breaker box breaker is tripped, and replace the fuse or reset the breaker. - Page 12 FRIEDRICH will pay a labor a_iowance and parts necessary to repair the Sealed Refrigeration System; PROVIDED FRIEDRICH will not pay the cost of diagnosis of the problem, removal, freight charges and transportation...
-
Page 13: Franqais
I appareil derri r eler servoir d econdensation. Pour e nregistrer votre d shumidificateur, compl tezetexpdiezlacarte d enregistrement ci-jointe, ouenregistrez-vous enligne surlesitewww.friedrich.com (uniquement Etats- Unis). P our v otre commodit, enregistrez icilesinformations surlemodle. NUMI_RO DU MOD#LE NUMC:RO DE SC:RIE... - Page 14 ARRC:TAUTOMATIQUE .........21 VOS DOSSIERS ..........14 LIRE CE MANUEL...........14 RETRAIT ET VIDANGE DU RECIPIENT D'EAU........21 PRECAUTIONS..........14 ENTRETIEN ............22 Mesures de s_curit6........15 Grille et boftier ..........22 SPECIFICATIONS ELECTRIQUES ....17 Filtre a air ...........22 FONCTIONNEMENT........18 Nettoyage intr_rieur de I'appareil....22 Caracteristiques .........18 Nettoyage g_n_ral........22 Tableau de commande ......19 Nettoyage du r_cipient d'eau .....22 INSTALLATIONDU DC:SHUMIDIFICATEUR..20...
- Page 15 LISEZ TOUTES LES INSTRUCTIONS AVANT UTILISATION. • Les instructions suivantes doivent ¢tre respectees afin de ne pas risquer de blesser I'utilisateur, ou d'autres personnes, ou d'endommager des biens. • Un mauvais fonctionnement de a la non-observation de ces instructions est susceptible de provoquer des prejudices et des dommages dont la gravite est _valu_e par les indications suivantes.
- Page 16 ATTENTION • Le deshumidificateur risque d'etre endommage ou de provoquer des blessures ou des dommages corporels. • Risque de choc _lectrique. • IIs doivent pouvoir resister _ 40 • Les basses temp6ratures sont kg (90 Ibs) environ. susceptibles de provoquer le givrage des bobines et d'empecher le d_marrage de rappareiL...
- Page 17 OBSERVER TOUS LES CODES ET REGLEMENTS LOCAUX. EN AUCUNE CIRCONSTANCE, NE PAS ENLEVER LA BROCHE DE MISE .,_ LA TERRE DE LA FICHE DU CORDON D'ALIMENTATION ELECTRIQUE. UNE MISE A LA TERRE F:LECTRIQUE EST REQUISE POUR CET APPAREIL. Risque de choc _lectrique. Une alimentation etectrique de 115 V, 60 Hz, Brancher dans une prisede courant mise a la CA seulement, avec fusible de 15 A et une...
- Page 18 FONCTIONS Pour reduire les dsques d'incendie, de choc etectrique ou de blessures aux personnes, lire la section des instructions importantes de S¢:CURIT¢: avant de faire fonctionner cet appareil. 1. PANNEAU DE CONTROLE 2. GRILLE AVANT 3. CABLE D'ALIMENTATION 4. CHASSIS 5.
- Page 19 PANNEAU DE CONTR( LE Le panneaude contrSledu d6shumidificateurcontient un indicateurde r6servoir plein,un indicateurd'humidit6,un contr61e d'alimentation,un contrSled'humidit_,un contrSlede vitesse du ventilateuret un contr61e de minuterie. Indicateurde r_servoir plein - Le voyants'allumequandle reservoir d'eauest pleinet dolt_trevid6. Alimentation - L'appareil s e meten marche quandvousappuyez surce boutonet s'arr_tequandvousappuyezde nouveausurce bouton.
- Page 20 • Installerle deshumidificateur sur un plancher d'aplomb assez fort pour supporter le 12 a 18 po deshumidificateur avec un r6cipient rempli d'eau. • Pour obtenir le meilleur rendement, laisser au moins de 12 a 18 pouces d'espace de tousles c6tes de I'appareil pour une bonne circulation de I'air.
- Page 21 Led6shumidificateur se metautomatiquement horscircuit I orsque ler6cipient estpleinous'ilest enleve oumalplac& Le rdcipient dolt _tre placd dans la position appropri_e afin que I'appareil fonctionne. voyant s'allume et le d_shumidificateur ne fonctionnera pas si le r_cipient est mal plac& Le r6cipient d'eau peut _tre vidange seion l'une des trois fa_ons: 2.
- Page 22 GRILLE ET BO|TIER Pour nettoyer la caisse: Utiliser de I'eau et un d_tergent cloux. Ne pas utiliser de I'eau de javelle ou un nettoyant abrasif. Pour nettoyer la grille: Utiliser un aspirateur avec un accessoire ou un pinceau. FILTRE .A, A IR Le filtre a air est _tI'arri_re du d_shumidiflcateur.
- Page 23 Le d_shumidificateur Le cordond'alimentation • S'assurer que la fche du nese met pas en _lectrique de rhumidificateur d_shumidificateur est pouss_e marche n'est pas branch,, compl_tement dans la prise de courant. Le fusible est grill_, ou le • Verifier la bo?tedu fusible et du disjoncteur disjoncteur est ouvert, de la maison, et remplacer le fusible, ou r_gler de nouveau le disjoncteur.
- Page 24 FRtEDRICH est d_fectueux & cause d'un d_faut de main d'oeuvre ou de mat_riau dans les 60 mois& compfar de la date d'achat initial, FRIEDRICH paiera une allocation pour les frais de main d'oeuvre et les pi_ces n6cessaires pour r_parer le sysfame de r_frig_ration _tanche. FRIEDRICH...
-
Page 25: Espa_Iol
La informaci n sobreel modeloseencuentra en la etiquetaidentificativa en la partefrontalde la unidad,detrs del recipiente de recogida de condensado. Pararegistrar su deshumidificador, s rvaserellenary enviarporcorreola tarjeta de registroadjunta,o regstreseen I neaen www.friedrich.com (s IoEE.UU.). Parasu usofuturo,anotela informaci n sobreel modeloaqu. NOMERO... -
Page 26: Para Guardar
APAGADO AUTOMATICO ......33 PARA GUARDAR ......... 26 REMOCION Y VACIADO DEL LEER ESTE MANUAL ........26 RECIPIENTE DE AGUA ....... 33 PRECAUCION ..........26 MANTENIMIENTO ........34 Precauciones de Seguridad ..... 27 La rejilla y el gabinete ......34 REQUERIMIENTOS ELECTRICOS .... -
Page 27: Precaucion
Lea todas las instrucciones antes del uso • Para prevenir lesiones al usuario u otras personas y dafios a la propiedad, deben de seguir las siguientes instrucciones. • La operaci6n incorrectadebido alas instrucciones ignoradascausara perjuicioo daSo la seriedad esta clasificada por medio de las siguientes indicaciones. I Z_ ADVERTENCIA Este simbolo indica la posibilidad de muerte o lesiones serias... - Page 28 PRECAUCI • Puede daSarse el deshumedecedor o causar otro daSo o lesi6n. • Puede causar corto el_ctrico. • Deberia resistir un peso acerca • Las temperaturas bajas podria de 90 libras. (40Kilos) causar que se congele las bobinas y la unidad puede no arrancar.
-
Page 29: Requerimientos Electricos
RESPETE TODOS LOS C6DIGOS REGLAMENTOS. BAJO NINGUNA CIRCUNSTANCIA CORTE, QUITE O EVITE EL USO DE LA CONEXI(_N A TIERRA DE ESTA CLAVIJA. ESTE APARATO NECESITA SER CONECTADO A TIERRA. Se requiere una alimentaci6n electrica CA, adecuadamente conectada a tierra con un Peligrode choque el6ctrico fusible de 15 A, de 60 Hz y de 115 V. -
Page 30: Funcionamiento
CARACTERiSTICAS Para reducir et riesgo de incendio, choque et6ctrico o daSos corporales, lea la secci6n de importantes instrucciones de SEGURIDAD antes de porter a funcionar este aparato. 1. Placa decorativa 2. Rejilla frente 3. Cable alimentaci6n 4. Armario 5. Filtro de aire 6. -
Page 31: Panelde Control
PANELDE CONTROL El panelde controldel deshumidificador contieneun indicador d e tanqueIleno,un indicador de humedad, u n controlde encendido, c ontrolde humedad, c ontrolde velocidad del ventilador y controldel temperizador. Indicador de tanque Ileno - Esteindicadorseiluminacuandoel tanquede aguaesta Ilenoy debevaciarse. Encendido- Eldeshumidificador seponeenfuncionamiente cuando sepulsaestebot6ny separacuando sepulsadenuevo. Control de humedad- Controla la humedad de la habitaci6n •... -
Page 32: Instalacion Del Deshumidificador
• Instale el deshumidificador en un piso nivelado lo suficientemente s61ido como para soportar la unidad con el recipiente lteno de agua. • Para lograr un m_ximo rendimiento, deje un espacio tibre de 12 a 18 pulgada en todo el espacio que circunde al aparato con objeto de mantener una buena circulaci6n de aire. -
Page 33: Apagado Automatico
Cuando etcuboestarepleto, o cuando el cubenoestaenlaposicion apropiada, etCuboRepleto ligeroprende y launidad apagaautomaticamente. Tambien, cuando cuboesfueradeposicion, l aunidad hacepippip3 times. Laeubetadebeserre-ubicado en la posiei6n apropiada para que el deshumedeeedor funcione. La luz ser_ encendida y el deshumedecedor no funcionar_ si la cubeta no est_ en la posicibn apropiada. -
Page 34: Mantenimiento
LA REJILLA Y EL GABINETE Para limpiar el gabinete: Use agua y un detergente suave. No use blanqueador ni limpiadores abrasivos. Para limpiar la rejilla: Use una aspiradora con un cono o cepitlo. FILTRO DE AIRE El fiitro de aire se encuentra en la parte posterior del deshumidificador. -
Page 35: Solucion De Problemas
El deshumidificadorno El cable de alimentacibndel • Cerci6rese de que la clavija del cable de arranca. deshumidificador estb desenchufado, alimentaci6n del deshumidificador est6 bien puesta en la conexi6n de pared. El fusible estbquemadoo el • Revise la caja del disyuntor del circuito del disyuntordel circuitoestb abierto, fusible y cambie el fusible o vuelva a cerrar el disyuntor. - Page 36 12 meses siguientes a ta fecha original de compra, FRIEDRICH reparar_ el producto sin costo alguno, siempre y cuando que [a unidad est_ razonablemente accesible para el servicio. Todo costo adicionat ocasionado per remover unidades inaccesibIes y/o costos per millaje reiacionados con el viaje de service, los cuales excedan und distancia de 25 mittas (una via), correr_n per cuenta del propietario.
- Page 37 - 37-...
- Page 38 - 38-...
- Page 39 - 39-...
- Page 40 FRIEDRICH AIR CONDITIONING Visit our web site at www friedrich corn Post Office Box 1540 • 4200 N Pan Am Expressway • San Antonio, Texas 78295-1540 • (210) 357-4400 • FAX (210) 357-4480 P/NO: 3828A20315C...
Need help?
Do you have a question about the D30A and is the answer not in the manual?
Questions and answers