Table of Contents
Advertisement
Available languages
Available languages
GermGuardian
TM
h_/gia:60
me
Complete Air Cleansin9 System
USE& CAREiNSTRUCTIONS
Engfish Manual...................................................... E -1
French Manual ...................................................... F -1
Spanish Manual.................................................... S -1
MODELNO. AC-6800
2 Year Limited Warranty
www.germouardian.cem
1-866-603-5900
Date Purchased
month
year
E-1
Advertisement
Chapters
Table of Contents

Related Manuals for Germ Guardian Hygia 6.0 AC-6000


Summary of Contents for Germ Guardian Hygia 6.0 AC-6000
- Page 1 GermGuardian h_/gia:60 Complete Air Cleansin9 System USE& CAREiNSTRUCTIONS Engfish Manual............E -1 French Manual ............F -1 Spanish Manual............ S -1 MODELNO. AC-6800 2 Year Limited Warranty Date Purchased month www.germouardian.cem 1-866-603-5900 year...
-
Page 2: Table Of Contents
SAFETY PRECAUTIONS Hygia6.0 CompleteAir CleansingSystem Model Number:AC-6OOO Please read the following precautions carefully before operating the Hygia 6.0 Complete Air Cleansing System. Failure to do so could result CONTENTS in a fire hazard, electrical shock, bodily injury or damage to the unit. •... -
Page 3: Identificationof Parts
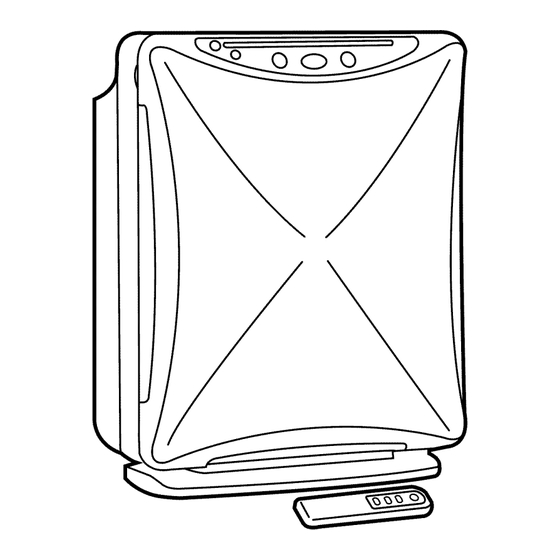
10/9/06 4:44 Page iDENTIFICATION OF PARTS IDEHTiFICATION OF PARTS(cont.) Control P anel Main Unit 1. FrontCover A. ionizer indicationLight 2. Control Panel B. Auto Mode indicationLight 3. Pre-Fiiter C. Fan Speed indicationLights 4. Charcoal Filter D. Home Dust indicationLights 5. HEPAFilter E. -
Page 4: Installation
iNSTALLATiON IDEHTIFICATION OF PARTS(cont.) RemoteControl The filters can be found packaged inside the air purifier. installingthe Filters 1. Power'0n/0ff' Button 2. Fan 'Speed'Button 1. Unplug the Hygia 6.0 from the electrical outlet. 2. Place the unit fiat, with the front cover pointing upwards. 3. -
Page 5: Operation
iNSTALLATION ( cont.) INSTALLATION ( cont.) 4. Remove the filters from the air purifier and discard the plastic bags. Installing batteries into the remote control. 5. Fill in the installation date on the "Filter Replacement Reminder" sticker 1. Press and slide out the back cover. located on the HEPA filter box. - Page 6 OPERATION (cont.) OPERATION (cont.) o:. The unit is preset to automatic operation mode. Each time the 'Timer' button is depressed, it switches the run time in a. The green 'Clean Air' indication light in the center of the 'Home the following sequence: Dust/Micro Dust' indication light region will be turned on.
-
Page 7: Maintenance
Hygia 10/9/06 4:44 Page MAINTENANCE MAINTENANCE (cont.) FrontCover • :. Dry the PCO filter under sunlight o:. Do not put the PCO filter back into the unit until it is *:* Wipe the front cover with a soft, damp cJoth, completely dry o:.Do not use detergents or chemicals of any kind .:. -
Page 8: Troubleshooting
Hygia 6.0 3L 10/9/06 4:44 PM Page 8 /;h_ TROUBLESHOOTING GUIDE MAINTENANCE (cont.) 3. Openthe sensor door. PROBLEM SOLUTION Unit doesnotoperate. Outlet: Make sure the electrical cord is plugged firmly into the outlet. Front Cover: Install the front cover properly. Odors and smoke are not easily Fillers: Follow the installation directions carefully for each being removed. -
Page 9: Technicalspecifications
Hygia 6.0 3L 10/9/06 4:44 PM Page 9 TECHNICAL SPECIFICATIONS 120 V Input Voltage: 0.85 A Input Current: Unit Dimension: 15" w x 8" d x 20" h 15 Ibs. Unit Weight: 9 feet Power Cord Length: REPLACEMENT PARTS FLT-6000 Filter Replacement Pack Includes: Hepa and Charcoal Filters LIMITED WARRANTY Tothe consumer, Guardian Technologies LLC warrants this product to be free of defects in... - Page 10 GermGuardian h_/gia:60 Syst_mecompietd'assainissement de I'air UTILISMIONET INSTRUCTIONS D 'ENTRETIEN Manuel anglais............E -1 Manuelfran(_ais............ F -1 Manuel espagnol ..........S -1 HO DE MODELE• AC-6800 6aranUe limit_e de 2 arts Date d'achat mois www.oermouardian.com 1-866-603-5900 ann_,e...
- Page 11 Hygia 10/9/06 4:44 Page MESURESDE SECURITE syst me compJetd'assainissement de I'air Hygia6.0. VeuiNez Nre attefltivement les mesures de s6curit6 avaflt de mettre eft Num6rode module: AC-6OO0 marche le syst_me complet d'assainissement de rair Hygia 6.0, _ d6faut de quoi vous vous exposez _ un risque d'incendie, _ une 61ectrocution, TABLEDES MATIERES des blessures...
- Page 12 Hygia 10/9/06 4:44 Page iDENTiFiCATiON DESPIECES iDENTiFiCATiON DESPIECES(suite) Panneau de commande Unit6 principale 1. Couvercieavant A. Indicateurlumineuxde I'ionisateur 2. Panneau de commande B. Indicateurlumineuxdu mode automatique 3. Pr6fiitre C. Indicateurslumineuxde la vitesse du ventiiateur 4. Filtre au charbon D. Indicateurslumineuxde poussi_resde maison 5.
- Page 13 Hygia 10/9/06 4:44 Page iNSTALLATiON IDEHTIFICATION DESPIECES(suite) T616commande Les filtres sont dans leur emballage, _ I'int@ieur du purificateur d'air. installation des fiitres 1. Interrupteur de I'appareil 2. Boutonde r6oiage de la vitesse 1. D@ranchez I'appareil Hygia 6=0 de la prise= du ventiiateur 2.
- Page 14 Hygia 10/9/06 4:44 Page iNSTALLATiON (suite) INSTALLATION (suite) 4, Retirez les filtres du purificateur d'air et jetez les emballages de Installation des piles dans la t_l_commande. plastique. 1. Appuyez dur le couvercle arri_re et faites-le glisser. Indiquez la date d'installation sur rautocollant portant la mention Ins_rez deux piles AAA en suivant les instructions indiqu_es <<...
- Page 15 Hygia 10/9/06 4:44 Page FONCTIONNEMENT ( suite) FONCTIONNEiViENT (suite) •:. L appareil est pr_r_gle pour fonctionner en mode automatique Chaque fois que vous appuyez sur le bouton << Timer _>, l a duree de a. L'indicateur lumineux vert << d'air pur >> situe au centre des fonctionnement change en suivant la sequence suivante : indicateurs lumineux <<...
- Page 16 Hygia 10/9/06 4:44 Page ENTRETIEN FONCTIONNEMENT ( suite) Couvercleavant • :. Laissez s_cher le filtre PCO au soleil. o:. Attendez que le filtre PCO soit compl_tement sec avant de le o:.Essuyez le couvercie avant avec un chiffon doux et humide. remettre en place dans rappareil.
- Page 17 Hygia 6.0 3L 10/9/06 4:44 PM Page 16 GUIDEDE DEPANNAGE FONCTIONNEMENT ( suite) 3. Ouvrez la porte du capteur. PROBLEME SOLUTIOH L'appareil n e fonctionnepas. Prise de courant ' Assurez-vous que I'appareil est bien branch& Couvercle avant ' Installez correctement le couvercle avant de I'appareil.
- Page 18 Hygia 6.0 3L 10/9/06 4:44 PM Page 17 SPECIFICATIONS TECHNIQUES Tension d'entr_e : 120V Courant d'entr_e : 0,85 A Dimensions de rappareil : 15 pc L x 8 pc P x 20 pc H Poids de rapparei I: 6,8 kg (15 Ib) Longueur du cordon _lectrique : 2,75 m (9 pieds) PI CES...
- Page 19 h oia:6.0 GermGuardian SistemaCompJeto de Purificaci6nde Aire IHSTRUCCJOHES DEUS8 Y CUIDAD8 Manualen Ingles ..........E -1 Manualen Frances..........F -1 Manualen Espa_ol ..........S -1 MODELON-°AC-6OOO 6arantia fimitada per 2 aries Fechade compra www.oermouardian.cem 1-866-603-5900...
- Page 20 Hygia 10/9/06 4:44 Page PRECAUCIOHES D E SEGURIDAD Hygia6.0 SistemaCompletode Purificaci n de Aire Lea deteflidameflte las siguiefltes adverteflcias de precauciOn antes de N mero de modelo: AC-6OOO utilizar el Hygia 6.0 Sistema Completo de Purificaci6n de Aire. En caso contrario, se podrian producir...
-
Page 21: Identificaci6N De Partes
Hygia 10/9/06 4:44 Page IDENTIFICACI6NDE PARTES(contin.aci6n) IDENTiFiCACI6NDE PARTES(Continuaci6n) PaneldeControl Unidadprincipal 1. Cubierta frontal A. Luzindicadoradel ionizador 8. Luzindicadoradel modo autom_tico 2. Panel de Control 3. Prefiltro C. Lutes indicadorasde la velocidaddel ventilador 4. Filtro de carb6nactivado D. Lucesindicadorasde polvodom6stico 5. Fiitro HEPA E. -
Page 22: Instalaci6N
Hygia 10/9/06 4:44 Page INSTALACI6N JDENTIFJCACI6N D E PARTES(contin.aci6n) Control r emoto 1--" Es posible que los filtros est6n embalados dentro del purificador de aire. C6ao instaiar los filtros 1. Bot6nde encendido/ apagadoel_ctrico 2. Bot6n'Speed' (Velocidad del ventilador) 1. Desconecte el Hygia 6.0 del tomacorriente. 2. - Page 23 Hygia 10/9/06 4:44 Page IHSTALACI6H(contin.aci6n) IHSTALACI6H(continuaci6n) C6mo instalar las baterias en el control remoto. 4. Quite los filtros del purificador de aire y deseche las bolsas pl_sticas. 5. Escriba la fecha de instalaci6n en el autoadhesivo "Recordatorio de 1. Presione y deslice hacia afuera la cubierta trasera. cambio de filtro"...
-
Page 24: Funcionamiento
Hygia 10/9/06 4:44 Page FUNCIONAMIENTO (continuaci6n) FUNCJONAMIENTO ( continuaci6n) La unidad est_ preajustada para comenzar a funcionar en mode Cada vez que se presiona el bot6n 'Timer' (Temporizador), el tiempo de de operaci6n autom_tico. funcionamiento cambia seg0n la siguiente secuencia: a. - Page 25 Hygia 10/9/06 4:44 Page MANTENIMIENTO MANTENIMIENTO (continuaci6n) Cubiertafrofltal • :. Seque el Filtro PCO con luz del sol o:. No vuelva a colocar el Filtro PCO en la unidad hasta que est_ •:. Limpie la cubierta frontal con un trapo suave y h0medo completamente seco o:.
- Page 26 Hygia 6.0 3L 10/9/06 4:44 PM Page 24 GU|ADESOLUCI6N DEPROBLEMAS MANTENIMIENTO (contin.aci6n) 3. Abra la puerta del sensor. PRQBLEMA SOLUCH)H La unidadnofunciona. Tomacorriente: Cerci6resede que el cable el_,ctrico est,, conectado firmemente al tomacorriente. Cubiertafrontal: Instale la cubierta frontal de manera correcta.
-
Page 27: Especificaciones T6Cnicas
Hygia 6.0 3L 10/9/06 4:44 PM Page 1 ESPECIFICACIONES T ECNICAS 120 V Voltaje de entrada: Corriente de entrada: 0.85 A Dimensiones de la unidad: 15"w x 8"d x 20" h (38,1 cm de ancho x 20,32 cm de profundidad x 50,8 cm de alto) Peso de la unidad 15 Ibs (6, 81 kg) Longitud del cable electrico:...
Need help?
Do you have a question about the Hygia 6.0 AC-6000 and is the answer not in the manual?
Questions and answers
Where can I get new filter set for my Hygia6.0 germ guardian air cleaning