Table of Contents
Advertisement
Quick Links
Advertisement
Table of Contents

Related Manuals for EVGA 132-GT-E768


Summary of Contents for EVGA 132-GT-E768
-
Page 1: User's Guide
User’s Guide ³ EVGA X58 FTW Motherboard... -
Page 3: Table Of Contents
User’s Guide ... 1 EVGA X58 FTW ³ ... 1 Motherboard ... 1 Before You Begin… ... 8 Parts NOT in the Kit... 9 Intentions of the Kit ... 9 Motherboard ...10 Motherboard Specifications ... 10 Unpacking and Parts Descriptions ...12 Unpacking ... - Page 4 8-pin ATX 12V Power (PW12) ... 24 Connecting IDE Hard Disk Drives ... 24 Connecting SATA Cables ... 25 Connecting Internal Headers ... 26 Front Panel Header ... 26 IEEE1394a (Firewire) ... 27 USB Headers ... 28 Audio ... 29 Fan Connections ...
- Page 5 Advanced BIOS Features ... 43 Hard Disk Boot Priority ... 44 CD-ROM Device Priority ... 44 First/Second/Third Boot Device ... 44 Boot Other Device ... 45 Boot Up NumLock Status ... 45 Security Option ... 45 Integrated Peripherals Menu ... 46 Legacy Devices ...
- Page 6 Frequency/Voltage Control Menu ... 58 Memory Feature ... 59 Voltage Control ... 61 CPU Feature ... 63 Installing Drivers and Software ...65 Windows XP/Vista/Win 7 Driver Installation ... 65 Appendix A. POST Codes...67 EVGA Glossary of Terms ...74 Compliance Information ...77...
- Page 7 Figure 1. EVGA X58 FTW3 Motherboard Layout ... 14 Figure 2. Chassis Back Panel Connectors ... 16 Figure 3. PW1 Motherboard Connector ... 23 Figure 4. BIOS CMOS Setup Utility Main Menu ... 37 Figure 5. Standard CMOS Features Menu ... 39 Figure 6.
-
Page 8: Before You Begin
Before You Begin…... -
Page 9: Parts Not In The Kit
Parts NOT in the Kit Intentions of the Kit building replacing replacing... -
Page 10: Motherboard
EVGA X58 FTW Motherboard ® ® ® ® Motherboard Specifications... -
Page 12: Unpacking And Parts Descriptions
Unpacking and Parts Descriptions Unpacking Equipment... -
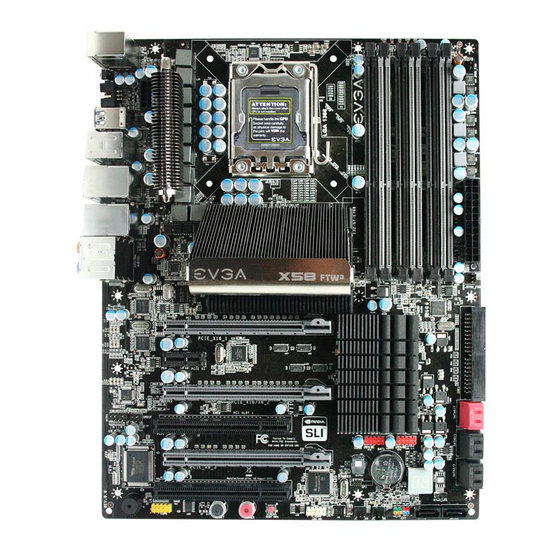
Page 14: Evga X58 Ftw3 Motherboard
EVGA X58 FTW3 Motherboard... - Page 16 Activity LED Status Blinking (Green) Description Speed/Link LED Status No data transmission Yellow Data transmission Green Center/Subwoofer Side Speaker Out Description 1000 Mbps data rate 100 Mbps data rate 10 Mbps data rate...
-
Page 17: Hardware Installation
Hardware Installation Safety Instructions... -
Page 18: Preparing The Motherboard
Preparing the Motherboard Installing the CPU away Note: After removing the CPU socket cover, it is recommended that you keep it in case you need to remove CPU for any reason you can replace the cover to avoid damaging the CPU socket pins. down... -
Page 19: Installing The Cpu Fan
Note: Make sure the CPU is fully seated and level in the socket. Installing the CPU Fan... -
Page 20: Installing System Memory (Dimms)
Installing System Memory (DIMMs) -
Page 21: Installing The Motherboard
Installing the Motherboard Note: Be sure that the CPU fan assembly has enough clearance for the system case covers to lock into place and for the expansion cards. Also make sure the CPU Fan assembly is aligned with the vents on the covers. This will depend on the system case being used. -
Page 22: Securing The Motherboard Into A System Case
Securing the Motherboard into a System Case Connecting Cables... -
Page 23: 24-Pin Atx Power (Pw1)
24-pin ATX Power (PW1) -
Page 24: 8-Pin Atx 12V Power (Pw12)
8-pin ATX 12V Power ( Connecting IDE Hard Disk Drives Note: If an ATA-100 disk drive and a disk drive using any other IDE transfer protocol are attached to the same cable, the maximum transfer rate between the drives may be reduced to that of the slowest drive. Motherboard Edge PW12... -
Page 25: Connecting Sata Cables
Connecting SATA Cables Connect the locking cable end to the motherboard connector. Connect the end without the lock to the SATA device. -
Page 26: Connecting Internal Headers
Connecting Internal Headers Front Panel Header Note: Some system cases do not have all four cables. Be sure to match the name on the connectors to the corresponding pins. -
Page 27: Ieee1394A (Firewire)
IEEE1394a (Firewire) Card Edge... -
Page 28: Usb Headers
USB Headers... -
Page 29: Audio
Audio Card Edge... -
Page 30: Fan Connections
Fan Connections Sense +12V Ground Sense +12V Ground PC Health Status +12V Sense Ground +12V Sense Ground Ground +12V Sense Control... -
Page 31: Com1
COM1 Expansion Slots Note: When using 1 Graphic Card in PCI-E: Slot 1, a speed of x16 will be used. When using 2 Graphic Cards in PCI-E Slots: 1 and 3, a speed of x16/x16 will be used. When running 3 Graphic Cards in PCI-E Slots: 1, 3, and 5 a speed of x16/x8/x8 will be used. -
Page 32: Pci Slots
PCI Slots PCI-E x1 Slots PCI-E x16/x8 Slots... -
Page 33: Onboard Buttons
Onboard Buttons Clear CMOS Button RESET and POWER Button... -
Page 34: Post Port Debug Led And Led Status Indicators
Post Port Debug LED and LED Status Indicators Post Port Debug LED LED Status Indicators... -
Page 35: Configuring The Bios
EVGA X58 SLI Motherboard Configuring the BIOS... -
Page 36: Enter Bios Setup
Enter BIOS Setup Press F1 to continue, DEL to enter Setup. Note: It is strongly recommended that you do not change the default BIOS settings. Changing some settings could damage your computer. Main Menu Note: that on the BIOS screens all data in yellow is changeable, data in red box... - Page 37 Power Management Setup PnP/PCI Configurations PC Health Status Esc : Quit F10 : Save & Exit Setup Time, Date, Hard Disk EVGA X58 SLI Motherboard Frequency/Voltage Control Load Defaults Set Supervisor Password Set User Password Save & Exit Setup Exit Without Saving ...
-
Page 39: Standard Cmos Features Menu
Enter:Select F5:Previous Values Note that all data in white is for information only, data in blue is non-changeable, and data in a EVGA X58 SLI Motherboard Item Help Standard CMOS Features Thu, Sep 15 1983 12 : 48: [None] Main Level... -
Page 40: Date And Time
Date and Time Date (mm:dd:yy) Time (hh:mm:ss) SATA Channel SATA 0 SATA 2 SATA 1 SATA 3 SATA 4 SATA 5 IDE Auto-Detect SATA 0 Access Mode Capacity Cylinder Head Precomp Landing Zone Sector hour : minute : second Sat, Jul 01 2006 14 : 48: [None]... - Page 41 IDE HDD Auto-Detect [Press Enter] SATA 0 [Manual} Access Mode [CHS] Capacity 0 MB Cylinder ...0 Head Precomp Landing Zone Sector EVGA X58 SLI Motherboard Access Mode [CHS] Cylinder Min= Max=65535 Key in a DEC number : :Move ENTER:Accept ESC:Abort...
-
Page 42: Halt On
Halt On Halt On [All , But Keyboard] Memory display-only values Halt On All Errors ... [ ] No Errors ... [ ] All , But Keyboard ... [ ] :Move ENTER:Accept Base Memory 640K Extended Memory 1047552K Total Memory 1048576K ESC:Abort... -
Page 43: Advanced Bios Features
Enter:Select F5:Previous Values Note: That all data in white data in blue is non-changeable, and data in a selection. EVGA X58 SLI Motherboard to display the sub-menus. Advanced BIOS Features [Press Enter] [Press Enter] [Removable] Main Level [CDROM] [Hard Disk]... -
Page 44: Hard Disk Boot Priority
Hard Disk Boot Priority 1. SATA 0 ST3802110A 2. Bootable Add-in Cards CD-ROM Device Priority 1. SATA 1 : BENQ DVD DC DW1810 First/Second/Third Boot Device First Boot Device Removable ... [ ] Hard Disk ... [ ] CDROM ... [ ] Legacy LAN ... -
Page 45: Boot Other Device
EVGA X58 SLI Motherboard Boot Other Device Boot Up NumLock Status Security Option Setup System... -
Page 46: Integrated Peripherals Menu
Integrated Peripherals Menu Integrated Peripherals Phoenix – AwardBIOS CMOS Setup Utility Legacy Devices Onboard PATA/SATA Device Onboard Device USB Device Setting :Move Enter:Select F5:Previous Values Legacy Devices Onboard Serial Port 1 Integrated Peripherals [Press Enter] [Press Enter] [Press Enter] Main Level [Press Enter]... -
Page 47: Onchip Pata/Sata Device
EVGA X58 SLI Motherboard OnChip PATA/SATA Device SATA Mode [AHCI] X LEGACY Mode Support [Disabled] SATA 3.0 Storage Controller [Enabled]... -
Page 48: Onboard Device
Onboard Device Realtek GigaLan (LAN1) Realtek GigaLan (LAN2) PE4 Slot (PCIE x1) Realtek Lan PXE Boot ROM TI 1394 Setting High Definition Audio P80 Show CPU Temp. [Auto] [Auto] [Auto] [Disabled] [Enabled] [Enabled] [Enabled]... -
Page 49: Usb Device Settings
USB Device Settings USB 3.0 Controller USB 1.0 Controller USB 2.0 Controller USB Operation Mode USB Keyboard Function USB Mouse Function USB Storage Function EVGA X58 SLI Motherboard [Enabled] [Enabled] [Enabled] [High Speed] [Enabled] [Enabled] [Enabled]... -
Page 50: Power Management Setup Menu
Power Management Setup Menu Power Management Setup Phoenix – AwardBIOS CMOS Setup Utility ACPI function [Enabled] APCI Suspend Type Run VGABIOS if S3 Resume Soft-Off by PWR-BTTN Wake-Up by PCI Card USB KB Wake-Up From S3 Resume by Alarm [Disabled] Day of Month Alarm Time (hh:mm:ss) Alarm HPET Support... -
Page 51: Acpi Suspend Type
EVGA X58 SLI Motherboard ACPI Suspend Type [S1&S3] [S1(POS)] [S3(STR)] Run VGABIOS if S3 Resume Soft-Off by PWR-BTTN [Instant-Off] [Delay 4 Sec] Wake-Up by PCI Card USB KB Wake-Up From S3 Resume by Alarm [Disable] [Enable]... -
Page 52: Power On Function
Day of Month Alarm Time (hh:mm:ss) Alarm POWER ON Function Hot Key Power On PWRON after PWR-Fail [ 0] [0 : 0 : 0]... -
Page 53: Pnp/Pci Configuration Menu
INT Pin 8 Assignment Reserved RC For Bridge ** PCI-E relative items ** :Move Enter:Select F5:Previous Values Init Display First [PCI Slot] [PCIEx]. EVGA X58 SLI Motherboard PnP/PCI Configuration [PCI [Disabled] Main Level [Auto(ESCD)] Press Enter [Auto] [Auto]... -
Page 54: Reset Configuration Data
Reset Configuration Data Resources Controlled By [Auto(ESCD)] Resources Resources Controlled By x IRQ Resources Resources Controlled By IRQ Resources IRQ Resources [Manual] IRQ-5 assigned to IRQ-9 assigned to IRQ-10 assigned to IRQ-11 assigned to IRQ-12 assigned to IRQ-14 assigned to IRQ-15 assigned to [Manual] [Auto(ESCD)]... -
Page 55: Pci/Vga Palette Snoop
EVGA X58 SLI Motherboard PCI/VGA Palette Snoop INT Pin 1/2/3/4/5/6/7/8 Assignment Maximum Payload Size... -
Page 56: Pc Health Status Menu
PC Health Status Menu PC Health Status Phoenix – AwardBIOS CMOS Setup Utility SmartFan Function VCC 3.3V CPU Vcore DIMM Voltage CPU VTT Voltage IOH Vcore +12V 3VSB CPU temperature NB temperature VREG temperature System temperature CPU Fan Speed Power Fan Speed Chassis Fan Speed ... -
Page 57: Smartfan Function
If temp < 30ºC, Set Fan Speed Chassis Speed Control Manual Fan Speed, % If temp > 100ºC, Set Fan Speed 100% If temp < 30ºC, Set Fan Speed [SmartFan] [Manual] EVGA X58 SLI Motherboard [PWM Fan (4pin)] [SmartFan] [SmartFan] [SmartFan]... -
Page 58: Frequency/Voltage Control Menu
Frequency/Voltage Control Menu Frequency/Voltage Control Phoenix – AwardBIOS CMOS Setup Utility Dummy O.C. Extreme Cooling Memory Feature Voltage Control CPU Feature CPU Clock Ratio CPU Host Frequency(Mhz) Target CPU Frequency (MHz) 3466MHz(133x28) Target Memory Frequency Spread Spectrum PCIE Frequency(Mhz) Save Profile Load Profile MCH Strap CPU Uncore Frequency (MHz) -
Page 59: Memory Feature
Setting tRTP Setting tWR Setting Round Trip Latency tddWrTRd Setting tdrWrTRd Setting tsrWrTRd Setting :Move Enter:Select F5:Previous Values EVGA X58 SLI Motherboard Memory Feature [Standard] [Disabled] [Auto] Main Level [6 way] [4 way] [Auto] Setting... -
Page 61: Voltage Control
Users should exercise caution when over- voltaging, as it can cause system instability or even void warranties and damage components. :Move Enter:Select F5:Previous Values EVGA X58 SLI Motherboard Voltage Control [With VDroop] [Auto] 1.337V [Auto] +0mv [Auto] 1.800V... -
Page 63: Cpu Feature
Active Processor Cores ***** QPI Controller Setting ***** QPI Controller Setting QPI Link Fast Mode QPI Frequency Selection :Move Enter:Select F5:Previous Values EVGA X58 SLI Motherboard CPU Feature [Enabled] [Enabled] [Auto] Main Level [Enabled] [Enabled] [Enabled]... - Page 64 Logical Processor Setting QPI Controller Setting...
-
Page 65: Installing Drivers And Software
It is important to remember that before installing the driver CD that is shipped in the kit, you need to load your operating system. The motherboard supports Windows XP 32bit and 64bit and is Vista-capable. Windows XP/Vista/Win 7 Driver Installation EVGA X58 SLI Motherboard Installing Drivers and Software... -
Page 67: Appendix A. Post Codes
EVGA X58 SLI Motherboard Appendix A. POST Codes... - Page 69 EVGA X58 SLI Motherboard...
- Page 71 EVGA X58 SLI Motherboard...
- Page 73 EVGA X58 SLI Motherboard...
-
Page 74: Evga Glossary Of Terms
EVGA Glossary of Terms... - Page 75 EVGA X58 SLI Motherboard...
-
Page 77: Compliance Information
Original Purchaser. Upon termination, for any reason, all copies of Software and materials must be immediately returned to EVGA and the Original Purchaser shall be liable to EVGA.com CORP for any and all damages suffered as a result of the violation or default.
Need help?
Do you have a question about the 132-GT-E768 and is the answer not in the manual?
Questions and answers