Table of Contents
Advertisement
Owner's Manual
]CRRFTSMRN'J
5.5 HP
24 INCH TINE WIDTH
FRONTTINE
TILLER
Model No.
/
917.292480
• Safety
,_--_ _[ ("
_.4_
• Assembly
___/_7_/_
• Operation
,_-w<..
_/
• Maintenance
('_,_'_,_
• Espa6ol
"--_'_J_(
([ _//_f/'_
• Repair Parts
_/-_
_<__ .=_-_(_.o.))
This product has a low emission engine which operates
differently from previously built engines. Before you start the
engine, read and understand this Owner's Manual.
CAUTION:
Read and follow all Safety
Rules and Instructions before
operating this equipment.
Sears, Roebuck
and Co., Hoffman Estates, II 60179
Visit our Craftsman website:www.sears.com/craftsman
Advertisement
Table of Contents

Related Manuals for Craftsman 917.292480


Summary of Contents for Craftsman 917.292480
- Page 1 This product has a low emission engine which operates engine, read and understand this Owner's Manual. CAUTION: Read and follow all Safety Rules and Instructions before operating this equipment. Sears, Roebuck and Co., Hoffman Estates, II 60179 Visit our Craftsman website:www.sears.com/craftsman...
- Page 2 Parts Ordering ..... Back Cover LIMITED ONE YEAR WARRANTY ON CRAFTSMAN TILLER For one (1) year from date of purchase, when this Craftsman Tiller is maintained, lubricated, and tuned up according to the operating and maintenance instructions the owner's manual, Sears will repair free of charge any defect in material or workman- ship.
- Page 3 • Do not overload the machine capacity • Use extensioncords and receptacles as specifiedby the manufacturer for all by attempting to till too deep at too fast unitswith electricdrive motorsor a rate. electricstartingmotors, • Never operate the machine at high •...
- Page 4 PRODUCT SPECIFICATIONS CUSTOMER RESPONSIBILITIES • Read and observe the safety rules. GASOLINE 3 QTS • Follow a regular schedule in maintain- C, APACITY: UNLEADED ing, cadng for and using your tiller. REGULAR • Follow the instructions under the OIL(API-SF-SJ): SAE 30 "Customer Responsibilities"...
- Page 5 Your new tiller has been assembled at the factory with exception of those parts left unassembled for shipping purposes. To ensure safe and proper operation of your tiller all parts and hardware you assemble must be tightened securely. Use the correct tools as necessary to Ensureproper tightness.
- Page 6 UNPACK CARTON & INSTALL INSTALL DEPTH STAKE ASSEMBLY HANDLE 1. Loosen nut "A". • iLCAUTION:Be carefulof exposed 2. Insert stake suppod between engine staples when handlingor disposingof bracket halves with stake spring down. cadoning material. 3. Bolt stake support to engine brackets IMPORTANT: When unpackingand with bolts, lock washers and nuts.
-
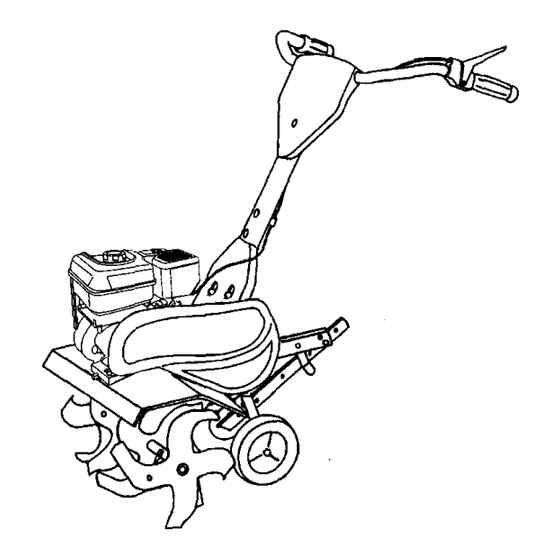
Page 7: Product View
KNOW YOUR TILLER READ THIS OWNER'S MANUAL AND SAFETY RULES BEFORE OPERATING YOUR TILLER Compare the illustrations with your tillerto familiarizeyourselfwith the locations of various controls and adjustments. Save this manual for future reference. TILUNC; F_WARD _£UTr_L REvEqs_ CAUTX_N ENGINE _:_NE fAST SLOW... - Page 8 The operation ofanytiller c anresult i nforeign o bjects t hrown i ntotheeyes which c anresult i nsevere e yedamage. Aways wear s afety g lasses o reye shields b efore starting y ourtiller a ndwhile tilling.Werecommend a wide vision safety m ask over s pectacles orstandard safety g lasses. HOW TOUSE YOUR TILLER WHEELS Know how tooperate a llcontrols b efore...
- Page 9 4, Tilt tiller back on its wheels and then TO START ENGINE re-level. _CAUTION: Keep fine control in "OFF" 5, With engine level, refill to point of position when starting engine. overflowing if necessary. Replace oil When starting engine for the first time or if filler plug.
- Page 10 BREAKING IN YOUR TILLER * You will find tilling much easier, if you leave a row untilled between passes. Break-inyour belt(s), pulleys and tine Then go back between tilted rows control beforeyou actuallybegin tilling. There are two reasons for doing this. •...
- Page 11 MAINTENANCE SCHEDULE FILL IN DATES AS YOU COMPLETE REGULAR SERVICE v" Check Engine OII Level Change Engine Oil Oil Pivot PoinLs Inspect Spark Attester / Muffler Inspect Air Screen Cle_n or Replace Air Cleaner Cartridge Clean Engine Cylinder Fins Replace Spark Plug 1 - Cf_angemote often when operal_ngunder a heavy load ot in high ambienl ternpefatures.
- Page 12 _CAUTION: Disconnectspark plug wire 5. Refillengine with oil. See =FILL before performingany maintenance ENGINE WITH OIL" in the Operation (except carburetoradjustment)to prevent accidentalstartingof engine. Prevent fires! Keep the enginefree of grass, leaves, spilledoil, or fuel. Remove Drain fuel from tank beforetippingunitfor maintenance.
- Page 13 Spark plug type and gap setting are Muffler Cynr}der Fins shown in "PRODUCT SPECIFICATIONS" BIowsr Houe o on page 4 of this manual. TRANSMISSION Your transmission is sealed and will not _] ! _t_/,_/Air Screen require lubrication unless serviced. CLEANING Do not clean your tiller when the engine and transmission are hot.
- Page 14 NARROW TILLING/CULTIVATING NOTE: If =ON" position check requtred 12-3/4" PATH adjustment, recheck "OFF" position adjustment to insure tines do not rotate • Remove outer tines. when control is =OFF" (up). "nneControl"OFF" Position "lineControlCable NOTE: When reassembling outer tines, be sure right tine assembly (marked =R") and left tine assembly (marked %") are mounted to correct side of tine shaft.
- Page 15 ENGINE CHECK TINE OPERATION 4. See "TINE OPERATION CHECK" in Maintenance, repair, or replacementof this section of manual. the emissioncontroldevices and sys- 5. Replace belt guard tems, whichare being done at the customers expense,may be performedby Belt Guide any non-roadangina repair establish- mentor individual.Warranty repairsmust Engine be performed by an authorizedengine...
- Page 16 NOTE: Fuel stabilizer is an acceptable Immediately prepare your tiller for storage at the end of the season or if the unit will alternative in minimizing the formation of not be used for 30 days or more. fuel gum deposits during storage. Add ACAUTION: Never store the tiller with stabilizer to gasoline in fuel tank or...
- Page 17 PROBLEM CORRECTION CAUSE Will not start 1. Out of fuel. 1. Fill fuel tank. 2. Engine not "CHOKED" 2. See "TO START ENGINE" properly. in the Operation section. 3. Engine flooded, 3. Wait several minutes before attempting to start. 4. Dirty air cleaner. 4.
- Page 18 CAUSE PROBLEM CORRECTION Engine 1. Low oil level/dirty oil. 1. Check oil level/change oil. overheats 2. Clean engine air screen. 2. Dirty engine air screen. 3. Dirty engine. 3. Clean cylinder fins, airscreen, muffler area. 4. Remove and clean muffler. 4.
- Page 19 TILLER -- MODEL NUMBER 917.292480 HANDLES PART PART DESCRIPTION DESCRIPTION 137118 Panel,Control 12000027 Ring,Clip 9_6R Grip,Handle 12000059 Retainer, Ring 98000129 Nut, Flange 72010520 Bolt 5/16-18 x 2-1/2 STD533107 Bolt, Carriage 5/16-18x3/4 73970500 Locknut, Flange 5/16-18 UNC 110514X Assembly, Panel and Tube 165197 Clip,Cable 3066J...
- Page 20 TILLER - - MODEL NUMBER 917.292480 BELT GUARD AND PULLEY ASSEMBLY PART PART DESCRIPTION DESCRIPTION 23230506 Screw Set 5/16-18 x 3/8 Patch 12000028 Ring, Retainer 130812 Sheave, Engine 151223 Sheave,Transmisison 17211006 Screw, Tap Hex Head 12000036 Ring, Klip 74610812 Bolt, Hex Head 1/2-20 x 3/4 STD541237 Nut, Hex, Jam 3/8-16...
- Page 21 TILLER - - MODEL NUMBER 917.292480 WHEEL AND DEPTH STAKE ASSEMBLY 19 20 KEY PART KEY PART DESCRIPTION DESCRIPTION 9194R Pin, Clevis 1951J Support, Depth Stake, L.H. 74760520 Bolt, Hex Head 5/16-18 x 1-1/4 5388J Spring, Stake STD583107 Bolt, Hex Head 5/16-18 x 3/4 121117X Bolt, Shoulder STD541031...
- Page 22 TILLER - - MODEL NUMBER 917.292480 TINE ASSEMBLY KEY PART KEY PART DESCRIPTION DESCRIPTION 156926 Tine, Outer, R.H. 156925 Tine, Outer, L.H. 4929H Pin, Clevis 3146R Retainer, Spring Zinc 156924 Tine, Inner, R.H. NOTE: All component dimensions given in U.S. 156923 Tine, Inner, L.H.
- Page 23 TILLER - - MODEL NUMBER 917.292480 TRANSMISSION PART PART DESCRIPTION DESCRIPTION 74760524 Bolt, Hex 5/16-19 x 1-1/2 Gr. 2 9173R Spacer, Split STD523732 Bolt, Fir), Hex 3/9-18 x 3-1/4 73970500 Nut, Lock Hex Flange STD5510_7 Washer 13/32 x13/16 5/16-19UNC STD541437 Locknut, w/washer 3/8-18 19091412 Washer...
- Page 24 TILLER - - MODEL NUMBER 917.292480 DECALS PART DESCRIPTION 166214 Decal, Logo 166215 Decal, Belt Guard Tine Shield HP 137539 Decal, Cntrl Phi lost, 120431X Decal, Hand Placement 176783 Decal, Engine Oper. 120075X Decal, Warning, Rotating Tines 167156 Decal, Engine B&S Intek 171078 Decal, Rewind Intek 162215...
- Page 25 TILLER - - MODEL f;u.i,_.i _. ,. r..;,.,480 ENGINE, BRIGGS & STRATTON -- MODEL NUMBER 110402, TYPE NO. 0206-E1 307 _ 12 I 718_ _li_..22 -_ 7 ¸_ _ I¸ ¸- 26 I REQUIRESSPECIALTOOLS 32 _ 30 _, TO INSTALL, SEE REPAIR 742'_ NSTRUCTON MANUAL.
- Page 26 TILLER - - MODEL NUMBER 917.292480 ENGINE, BRIGGS & STRATTON - MODEL NUMBER 110402, TYPE NO. 0206-E1 _1_! • _i ! 1633A 6331:! 6921 18d_ ..I 276'_ 130'_ : ", _/ 95 ''_ _: I 1171 276,_ __ 276'_" 51 /_"...
- Page 27 TILLER - - MODEL NUMBER 917.292480 ENGINE, BRIGGS & STRATTON -- MODEL NUMBER 110402,TYPE NO. 0206-E1 209A _" • -_-_J 562 , i, 505 '?' 2221 °, 773_,_ 66271, '%_, 188_ 356 " Im_l_._ . _ _, 836A'_ 621 _ 300 y 613_ 883 _ ;-_"...
- Page 28 TILLER--MODEL NUMBER 917.292480 ENGINE, BRIGGS &STRATTON -- MODEL NUMBER 110402, TYPE NO. 0206-E1 592_ 689 ,I_ 456 i_ 11036 EMISSIONS LABEL 1005 1095 VALVE GASKET SET...
- Page 29 TILLER -- MODEL NUMBER 917.292480 ENGINE, BRIGGS & STRATTON --MODEL N UMBER 110402, TYPE NO. 0 206-E1 PART PART DESCRIPTION DESCRIPTION 693811 Cylinder Assembly 691242 O Pin-Float Hinge 299819 • Seal-Oil (Magneto Side) 692567 Valve-Choke 693643 Head-Cylinder 690023 Shaft-Choke 695166 •+ Gasket-Cylinder Head 694975 Jet-Main (Standard)
- Page 30 TILLER - - MODEL NUMBER 917.292480 ENGINE, BRIGGS & STRATTON - MODEL NUMBER 110402,TYPE NO. 0206-E1 PART PART DESCRIPTION DESCRIPTION 690662 Nut (Flywheel) 692564 Retainer-E Ring 692605 Armature-Magneto 692566 Gear-Idler 691061 Screw(Armature Magneto) 694258 Retainer 491055 Spark Plug 694544 Stud(RockerArm) 692390 Wire-Stop 693583...
- Page 31 Get it fixed, at your home or ours! For repair of major brand appliances in your own home... no matter who made it, no matter who sold it! 1-800-4-MY-HOME s. Ao_i_,, day or night (1-800-469-4663) www.sears.com To bring in products such as vacuums, lawn equipment and electronics for repair, call for the location of your nearest Sears Parts &...
Need help?
Do you have a question about the 917.292480 and is the answer not in the manual?
Questions and answers