Table of Contents
Advertisement
Available languages
Available languages
Operator's
Manual
CRAFTSMAN °
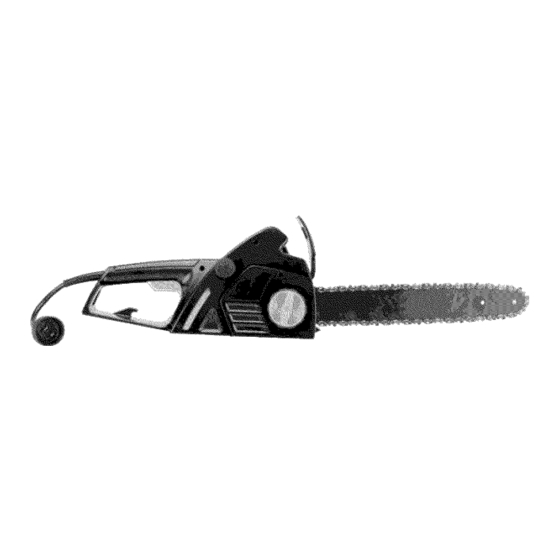
12 Amp/3.5 Peak HP Motor
ELECTRIC
CHAIN SAW
Model No.
358.341190
- 16 in. Bar
•
Safety
•
Assembly
•
Operation
•
Maintenance
•
Espahol,
p. 17
245157
&
WARNING:
c
us
Read and follow all Safety
Rules and Operating
Instructions
before first use of this product.
For answers
to your questions
about this product:
Call 7 am-7
pm, Mon-Sat;
10 am-7
pm, Sun
1-800-235-5878
(Hours listed are Central
Time)
Sears,
Roebuck
and Co., Hoffman
Estates,
IL 60179
U.S.A.
115367526
Rev. 1 2/11/10
JBW
Advertisement
Table of Contents

Related Manuals for Craftsman 358.341190


Summary of Contents for Craftsman 358.341190
- Page 1 Operator's Manual CRAFTSMAN ° 12 Amp/3.5 Peak HP Motor ELECTRIC CHAIN SAW Model No. 358.341190 - 16 in. Bar • Safety • Assembly • Operation • Maintenance • Espahol, p. 17 245157 WARNING: & Read and follow all Safety Rules and Operating Instructions before first use of this product.
- Page 2 Sears store or other Craftsman outlet in the United States for free replacement. This warranty applies for only 90 days from purchase date if this product is used for commercial or rental purposes.
- Page 3 • Do not s tart cutting until you have a possible injury tothe operator orby- clear work a rea, secure footing, and standers. Use only C raftsman acces- especially ifyou are felling a tree, a sories and replacement parts asrec- retreat path.
- Page 4 plug. Ifthe plug still does n ot f it, o btain chain s aw cords p eriodically and if acorrect polarized extension cord. A damaged, have repaired byaSears Service Center. polarized extension cord w ill r equire the use ofapolarized wall outlet.
- Page 5 from the operator and could e asily MAINTAIN CONTROL: cause t he operator tolose control of the saw. REDUCE THE CHANCE Stand to the left of the sa_ KICKBACK • Recognize that k ickback can happen With a basic u nderstanding ofkick- Thumb on Y_-,_/_;_W...
- Page 6 • Position offront and rear h andlebars: AVOID KICKBACK. Reduced-kickback designed with distance between guide bars and low-kickback handles and "in-line" with each o ther. chains reduce the chance and magni- The spread and "in-line" position of tude of kickback and are recommended. the hands provided by this design Your saw has a low kickback chain and work t ogether togive balance and...
- Page 7 double insulation system o nly provides appliance. Failure tohave t he unit r e- added p rotection against injury r esult- paired bySears service personnel cause the double insulation construc- ingfrom aninternal electrical insulation failure. tion tobecome ineffective and result in serious injury.
- Page 8 Craftsman far as possible. chain saw bar oil. If Craftsman bar oil is • When cutting with the saw, the chain not available, you may use a good brake must be disengaged.
- Page 9 • Squeeze trigger switch and allow Disengaged unit to reach full speed before cut- Engaged ting. • Begin cutting with the saw frame against the log. • Keep the motor at full speed the entire time you are cutting. Braking function control •...
- Page 10 • Remove dirt, s tones, loose b ark, Hinge holds tree on stump and helps nails, staples, and wire from the tree control fall where c uts are tobemade. Opening of felling Plan aclear retreat path Closing of _" _.._ _Direction offall notch...
- Page 11 ofplastic orwood i nto the cut u ntil the ing. See illustration above for cutting saw can beremoved easily. Restart the logs with a compression side. saw and carefully reenter the cut. D onot BUCKING USING A LOG OR use ametal wedge. Do not a ttempt to SUPPORT STAND restart your saw when i tispinched or...
- Page 12 IMPORTANT POINTS PRUNING • Watch out f orspring p oles. Spring poles a resmall size limbs w hich c an ,_IkWARNING: Limit pruning to limbs whip t oward you orpull y ou off b al- shoulder height or below. Do not cut if ance.
- Page 13 CHECK FOR DAMAGED Tensioning the chain is easy. WORN PARTS Turn bar bolt knob (A) counter Contact Sears Service Center for re- clock wise. Then turn ring (B) counter clock wise to loosen placement of worn or damaged parts. chain or clock wise to tighten NOTE: It is normal for a small amount chain.
- Page 14 CHECK CHAIN S HARPNESS • Burring of guide bar rails is a normal A sharp chain makes wood chips. A dull process of rail wear. Remove these burrs with a flat file. chain makes a sawdust powder and • When rail top is uneven, use a flat cuts slowly.
-
Page 15: Chain Adjustment
INSTALL GUIDE BAR & SAW Cutters Depth Gauge CHAIN These instructions are for replacing bar. The unit is fully assembled when shipped. NOTE: Always wear heavy gloves Drive Links when handling the saw chain. To fit the chain links into the 1. - Page 16 SEASONAL STORAGE WARNING: Perform the following Prepare your unit for storage at the end steps after each use: of the season or if it will not be used for • Allow motor to cool before storing or 30 days or more. transporting.
- Page 17 Si este producto falla per un defecto en el material o de mano de obra dentro de dos ahos a partir de la fecha de compra y este se ha utilizado y mantenido de acuerdo al manual del usuario, envfelo a cualquier tienda Sears o otra tienda Craftsman en los Estados Unidos para su reemplazo gratuita.
- Page 18 • No fuerce lasierra d ecadena. Esta dores. Use exclusivamente los acce- har& eltrabajo demanera m&s e ft- sorios yrepuestos Craftsman recom- ciente y con mayor seguridad sise endados. Nunca modifique lasierra. usa enlaproporci6n para lacual fue •...
- Page 19 usarse deforma a propiada ypara patibles para el uso de aparatos de vierificar sipuede e fectuar elfuncio- exterior, y que tengan una clasificaci6n namiento para elcueal fue disefiada. electrica no menor que la clasificaci6n Inspeccione elalineamiento delas del aparato. El cable deber_, venir piezas movibles, piezas movibles marcado con el sufijo 'MT-A"...
- Page 20 Trayectoria hacer f&cilmente al usuario perder el de la Reculada control de la sierra. REDUZCA LAS PROBABILIDADES DE RECU LADA • Este consciente de la posibilidad reculada. Teniendo una buena com- Evite las Obstrucciones prensi6n b&sica de la reculada, ud. podr&...
- Page 21 • AIseccionar troncos con corte a s- DISPOSITIVIOS DE SEGURIDAD cendiente, notuerza l asierra a lsa- CONTRA LAS RECULADAS car lavarra del c orte. ADVERTENCIA: Los siguientes Evite la Impulsion: dispositivos han sido incluidos en la • Siempre empiece a cortar con el mo- sierra para ayudar a reducir el riesgo de tor acelerado a fondo y la caja de la...
- Page 22 Cadena Minimizadora deReculadas AVISO DE SEGURIDAD: El estar ex- Marcador deProfundidad Perfilado puesto alas vibraciones a traves del ..E slab6n Protector uso prolongado de herramientas de manos puede causar dafios a los vasos Fuerza deReacci6n sanguineos o a los nervios de los de- Permite que l aMadera Alargado...
- Page 23 miento, vienen marcados con las PATRONES: Este p roducto estA e nlis- palabras DOBLE AISLAMIENTO oAISLA- tado por U nderwriters Laboratories, Inc. DO DOBLEMENTE. El s fmbolo [] (cua- deacuerdo con UL Standard 1662 y ANSI B175.1. drado d entro deotro cuadrado) puede ANSI B175.1-2000 "Padr6n Estadou-...
- Page 24 CABLE D EL APARATO TENSION DE LACADENA El C ABLE DEL A PARATO seusa para Esnormal que las cadenas nuevas se conectar lasierra d ecadena aun estiren durante los primeros 15 minu- cable d eextensi6n aprobado tos de uso Deber& verificarse la ten- si6n de la cadena con frecuencia Reajuste...
- Page 25 • Esta s ierra viene e quipada con unfre- SION DE LA CADENA en la secci6n de nodecadena diseRada para d etener SERVICIO Y AJUSTES. lacadena enelcaso d ereculada. • Corte madera Onicamente. No corte • El f reno d ecadena inercia-activado metal, plAstico, ladrillos, cemento, u seactiva s ielprotector delantero otros materiales...
- Page 26 • Planifique laoperaci6n decorte c ui- caer hacia e llado enque sehahecho elcorte d emuesca. dadosamente por a delantado. • Despeje el&rea d etrabajo. Usted AVlSO: Siel&rbol tiene raices g rand- precisa un&rea d espejada entodo esdeapoyo, retirelas antes d ehacer elcontorno del &...
- Page 27 • En elinstante enque el&rbol com- Use una cuba para sacar la sierra ienza a caer, detenga lasierra atascada. ap6yela enelsuelo y retroceda r&pi- damente por l atrayectoria deretro- ceso prevista. • NO corte l os &rboles parcialmente caidos con lasierra.Tome extrema Apague la sierra y use una cuSa de precauci6n...
- Page 28 SECCIONAMIENTO USANDO PUNTOS IMPORTANTES TRONCO OCABALLETE DE APOYO • Tenga cuidado con las ramas delga- • Recuerde que el primer corte das bajo presi6n. El materaial de siempre es del lado presionado poco di&metro buede enredarse tronco. (Vea en la ilustraci6n que si- la cadena, dando un latigazo al gue el primero y segundo corte.)
- Page 29 • Finalice lamaniobra depodar dando uncote demanera que eltoc6n d e larama s obresalga de3a5cm(1a 2pulgadas) desde e ltronco del &rbol. 1IS ..,3 e, ,ametro Tercer corte de1 a 2 pulgadas del tronco del arbol RESPONSABILIDADES DEL USUARIO ADVERTENCIA: Desconecte del recurso de energia...
- Page 30 VERIFIQUE LA TENSION DE LA Despues del ajuste y utilizando CADENA guantes protectores de alta resistenoia, presione con una ADVERTENCIA: Use guantes mane el bot6n de aislamiento protectores al manejar la cadena. La apagado situado en la parte cadena tiene file y podrfa causarle superior del mango trasero y, al graves cortaduras,...
- Page 31 INSPECClONE LABARRA GUlA • Si la superficie superior del riel estA Condiciones que requieren que se desnivelada, use una lima plana haga m antenimiento alabarra: para restaurar la forma cuadrada. • Lasierra corta para u nlado o _ngulo. Bordes del Riels •...
- Page 32 miento dereculada deANSI B175.1 Extienda la eadena con los bordes euando estA probado con esta sierra. eortantes de la misma orientados Entre e neontaeto con elCentre de en la DIRECCION Servicio deSears para cambiar yafilar laseuehillas individuales delaeadena. ROTACION. INSTALAR LAESPADA YLA OADENA DE LASIERRA...
- Page 33 PIEZAS DE SERVICIO AL CLIENTE N-_DE PIEZA PIEZA DE REPUESTO 574-197501 Tapa del Aceite ADVERTENCIA: El use de eual- Lima (5/32" diametro) quier otro accesorio puede presentar 71-36524 Paquete de Dos riesgo de accidente al usuario. Lima asidero 71-36565 Herramienta de medidor de la 71-36557 profundidad...
- Page 34 TABLA D IAGNOSTICA ADVERTENCIA: Siempre apague el aparato y desconecte del recurso de energia antes de hacer cualquiera de las reparaciones recomendadas continuaci6n excepto reparaciones que requieran que el aparato funcionar. PROMBLEMA CAUSA SOLUCION 1. Yea "Tensi6n de la Cadena" 1.
Need help?
Do you have a question about the 358.341190 and is the answer not in the manual?
Questions and answers