
Related Manuals for DieHard 200.71465


Summary of Contents for DieHard 200.71465
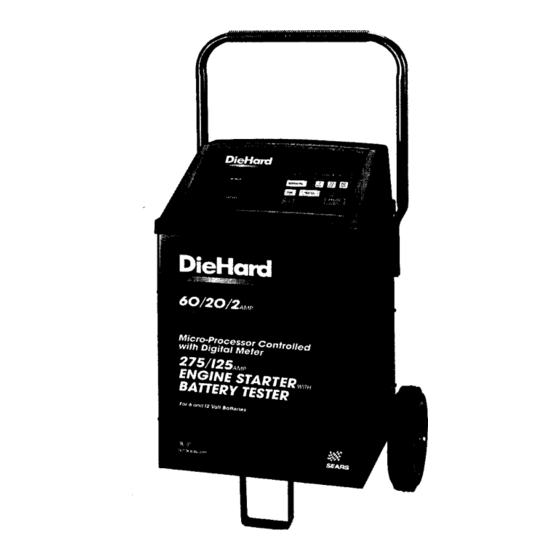
- Page 1 SEARS OWNER'S MANUAL Model NO, 200_71465 60/20/2 FULLY AUTOMATIC BATTERY CHARGER 275/125 ENGINE STARTER with BATTERY TESTER Sears, Roebuck and Co., Hoffman Estates, IL 60179 U.S.A.
-
Page 2: Table Of Contents
Table Of Contents Warranty ..............Using Your Battery Charger ........Important Safety Instructions ........Setting the controls ..........Parts ................. Charging your battery ........... Before Using Your BaRery Charger ......Calculating charge time ........Assembling your charger ........Using the engine start feature ......Plugging it in ............ -
Page 3: Important Safety Instructions
Important Safety Instructions - SAVE THESE INSTRUCTIONS - • Read all instructions and cautions printed on the • Do not disassemble charger. Take it to a qualified battery charger, battery, and vehicle or equipment service professional if service or repair is required. using battery. -
Page 4: Parts
Parts The exploded view of your charger shows parts, their location, and a keyed chart identifying each part by nam e and part number. The wiring diagram provides additional reference for the professional repair person. Replacement Parts Ust Sears 71465 Item Description Part Number... -
Page 5: Before Using Your Barery Charger
Before Using Your Battery Charger It is important to prepare your charger for use. This section will tell you how to assemble the charger, ground and connect the power cord, and prepare to charge a battery. Assembling your charger It is important to fully assemble your charger before use. -
Page 6: Plugging It In
3. Taptheotheraxlecapontotheopposite endofthe axleandplacetheaxleassembly o ntothebottom of thecharger. P lace oneendofthebracket i ntoslot, thenplace theaxleassembly under each bracket. Fasten the other side of the brackets using the two 10-32 screws provided. To attach the handle: Turn the charger right side up onto its foot and wheels. Remove the two top screws from each side of the charger and align with the screw holes on the handle. -
Page 7: Using An Extension Cord
TEMPORARY adapter may be used to connect the charger to a two-pole outlet if a properly grounded outlet is not available. Use the adapter ONLY until a properly grounded outlet can be installed by a qualified electrician. DANGER: Before using an adapter as illustrated, be certain that the center screw of the outlet plate is grounded. -
Page 8: Using Your Battery Charger
Manual mode. Touch the AUTO pad and either the 2, 20, or 60 AMP Charge DieHard Rate Selector pad. Charging will start after a short delay. It will stop when the battery is fully charged. - Page 9 TIME pad. • RESET: To stop charging or to change settings DieHard once charging has begun, touch the RESET pad. Then proceed as if you've just turned on the charger.
-
Page 10: Charging Your Battery
• METER: Besides showing amps, volts, and time, the meter displays information: - --A-- Charge Rate in amps - --V-- Voltage - MAN Charger is in Manual mode - AUTO Charger is in Automatic mode - RDY Charger is ready for cranking (Engine Start) - WAIT Wait until the charger is ready... - Page 11 8. For automatic charging, touch AUTO then a charge-rate pad 2, 20, or 60.Amps. The charging will stop when the battery is fully charged. 9. For manual charging, touch a charge rate pad then select a charge time up to 18 hours. If more than 135 minutes of charging time is needed, reset the time when the original time runs out.
- Page 12 Make sure the POWER switch is set to the OFF position. Next plug the power cord into a grounded AC outlet. For automatic charging, touch AUTO then a charge-rate pad. The charger will quit when the battery is fully charged. For manual charging touch a charge rate pad then select a charge time, from up to 18 hours.
-
Page 13: Calculating Charge Time
Calculating charge time The Chart Method • Marine, or deep-cycle batteries are usually rated in Use the following table to more accurately determine Reserve Capacity (RC). the time it will take to bring a battery to full charge. • NR means that the charger setting is NOT First, identify where your battery fits into the chart. -
Page 14: Using The Engine Start Feature
Using the engine start feature Your battery charger can be used to jump-start your car 5, Crank the engine for no more than 3 seconds. If if the battery is low. Follow these instructions when it does not start, wait 4 minutes. (The display will using the ENGINE START feature. -
Page 15: Troubleshooting
Troubleshooting Performance problems often result from little things that you can fix yourself. Please read through this chart for a )ossible solution if a problem occurs. PROBLEM POSSIBLE CAUSE SOLUTION/REASONS I Clamps are not making a Check for poor connections at battery and frame. Make No reading on the meter. - Page 16 60/20/2 SEARS FULLY AUTOMATIC BATTERY CHARGER OWNER'S 275/125 MANUAL ENGINE STARTER with BATTERY TESTER Model No. 200.71465 Forinformation abouttroubleshooting Calltoll-free fromanywhere intheU.S.A. 7 am to 4:30 pm CSTMondaythroughFriday 1-800-SEARS-64 (1-800-732-7764) Forthe repairor replacement partsyouneed Call7 am - 7 pro, 7 daysa week 1-800-366-PART (1-800-366-7278) Forthe location of a SearsRepair...
Need help?
Do you have a question about the 200.71465 and is the answer not in the manual?
Questions and answers