Table of Contents
Advertisement
Advertisement
Table of Contents

Related Manuals for DieHard 200.71231


Summary of Contents for DieHard 200.71231
- Page 1 OWNER'S MANUAL DieHard, BATTERY CHARGER 50/15/2 Amp Manual ENGINE STARTER With Battery Tester 225/125 Amp Model No. 200.71231 CAUTION: Read all Safety Rules and Operating Instructions, and follow them with each use of this product. Sears, Roebuck and Co., Hoffman Estates, IL 60179 U.S.A.
-
Page 2: Table Of Contents
Please read this Manual be_fore using your Battery Charger The DieHard model 71231 Manual Battery Charger/Engine Starter, offers a wide range of features to accommodate the needs for home or light commercial use. This manual will show you how to use your charger safely and effectively. -
Page 3: Important Safety Instructions
Important Safety Instructions - SAVE THESE INSTRUCTIONS - To reduce the risk of explosion, explcelve gamin, or Injury while using your battmy charger, follow the precautions listed below:. • Read all instructions and cautions printed on the • Do not disassemble Charger. Take it to a battery charger, battery, and vehicle or equipment qualified service professional if service or repair using battery. -
Page 4: Parts
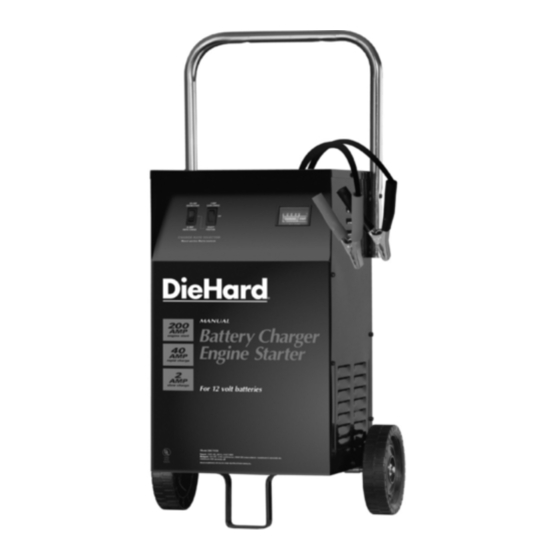
Parts This section shows an Illustration of your battery charger. Use It to become familiar with where all the parts ere located, and what they look like. Item Deecrlptlon Part Number Handle 359900(_86 Negative (BLK) Cable w/clamp_ 3899000_91 Po6itive (RED) Cable w/clamps 3899000408 Power Cord _(_6125... -
Page 5: Before Using Your Battery Charger
Before Using Your Battery Charger It is important to prepare your charger for use. This section will tell you how to assemble the charger, ground and connect the power cord, and prepare to charge a battery. Assembling your charger It is important to fully assemble your charger before use. Follow these instructions for easy assembly. -
Page 6: Plugging It In
Tap the other axle cap onto the opposite end of the axle and place the axle assembly onto the bottom of the charger. Place one end of the bracket into slot, then place the axle assembly under each bracket. Fasten the other side of the brackets using the two 10-32 screws provided. -
Page 7: Using An Extension Cord
ATEMPORARY a dapter m ay be used to connect the charger to a two-pole outlet if a propedy grounded outlet is not available. Use the adapter ONLY until a propedy grounded outlet can be installed by a qualified electrician. WARNING: Improper adapter con-... -
Page 8: Preparing Your Battery To Be Charged
Preparing your battery to be charged It is important that you read and follow these guide- lines while you are preparing to charge your battery. • Make sure that you have a 12 volt or 6 volt lead-acid battery. Set the volt/amp selector switch to match the voltage rating of the battery to be charged. -
Page 9: Using Your Battery Charger
Using Your Battery Charger To obtain the best results from your battery charger, you must know how to use it properly. This section tells how to set the controls and how to charge a battery in and out of the vehicle. Setting the controls All the controls for your charger are located on the... - Page 10 The "START" area of the ammeter indicates a high ALTERNATOR/GENERATOR TEST rate of current being drawn by the battery. For ex- Set the volt/amp selector switch to the OFF ample, when cranking an engine, the needle will be at position. the far right side of the =START"...
-
Page 11: Charging Your Battery
Charging Your Battery Charging your battery in the vehicle: Arrange the power cord and charging cords care- fulty in order to avoid damage that could be caused by the hood, door, or moving engine parts. Keep clear of the fan blades, belts, pulleys, and other parts that can cause injury. - Page 12 Charging your battery outside the vehicle: Remove battery from vehicle, making sure to dis- connect grounded terminal first with all power tumed off to the vehicle. REMEMBER: A marine battery should be re- moved and charged on shore unless special equipment designed for marine use is available.
-
Page 13: Calculating Charge Times
Calculating charge times The Chart Method • Marine, or deep-cycle batteries are usually rated in Use the following table to more accurately determine Reserve Capacity (RC). the time it will take to bring a battery to full charge. First, identify where your battery fits into the chad. •... -
Page 14: Using The Engine Start Feature
Using the engine start feature Your battery charger can be used to jump start your IMPORTANT: Do not try to start the engine without a car if the battery is low. Follow these instructions on battery in it. You could cause damage to the electrical system. -
Page 15: Troubleshooting
Troubleshooting Performance problems often result from little things that you can fix yourself. Please read through this table for a possible solution if a problem occurs. SOLUTIONIREASONS PROBLEM POSSIBLE CAUSE No reading on the Clamps are not making a Check for poor connection at battery. Make sure ammeter. - Page 16 For information about troubleshooting, call toll-free from anywhere in the U.S,A. 7 am to 4:30 pm CT Monday through Friday. 1-800-SEARS-64 (1400-732-7764). For repair parts or the location of a Sears Parts and Repair Center call: 1-800..4-MY-HOME ° (1-800-469-4663).
Need help?
Do you have a question about the 200.71231 and is the answer not in the manual?
Questions and answers
Need the knots for model 200.71231
Timer knob just goes around in circles no grip to turn on