Table of Contents
Advertisement
Operator's Manual
CRAFTSMAN °
16 IN. SCROLL SAW
Model No. 137.216010
CAUTION:
Before using this Scroll Saw,
read this manual and follow
all its Safety Rules and
Operating
Instructions
Customer
Help
Line
For
Technical
Support
1-800-843-1682
•
Safety Instructions
•
Installation
•
Operation
•
Maintenance
•
Parts List
Sears
Parts
&
Repair
Center
1-800-488-1222
Sears, Roebuck and Co., Hoffman Estates, IL 60179 USA
Visit our Craftsman website: www.sears.com/craftsman
Part No. 137216010001
Advertisement
Table of Contents

Related Manuals for Craftsman 137.216010


Summary of Contents for Craftsman 137.216010
- Page 1 Maintenance all its Safety Rules and • Parts List Operating Instructions Sears Parts & Customer Help Line Repair Center Technical Support 1-800-843-1682 1-800-488-1222 Sears, Roebuck and Co., Hoffman Estates, IL 60179 USA Visit our Craftsman website: www.sears.com/craftsman Part No. 137216010001...
- Page 2 FULL WARRANTY ON CRAFTSMAN TOOL If this Craftsman tool fails due to a defect in material or workmanship within one year from the date of purchase, CALL 1-800-4-MY-HOME® TO ARRANGE FOR FREE REPAIR (or replacement if repair proves impossible). If this tool is used for commercial or rental purposes, this warranty will apply for only ninety days from the date of purchase.
- Page 3 GENERAL SAFETY INSTRUCTIONS Safety standard Z87.1 Everyday eyeglasses have only impact-resistance lenses. They ARE NOT safety BEFORE USING THIS POWER TOOL glasses. Safety Goggles are available at Sears. NOTE: Glasses or goggles not in compliance with Safety is a combination of common sense, staying alert ANSI Z87.1 could cause serious injury.
- Page 4 SPECIFIC SAFETY INSTRUCTIONS 13.HOLD WORKPIECE FIRMLY against the table top. THIS SCROLL 14.NEVER CUT MATERIAL that is too small to be held safely. 1. READ AND UNDERSTAND all safety instructions and operating procedures throughout the manual. 15.DO NOT USE dull or bent blades. 2.
- Page 5 lag fuse or a #14 wire with a 15 A time-lag fuse. Before GROUNDING INSTRUCTIONS connecting the motor to the power line, make sure the IN THE EVENT OF A MALFUNCTION switch is in the off position and the electric current is rated the same as the current stamped on the motor BREAKDOWN, grounding provides a path of least...
- Page 6 AVAILABLE ACCESSORIES UNPACKING AND CHECKING CONTENTS WARNING I I A. WARNING I • To avoid injury, do not attempt to modify this tool • To avoid injury, if any part is missing or or create accessories not recommended for use damaged, do not plug the scroll saw in until with this tool.
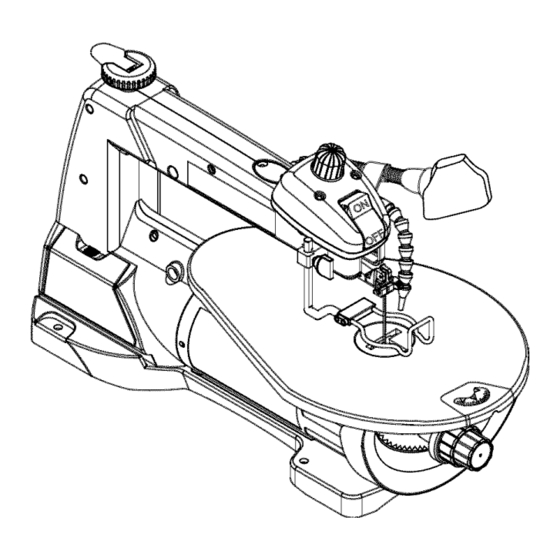
- Page 7 Quickrelease Variable speed tension lever control k nob Blade guard footlockknob light Blade storage Sawdust blower Upper arm Blade guard foot Bevel s cale Mounting holes ON/OFF switch Worktable Blade lockknob Tablelockknob Sawdust collection port...
- Page 8 SCROLL SAW TERMS WOODWORKING TERMS BLADE TOOTH SET - The total width the blade will BEVEL SCALE - Represents the degree of table angle from 0 ° to 45 ° when the table is tilted for bevel cutting. cut based on the distance from the outside point of one bent tooth to the outside point of the next bent tooth BLADE GUARD FOOT - Guards the blade and keeps establishing set of teeth.
- Page 9 ASSEMBLY INSTRUCTIONS SAWDUST COLLECTION PORT (FIG. C) This scroll saw will accept a hose or vacuum accessory IA WARNING I (not provided) to be connected to the port (1) on the To avoid injury, do not connect this scroll saw to the right side of base.
- Page 10 PLAIN-END BLADE REMOVAL (FIG. D, E, F) PLAIN-END BLADE INSTALLATION (FIG. F, G, H) 1. To remove the blade, loosen the blade tension by CAUTION: In order to avoid uncontrollable lifting of the lifting the quick release tension lever. (2-Fig. D) workpiece, the teeth of the blade should ALWAYS point downward.
- Page 11 PIN-END BLADE REMOVAL AND INSTALLATION PIN-END BLADE INSTALLATION ( FIG. K, L ) NOTE: Do not tighten the lock knobs (8-Fig.K) when WARNING I using Pin-end blades. To prevent personal injury, always turn the saw CAUTION: In order to avoid uncontrollable lifting of the OFF and disconnect the plug from source before workpiece, the teeth of the blade should always point downward.
- Page 12 BLADE GUARD FOOT ADJUSTMENT (FIG. M, N) BLADE SELECTION (FIG. P) 14WARNING NOTE: User must keep constant downward pressure on workpiece when cutting. The blade guard foot is not To avoid injury from accidental starting, always turn designed to hold down the workpiece, but rather a guard the switch OFF and unplug the scroll saw before to help prevent the workpiece from lifting up excessively.
- Page 13 VARIABLE SPEED CONTROL O N/OFF SWITCH RECOMMENDATIONS FOR CUTTING 1. When feeding the workpiece into the blade do not The variable speed control allows greater versatility to force the leading edge of the workpiece into the blade cut a variety of materials such as wood, plastics, non- because the blade will deflect, reducing the accuracy ferrous metals, etc.
- Page 14 FREEHAND CUTTING (FIG. S) ANGLE CUTTING (FIG. S, T) I,AWARNING IA WARNING I To avoid injury from an accidental start, make sure To avoid injury from an accidental starting, make the switch is in the OFF position and the plug is not sure the switch is in the OFF position and the plug connected to the power source outlet.
- Page 15 RIP OR STRAIGHT LINE CUTTING (FIG. U) 9. When the cut is complete, move the trailing edge of the workpiece beyond the blade guard foot. Turn the IA WARNING I scroll saw OFF. To avoid injury from an accidental starting, make NOTE: When cutting a narrow workpiece use push sticks.
- Page 16 IA WARNING I For your own safety, turn the switch OFF and remove the plug from the power source before maintaining your saw. GENERAL An occasional coat of paste wax on the work table will allow the wood being cut to glide smoothly across the work surface.
- Page 17 IA WARNING I To avoid injury from accidental starting, always turn switch OFF and unplug the tool before moving, replacing the blade or making adjustments. Consult your Sears Service Center if for any reason the motor will not run. PROBLEM PROBLEM CAUSE REMEDY SUGGESTED...
- Page 18 MODEL NO. 137.216010 IA WARNING I When servicing use only CRAFTSMAN replacement parts. Use of any other parts many create a HAZARD or cause product damage. Any attempt to repair or replace electrical parts on this Scroll Saw may create a HAZARD unless repair is done by a qualified service technician.
- Page 19 0"1 0KTH 0LSR ODG4_ 0KBD4 0ZX3 0KA9 _076B OKTO ozx6 OKUX OJU4ad OJ91z/! OAMW 2 OZWM OKDM 075L 20P1 OZW6 OCDD 3 2EZD OZW8 OJPG 5...
- Page 20 Your Home For repair - in your home - of all major brand appliances, lawn and garden equipment, or heating and cooling systems, no matter who made it, no matter who sold it! For the replacement parts, accessories owner's manuals that you need to do-it-yourself. For Sears professional installation of home appliances...
Need help?
Do you have a question about the 137.216010 and is the answer not in the manual?
Questions and answers
Why does the variable speed not work