Advertisement
Table of Contents
- 1 Table of Contents
- 2 Introduction
- 3 Principle of Operation
- 4 Automatic Humidifier Control
- 5 Operating Instructions
- 6 IV. Annual Maintenance
- 7 Annual Summer Shutdown
- 8 Periodic Preventative Maintenance
- 9 Small and Large Bypass Humidifiers
- 10 Water Saver Humidifier
- 11 Limited Warranty
- Download this manual
Advertisement
Table of Contents

Related Manuals for Carrier Humidifier


Summary of Contents for Carrier Humidifier
- Page 1 A UAL OWNE FOR BYPASS AND FAN POWERED HUMiDiFiERS Type Installed: Maintenance page: [] Small or Large Bypass [] "Water Saver Bypass [] Fan Powered Includes Safety, Operating and Maintenance Instructions...
-
Page 2: Table Of Contents
Humidifiers Bypass and Fan Powered Table of Contents Page Introduction ............. Principle of Operation ..........Operating Instructions ........... Effect of Water Characteristics ........Annual Maintenance ..........Annual Summer Shutdown ........Periodic Preventative Maintenance ......Maintenance RnstruC_ions Small and Large Bypass Humidifiers ....... Water Saver Humidifier ......... -
Page 3: Introduction
lntrodu Jon Thank you for your humidifier purchase. We sincerely appreciate your business and are pleased to add your name to our growing list of customers. Now, please take a few minutes and read this booklet. This will familiarize you with the benefits you will receive from the equipment you have purchased and help you understand the routine maintenance that will be required. -
Page 4: Principle Of Operation
E Prindp]Je of Operation You have purchased a humidifier that operates on the evaporative principle, it will provide the proper relative humidity (see operating instructions) all during the heating season, it is very possible that you have questions concerning what your humidifier can do for you, and what you should do to receive maximum benefits from it. - Page 5 The humidifier pad, designed especially for uniform, high evaporation, and the Scale Control Insert also efficiently trap mineral deposits which are often the cause of damage to working parts in ordinary humidifiers. No "white dust" can be distributed throughout the living quarters.
-
Page 6: Operating Instructions
H. OperatBngInstnn ons Your humidifier is controlled bv a manual humidifier control, HumidiTrac or Thermidistat installed either in the living area or in the cold air return. AutomaticHumidifierControl: ( for Manual Humidifier Control- see page 8) Your HumidiTrac Control is installed in the cold air return. During the first heating season, your HumidiTrac Control needs to be set initially to match your home's condition. - Page 7 Your Automatic Humidifier, is a high precision system that will accurately maintain the relative humidity in your home. For every t°F change in outdoor temperature, the control will automatically adjust the indoor relative humidity (RH) by I/2%. if you would like to determine the RH in your home, follow these steps: 1.Determine the outdoor temperature.
- Page 8 To check the humidifier'soperation, note the current setting andset the HumidiTrad MControlto the Test modewhen the furnace blower motor is operating.Water will flow into the humidifierfor 1 minute andthen it will turn off. This insures the humidifier is operatingproperly. Do not leavethe control in the test mode as it wilt not operate.Resetthe control to it's original setting.
- Page 9 The Humidifier Control is a precision instrument that can be used to determine the RH accurately in your home during the winter. Turn the dial to the lowest setting, then reverse the dial direction slowly until a "click" is heard° At this point, read the RH on the dial. This will be very close to the actual RH in your home.
-
Page 10: Iv. Annual Maintenance
IlL Effectof Water Chara er[stks Your humidifier will operate effectively using either hard or mechanically softened water. Any type of water (hard, soft, hot, or cold) is acceptable for use with the drain-type humidifiers. Hot supply water, 125°F(52°C) maximum, is recommended for all heat pump applications. The use of hotsupplywater will also increase the amount of humiditygenerated in other applications.The heat in the water increases evaporation and the water going to the drain is cold to the touch. -
Page 11: Periodic Preventative Maintenance
VL Periodic Preventative Maintenance NOTE: Periodic inspection and preventative maintenance of vour total heating system is important for efficient and safe operation. Your dealer will include humidifier service during a maintenance inspection_ Your humidifier is equipped with an in-line water strainer orifice as shown below. -
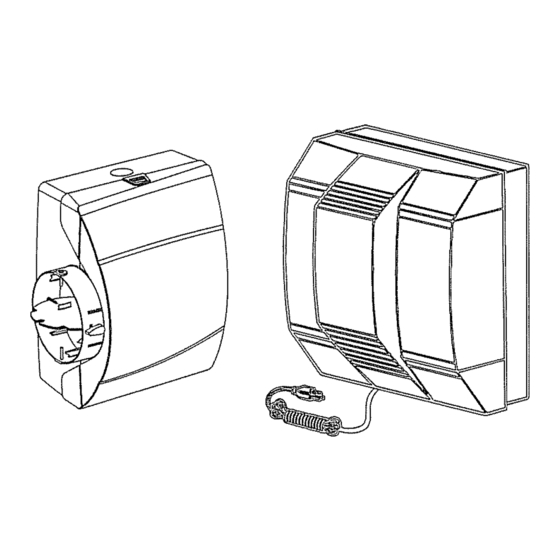
Page 12: Small And Large Bypass Humidifiers
CAUTION ® 1.,Front Cover 2. FeedTube 3oIntegral Bypass Damper 4oEvaporativeAssembly 5. Distribution Tray 6o"V °' Notches 7_Humidifier Pad 8,,Scale Control Insert g, Drain Line _0-1173 1.,Note Humidifier Control setting and turn dial to the "OFF" position. 2, Turn off water supply Turn the integral bypass damper (3)to the SUMMER position_, 3 Pressthe tabs inthe latches on the top and bottom of front cover tt! and pull cover off basewith both hands. -
Page 13: Water Saver Humidifier
,KXCAUTION t. Front Cover 2 FeedTube 3. Integral BypassDamper 4 EvaporativeAssembly 5 Distribution Tray 6 "V" Notches 7,.Humidifier Pad 8.,Scale Control InsertlFloat Chamber 9 OverflowDrain Line 10.Float Cover 1t, Float 12.Water Level SensorAssembly t. Note Humidifier Control setting andturn dia! to the "OFF"position_ 2 Turnoff water supply Turnthe integral bypassdamper (3)to the "SUMMER"... - Page 14 WARNING 1.,Humidifier Cover Assembly 2, Base Assembly 3 EvaporativeAssembly 4 Distribution Trav 5. "V" Notches 6, Humidifier Pad 7.,Scale Control Insert 8, Drain Line 9_Power Cord t. Note Humidifier Control setting and turn dial to the "OFF" position, 2, Disconnect electrical power and turn off water supp]y, 3, Unlatch humidifier front cover assembly (I) from base assembly (2) at the bottom of the cover, lift, and set aside,, 4_Pullout the evaporativeassembly (3}by graspingat the top and tipping out,...
-
Page 15: Limited Warranty
limited @el, r arity FOR WARRANTYSERVICE OR REPAIR: Contactthe installer..Youmay find the instatler'sname on the equipment o r inyourOwner's PackeL Forhelp, contact: C AC/ BDP,ConsumerRelations,RO.Box 4808,Syracuse,New York13221, Phone 1-800-227-7437 PRODUCT REGISTRATION: Youcan register your product online at wvm_.cac-bd_.com.. Model NoD UnitSerial ikloo Dateof Installation Installed bv... - Page 16 LRM_e_ _arran_ (continuedfrom page 15) WARRANTY CONDITIONS: To obtain the tongerwarranty' periods as shown in the tabte under original owner, for the original purchaser, t he product mttst be properfy registered at wt,_..cac-bdp.com w_thinninety (90)days of original installation Injurisdictions where warranty terms cond_oned on registration are prohibited by law, registration is not requiredand the tongerwarranty periodshown will be apply 2 Where a product is installed in a newly constructed home,the date of installation is the da_ethe homeowner purchasedthe home from the builder..
Need help?
Do you have a question about the Humidifier and is the answer not in the manual?
Questions and answers