
Related Manuals for Microcom 410


Summary of Contents for Microcom 410
- Page 1 MICROCOM CORPORATION MODEL 410 DIRECT THERMAL PRINTER OPERATOR'S MANUAL (6dpmm version) January 1995 Software Version 3.35...
- Page 2 - Revised 01/13/95 MSG - Centronics is a registered trademark of Data Computer Corp. Epson is a registered trademark of Seiko Epson Corporation. FX-86e is a trademark of Seiko Epson Corporation. HP and LaserJet II are trademarks of Hewlett-Packard Company.
-
Page 3: Table Of Contents
UNPACKING THE 410 PRINTER ........ - Page 4 PRINTER ENQUIRIES ..........35 SENDING ^D PRINTER COMMANDS ....... . . 36 5.3.1 SOFTWARE DIP SWITCHES AND EEPROM COMMANDS .
- Page 5 Index ............... 96 )))))))))))))))))))))))))))))))))))))))))))) 410 Operators Manual...
- Page 6 Printer Feed Mechanism ........
-
Page 7: Introduction
The 410 is capable of printing on most types of label stock or fax paper. It offers operation in a tag/tear, peel-and-dispense, batch mode, and user-defined advance mode. It can handle blow- hole, black-line, label gap and continuous stock. - Page 8 )))))))))))))))))))))))))))))))))))))))))))) 410 Operators Manual...
-
Page 9: Chapter 1: Features And Specifications
The Microcom Corporation model 410 direct thermal printer is designed with many standard features that are unique when compared to other printers. The 410 is built to meet the demands of complicated applications and rigorous use. A guarantee of excellence in engineering is provided by fulfilling the requirements for approval by UL, CSA and the FCC. -
Page 10: Bar Codes
Tag/tear mode advances label to the tear bar Batch mode printing User defined label advancement for special stock or application Label-presence sensor allows printer to dispense at operator's pace Label back-up to prevent wasted media in tag/tear and peel modes INTERFACE COMMUNICATIONS... -
Page 11: Physical
Expandable memory: 128K bytes ROM, 64K bytes RAM or 256K bytes ROM, 32K bytes Media supply rack of 8 inch outer diameter (no charge option) Real-time clock that battery-backs RAM PCX to printer graphic conversion PC software Parallel interface On-demand label support rack )))))))))))))))))))))))))))))))))))))))))))) 410 Operators Manual " C operating Features and Specifications... -
Page 12: 1.10 Printer Variations
Features and Specifications )))))))))))))))))))))))))))))))))))))))))))) 1.10 PRINTER VARIATIONS 230V European power supply Battery powered model (405) 1.11 APPROVALS UL, CSA, Complies with FCC, Class A )))))))))))))))))))))))))))))))))))))))))))) Chapter 1 410 Operators Manual... -
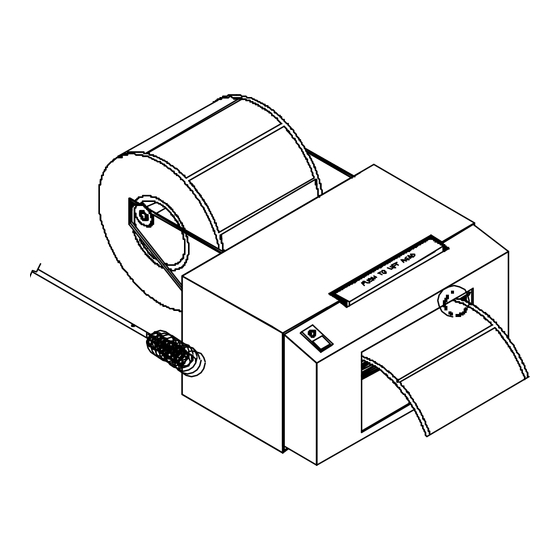
Page 13: Front View
FRONT PANEL LED FRONT PANEL SERIAL PORT LINE GUIDE IDLER LINE GUIDE SHAFT PAPER LINE GUIDES )))))))))))))))))))))))))))))))))))))))))))) 410 Operators Manual Features and Specifications LABEL SUPPORT RACKS PUSH TO LIFT HEAD LEVER PINCH ROLLER LABEL FEED AND LINE FEED BUTTON Front View... - Page 14 )))))))))))))))))))))))))))))))))))))))))))) 410 Operators Manual...
-
Page 15: Chapter 2: Basic Operation
3). When a status label is created, the communication settings will be temporarily set to 9600 baud rate, no parity, 8 data bits, and 1 stop bit. The printer will return to the old settings, if different, after power down or a soft reset. -
Page 16: Paper-Out Mode
It will then turn yellow and the printer will print a duplicate of the last label printed and return to the blinking mode. This feature was designed to facilitate batches with serial numbers or other variable data. This process can be repeated as often as necessary to allow the paper to align itself. -
Page 17: The Status Light
Chapter 2 )))))))))))))))))))))))))))))))))))))))))))) THE STATUS LIGHT The status light has different functions depending upon the mode of the printer. Table 1 shows the relationship between the status light and the different modes. Light Mode Color Green Flashing Yellow Tag/tear, Peel... -
Page 18: Loading Paper
NORMAL AND TAG/TEAR MODES Unwind about two feet of stock from the paper supply roll of paper. Set the roll behind the printer on the table. Remove the label supply shaft. Insert the paper with the thermally sensitive side up, under the rear threaded paper guide shaft, and into the printer until the paper stops. -
Page 19: Peel-And-Dispense Mode
CLEARING LABEL MISFEEDS: DIAPHRAGM REMOVAL The purpose of the label diaphragm is to provide a smooth path for labels through the printer and provide an easy means of removing label misfeeds. If a label misfeed occurs, remove the supply roll shaft at rear of printer. -
Page 20: Cleaning Instructions
The printer should also be cleaned whenever a label roll is changed. A Microcom Corporation cleaning kit should be used for cleaning and maintaining the model 410 printer. It is important to note that the optimum printhead life is achieved by maintaining a clean printer and printhead. -
Page 21: Chapter 3: Communications
Table 3 shows the optional parallel port configuration. If XON/XOFF hand shaking is used, the only signals the 410 requires are RXD, TXD, and GND. If hardware (CTS) hand shaking is used, a CTS signal is provided. XON/XOFF may be disabled through the software dip switch #1 (see chapter 5). -
Page 22: Printer Cables
9 = D7 PRINTER CABLES Warning: Connection of a serial printer to a parallel port may result in damage to the printer and/or computer. Connection of a parallel printer to a serial port may result in damage to the printer and/or computer. -
Page 23: Chapter 4: Designing Labels Using Lds
PC's. However, if you are using the printer for the first time, the easiest way to start is with a PC and terminal emulation software. This will allow two-way, serial communication with the printer. You will be able to quickly upload files and access label sizing and other features that will help considerably in formatting your first labels. -
Page 24: Pc Connection (Parallel)
Designing Labels Using LDS )))))))))))))))))))))))))))))))))))))))))))) If a terminal program is not available, it is possible to send files to the printer using the DOS COPY command. To do this you must first create a text file containing the information to be sent (i.e. -
Page 25: Learning Lds
DOS copy command. (To use the DOS copy command, first use the DOS mode instruction to configure the PC. For example, MODE COM1:9600,N,8,1,P). There are some special features offered by the printer that will aid label design. For example, the auto-size command (^A2^D395) will provide most of the header format information needed to define the different properties of label stock. -
Page 26: Microcom Label
The sequence ^D56<CR> selects the user layout. The sequence ^D2<CR> tells the printer to start accepting text data for each defined field. The next three lines contain the text for each field. The first string will be TSN# 1, the second will be TSN#2 and so on. -
Page 27: Label Header
Below is a list of the header element mnemonics and their default values: HFM, LSX, LSY, WEB, GAP, DPS, LCB, AGD, SPG, OFX, OFY 0, 640, 443, Label Header Parameters of a 4" X 3" Label )))))))))))))))))))))))))))))))))))))))))))) 410 Operators Manual 1, 352, Figure 6 Designing Labels Using LDS... - Page 28 PRINT SPEED The speed the printer actually prints a label. The printer will slow down in a dense area of the label, if needed, to prevent the label from being garbled. If the printer must slow down in an area, reducing the print speed will produce a better quality label.
- Page 29 Normal Stock (leading edge): If defaulted (value of 0), the printer will detect the trailing edge of the label (the beginning of the gap). Black Line Stock: If set to a value of 1, the printer will detect the leading edge of a black line.
- Page 30 SPG would need to be manipulated so that the printer can print the label between the perforations, yet still trigger on the black line. In this case SPG would be calculated as the distance from the black line to the perforation.
-
Page 31: 4.3.1 A Sample Session With A Label Header
- OFX and OFY. Because they were not entered, the printer assumes the default values, 0 in their cases. Likewise, if the AGD and SPG were defaulted, the carriage return could have followed the DPS. -
Page 32: Label Fields
The X coordinate of the field is measured in dots. The far left edge of the print head as viewed from the front of the printer is X co-ordinate 1. There is no X co-ordinate 0. The X coordinate increases in size from left to right (See figure 7). An XB of 154 would place the text one inch from the left side of the print head. -
Page 33: Character Count
* Refer to section 7.1.1 on how to use these TCI's Example: For the text string - 1234567 A TCI of one would print it as an ASCII string A TCI of 42 would print it as a Codabar bar code )))))))))))))))))))))))))))))))))))))))))))) 410 Operators Manual Designing Labels Using LDS... -
Page 34: Fonts
0123 Standard 0123 Standard 0123 Standard 0123 Standard 0123 Standard 0123 Bold 0123 Standard 0123 Standard 0123 Standard 0123 Standard 0123 Standard 0123 Standard 0123 Standard Standard Standard 0123 Numeric Custom #1 Custom #2 OCR-A Upper/ Lowercase 410 Operators Manual... -
Page 35: Bar Code Symbologies
Chapter 4 )))))))))))))))))))))))))))))))))))))))))))) This list constitutes the bar codes available on the 410 printer. Some bar codes offer different ratios to accommodate different applications. See section 7.1 on designing with bar codes for more information. Bar code Code 3 of 9... -
Page 36: Fo Field Orientation
Below Baseline - )))))))))))))))))))))))))))))))))))))))))))) Text positioned right of X co-ordinate Text positioned left of X co-ordinate Text is centered on the X co-ordinate Text positioned above the Y co-ordinate Text positioned below the Y co-ordinate Chapter 4 410 Operators Manual... -
Page 37: Character Starting Positions
Multiplies each character in the Y direction. A 5 high by 3 wide character with a CMY of 2 would produce a 10 high by 3 wide character. )))))))))))))))))))))))))))))))))))))))))))) 410 Operators Manual Field Orientation 0 - Right justified above base-line... -
Page 38: Cs Character Spacing
It will form an incomplete character. CHARACTER CELL LENGTH Y DIRECTION This elements will over-ride the height of the characters in the selected character generator. This element is used only in creating lines. )))))))))))))))))))))))))))))))))))))))))))) Chapter 4 410 Operators Manual... -
Page 39: 4.4.1 A Sample Session With A Label Field
TSN is 1, therefore we will print the entire EASY word (a TSN of 2 would have printed ASY). CLX and CLY will default to 5 and 7, respectively, so a full character will be printed. )))))))))))))))))))))))))))))))))))))))))))) 410 Operators Manual Designing Labels Using LDS A format is coming Header Information... -
Page 40: Chapter 5: Printer Commands
CHAPTER 5: PRINTER COMMANDS The Model 410 printer has a large and versatile collection of control codes to meet the special needs of labeling applications. Most of the commands use a ^D control sequence, however the printer also recognizes a selected number of other control sequences. -
Page 41: Printer Enquiries
ASCII '^' response followed by the defining alpha character. The control-code equivalent returns an actual control code. The printer will send to the host one of the following responses in response to a ^E or ^D5: )))))))))))))))))))))))))))))))))))))))))))) 410 Operators Manual... -
Page 42: Sending ^D Printer Commands
All commands not listed in 5.3.1 (the EEPROM and dip switch section) are not retained when the printer is turned off and if desired, must be sent again upon power-up. When possible, the following commands are grouped by function. See the quick reference command summary in Appendix G for a listing by number. -
Page 43: Software Dip Switches And Eeprom Commands
The printer will only configure to the following commands after a the machine has been powered off and then turned back on. The printer will not accept these commands until this is done. COMMAND Change baud rate: Unless otherwise requested by the customer, the baud rate of the printer is 9600. - Page 44 Parity: Selects either even or odd parity error checking. Enable Parity: Enables or disables parity error checking. Echo: If this feature is enabled, the printer will echo all received characters to the serial port. Data Bits: Choose 7 or 8 bit data.
- Page 45 The >RESTARTED< message is only sent once after reset. Button Use: Set to 1, the printer will not allow button use, even for paper feed. Print Button: If this is 0, the button can be used for paper feed, but cannot be used to initiate label printing.
- Page 46 Response After Print: If enabled, an enquiry response will be sent back through the serial port after every print. Label Centering: The printer will center all label formats if this position is set to 1. Label centering creates an X offset for the older formats that were left justified.
- Page 47 (see section 2.1.3) and clear (0) this position in this software dip switch. This function is no longer supported. Enable 2" Epson Emulation: Same as position 2, but prints in a 40 column format. (Also see the ^A2^D38 command in section 5.3.) This function is no longer supported.
-
Page 48: Printing Commands
150 labels; three copies of each serial number and 50 different numbers (^A3^D73^A50^D75^D3<CR>). Infinity Print: Prints a batch of labels but will continue to print until the printer is turned off. This command is most useful in tag/tear or peel-and-dispense modes. -
Page 49: Auto-Sizing And Valid Gap Commands
)))))))))))))))))))))))))))))))))))))))))))) COMMAND Load Label Count: Tells the printer to print a batch of labels using the serial number function if enabled. Can be used in conjunction with load copies count (^D73). The batch of labels will be printed when a ^D3 is executed. Therefore, this must precede a ^D3 command. - Page 50 ^A1^D47<CR>) XX 91 Load Value for Printer to See Valid Gap. Obtained from the auto-size (^D39) command. This value states the translucent properties of stock to the gap detector. This ^AXX^D91 command should be at the beginning of all format files if suggested ^D91 value returned from auto-size is not between 50 and 70 or the default value creates skipping over the label gap.
-
Page 51: Real-Time Clock
HH:MM:SS MN/DD/YR XXX DD/MN/YR XXX ...where xxx is the day of the week. These values should be inserted into the Field parameters for proper clock text access: )))))))))))))))))))))))))))))))))))))))))))) 410 Operators Manual DD = day MN = month YR = last 2 of year... -
Page 52: Clock Option
^D2<CR> US DATE FORMAT<CR> ^D3<CR> Figure 10 ^D57<CR> 3,,163,,,35,,1,178<CR> 0,320,20,34,1,10, ,4<CR> 0,550,80, 8,1,10,3,4<CR> 1,320,60,18,1,13, ,4<CR> ^D56<CR> ^D2<CR> M-410 CLOCK OPTION<CR> ^D3<CR> )))))))))))))))))))))))))))))))))))))))))))) Chapter 5 Clock Option Figure 7 European Date Format Figure 8 U.S. Date Format Figure 9 Time Format... -
Page 53: Serial Number Commands
The following commands, ^D80 through ^D89, refer to the serial number function of the printer. The printer can increment or decrement any single serial number on the label by any amount. However, if there is more than one serial number on the label, it can only increment or decrement those serial numbers by one. - Page 54 )))))))))))))))))))))))))))))))))))))))))))) Command Load Label Count: Tells the printer to print a batch of labels using the serial number function if enabled. Can be used in conjunction with load copies count (^D73, see section 5.3). The batch of labels will be printed when a ^D3 is executed.
-
Page 55: Label Header Commands
)))))))))))))))))))))))))))))))))))))))))))) 5.3.6 LABEL HEADER COMMANDS The following ^D commands, 41 - 51, all refer to label header values. The printer will use these values for all subsequent label formats unless a ^D40 is executed, or the machine is powered off. -
Page 56: Saving Format Files Commands
Next send the ^A1^D59<CR> command sequence. This indicates to the printer that file #1 of a possible 8 is being sent to the printer. After this command, follows the format file. The format file must be terminated with an escape character (1B hex) so that the printer knows that the complete file has been sent down. - Page 57 To list a file that has previously been sent to the printer, use the ^AX^D54 command, where ^AX denotes the file to be read. The printer will send the file to the serial port. Sample files: File #1 initiates the save format file memory and downloads saved format file #1.
- Page 58 ^D57<CR> 4,620,161,,18,35,,73,3<CR> 1,120,110,50,1,11<CR> 2,120, 80,70,1,10<CR> 3,120, 60,70,1,10<CR> 4,120, 40,70,1,10<CR> ^D56<CR> ^D2<CR> MICROCOM CORPORATION<CR> 8333-A GREEN MEADOWS DR., N.<CR> WESTERVILLE, OH 43081<CR> (614) 548-6262<CR> <ESC> The above file would be selected by sending an ^A2^D58<CR>. )))))))))))))))))))))))))))))))))))))))))))) Chapter 5 410 Operators Manual...
-
Page 59: Label Presence Sensor Control
)))))))))))))))))))))))))))))))))))))))))))) 5.3.8 LABEL PRESENCE SENSOR CONTROL The label presence sensor that is standard on the 410 printer gives the printer the ability to print at the operators pace. The following modes define its operation. Command Load Advance Delay: ^A specifies how many milliseconds to delay repositioning of the label in tag/tear and peel-and-dispense modes. - Page 60 The printer will advance the label so that it is still hanging off the tear bar. This will make it easier for the operator to take the label. Once the label is taken, the printer will back the paper into the printer so as not to waste label stock.
-
Page 61: Text Strings Commands
When the printer is put in auto-print mode, it is not necessary to send a ^D2<CR> to inform the printer that text is coming or send a ^D3<CR> to tell the printer to print a label. The printer will accept all incoming data as text strings (except... - Page 62 ^D64 command. At this point, the printer will print a label and continue to accept data. This mode is useful for interfacing to a device that transmits raw data, such as a scale or meter.
-
Page 63: 5.3.10 Miscellaneous Printer Commands
130% of Base 140% of Base Epson Emulation: The 410 printer will emulate an Epson printer in this mode. There is also an Epson emulation on power-up feature as explained in section 5.3.1. The following ^A parameters define mode of operation. This function is no longer supported. - Page 64 Microcom Corporation printer and now want to use their old format files with the model 410 printer. Label centering creates an X offset for the older formats that were left justified. It will not center all the fields on the label.
-
Page 65: Chapter 6: Logos
)))))))))))))))))))))))))))))))))))))))))))) CHAPTER 6: LOGOS The Microcom Corporation model 410 printer is capable of storing two graphic images at 0 and 180 degree rotations, or one graphic image in four (0 ,90, 180, and 270 degree) rotations. You may either use the Microcom Corporation "pcx2410" software to create an OGO file from a downsized PCX of PCC file, or use your own software to format a graphics file into a form that the printer can understand. -
Page 66: Procedure For Using The Pcx2410 Software
Sample Format Files to Access Graphic Images Label format for one graphic image, four rotations (See figure 11) ^D57<CR> 4,615,441,,10,36,0,1,352<CR> 1,355,20,1,7,3,0,4,1,1<CR> 1,355,400,1,7,3,1,4,1,1<CR> 1,100,20,1,7,3,2,4,1,1<CR> 1,150,270,1,7,3,3,4,1,1<CR> ^D56<CR> ^D2<CR> .<CR> ^D3<CR> )))))))))))))))))))))))))))))))))))))))))))) Graphic Image in Four Rotations Figure 11 410 Operators Manual Chapter 5... -
Page 67: Two Graphic Images In Two Rotations
Chapter 5 Printer Commands )))))))))))))))))))))))))))))))))))))))))))) Label format for two graphic imgaes, two rotations (See figure 12) ^D57<CR> 4,615,441,,10,36,0,1,352<CR> 1,315,20,1,7,3,0,4,1,1<CR> 1,315,220,1,7,4,0,4,1,1<CR> 1,150,20,1,7,3,1,4,1,1<CR> 1,150,420,1,7,4,1,4,1,1<CR> ^D56<CR> ^D2<CR> .<CR> ^D3<CR> Two Graphic Images in Two Rotations Figure 12 )))))))))))))))))))))))))))))))))))))))))))) 410 Operators Manual... -
Page 68: Format Of Logo Files
FORMAT OF LOGO FILES This information is made available to companies that may need to convert other graphic formats to the OGO format. The file sent to the 410 printer should appear as follows, whereas: h = Hex representation X = Indeterminate data... - Page 69 Printer Commands )))))))))))))))))))))))))))))))))))))))))))) If you are sending logo #1, the format is finished. This data can be sent to the printer. Proceed with graphic image #2 from the very beginning of this format (It does not matter whether you send graphic #1 or graphic #2 first).
-
Page 70: Chapter 7: Special Designs
(CMX) for better readability, the space between characters is also multiplied to create a more readable bar code. The printer will do this internally. Therefore, when multiplying bar codes, use the default value for the spacing element (SP) in the field parameters. -
Page 71: Bar Code Human Readables
All other bar code human readables only require a text TCI of 1, a user selectable text character generator, and text positioning under the desired bar code. This field must refer to the bar code number. )))))))))))))))))))))))))))))))))))))))))))) 410 Operators Manual... - Page 72 4, 80,150,19, 1,10<CR> 4, 65,167,12,20, ,,,2,60,,8<CR> 5,408,150,14, 1,10<CR> 5,395,167, 7,21, ,,,2,60,,7<CR> 6,110,270, 5, 1,10<CR> 6,120,287,12,13, ,,,2,60,, 8<CR> 9,180,270, 8, 3,10<CR> 7,400,270, 5, 1,10<CR> 7,410,287,12,13, ,,,2,60,, 8<CR> 8,460,270, 8, 3,10<CR> ^D56<CR> ^D2<CR> UPC-A HR W/CHKSUM<CR> UPC-A HR W/O CHKSUM<CR> 01234567890<CR> EAN13 012345678901<CR>...
-
Page 73: Making Lines
The following program is similar to the thick line program, but also accesses a blank space to create a line that fires every other dot. )))))))))))))))))))))))))))))))))))))))))))) 410 Operators Manual Note in the following program sample that the line logo needs to refer to some kind of text. A period is used only because there was no other text field to reference. -
Page 74: Reverse Video
Place a text field in this box and you have reverse video. When the 410 printer has two fields occupying the same space, it XOR's the data together. This creates the reverse video. Here is a label example that shows text placed in a filled box. -
Page 75: Chapter 8: Options
This 16bit DOS PC software program converts a PCX file into an OGO file that can be downloaded to the 410 printer. The PCX or PCC file must meet the 248 X 248 pixel scale- excluding white space - for the program to create the picture. Otherwise, the graphic will begin with the first Y and X co-ordinate that contains dark pixel data, and create a window of the graphic from that point. -
Page 76: Wysiwyg Software Packages
PARALLEL CONVERSION BOARDS Some applications require a parallel interface. Microcom Corporation offers a parallel board option that is internal to the 410. CLEANING KIT An approved cleaning kit is offered for the 410 printer. )))))))))))))))))))))))))))))))))))))))))))) Chapter 5 410 Operators Manual... -
Page 77: Appendix A: Warranty And Repair Procedures
Microcom Corporation. This warranty does not cover normal wear and tear and shall be null and void if the printer is modified, improperly installed or used, damaged by accident or neglect, or in the event any parts are improperly installed or replaced by the user. -
Page 78: Return Material Authorization (Rma) Procedure
Items returned for repair with inadequate packaging material will be returned to the customer in Microcom Corporation approved packaging at the customers expense. )))))))))))))))))))))))))))))))))))))))))))) Microcom Corporation Attn: Service Dept. RMA# <place number here > 8333A Green Meadows Dr. N. Westerville, OH 43081 USA Chapter 5 410 Operators Manual... -
Page 79: Appendix B: Cleaning Kit & Accessories
)))))))))))))))))))))))))))))))))))))))))))) APPENDIX B: CLEANING KIT & ACCESSORIES Cleaning Kit 040005 410 Cleaning Kit. IT IS SUGGESTED THE PRINTER BE CLEANED ONCE EVERY TWO WEEKS, EVERY 5,000 LABELS, OR WHENEVER LABEL STOCK IS REPLACED. Supply Rack Supply Rack holds 5" or 8" OD media supply roll (must specify size at time of order). -
Page 80: Appendix C: Configuration Guide
A battery backed RAM/clock socket is required to utilize the real-time clock capabilities of the 410 printer. This socket should be placed in socket U5 after removal of the RAM chip already in that socket. The RAM chip should then be inserted into the battery backed RAM/clock socket. -
Page 81: Appendix D: Installing The Label Support Rack
To install the optional label support rack, insert the lower left tab of the rack into the hole on the lower left side of the printer. Press inward on the opposite side and slide the rack downward until the tab drops into the hole on the right side. Both lower tabs should be inserted. -
Page 82: Appendix E: More Label Samples
1,476,13,1,7,1,,,2,97,,,1,1<CR> 1,164,11,2,7,1,,,157,2,,,1,1<CR> 10,320,80,30,1,11,,4<CR> 11,320,60,30,1,6,,4,,2<CR> 12,320,40,30,1,6,,4,,2<CR> 13,320,20,30,1,6,,4,,2<CR> ^D56<CR> ^D2<CR> PRINT CAPABILITIES OF THE<CR> M-410 DIRECT THERMAL PRINTER<CR> INVOICE NO: 395172<CR> ACCOUNT NO: 60417<CR> SHIP VIA: BEST WAY<CR> DEST. ZIP: 43085<CR> PACKAGE WT: 6 LBS.<CR> 04312598<CR> LOGOS AND CHARACTER ROTATION<CR> MICROCOM CORPORATION<CR>... -
Page 83: Fonts 410
FONT 14: 40X20<CR> FONT 19: OCR A<CR> ^D3<CR> ^D57 16,620,441,,10,25,,,352<CR> 1,100, 20,17, 1,10<CR> 3, 60, 37,11,32, ,,,2, 2<CR> 3, 82, 55,11,12, ,,,2,60<CR> 2,375, 20,19, 1,10<CR> 3,350, 37,11,33, ,,,2, 2<CR> 3,372, 55,11,12, ,,,2,60<CR> 4, 80,150,19, 1,10<CR> )))))))))))))))))))))))))))))))))))))))))))) 410 Operators Manual Printer Commands... - Page 84 )))))))))))))))))))))))))))))))))))))))))))) 4, 65,167,12,20, ,,,2,60,,8<CR> 5,408,150,14, 1,10<CR> 5,395,167, 7,21, ,,,2,60,,7<CR> 6,110,270, 5, 1,10<CR> 6,120,287,12,13, ,,,2,60,, 8<CR> 9,180,270, 8, 3,10<CR> 7,400,270, 5, 1,10<CR> 7,410,287,12,13, ,,,2,60,, 8<CR> 8,460,270, 8, 3,10<CR> ^D56<CR> ^D2<CR> UPC-A HR W/CHKSUM<CR> UPC-A HR W/O CHKSUM<CR> 01234567890<CR> EAN13 012345678901<CR> EAN8 0123456<CR>...
- Page 85 5,100, 62, 3, 1,10,,, 8<CR> 4,100, 84, 3, 1,10,,, 4<CR> 3,100,106, 3, 1,10,,, 2<CR> 2,100,128, 3, 1,10<CR> ^D56<CR> ^D2<CR> X MULTIPLIER<CR> 1X<CR> 2X<CR> 4X<CR> 8X<CR> ^D3<CR> ^D57<CR> 5,620,441,,10,25,,,352<CR> 1,100, 40,12, 1,10<CR> 5,100, 62, 3, 1,10,,,, 8<CR> )))))))))))))))))))))))))))))))))))))))))))) 410 Operators Manual...
- Page 86 2, 50,144,23,1,10,,,,, 5<CR> 1, 50,166,23,1,10,,,,, 1<CR> ^D56<CR> ^D2<CR> CHARACTER SPACING 1<CR> CHARACTER SPACING 5<CR> CHARACTER SPACING 10<CR> CHARACTER SPACING 20<CR> ^D3<CR> ^D57<CR> 5,620,441,,10,25,,,352<CR> 1,310,100,5,1,10<CR> 2,200,120,1,7, 1,,,255, 2,,,1,1<CR> 2,210,130,1,7, 1,,,200, 2,,,1,1<CR> 2,200,140,1,7, 1,,, 2,200,,,1,1<CR> 2,190,130,1,7, 1,,, 2,255,,,1,1<CR> )))))))))))))))))))))))))))))))))))))))))))) 410 Operators Manual...
- Page 87 1,320,100,50,1,10,,0<CR> 2,320,100,50,1,10,,2<CR> 3,320,150,50,1,10,,4<CR> 4,320,150,50,1,10,,5<CR> 5,320,200,50,1,10,,1<CR> 6,320,200,50,1,10,,3<CR> ^D56<CR> ^D2<CR> LEFT JUSTIFIED ABOVE BASELINE<CR> LEFT JUSTIFIED BELOW BASELINE<CR> CENTER JUSTIFIED ABOVE BASELINE<CR> CENTER JUSTIFIED BELOW BASELINE<CR> RIGHT JUSTIFIED ABOVE BASELINE<CR> RIGHT JUSTIFIED BELOW BASELINE<CR> ^D3<CR> ^D57<CR> 1,620,441,,10,25,,,352<CR> 1,100,100,13,1,13<CR> )))))))))))))))))))))))))))))))))))))))))))) 410 Operators Manual...
- Page 88 Printer Commands Chapter 5 )))))))))))))))))))))))))))))))))))))))))))) ^D56<CR> ^D2<CR> X OFFSET OF 0<CR> ^D3<CR> ^D57<CR> 1,620,441,,10,25,,,352,100<CR> 1,100,100,15,1,13<CR> ^D56<CR> ^D2<CR> X OFFSET OF 100<CR> ^D3<CR> )))))))))))))))))))))))))))))))))))))))))))) 410 Operators Manual...
- Page 89 Chapter 5 Printer Commands )))))))))))))))))))))))))))))))))))))))))))) ^D57<CR> 1,620,441,,10,25,,,352<CR> 1,100,100,13,1,13<CR> ^D56<CR> ^D2<CR> Y OFFSET OF 0<CR> ^D3<CR> ^D57<CR> 1,620,441,,10,25,,,352,,100<CR> 1,100,100,15,1,13<CR> ^D56<CR> ^D2<CR> Y OFFSET OF 100<CR> ^D3<CR> )))))))))))))))))))))))))))))))))))))))))))) 410 Operators Manual...
-
Page 90: Aiag Label
1,463,256,1,7,1,3,,,,,,2,255<CR> 1,463,511,1,7,1,3,,,,,,2,255<CR> 1,463,766,1,7,1,3,,,,,,2,150<CR> 1,535,623,1,7,1,3,,,,,,2,255<CR> 1,535,878,1,7,1,3,,,,,,2,48<CR> 1,336,621,1,7,1,,,,,,,126,2<CR> 1,464,621,1,7,1,,,,,,,150,2<CR> 1,166,515,1,7,1,,,,,,,168,2<CR> 1,25,10,8,1,10,3<CR> 1,40,10,3,1,10,3,,,,,10<CR> 2,182,10,8,1,10,3<CR> 2,197,10,3,1,10,3,,,,,10<CR> 3,352,10,8,1,10,3<CR> 3,367,10,3,1,10,3,,,,,10<CR> 4,480,10,6,1,10,3<CR> 4,495,10,3,1,10,3,,,,,8<CR> 5,182,525,11,1,10,3<CR> 6,352,634,15,1,10,3<CR> 8,480,634, 4,1,10,3<CR> 9,554,634,11,1,10,3<CR> 10,600,10,60,1,10,3<CR> 11,161,62,9,16,3,3,,69,2,2<CR> 11,88,115,8, 1,13,3,,2,4,8,2<CR> 12,330,62,5,16,3,3,,69,2,2<CR> 12,253,115,4,1,13,3,,2,4,8,2<CR> 13,455,62,10,16,3,3,,69,2,2<CR> 13,380,115,9,1,13,3,,,2,,2<CR> 14,581,62,8,16,3,3,,69,2,2<CR> 14,506,115,7,1,13,3,,,2,,2<CR> 15,280,525,12,1,13,3,,2,3,6<CR> 17,452,634,3,1,13,3,,2,4,8,2<CR> 19,528,634,8,1,13,3<CR> 20,602,684,2,1,13,3,,,2<CR> ^D56<CR> )))))))))))))))))))))))))))))))))))))))))))) 410 Operators Manual... - Page 91 )))))))))))))))))))))))))))))))))))))))))))) ^D2<CR> PART NO. (P)<CR> QUANTITY (Q)<CR> SUPPLIER (V)<CR> SERIAL (S)<CR> DESCRIPTION<CR> BROADCAST CODE<CR> .<CR> DATE<CR> ENGR CHANGE<CR> GREAT PRODUCTS COLS OH 43229 MICRO 000069073<CR> P14015248<CR> Q60<CR> V046068722<CR> S150<CR> WHEEL<CR> .<CR> AA<CR> 11<CR> 06-10-92<CR> 3<CR> ^D3<CR> )))))))))))))))))))))))))))))))))))))))))))) 410 Operators Manual...
-
Page 92: Appendix F: Sample Basic Program
APPENDIX F: SAMPLE BASIC PROGRAM This program produces labels for computer diskettes. It is intended to show the simplicity that higher languages communicate with the 410 printer. Communication parameters may need to be changed for some computers. 2 REM *******************************************... - Page 93 Chapter 5 Printer Commands )))))))))))))))))))))))))))))))))))))))))))) 190 CLOSE 200 SYSTEM )))))))))))))))))))))))))))))))))))))))))))) 410 Operators Manual...
-
Page 94: Appendix G: Quick Reference Command Summary
1=8 Data Bits, 0=7 Data Bits 1=Echo Enable, 0=Disable 1=No Parity, 0=Enable Parity 1=Odd Parity, 0=Even Parity 1=Ignore Control Codes, 0=Accept Enquiry Response 00 = Control Codes 10 = Text Equivalent 11 = ^ Equivalent Chapter 5 410 Operators Manual... - Page 95 ****.))Q ***.)))Q **.))))Q *.)))))Q .))))))Q )))))))))))))))))))))))))))))))))))))))))))) 410 Operators Manual Power-up Label Format 000=ALWAYS EPROM Format 1 001=ROM or Saved Format File 1 010=ROM or Saved Format File 2 011=ROM or Saved Format File 3 100=ROM or Saved Format File 4...
- Page 96 120% of Base 130% of Base 140% of Base Adjust Contrast Base:An EEPROM command. The ^AXX is between 10 and 200%. Section 5.3. Epson Emulation: This function is no longer supported. 40 column Epson emulation (2 inch) )))))))))))))))))))))))))))))))))))))))))))) Not Used Not Used...
- Page 97 Chapter 5 Printer Commands )))))))))))))))))))))))))))))))))))))))))))) 80 column Epson emulation (4 inch) )))))))))))))))))))))))))))))))))))))))))))) 410 Operators Manual...
- Page 98 Select ROM Label Layout: Select from the ROM power-up layouts. ^AXX ranges from 1 to 8. Select User Defined Layout: Signals to the printer the end of the label fields and precedes the text fields in a format file. Enter Label Format Mode: This tells the printer that information for a label is following.
- Page 99 Disable Copies Function. Enable Copies Function. Load copies count: Tells the printer to print a group of labels. Will not increment serial numbers (use ^D75). Infinity Print: Prints a batch of labels like ^D75 but will continue to print until the machine is turned off.
- Page 100 Clears Commands 86, 88, 89. Disable Serial Number Function: Will disable either single or multiple serial number commands. Load Text String Number to increment/decrement: Tells the printer which text string number to increment or decrement. For single serial numbers. Section 5.3.8.
- Page 101 Chapter 5 )))))))))))))))))))))))))))))))))))))))))))) 97 Tag/Tear Operation: Turns off tag/tear operation. Advance after every label. Advance after copies count. Advance when idle. Peel-and-Dispense Mode: Section 2.1.2. Turn off peel-and-dispense mode. Turn on peel-and dispense mode. )))))))))))))))))))))))))))))))))))))))))))) 410 Operators Manual Printer Commands...
-
Page 102: Index
Electrical 5, 35 Emulation 17, 19, 40, 41, 57, 58, 89-91, 93 Enquiries 3, 35, 39 Environment 5, 70 Epson ii, 41, 57, 90, 91 Escape 17, 50 Field Justification 30, 33 Field Orientation 28, 30, 31, 33 Field Parameters 26, 33, 45, 64... - Page 103 Text Strings Commands 55 Variable Text 39, 50 VDD 36 Warranty 9, 71, 72 XOFF 4, 11, 15, 35, 38, 88 XON 4, 15, 35, 38, 88 Y Beginning Coordinate 26 Y Direction Offset 24, 49, 92 )))))))))))))))))))))))))))))))))))))))))))) 410 Operators Manual...
- Page 104 Printer Commands Chapter 5 )))))))))))))))))))))))))))))))))))))))))))) Notes )))))))))))))))))))))))))))))))))))))))))))) 410 Operators Manual...
Need help?
Do you have a question about the 410 and is the answer not in the manual?
Questions and answers