Table of Contents
Advertisement
Advertisement
Table of Contents

Related Manuals for SoundCraft GIGRAC


Summary of Contents for SoundCraft GIGRAC
-
Page 1: User Guide
GREAT SOUND MADE EASY User Guide... - Page 2 Soundcraft is a trading division of Harman International Industries Ltd. Information in this manual is subject to change without notice and does not represent a commitment on the part of the vendor. Soundcraft shall not be liable for any loss or damage whatsoever arising from the use of information or any error contained in this manual.
-
Page 3: Table Of Contents
CONTENTS IMPORTANT SAFETY INSTRUCTIONS ......4 Introduction ............7 Quick Start Guide ............ 8 A Note on Channel Use ........... 14 Front and Rear Panels ..........15 Master Section GigRac 600 ........18 Master Section GigRac 300 ........24 Rear Panel GigRac 600 .......... 28 Rear Panel GigRac 300 .......... -
Page 4: Important Safety Instructions
If the mains fuse fails repeatedly this may be because an electrical safety hazard exists. The unit must be taken out of service and referred to the Soundcraft dealer from where the equipment was purchased. THIS UNIT MUST BE EARTHED •... - Page 5 As the colours of the wires in the mains lead may not correspond with the coloured markings identifying the terminals in your plug, proceed as follows: The wire which is coloured Green and Yellow must be connected to the terminal in the plug which is marked with the letter E or by the earth / ground symbol: The wire which is coloured Blue or White must be connected to the terminal in the plug which is marked with the letter N.
- Page 6 It is recommended that all maintenance and service on the • product should be carried out by Soundcraft or its authorised agents. Soundcraft cannot accept any liability whatsoever for any loss or damage caused by service, maintenance or repair by unauthorised personnel.
-
Page 7: Introduction
Intr Intr Intr oduction oduction oduction Firstly we’d like to thank you for choosing the Soundcraft GigRac. We hope you have many happy years together! Features 8 Microphone Inputs 48V Phantom Power for condenser microphones (Inputs 1-4 only) PAD buttons for controlling loud input signals (Inputs 1-4 only) -
Page 8: Quick Start Guide
Plugging in a guitar or stereo keyboard Apply one of the 8 GigFX digital effects to the signals Note: We recommend that you read through the entire GigRac user guide to familiarise yourself with all of the features on offer. - Page 10 Connecting up your loudspeakers to the GigRac Note: Make sure your GigRac is not powered up. This is very important to prevent any damage to either the GigRac or your loudspeakers! Using good quality speaker cables connect the loudspeakers to the Speaker outputs on the rear of the GigRac.
- Page 11 Turn the Main Master Volume control (1) up to about half-way. Now gradually turn up the Main Volume control (2) on the microphone channel you have chosen to use. You should now hear the microphone signal appearing in the loudspeakers as you begin to speak. You should also be able to see activity on the Output Meter (4) Note: The XLR input on channels 1 - 4 is very sensitive.
- Page 12 Adding Treble or Bass to the signal The GigRac offers simple Treble and Bass control for changing the tone of the signal. Treble (5) To add or remove some brightness or ‘sparkle’ to or from a signal, use the Treble control. In the center ‘click’ position (0) the Treble control has no effect.
- Page 13 Plugging in an Acoustic Guitar, Stereo Keyboard or CD Player The GigRac will happily receive signals from instruments with either mono or stereo outputs such as guitars (Mono) or stereo keyboards and CD Players (Stereo) Before plugging in, make sure the Main Volume control (2) for the chosen channel is turned fully off to avoid accidental damage to your speakers.
-
Page 14: A Note On Channel Use
Apply one of the 8 GigFX digital effects to the signals The GigRac’s GIGFX Processor (10) has a choice of 8 studio quality digital effects that can be added to any individual or group of signals running through the mixer. Usually vocals require some digital reverb or echo to be added to them in order to create a more spatial sound that is pleasing to the listener. -
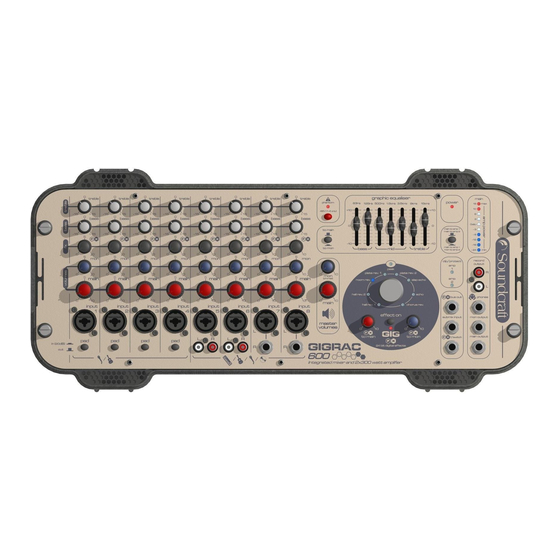
Page 15: Front And Rear Panels
Fr Fr Fr Fr Fr ont and Rear Panels ont and Rear Panels ont and Rear Panels ont and Rear Panels ont and Rear Panels Front Panel (GigRac 300 and 600) Input channel The GigRac has a total of 8 channels. Channels 1-4 are designed to handle mono microphone or mono line level signals only. - Page 16 (2) P (2) P AD switch (Channels 1-4 only) AD switch (Channels 1-4 only) (2) P (2) P (2) PAD switch (Channels 1-4 only) AD switch (Channels 1-4 only) AD switch (Channels 1-4 only) Pressing the PAD switch reduces the input level by 20dB allowing line or mic level signals that would normally be too loud for the Input stage to handle to be connected without any audible distortion.
- Page 17 (6) Bass Contr (6) Bass Contr (6) Bass Control ol ol ol ol (6) Bass Contr (6) Bass Contr The Bass Control is set at 80Hz and allows you to either add or remove the low frequency content of the signal by 15dB. Rotating the control clockwise will ’boost’...
-
Page 18: Master Section Gigrac 600
Master Section GigRac 600 Master Section GigRac 600 Master Section GigRac 600 Master Section GigRac 600 Master Section GigRac 600... -
Page 19: V Phantom Power
(8) Main Master Volume Control This control determines the overall level that is sent to the internal amplification and to the Main Output socket.(19) (9) Mon (PHONES) Master Volume Control This control determines the overall level that is sent to the Monitor Output (Mon Output) and Phones socket. - Page 20 (13) Power LED The red Power LED illuminates when the GigRac is switched on. (14) Main to Amp 1/Mon to Amp 2 - Main to Amp 1/Main to Amp 2 switch (GigRac 600 only) This switch determines which signals are sent to Amp 1/Speaker Output 1 and Amp 2/Speaker Output 2.
- Page 22 (15) Amp Clip LED The red Amp Clip LED illuminates when the input level to the internal amplifier is too high. It is acceptable for this LED to come on momentarily every now and then but the Main or Monitor Master Volume (depending on which mode has been selected: see (14) above) should be turned down if the Amp Clip LED illuminates consistently.
- Page 23 be used to send the Main Mix to another amplifier or powered speaker or alternatively it can be used to send a ‘submix’ to another mixer’s input channel or another recording device. (20) Mon Output The Mon Output carries the Monitor Mix signal derived from the Mon controls on each channel.
-
Page 24: Master Section Gigrac 300
Master Section GigRac 300 Master Section GigRac 300 Master Section GigRac 300 Master Section GigRac 300 Master Section GigRac 300 (8) Main Master Volume Control This control determines the overall level that is sent to the internal amplification and to the Main Output socket. (9) Monitor Master Volume Control (Mon Master Volume Con- trol) This control determines the overall level that is sent to the Monitor... - Page 25 (10) Phantom 48V switch This switch turns the 48v phantom power On/Off for the 3 pin XLR sockets on channels 1-4. When the switch is turned On the red LED will illuminate. 48V phantom power is used to power condenser microphones and DI boxes.
- Page 26 (14) Amp Clip LED The red Amp Clip LED illuminates when the input level to the internal amplifier is too high. It is acceptable for this LED to come on momentarily every now and then but the Main or Monitor Master Volume (depending on which mode has been selected –...
- Page 27 be used to send the Main Mix to another amplifier or powered speaker or alternatively it can be used to send a ‘submix’ to another mixer’s input channel or another recording device. (19) Mon Output The Mon Output carries the Monitor Mix signal derived from the Mon controls on each channel.
-
Page 28: Rear Panel Gigrac 600
Rear Panel GigRac 600 Rear Panel GigRac 600 Rear Panel GigRac 600 Rear Panel GigRac 600 Rear Panel GigRac 600 (1) Power Switch This switch turns the GigRac On or Off. The red Power LED (13) on the front panel will illuminate to confirm this. NB! Before switching the GigRac On or Off, make sure that the Main and Mon Master Volume controls are turned fully down. -
Page 30: Rear Panel Gigrac 300
Rear Panel GigRac 300 Rear Panel GigRac 300 Rear Panel GigRac 300 Rear Panel GigRac 300 Rear Panel GigRac 300 (1) Power Switch This switch turns the GigRac On or Off. The red Power LED (13) on the front panel will illuminate to confirm this. NB! Before switching the GigRac On or Off, make sure that the Main and Mon Master Volume controls are turned fully down. -
Page 32: Rackmounting Your Gigrac
Rackmounting Y Rackmounting Y our GigRac our GigRac Rackmounting Y our GigRac our GigRac Rackmounting Y Rackmounting Y our GigRac The GigRac 300 or 600 can be rack mounted into a standard 19’’rack.This is useful for fixed instalations or for applications where the GigRac might need to be installed into a portable 19’’... -
Page 33: Connectors And Leads
Connectors and Leads Connectors and Leads Connectors and Leads Connectors and Leads Connectors and Leads... -
Page 34: Block Diagram Gigrac 600
Block Diagram GigRac 600 Block Diagram GigRac 600 Block Diagram GigRac 600 Block Diagram GigRac 600 Block Diagram GigRac 600... -
Page 35: Block Diagram Gigrac 300
Block Diagram GigRac 300 Block Diagram GigRac 300 Block Diagram GigRac 300 Block Diagram GigRac 300 Block Diagram GigRac 300... -
Page 36: Warranty
Soundcraft. Any Equipment or component returned will be at the risk of the End User whilst in transit (both to and from the Dealer or Soundcraft) and postage must be prepaid. This warranty shall only be valid if: the Equipment has been properly installed in accordance with instructions contained in Soundcraftís manual;... -
Page 37: Gigrac 300 / 600 Specifications
Gigrac 300 / 600 Specifications Gigrac 300 / 600 Specifications Gigrac 300 / 600 Specifications Gigrac 300 / 600 Specifications Gigrac 300 / 600 Specifications Noise EIN 150 ohms 20 - 22kHz CH1 - CH4 -123 dBu EIN 150 ohms 20 - 22kHz CH5 - CH6 -123 dBu Main out Level control mid -78 dBu... -
Page 38: Your Notes
Y Y Y Y Y our Notes: our Notes: our Notes: our Notes: our Notes:... - Page 40 8500 Balboa Blvd., Northridge, CA 91329, USA TEL: +1-818-920-3212 FAX: +1-818-920-3208 EMAIL: soundcraft-usa@harman.com www.gigrac.com Soundcraft reserves the right to improve or otherwise alter any information supplied in this document or any other documentation supplied hereafter. E&OE 11/03. This equipment complies with the EMC Directive 89/336/EEC...
Need help?
Do you have a question about the GIGRAC and is the answer not in the manual?
Questions and answers