NetComm N300 GATEWAY SERIES User Manual
Netcomm gateway series adsl2+ wireless modem router with voip
Hide thumbs
Also See for N300 GATEWAY SERIES:
- User manual (72 pages) ,
- User manual (65 pages) ,
- User manual (67 pages)

Related Manuals for NetComm N300 GATEWAY SERIES


Summary of Contents for NetComm N300 GATEWAY SERIES
- Page 1 NETCOMM GATEWAY SERIES NetComm Gateway Series - ADSL2+ Wireless N300 Modem Router with VoIP ADSL2+ Wireless N300 Modem Router with VoIP USER GUIDE...
-
Page 2: Important Safety Instructions
Copyright Copyright©2008 NetComm Limited. All rights reserved. The information contained herein is proprietary to NetComm Limited. No part of this document may be translated, transcribed, reproduced, in any form, or by any means without prior written consent of NetComm Limited. -
Page 3: Table Of Contents
NetComm Gateway Series - ADSL2+ Wireless N300 Modem Router with VoIP Table of Contents 1 INTRODUCTION ....................................5 1.1 Features .............................................6 1.2 Application ..........................................7 1.3 Front Panel Led Indicators ......................................7 2 INSTALLATION ...................................... 8 2.1 Hardware Installation ........................................9 2.2 Configuring Your Computer ......................................9 3 WEB USER INTERFACE .................................. - Page 4 9.4 Statistics ..........................................58 9.4.1 LAN Statistics .........................................58 9.4.2 WAN Statistics ........................................59 9.4.3 ATM Statistics .........................................59 9.4.4 ADSL Statistics .......................................60 APPENICIES ......................................62 APPENDIX A: LEGAL AND REGULATORY INFORMATION .............................63 ADSL2+ Wireless N300 Modem Router with VoIP User Guide YML9WMAXXN www.netcomm.com.au...
-
Page 5: Introduction
Introduction... -
Page 6: Features
Introduction The NetComm NB9WMAXXn ADSL2+ Wireless N Modem Router with VoIP is a true all-in-one device that combines a number of technologies, eliminating the need to clutter your desk with many separate devices. Connect to the Internet with ADSL2+, share the connection with built-in Wireless N or 4 LAN Ethernet ports and utilise the VoIP ports to make phone calls over the Internet, drastically reducing your phone bills. -
Page 7: Application
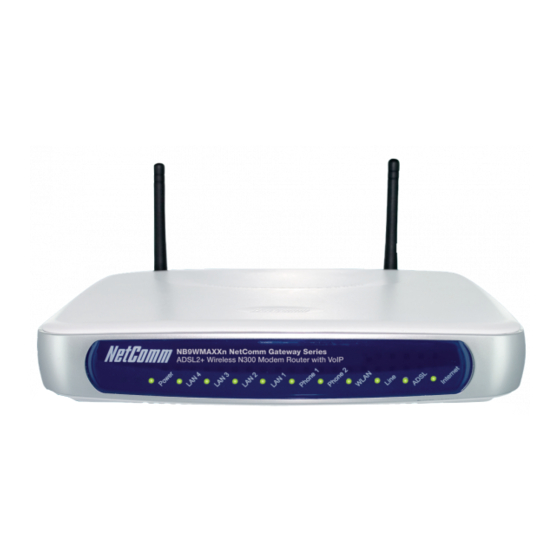
All type and graphics print WHITE INK onto background colour of PANTONE METALLIC 8480 The front panel LED indicators are shown and explained below. Lights and product keyline are for positioning purposes only – do not output NB9WMAXXn NetComm Gateway Series ADSL2+ Wireless N300 Modem Router with VoIP Colour... -
Page 8: Installation
Installation... -
Page 9: Hardware Installation
NetComm Gateway Series - ADSL2+ Wireless N300 Modem Router with VoIP Installation 2.1 Hardware Installation Follow the instructions below to complete the hardware installation. Laptop Computer connected wirelessly 1 or 2 Analogue/ Cordless Telephones Telephone Socket Splitter ADSL/Modem Phone Computers connected... -
Page 10: Web User Interface
Web User Interface... -
Page 11: Login Procedure
DHCP server on LAN interface: enabled • WAN IP address: none • Wireless access: enabled • SSID: Netcomm Wireless • Wireless authentication: enabled Password a1b2c3d4e5 • Annex A enabled / Annex M disabled This router supports the following connection types. -
Page 12: Quick Setup
Quick Setup... -
Page 13: Auto Quick Setup
NetComm Gateway Series - ADSL2+ Wireless N300 Modem Router with VoIP Quick Setup The Quick Setup screen allows the user to configure the router for DSL connectivity and Internet access. It also guides the user though the WAN network setup first and then the LAN interface setup. You can either manually customize the router or follow the online instruction to set up the router. -
Page 14: Manual Quick Setup
The sections that follow describe the PVC setup procedure further. Choosing different connection types pops up different settings requests. Enter appropriate settings that are required by your service provider. ADSL2+ Wireless N300 Modem Router with VoIP User Guide YML9WMAXXN www.netcomm.com.au... -
Page 15: 1Ppp Over Atm (Pppoa) And Ppp Over Ethernet (Pppoe)
NetComm Gateway Series - ADSL2+ Wireless N300 Modem Router with VoIP 4.2.1 PPP over ATM (PPPoA) and PPP over Ethernet (PPPoE) Follow Steps 1 through to 3 of Manual Quick Setup Select the PPP over ATM (PPPoA) or PPP over Ethernet (PPPoE) radio button and click Next. The following screen appears. - Page 16 Enable WAN Service checkbox: Tick this item to enable the ATM service. Untick it to stop the ATM service. Service Name: This is user-defined. ADSL2+ Wireless N300 Modem Router with VoIP User Guide YML9WMAXXN www.netcomm.com.au...
- Page 17 NetComm Gateway Series - ADSL2+ Wireless N300 Modem Router with VoIP After entering your settings, select Next. The following screen appears. This screen allows the user to configure the LAN interface IP address, subnet mask and DHCP server. If the user would like this router to assign dynamic IP address, DNS server and default gateways to other LAN devices, select the button Enable DHCP server and enter the Start and End IP addresses and DHCP leased time.
-
Page 18: 2Mac Encapsulation Routing (Mer)
Tick the checkbox to enable the WAN service. If this item is not selected, you will not be able to use the WAN service. Service Name: This is User-defined. ADSL2+ Wireless N300 Modem Router with VoIP User Guide YML9WMAXXN www.netcomm.com.au... - Page 19 NetComm Gateway Series - ADSL2+ Wireless N300 Modem Router with VoIP Upon completion click Next. The following screen appears. Consult the following paragraphs for more details about these settings. The Device Setup screen allows the user to configure the LAN interface IP address and DHCP server. If the user would like this router to assign dynamic IP addresses, DNS server and default gateway to other LAN devices, select the radio box Enable DHCP server to enter the starting IP address and end IP address and DHCP lease time.
-
Page 20: 3Ip Over Atm
DHCP is not supported over IPoA. The user must enter the IP address or WAN interface for the default gateway setup and the DNS server addresses provided by the ISP. ADSL2+ Wireless N300 Modem Router with VoIP User Guide YML9WMAXXN www.netcomm.com.au... - Page 21 NetComm Gateway Series - ADSL2+ Wireless N300 Modem Router with VoIP Click Next. The following screen appears. Enable NAT If the LAN is configured with a private IP address, the user should select this checkbox. The NAT submenu will be displayed after reboot.
-
Page 22: 4Bridging
LED indicators display as described in Section 1.3 4.2.4 Bridging Follow Steps 1 through to 3 of Manual Quick Setup Select the Bridging radio button and click Next. ADSL2+ Wireless N300 Modem Router with VoIP User Guide YML9WMAXXN www.netcomm.com.au... - Page 23 NetComm Gateway Series - ADSL2+ Wireless N300 Modem Router with VoIP The following screen appears. To use the bridge service, tick the Enable Bridge Service checkbox and enter a service name (user defined). Click the Next button to continue. Enter the IP address for the LAN interface. The default IP address is 192.168.1.1. The LAN IP interface in bridge operating mode is needed for local users to manage the router.
- Page 24 Select Basic Info from the main menu to display Summary information as below. NOTE: The figure above shows the summary screen with an ADSL signal. For more information on ADSL Quick Setup, please refer to Chapter 4- Quick Setup ADSL2+ Wireless N300 Modem Router with VoIP User Guide YML9WMAXXN www.netcomm.com.au...
-
Page 25: Voice
Voice... -
Page 26: Sip
The time period the user would like the registration to be valid for the Registrar/ Proxy Server. The default is 300 seconds. Provided by your VoIP provider. SIP domain name ADSL2+ Wireless N300 Modem Router with VoIP User Guide YML9WMAXXN www.netcomm.com.au... -
Page 27: Sip Advanced
NetComm Gateway Series - ADSL2+ Wireless N300 Modem Router with VoIP • A proxy is an intermediary program that acts as both a server and a client for the purpose of making requests on behalf of other clients. Requests are serviced internally or transferred to other servers. A proxy interprets and, if necessary, rewrites a request... -
Page 28: Telephone Calls
Network busy tone (fast busy) will be played for unknown or unreachable destinations. To answer a call, pick up the phone or press the hands free button. ADSL2+ Wireless N300 Modem Router with VoIP User Guide YML9WMAXXN www.netcomm.com.au... - Page 29 NetComm Gateway Series - ADSL2+ Wireless N300 Modem Router with VoIP CALL COMMAND LIST Caller ID The Call Manager delivers Caller ID when placing calls. The caller ID is transmitted to the analog line for CLASS recognition. Call Hold To put a call on hold, press flash then hang up (optional). To return to the original call, press flash or pick up the phone. The phone will issue a short ring burst every 30 seconds or so while on-hook to remind you that a call is on hold.
-
Page 30: Wireless
Wireless... -
Page 31: Setup
NetComm Gateway Series - ADSL2+ Wireless N300 Modem Router with VoIP Wireless The Wireless dialog box allows you to enable the wireless capability, hide the access point, set the wireless network name and restrict the channel set. 6.1 Setup The Setup option allows you to configure basic features of the wireless LAN interface. You can enable or disable the wireless LAN interface, hide the network from active scans, set the wireless network name (also known as SSID) and restrict the channel set based on country requirements. -
Page 32: Wireless Security Quick Setup
SSID or network name not advertise your actual name but be kept ‘generic’ or anonymous. Note: WEP Security is the appropriate choice if the network clients that wish to connect include 802.11b standard NICs. ADSL2+ Wireless N300 Modem Router with VoIP User Guide YML9WMAXXN www.netcomm.com.au... -
Page 33: Wireless Security In Detail
NetComm Gateway Series - ADSL2+ Wireless N300 Modem Router with VoIP Quick Security Setup 2 – WPA-PSK If a stronger network security settings is required, go to Wireless>Security and select WPA-PSK from the Network Authentication drop- down menu. Enter a network key of your choice in the WPA Pre-Shared Key field; this can be from 8 to 63 characters and contain special characters and spaced. -
Page 34: Network Authentication
This method also requires specification of the IP address of a RADIUS server, the port on which to connect to the RADIUS server, and the shared key used to authenticate with the RADIUS server. ADSL2+ Wireless N300 Modem Router with VoIP User Guide YML9WMAXXN www.netcomm.com.au... - Page 35 NetComm Gateway Series - ADSL2+ Wireless N300 Modem Router with VoIP WPA-PSK WPA-PSK is a special mode of WPA providing strong encryption without access to a RADIUS server. In this mode encryption keys are automatically changed (rekeyed) and authentication re-established between devices after a specified period referred to as the ‘WPA Group Rekey Interval’.
-
Page 36: Configuration
Global Max Clients “Global Max Clients” limits the total associated clients to your SSID. Xpress TM Xpress Technology is compliant with draft specifications of two planned wireless industry standards. Technology ADSL2+ Wireless N300 Modem Router with VoIP User Guide YML9WMAXXN www.netcomm.com.au... -
Page 37: Mac Filter
NetComm Gateway Series - ADSL2+ Wireless N300 Modem Router with VoIP The router will set different power output (by percentage) according to this selection. Transmit Power WMM (Wi-Fi The technology maintains the priority of audio, video and voice applications in a Wi-Fi network. It allows multimedia service get higher priority. -
Page 38: Wireless Bridge
Any wireless bridge will be granted access. Select Enabled or Enabled (Scan) to enable the wireless bridge restriction. Only those bridges selected in Remote Bridges will be granted access. 6.7 Station Info This screen shows authenticated wireless stations and their status. ADSL2+ Wireless N300 Modem Router with VoIP User Guide YML9WMAXXN www.netcomm.com.au... -
Page 39: Management
Management... -
Page 40: Device Settings
The Update firmware screen allows you to update the firmware of the device. Manual firmware upgrades from a locally stored file can be performed using the following screen. Your ISP will provide this file to you, if necessary. ADSL2+ Wireless N300 Modem Router with VoIP User Guide YML9WMAXXN www.netcomm.com.au... -
Page 41: Snmp
NetComm Gateway Series - ADSL2+ Wireless N300 Modem Router with VoIP 7.2 SNMP The Simple Network Management Protocol (SNMP) allows a network administrator to monitor a network by retrieving settings on remote network devices. To do this, the administrator typically runs an SNMP management station program such as MIB browser on a local host to obtain information from the SNMP agent, in this case the NB9WMAXXn (if SNMP enabled). -
Page 42: Tr-069
Select the required server. Second NTP time server: Select second time server, if required. Time zone offset: Select the local time zone. Configure these options and then click Save/Apply to activate. ADSL2+ Wireless N300 Modem Router with VoIP User Guide YML9WMAXXN www.netcomm.com.au... -
Page 43: Access Control
NetComm Gateway Series - ADSL2+ Wireless N300 Modem Router with VoIP 7.5 Access Control The Access Control option under the Management menu configures three access-related parameters: Services, IP Address and Passwords. 7.5.1 Services The Services option limits or opens the access services over the LAN or WAN. These services are provided FTP, HTTP, ICMP,SNMP, SSH (Security Socket Share), TELNET, and TFTP. -
Page 44: Save And Reboot
You may need to close and restart the web browser if it does not refresh automatically. You may need to reconfigure your PC IP address to match your new configuration. In this case, see section 3.1 Configuring your computer for detailed instructions. ADSL2+ Wireless N300 Modem Router with VoIP User Guide YML9WMAXXN www.netcomm.com.au... -
Page 45: Advanced
Advanced... -
Page 46: Wan
After proceeding to STEP 3 in section 4.2 Manual Quick Setup, the screen will appear as follows. Notice that PPPoA and IPoA are not available. PVCs can be added using the regular procedure, however, now multiple protocols can exist over the same connection, as long as the 802.1Q VLAN IDs differ. ADSL2+ Wireless N300 Modem Router with VoIP User Guide YML9WMAXXN www.netcomm.com.au... -
Page 47: Msp
NetComm Gateway Series - ADSL2+ Wireless N300 Modem Router with VoIP The graphic below shows an example of three protocols over the same connection. 8.1.2 Multi-Service over PVC (MSP) supports multiple protocols over a single connection. As with the VLAN Mux function, PPPoE, Bridge and MER protocols can coexist, while IPoA and PPPoA are not supported. - Page 48 On the screen shown below, select the bridge connection and one Ethernet virtual port (ENET 1-4). Enter a group name, such as “MSP1”, and click Save/Apply. If successfully configured, the Port Mapping screen will display as follows. ADSL2+ Wireless N300 Modem Router with VoIP User Guide YML9WMAXXN www.netcomm.com.au...
-
Page 49: Lan
NetComm Gateway Series - ADSL2+ Wireless N300 Modem Router with VoIP 8.2 LAN Use this screen to configure LAN interface settings. NOTE: NAT is enabled so Enable UPnP is shown above while DHCP Server Relay is hidden. Consult the field descriptions below for more details. -
Page 50: Qos Classification
Assign queue to a specific network interface whose QoS is enabled. Queue Precedence: Configure precedence for the queue. Lower integer values for precedence imply higher priority for this queue relative to others. ADSL2+ Wireless N300 Modem Router with VoIP User Guide YML9WMAXXN www.netcomm.com.au... -
Page 51: Qos Classification
NetComm Gateway Series - ADSL2+ Wireless N300 Modem Router with VoIP 8.3.3 QoS Classification Click Add to configure network traffic classes. This screen creates a traffic class rule to classify the upstream traffic, assign queuing priority and optionally overwrite the IP header TOS byte. -
Page 52: Routing
To add static route, click the Add button to display the following screen. Enter the destination network address, subnet mask, gateway AND/OR available WAN interface then click Save/Apply to add the entry to the routing table. ADSL2+ Wireless N300 Modem Router with VoIP User Guide YML9WMAXXN www.netcomm.com.au... -
Page 53: Dsl
NetComm Gateway Series - ADSL2+ Wireless N300 Modem Router with VoIP 8.5 DSL This screen is used to select ADSL modulations and capabilities. The following table describes these DSL settings Option Description G.dmt Sets G.Dmt if you want the system to use G.Dmt mode. -
Page 54: Port Mapping
ISP’s deco server. Then the CPE will change the PortMapping configuration automatically. The PortMapping configuration would become: 1. Default: ENET1, ENET2, ENET3, ENET4, Wireless and USB. 2. Video: nas_0_36, nas_0_37 and nas_0_38 and ENET1. ADSL2+ Wireless N300 Modem Router with VoIP User Guide YML9WMAXXN www.netcomm.com.au... -
Page 55: Status
Status... -
Page 56: Diagnostics
Follow the steps below to enable and view the system log. Click Configure System Log to display the following screen. Select from the desired Log options described in the following table, and then click Save/Apply. ADSL2+ Wireless N300 Modem Router with VoIP User Guide YML9WMAXXN www.netcomm.com.au... - Page 57 NetComm Gateway Series - ADSL2+ Wireless N300 Modem Router with VoIP Option Description Indicates whether the system is currently recording events. The user can enable or disable event logging. By default, it is disabled. To enable it, tick Enable and then Apply button.
-
Page 58: Wan
The Network Statistics screen shows interface statistics for Ethernet and Wireless interfaces. (The Network Statistics screen shows interface statistics of LAN. Eg; Here provides byte transfer, packet transfer, Error and Drop statistics for the LAN interface.) ADSL2+ Wireless N300 Modem Router with VoIP User Guide YML9WMAXXN www.netcomm.com.au... -
Page 59: Wan Statistics
NetComm Gateway Series - ADSL2+ Wireless N300 Modem Router with VoIP 9.4.2 WAN Statistics WAN statistics screen shows the interface statistics for all WAN connections Service Shows the service type VPI/VCI Shows the values of the ATM VPI/VCI Protocol Shows the connection type... -
Page 60: Adsl Statistics
Number of bytes in DMT frame Number of check bytes in RS code word RS code word size in DMT frame The interleaver depth The delay in milliseconds (msec) Delay ADSL2+ Wireless N300 Modem Router with VoIP User Guide YML9WMAXXN www.netcomm.com.au... - Page 61 NetComm Gateway Series - ADSL2+ Wireless N300 Modem Router with VoIP In ADSL2+ mode the following section is inserted here. MSGc Number of bytes in overhead channel message Number of bytes in Mux Data Frame Number of Mux Data Frames in FEC Data Frame...
-
Page 62: Appenicies
Appendix... -
Page 63: Appendix A: Legal And Regulatory Information
(3) The power supply that is provided with this unit is only intended for use with this product. Do not use this power supply with any other product or do not use any other power supply that is not approved for use with this product by NetComm. Failure to do so may cause damage to this product, fire or result in personal injury. -
Page 64: Product Warranty
This warranty is in addition to and not in replacement for such conditions and warranties. To the extent permitted by the Relevant Acts, in relation to your product and any other materials provided with the product (“the Goods”) the liability of NetComm under the Relevant Acts is limited at the option of NetComm to: •... - Page 65 Note: NetComm Technical Support for this product only covers the basic installation and features outlined in the Quick Start Guide. For further information regarding the advanced features of this product, please refer to the configuring sections in the User Guide or contact a Network Specialist.
Need help?
Do you have a question about the N300 GATEWAY SERIES and is the answer not in the manual?
Questions and answers