Yard-Man 560 Series Operator's Manual
21"
Hide thumbs
Also See for 560 Series:
- Operator's manual (20 pages) ,
- Operator's manual (21 pages) ,
- Operator's manual (22 pages)
Table of Contents
Advertisement
Quick Links
Safety • Assembly • Operation • Tips & Techniques • Maintenance • Troubleshooting • Parts Lists • Warranty
OF
A'rO
AL
21" Rotary Mower-
Model Series 560
iMPORTANT
READ SAFETY
RULES AND iNSTRUCTiONS
CAREFULLY
BEFORE
OPERATION
Warning:
This unit is equippedwith an internal combustionengineand shouldnot be usedon or nearany unimproved forest-covered, b rush-
coveredor grass-covered land unlesstheengine'sexhaustsystemis equippedwith a sparkarrestermeetingapplicablelocalor statelaws(if any).
If a sparkarresteris used,it shouldbe maintainedin effectiveworkingorder by the operator.In theState of Californiathe aboveis requiredbylaw
(Section4442 of the CaliforniaPublicResources Code). Otherstatesmay havesimilarlaws.Federallaws applyon federallands.A sparkarrester
for the muffleris availablethroughyour nearestengineauthorizedservicedealeror contactthe servicedepartment,RO. Box361131 Cleveland,
Ohio 44136-0019.
PRINTEDIN U.S.A.
MTD LLC, P.O. BOX 361131 CLEVELAND, OHIO 44136-0019
FORMNO.770-10347F
10/18/2005
Advertisement
Table of Contents

Related Manuals for Yard-Man 560 Series


Summary of Contents for Yard-Man 560 Series
- Page 1 Safety • Assembly • Operation • Tips & Techniques • Maintenance • Troubleshooting • Parts Lists • Warranty A'rO 21" Rotary Mower- Model Series 560 iMPORTANT READ SAFETY RULES AND iNSTRUCTiONS CAREFULLY BEFORE OPERATION Warning: This unit is equippedwith an internal combustionengineand shouldnot be usedon or nearany unimproved forest-covered, b rush- coveredor grass-covered land unlesstheengine'sexhaustsystemis equippedwith a sparkarrestermeetingapplicablelocalor statelaws(if any).
-
Page 2: Customer Support
You can locate the model plate by standing at the operating position and looking down at the rear of the deck. This information will be necessary to use the manufacturer's web YaRD-MaN)/f site and/or obtain assistancefrom the Customer Support P. O. BOX 361131 CLEVELAND,OH44136 Department or an authorized service dealer. - Page 3 Sight and hold this levelwith a vertical tree... >:. also 15° t"b...
-
Page 4: General Operation
WARNING: Engine Exhaust, some of its constituents, and certain vehicle compo- nents contain or emit chemicals known to State of Californiato cause cancer and birth defects or other reproductiveharm. DANGER: This machine was built to be operated according to the rules for safe operation in this manual. -
Page 5: Slope Operation
The cuttingbladecontinuesto rotatefor a fewseconds after 7. Extinguishall cigarettes,cigars, pipesand othersources the engine is shut off. Neverplaceany part of the bodyin of ignition. the bladearea untilyou are surethe blade hasstopped 8. Neverfuel machineindoorsbecauseflammablevapors will rotating. accumulatein the area. 20. Neveroperate mowerwithoutpropertrailshield, discharge 9. - Page 6 1. Removeanypackingmaterialwhich may be between upperand lowerhandles. a. Pull up and backon upperhandleas shownin Step 1.Makecertainthe lowerhandleis seated securelyintothe handle mountingbrackets. b. Tightenhandknobs securingupperhandleto lowerhandle.Make surethat eachcarriagebolt is seatedproperlyin the handle. 2. Locatehairpinclip in one holeon the weldpin on each sideof lowerhandle.
- Page 7 6. Followstepsbelowto assemblethe grasscatcher: a. Placebag overframe sothat its black plasticside is at the bottom. b. Slip plasticchannelof grass bagoverhooks on the frame.See Step6. All the plasticchannelsexcept centertop of bagattachfrom outsideof bag. c. Attachcentertop of bag from insideof bag. 7. Followstepsbelowto attachgrass catcher: uStment a.
-
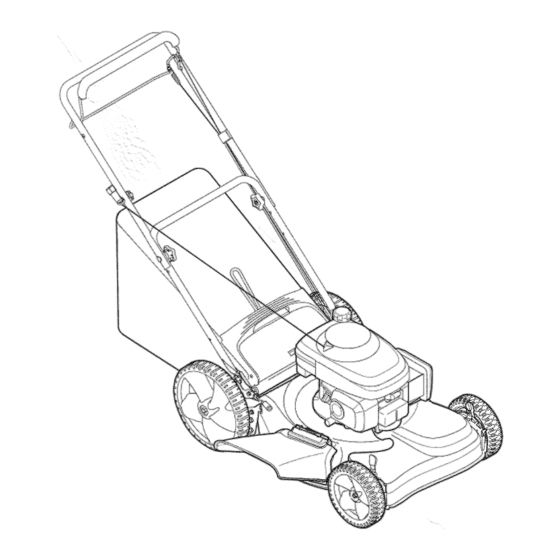
Page 8: Know Your Lawn Mower
Know Your Lawn Mower BladeControl Control Recoil Starter GasolineFill Grass--_ WARNING Mulchinc Heigh! Adjustment Plug Levers The blade control mechanism is a Figure safety device. Never Cutting Height Adjustment Levers Now that you have set up your lawn mower for op- eration, get aquainted with its controls and features. - Page 9 Starting Engine WARNING:Besure no one otherthan the operatoris standingnear the lawn mower whilestartingengineor operat- ingmower.Neverrun engineindoors or in enclosed,poorlyventilatedareas. Engineexhaustcontainscarbonmonox- ide,an odorlessand deadly gas. Keep hands, feet, hair and loose clothing Mower away from any moving parts on engine and lawnmower. 1.
- Page 10 Lubrication 1. Lubricatepivot pointson theblade controlat least oncea seasonwith lightoil. The bladecontrol must operatefreely in both directions.See Figure3. 2. Lubricatethe wheelsat least oncea seasonwith lightoil (or motoroil). If wheelsare removedfor any reason,lubricatesurfaceof the pivotarm and inner Maintaining surfaceof thewheelwith light oil. See Figure3. reassembly.
-
Page 11: Blade Care
Blade Care bladefor sharpeningor replacement, ARNING:Whenremovingcutting protectyourhandswith a pairof heavy gloves or use a heavy rag to hold blade. i i iii Maintaining 1. Disconnectsparkplug wirefrom spark plug.Turn moweron its side makingsurethat the air filter and You r LaWn the carburetorare up. MOwer 2. - Page 12 Problem Cause Remedy Engine fails to start I Biadecontroldisengaged. Engage bladecontro!. spark plug Wiredisconnected: 21 c0nnect wireto sPa[k piugl 1. Sparkplug wire loose. 1. Connect andtighten sparkplug wire. Engineruns erratic 2. Blockedfuel lineor stale fuel. 2. Clean fuel line; fill tank withclean, fresh gasoline.
- Page 13 Off-Season 4. Coat mower'scuttingblade with chassisgreaseto Storage preventrusting. The followingstepsshouldbe taken to prepareyour lawn mowerfor storage. 5. Storemowerin a dry, cleanarea. Donot storenext 1. Cleanand lubricatemowerthoroughlyas describedin to corrosivematerials,suchas fertilizer. the lubricationinstructions. Whenstoringanytype of powerequipmentin a poorly 2. We do not recommendthe useof a pressurewasher ventilatedor metal storageshed, careshouldbe taken or gardenhoseto cleanyour unit.
- Page 14 iVlodel Series 560...
- Page 15 1 747-1214 Drive Control 749-0928A LowerHandle 710-0703 CarriageBolt 1/4-20 750-04162 Spacer.375 x.50 x 1.02"Lg. 731-04134A RearDischargeDoor 731-2626 DeluxeBail Cover 7 747-1161A BladeControl 749-1092A UpperHandle 731-04177 ChuteDeflector 10 687-02055 Mulch PlugComplete 11 732-04090A TorsionSpring- RH 12 712-04064 FlangeLock Nut,1/4-20 13 720-0279 HandleKnob 14 720-04072 HandleKnob...
- Page 16 Model Series 560...
- Page 17 710-0599 TT Screw 1/4-20x 0.5 31 734-04089 RearWheel, 12x 1.8 736-0270 BellWasher.265x0.75 32 787-01298 HeightAdjusterPlate- RH 17032A DeflectorChuteAdapter 787-01299 HeightAdjusterPlate- LH 33 732-0706 FrontLever- RH 732-1014 TorsionSpring 732-0707 FrontLever- LH 747-0710 HingePin 687-02192 HandleBracket-RH 34 716-0102 Snap Ring 687-02191 HandleBracket- LH 35 782-7551A WheelDustCap 748-0355...
- Page 18 Use this page to make notes and write down important information:...
- Page 19 U_e_¸pagetoma_ notes a ndwrite down important information:...
- Page 20 MANUFACTURER'S LiMiTED WARRANTY FOR The limitedwarranty set forth belowisgivenby MTDLLCwith respectto MTDdoes notextendany warrantyfor productssoldor newmerchandisepurchasedand usedin the UnitedStates,its posses- exportedoutsideof the UnitedStates,its possessions and sionsand territories. territories,exceptthose soldthroughMTD'sauthorized channelsof exportdistribution. "MTD"warrantsthis productagainstdefectsin materialand workmanship Replacement p artsthat are not genuineMTDparts. for a periodof two (2) yearscommencingon the dateof originalpurchase Transportation chargesand servicecalls.
Need help?
Do you have a question about the 560 Series and is the answer not in the manual?
Questions and answers