EnGenius DURAFON 1X Instruction Manual
Digital long range cordless phone
Hide thumbs
Also See for DURAFON 1X:
- Workshop manuals (25 pages) ,
- Instruction manual (16 pages) ,
- Quick reference sheet (5 pages)
Table of Contents
Advertisement
Available languages
Available languages
Table of Contents
Safety Instructions ........................................................................................ 4
General Safety Instructions...................................................................... 4
Product Safety Instructions ...................................................................... 4
Battery Safety Instructions ....................................................................... 6
Regulatory Information ................................................................................. 7
Equipment Checklist..................................................................................... 9
Handset Illustration..................................................................................... 10
Basic Handset Features......................................................................... 11
Additional Handset Features.................................................................. 12
Administrator Features........................................................................... 15
Base Illustration .......................................................................................... 16
Basic Base Station Features.................................................................. 17
Charger Illustration ..................................................................................... 18
Charger Features ....................................................................................... 19
Base Station Installation......................................................................... 20
Handset and Charger Installation .......................................................... 20
Basic Operations ........................................................................................ 22
Operation Modes.................................................................................... 22
A. Base Operation Modes.................................................................. 22
B. Handset Operation Modes ............................................................ 22
Making a Telephone Call ....................................................................... 23
Making an 2-Way/ Intercom Call............................................................ 24
A. Handset to Handset Calls.............................................................. 24
B. Intercom/2-Way from Base to Handset ......................................... 24
C. Intercom/2-Way from Handset to Base......................................... 25
Making a Broadcast ............................................................................... 25
A. Handset to Handset Calls.............................................................. 25
B. Broadcasting from Base to Handset ............................................. 26
C. Broadcasting from Handset to Base ............................................. 26
Redial ..................................................................................................... 26
Receiving a Telephone Call ................................................................... 27
Receiving an Intercom Call .................................................................... 27
Ending a Call.......................................................................................... 27
Adjusting Receiver (Earpiece) Voice Volume ........................................ 28
Placing a Call On Hold ........................................................................... 28
Mute ....................................................................................................... 28
Do Not Disturb (Silent Ring)................................................................... 29
Key Guard .............................................................................................. 29
To View Missed Call(s) .......................................................................... 29
Battery Recharge and Replacement...................................................... 29
~2~
Advertisement
Chapters
Table of Contents

Related Manuals for EnGenius DURAFON 1X


Summary of Contents for EnGenius DURAFON 1X
-
Page 1: Table Of Contents
Table of Contents Safety Instructions ..................4 General Safety Instructions..............4 Product Safety Instructions ..............4 Battery Safety Instructions ............... 6 Regulatory Information ................. 7 Equipment Checklist..................9 Handset Illustration..................10 Basic Handset Features................. 11 Additional Handset Features..............12 Administrator Features................15 Base Illustration .................. -
Page 2: Safety Instructions
Advanced Operations................. 31 Safety Instructions Handset Registration................31 Handset Group Subscription..............32 Caution: Your wireless telephone gives you freedom and flexibility to stay Registration of Additional Base.............. 32 in touch while you move around. However, when using your phone Call Transfer................... 33 equipment, safety instructions should be followed to avoid the risks of fire, Call Manager.................. -
Page 3: Battery Safety Instructions
3. Changes or modifications to this product not expressively approved by 14. Do not place the product where persons can step, trip, or fall on it. the manufacturer will void the warranty and the FCC authorization to 15. Do not place conductive objects over or near the antenna. operate the equipment. -
Page 4: Regulatory Information
Regulatory Information Notes: In the event of any inconsistency between the English DuraFon 1X and French versions hereof, the English version shall FCC ID: NI3-SN1302 prevail. IC: 3616A-SN1302 This device complies with Part 15 of the FCC Rules. Operation is subject to the following two conditions: 1) this device may not cause harmful interference, and this device must accept any interference received, including... -
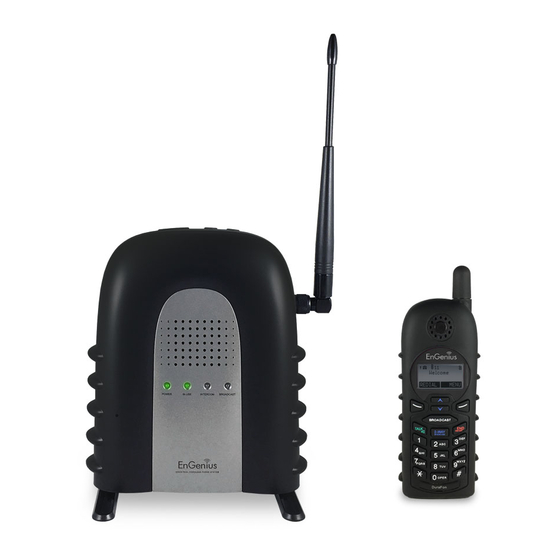
Page 5: Equipment Checklist
Equipment Checklist Handset Illustration In a Base + Handset package, please find the following components: Base Station x 1 Base Antenna x 1 Base AC/DC Adaptor x 1 Handset x 1 Low Profile Handset Antenna x 1 Optimal Performance Handset Antenna x 1 1700mA Li-ion Battery Pack x 1 Charger x 1 Charger AC/DC Adaptor x 1... -
Page 6: Basic Handset Features
Handset Features b. Sends a Flash signal to phone line to retrieve a dial tone after the call ends, or to perform the call waiting feature provided by local phone companies during a call. Basic Handset Features c. Press and hold the key for one second to enable/disable speakerphone. - Page 7 2. Ringer Vibrator a. Five-level ringer volume selections (high/ low/ vibrate/ vibrate-then- 9. Any Key Answer (except END, Silent Soft Key) ring/ off) b. Four ringer type selections 10. Key-guard 3. Caller ID 11. Dialing Prefix a. Displays incoming call phone number and name on the LCD (needs a.
-
Page 8: Administrator Features
a. Allow user to pre-program the most frequently used PBX feature Base Illustration along with its feature code into DuraFon which is adjunct to the PBX system b. Up to 9 entries can be saved c. Once the feature and feature codes being programmed, you can quick perform those functions during the call by pressing OPTION soft key. -
Page 9: Basic Base Station Features
Base Features Charger Illustration Basic Base Station Features 1. Antenna a. The antenna port has a reverse thread connector; to remove antenna or cable, turn clockwise; to install, turn counterclockwise. Improper installation may damage the connector b. When using an outdoor antenna, locate the antenna (not the base station itself) as high as possible for a clear transmission path. -
Page 10: Charger Features
Charger Features Getting Started Base Station Installation 1. DC In There are three possible base station setups: Connects to Charger AC Adaptor. Base station alone Base station plus telephone answering device 2. Handset Charging Slot Base station plus standard telephone a. -
Page 11: Basic Operations
Basic Operations and receiving phone calls and intercom calls. No base station or handset programming is needed for basic operations. Operation Modes Both the base station and handset have levels of operation at which time Note: only certain procedures of functions can be performed. Handset(s) packaged along with a Base Station are pre- registered at the factory. -
Page 12: Making An 2-Way/ Intercom Call
Making an 2-Way/ Intercom Call The EnGenius Industrial Cordless Phone System offers private, Intercom/ 2- way radio calls independence of base station. Intercom/ 2-way communication can be placed from or to base stations and handsets. -
Page 13: Intercom/2-Way From Handset To Base
handset responds. “BROADCAST” key b. Hear bi-bi-beep while the initiating handset PA paging 4. Before a handset answers, the INTERCOM can be cancelled from the broadcast all handsets within communication to Ext. # 12 base by pressing INTERCOM again. However, once a handset answers, coverage only the answering handset can end the call. -
Page 14: Receiving A Telephone Call
[Note] Intercom numbers (Handset ID) are not stored in the last 10 To end a telephone or intercom call, press END key or place handset into numbers dialed log. charger cradle. Receiving a Telephone Call Adjusting Receiver (Earpiece) Voice Volume 00:00:10 1. -
Page 15: Do Not Disturb (Silent Ring)
hold. effective only for the current call. Do Not Disturb (Silent Ring) 3. Battery talk time and standby time vary depending on the talk/standby pattern and the operating distance. Putting the handset back to charger 1. Enter the key sequence MENU – Sounds – Ring cradle as often as possible is recommended for best performance. -
Page 16: Advanced Operations
Advanced Operations pressing the REG button. The handset has a 12 second registration timeout starting from the registration or de- registration option has been selected. The base and handset Handset Registration will automatically exit registration mode after timeout. When you conduct the registration procedure with BASE 20, the 1. -
Page 17: Call Transfer
, and 4 base unit. (1) Speak to the destination handset. XFER (2) Press soft key or the END to end announcement. The call is transferred to the destination handset. 3. Registration: a. Press MENU-6 from HS 11 to enter the registration mode Notes: If the destination handset does not answer after handset Main Menu:... -
Page 18: Phonebook Operations
a. Press Menu-9 and enter the two-digit base ID to designed handset ID to a specific handset. Press enter the System mode. Main Menu: Menu-9 and enter the two-digit base ID to enter Please enter 8. Call Manager b. Press 1 to enter Tone selection the administration mode. -
Page 19: Call Barring
# when in number editing b. Press a key that corresponds to the first character of the name you are looking for. c. For example, you are looking for “EnGenius”, and then press the Call barring number “3” once. d. Use scrolling key to locate the exact record you are looking 1. -
Page 20: Text Messaging
confirm your selection. the character. For example, you are editing the Meeting now message 1 as “Meeting now.” 3. To edit the Call barring code (3) When finished, press SAVE soft key to save SAVE12 ODELETE a. Once turn on the call barring feature, you can key change. -
Page 21: Menu Operations
with all PBX / Key systems due to the diversity of various proprietary systems. Up to 9 most frequently used PBX feature codes can be pre-programmed. Menu Operations Settings: 3. Name and enter PBX feature codes: 9. Name Tag a. Press Menu (Right) soft key while the handset is 0. - Page 22 options: 0, 1, 2, and 3. Press SAVE to save selection. Default = 0. (2) Save: press “2” to edit and save or save without editing into the c. Press “3” to select key volume when a key is pressed: use phonebook.
-
Page 23: Technical Specifications
Technical Specifications (2) When finished; press SAVE to save change. g. Press “7” to change the LCD backlight: (1) Use to scroll through options: On, Off, and 8 Seconds. Default = Electrical Specifications Base Station Portable Handset Frequency 902-928 MHz 902-928 MHz 6 seconds, meaning that the backlight will turn off the backlight after 8 RF Power... - Page 24 Index Electric Shock, 4, 5 2-Way/Intercom, 12, 24, 34 Emergency, 4 Equipment Checklist, 9 Adjusting Receiver (Earpiece) Voice Volume, 28 Administrator Features, 15 FCC, 5, 7, 46 Audio-in Jack, 17 FDA, 4 Flash Time, 15, 35, 46 Base Station Features, 17 Base Station Installation, 20 Group ID, 12, 24, 25, 40 Battery, 5, 6, 9, 11, 14, 19, 20, 21, 22, 28, 30, 46...
- Page 25 Reverse Thread Connector, 17 Ringer, 7, 11, 13, 27, 29, 43 RSSI, 11 Safety Instructions, 4, 6, 41 Spare Battery Charging Slot, 19 Speed Dial, 23 Talk Mode, 12, 22 Talk/ Technical Specifications, 7, 46 Text Messaging, 14, 39, 40, 45 Transformer, 20 Three Call Logs, 13, 43, 44 To View Missed Call(s), 29...
- Page 26 Table des matières Instructions de sécurité ................50 Instructions générales de sécurité ............50 Instructions de sécurité du produit ............51 Instructions de sécurité pour la batterie ..........52 Information sur les règlements ..............53 Liste de vérification de l’équipement ............55 Illustration du combiné...
-
Page 27: Instructions De Sécurité
Opérations avancées ................. 82 Instructions de sécurité Enregistrement du combiné ..............82 Enregistrement de groupe de combinés ..........83 Attention : votre téléphone sans fil vous donne la liberté et la flexibilité de Enregistrement d’une base supplémentaire .......... 84 rester en contact tout en continuant de bouger. Cependant, vous devriez Transfert d’appels .................. -
Page 28: Instructions De Sécurité Du Produit
Instructions de sécurité du produit 12. Pour éviter les chocs électriques ou les brûlures, ne démontez pas le produit. Envoyez le produit à un centre de service autorisé où des 1. Lisez et comprenez bien toutes les instructions. travaux de réparation seront effectués. Téléphonez au Service à la clientèle pour connaître les endroits près de chez vous. -
Page 29: Information Sur Les Règlements
4. Ne jeter pas la batterie dans les résidus urbains. Informez-vous sur les Votre compagnie de téléphone peut faire des changements dans ses installations, équipements, fonctionnements ou procédures et ils pourraient affecter le bon lois locales concernant les instructions pour les déchets. fonctionnement de votre système téléphonique. -
Page 30: Liste De Vérification De L'équipement
Liste de vérification de l’équipement Illustration du combiné Dans un ensemble de Base + Combiné, vous retrouverez les composants suivants : Station de base x 1 Antenne de base x 1 Adaptateur de base c.a.-c.c. x 1 Combiné x 1 Combiné... -
Page 31: Caractéristiques De Base Du Combiné
Caractéristiques du combiné batterie faible (4) Longue série périodique de bips (se répète à toutes les 30 secondes) : indique qu’un appel est en attente Caractéristiques de base du combiné 3. PARLER/HAUT-PARLEUR 1. LCD à 4 lignes (affichage à cristaux liquides) a. - Page 32 b. (ID) Identification 11-19 ; 21-29 ; 31-39 ; 41-49: Identifications du chiffres, noms à 14 caractères et horodateur). Vous devez être combiné individuel. ID 11 et 12 sont les deux premières abonné au service Identification de l’appelant de votre compagnie de identifications attribuées par la base et sont des «...
-
Page 33: Caractéristiques De L'administrateur
Caractéristiques de l’administrateur identification (ID) de combiné (jusqu’à 28 chiffres) et nom (jusqu’à 14 caractères) Les combinés 11 et 12 sont des administrateurs désignés. Les deux ont le b. Affichage en ordre alphabétique et recherche par lettre même pouvoir d’effectuer les fonctions administratives de la station de base. c. -
Page 34: Illustration De La Base
Illustration de la base ~63~... -
Page 35: Illustration Du Chargeur
Illustration du chargeur : pour brancher l’adaptateur de courant Courant continu entrant 9. Volume de la voix ~65~ ~66~... - Page 36 5. L’adaptateur pour le changement de station peut être aussi utilisé comme chargeur de voyage. Cependant, vous ne pouvez le fermer lorsque vous chargez le combiné avec le chargeur de voyage. Un message d’avertissement : « débrancher le chargeur de voyage, alors de »...
-
Page 37: Installation De La Station De Base
Comment démarrer avec protection de ligne téléphonique. Installation de la station de base 3. Branchez le cordon téléphonique dans la prise « LINE » Il y a trois installations de station de base possibles : Seulement la station de base 4. -
Page 38: Opérations De Base
Opérations de base c. Pour plus de détails sur les fonctions disponibles par le choix de MENU, allez à la page 93. Modes d’opération d. L’affichage de la structure du MENU est comme La station de base et le combiné ont des niveaux de fonctionnement qui suit : peuvent effectuer les procédures et les fonctions à... -
Page 40: Intercom/Bidirectionnel De La Base Au Combiné
destination s’ouvrira B. Intercom/Bidirectionnel de la base au combiné d. Appuyez sur la touche END pour terminer la 1. Appuyez (Press) sur la touche Intercom sur la diffusion. station de base pour faire un intercom de tous les Annooncer combinés enregistrés. Le premier combiné qui Appel entrant de 2. -
Page 41: Diffuser Du Combiné À La Base
retournez en mode Inactif. Notes : Vous pouvez appuyer (Press) sur la touche SILENC C. Diffuser du combiné à la base (Gauche) si vous choisissez d’ignorer l’appel. À la différence de fermer la sonnerie (à partir du menu du combiné), la Diffusion à... -
Page 42: Mettre Un Appel En Attente
2. Il y a 6 niveaux de choix de volumes. Le volume par Ne pas déranger (Sonnerie silencieuse) défaut est 4. Utilisez (Use) les flèches de défilement pour l’ajustement. 1. Entrez (Enter) la séquence de touches MENU – Sons Sonneries: –... -
Page 43: Recharge Et Remplacement De La Batterie
Recharge et remplacement de la batterie Opérations avancées 1. Chargez la batterie lorsqu’une ou plusieurs des situations suivantes Enregistrement du combiné surviennent : a. Le téléphone émet un bip toutes les deux secondes. 1. Si vos combinés font partie d’un système lors de l’achat, ils ont été pré- b. -
Page 44: Enregistrement De Groupe De Combinés
e. Appuyez et tenez le bouton REG de la base pendant 2 secondes jusqu’à ce que 4 voyants DEL s’allument. Notes : Appuyez sur la touche 2 du combiné. Ceci termine le processus de Le combiné peut changer d’affiliations de groupe en tout temps. La base (administrateur) n’est pas responsable des affectations désenregistrement. -
Page 45: Gestionnaire D'appels
1. Choisissez si vous voulez recevoir les appels d’autocommutateur privé, vous pouvez entrants, transférés et bi-directionnels/intercom à transférer l’appel à un poste d’autocommutateur privé désigné. partir d’une station de base spécifique : 1.Xfer PBX (2) Généralement, chaque système 2.Xfer Combine d’autocommutateur privé... - Page 46 b. Appuyez sur 1 pour passer au mode Sélection de la tonalité. Notes : Si la station de base est associée au système c. Vous pouvez ajuster le mode de composition d’autocommutateur privé, il est recommandé d’ajuster le temps de clignotement du DuraFon 1X pour qu’il corresponde au spéc.
-
Page 47: Opérations De L'annuaire Téléphonique
configuration » et une confirmation Terminé. (3) Utilisez (Use) la touche SUPPRI pour supprimer le dernier caractère entré. Lorsque terminé, appuyez Opérations de l’annuaire téléphonique GARDER sur la touche pour confirmer votre choix. 1. Vous pouvez enregistrer jusqu’à Notes : 30 entrées dans l’annuaire Lorsque vous entrez un numéro de téléphone, le curseur Le menu:... -
Page 48: Interdiction D'appels
Appuyez sur une touche correspondant au premier caractère du J K L 5 nom que vous recherchez. P Q R S 7 c. Par exemple, vous recherchez « EnGenius » et appuyez ensuite sur T U V 8 le numéro "3" une fois. W X Y Z 9 d. -
Page 49: Messagerie Texte
b. Appuyez sur OPTION pour effacer ou modifier les GARDER pour enregistrer vos modifications. Vous codes d’interdiction d’appels. verrez l’identification (ID) 01 du message texte Message texte: c. Jusqu’à 5 séries de codes d’interdictions d’appels dans le coin supérieur droit de l’écran à cristaux 1. -
Page 50: Options D'autocommutateur Privé Programmables
Entrant. pendant l’appel. a. Appuyez sur la touche OPTION pendant que le Options d’autocommutateur privé programmables combiné est en mode TALK. 00:00:16 b. Appuyez sur le num ro correspondant à la Volume: 4 Lorsque l’unité de base DuraFon 1X est installée derrière le système TENIR OPTION fonction que vous voulez effectuer, c’est-à-dire... -
Page 51: Opérations Du Menu
Opérations du menu a. Appuyez sur “1” pour voir les 10 derniers numéros de téléphones composés à partir du plus récent. Utilisez (Use) pour défiler à travers la liste. Appuyez sur OPTION pour accéder aux options. (1) Effacer : appuyez sur “1” et confirmez que vous effacez les enregistrements. - Page 52 est en anglais par défaut. journaux d’appels. Les appels intercom ne sont pas enregistrés. Le service Identifiant d’appel de votre compagnie de téléphone (2) Appuyez sur GARDER pour confirmer votre choix. locale est requis pour recevoir les numéros de téléphone, les noms “4”...
-
Page 53: Spécifications Techniques
Spécifications techniques (1) Programmez et sauvegardez les fonctions d’autocommutateur privé les plus utilisées dans le système DuraFon. (2) Veuillez vous référer à la page 95 pour les détails du fonctionnement. Spécifications Station de base Combiné portatif électriques Fréquence 902-928 MHz 902-928 MHz 7. - Page 54 Température de -10 – 70 C -10 – 70 C stockage Humidité 20 – 75 % 20 – 75 % Taille avec antenne 188*161*42mm 161*58*31mm Poids 424g 175g Notes: S/O = Sans objet. Le manufacturier se réserve le droit de modifier les concepts et les spécifications sans préavis.
Need help?
Do you have a question about the DURAFON 1X and is the answer not in the manual?
Questions and answers