Sign In
Upload
Download
Table of Contents
Contents
Add to my manuals
Delete from my manuals
Share
URL of this page:
HTML Link:
Bookmark this page
Add
Manual will be automatically added to "My Manuals"
Print this page
×
Bookmark added
×
Added to my manuals
Manuals
Brands
Asus Manuals
Motherboard
P5P41T LE
User manual
Asus P5P41T LE User Manual
User manual
Hide thumbs
1
2
Table Of Contents
3
4
5
6
7
8
9
10
11
12
13
14
15
16
17
18
19
20
21
22
23
24
25
26
27
28
29
30
31
32
33
34
35
36
37
38
39
40
41
42
43
44
45
46
47
48
49
50
51
52
53
54
55
56
page
of
56
Go
/
56
Contents
Table of Contents
Bookmarks
Table of Contents
Table of Contents
Canadian Department of Communications Statement
Federal Communications Commission Statement
Notices
Electrical Safety
Safety Information
About this Guide
Conventions Used in this Guide
P5P41T LE Specifications Summary
Chapter 1: Product Introduction
Welcome
Package Contents
Special Features
Product Highlights
Innovative ASUS Features
Asus Mylogo2
Before You Proceed
Motherboard Overview
Placement Direction
Screw Holes
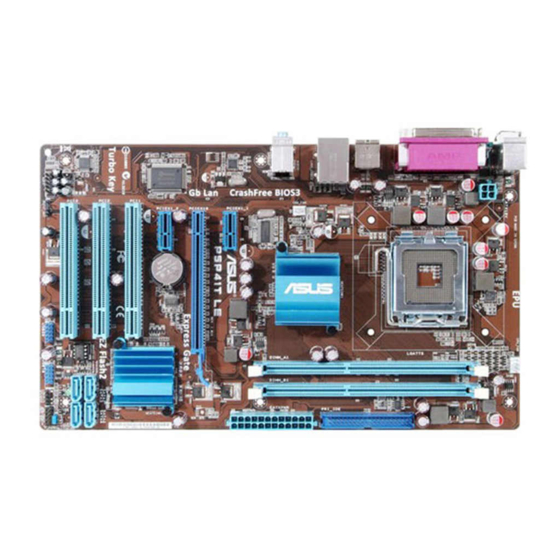
Motherboard Layout
Layout Contents
Central Processing Unit (CPU)
Installing the CPU
Installing the CPU Heatsink and Fan
Uninstalling the CPU Heatsink and Fan
System Memory
Overview
Memory Configurations
Installing a DIMM
Removing a DIMM
Expansion Slots
Installing an Expansion Card
Configuring an Expansion Card
PCI Slots
PCI Express X1 Slots
PCI Express X16 Slot
Jumpers
Jumper
Clear RTC RAM (3-Pin CLRTC)
Connectors
Rear Panel Connectors
Internal Connectors
System Panel Connector
Software Support
Installing an Operating System
Support DVD Information
Chapter 2 : BIOS Information
Managing and Updating Your BIOS
ASUS Update Utility
ASUS EZ Flash 2 Utility
ASUS Crashfree BIOS
BIOS Setup Program
BIOS Menu Screen
Menu Bar
Navigation Keys
Menu Items
Submenu Items
Configuration Fields
Pop-Up Window
Scroll Bar
General Help
Main Menu
System Time
System Date
Primary IDE Master/Slave and SATA 1-4
Storage Configuration
System Information
Advanced Menu
Jumperfree Configuration
CPU Configuration
Chipset
Onboard Devices Configuration
USB Configuration
PCI Pnp
Power Menu
Suspend Mode
ACPI 2.0 Support
ACPI APIC Support
APM Configuration
Hardware Monitor
Boot Menu
Boot Device Priority
Boot Settings Configuration
Security
Tools Menu
ASUS EZ Flash 2
Express Gate
Ai Net 2
Exit Menu
Advertisement
Quick Links
1
Motherboard Overview
2
Motherboard Layout
3
Memory Configurations
4
Jumpers
5
Rear Panel Connectors
6
Internal Connectors
Download this manual
P5P41T LE
Table of
Contents
Previous
Page
Next
Page
1
2
3
4
5
Advertisement
Table of Contents
Need help?
Do you have a question about the P5P41T LE and is the answer not in the manual?
Ask a question
Questions and answers
Related Manuals for Asus P5P41T LE
Motherboard Asus P5P41D User Manual
User manual (58 pages)
Motherboard Asus P5P41T USB3 User Manual
User manual (62 pages)
Motherboard Asus P5P41T/USB3 Quick Start Manual
(12 pages)
Motherboard Asus P5P43T User Manual
User manual (64 pages)
Motherboard Asus P5P43T-SI User Manual
User manual (64 pages)
Motherboard Asus P5P43TD PRO User Manual
User manual (62 pages)
Motherboard Asus P5P41C User Manual
User manual (62 pages)
Motherboard Asus Р5Р41С Quick Start Manual
(26 pages)
Motherboard Asus P5P41TD User Manual
User manual (58 pages)
Motherboard Asus P5P41T PLUS User Manual
User manual (56 pages)
Motherboard Asus P5P43TD/USB3 User Manual
User manual (64 pages)
Motherboard Asus Motherboard P5PL2 User Manual
Asus p5pl2 motherboard user manual (116 pages)
Motherboard Asus P5PL2 User Manual
Motherboard diy troubleshooting guide (116 pages)
Motherboard Asus P5P800 Benutzerhandbuch
Motherboard installation guide (116 pages)
Motherboard Asus P5P800-MX User Manual
Micro-atx motherboard (84 pages)
Motherboard Asus P5P800S Quick Start Manual
Motherboard installation guide (20 pages)
This manual is also suitable for:
P5p41t plus
Table of Contents
Save PDF
Print
Rename the bookmark
Delete bookmark?
Delete from my manuals?
Login
Sign In
OR
Sign in with Facebook
Sign in with Google
Upload manual
Upload from disk
Upload from URL


Need help?
Do you have a question about the P5P41T LE and is the answer not in the manual?
Questions and answers