Table of Contents
Advertisement
Thank you for purchasing an IP Proprietary Telephone (IP-PT).
Please read this manual carefully before using this product and save
this manual for future use.
For more details, please refer to the manuals of the PBX.
Note:
In this manual, the suffix of each model number is omitted unless
necessary.
Accessories (included)
Handset
Screws
This model supports the following PBX versions and CODEC types:
KX-TDA15/KX-TDA30: PSMPR Software File Version 4.0000 or later
KX-TDA100/KX-TDA200: PMPR Software File Version 5.0000 or later
KX-TDA600: PLMPR Software File Version 5.0000 or later
KX-TDE100/KX-TDE200: PMMPR Software File Version 1.0000 or later
KX-TDE600: PGMPR Software File Version 2.0000 or later
KX-NCP500/KX-NCP1000: PBMPR Software File Version 1.0000 or later
CODEC: G.729A, G.711, G.722 *
*1
G.722 is only available for KX-TDE100/KX-TDE200/KX-TDE600/KX-NCP500/
KX-NCP1000.
Handset Cord
One
Stand
Two
Quick Reference Guide
IP Proprietary Telephone
One
One
1
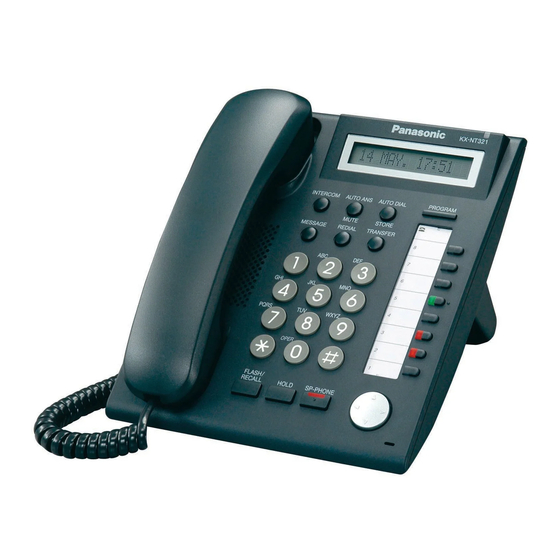
KX-NT321
Model No.
Wall Mounting
Adaptor
One
Advertisement
Table of Contents

Related Manuals for Panasonic KX-NT321-B


Summary of Contents for Panasonic KX-NT321-B
-
Page 1: Quick Reference Guide
Quick Reference Guide IP Proprietary Telephone KX-NT321 Model No. Thank you for purchasing an IP Proprietary Telephone (IP-PT). Please read this manual carefully before using this product and save this manual for future use. For more details, please refer to the manuals of the PBX. Note: In this manual, the suffix of each model number is omitted unless necessary. -
Page 2: Location Of Controls
Location of Controls Location of Controls... - Page 3 Location of Controls A LCD (Liquid Crystal J HOLD: Used to place a call Display) on hold. B AUTO DIAL/STORE: Used K SP-PHONE for System/Personal Speed (Speakerphone): Used for Dialling or storing programme performing hands-free changes. operations. C AUTO ANS (Auto Answer)/ L Navigator Key: Used to MUTE: Used to receive an adjust the volume and the...
-
Page 4: Settings
Settings Settings Speaker volume While in a hands-free conversation Handset/Headset While using the handset or volume headset Press Up to increase Ringer volume While on-hook or receiving a call or Down to decrease the volume. LCD Contrast While on-hook AUTO DIAL AUTO DIAL PROGRAM PROGRAM... -
Page 5: Making Calls
Features List Features List Icon Meanings = Flexible CO button = Off-hook = On-hook (CO) = Feature number = Talk = Confirmation Tone C. Tone Making Calls Calling To an extension To an outside party outside phone no. extension no. (CO) Redial REDIAL... -
Page 6: During A Conversation
Features List Personal Speed Dialling To store personal speed desired no.* (max. 32 digits) dial no. (2 digits) C. Tone * Enter outside line access number before outside phone number. To dial AUTO DIAL personal speed dial no. (2 digits) STORE System Speed Dialling To dial... -
Page 7: Do Not Disturb
Features List Useful Features Multiple Party Conversation To add other parties during a conversation (i.e., conference) assigned as a desired Conference phone no. Talk to the (Conference) C. Tone button new party. assigned as a Conference Talk with (Conference) C. Tone button multiple parties. -
Page 8: Listening To A Message
Features List Before Leaving Your Desk Call Forwarding Both Calls Outside Calls Intercom Calls All calls extension no. Busy No answer C. Tone outside outside line phone no. access no. Busy/ No answer Cancel Making Use of the Voice Mail Service Listening to a message From your own extension KX-TVM series... - Page 9 Features List Leaving a message VPS extension no. From your own extension Mailbox Password* From someone else's extension Mailbox Password* mailbox no. * If you have no password, you can skip the last step. Leave Enter the desired mailbox number a message (KX-TVM series) (KX-TVP series)
- Page 10 PBX. AC adaptor • Use a Panasonic AC adaptor KX-A239UK (PQLV206E). • The AC adaptor is used as the main disconnect device. Ensure that the AC outlet is located near the unit and is easily accessible.
- Page 11 Stand Usage Stand Usage Attaching the Stand Place the catches ( ) of the stand into hooks located in the unit. Gently push the stand in the direction indicated until it locks into place. The stand will be mounted in the high position. Removing the Stand Hold the stand with both hands.
- Page 12 Stand Usage Adjusting from High to Low Position Hold the stand with both hands as shown and rotate the stand in the direction indicated until it locks into the low position ( Adjusting from Low to High Position Hold the stand with both hands as shown and rotate the stand in the direction indicated until it locks into the high position (...
-
Page 13: Wall Mounting
Wall Mounting Wall Mounting 1. Remove the stand if it is attached. For information on removing the stand, refer to page 11. 2. Attach the wall mounting adaptor as shown. • Make sure the cables are not pinched by the wall mounting adaptor. - Page 14 • If you are having problems making calls, disconnect the Ethernet cable and connect a known working IP-PT. If the known working IP-PT operates properly, have the defective IP-PT repaired by an authorised Panasonic factory service centre. If the known working IP-PT does not operate properly, check the PBX and the Ethernet cable.
-
Page 15: Installation Environment
Important Information Take special care to follow the safety suggestions listed below. Safety 1) The unit should only be connected to a power supply of the type described in the Quick Reference Guide or as shown on the label on the unit. -
Page 16: Important Notice
• For information regarding network setup of the IP-PT such as IP addresses, please refer to the Installation Manual for the Panasonic PBX. • If an error message is shown on your display, consult your dealer or the network administrator. - Page 17 Important Information Information for Users on Collection and Disposal of Old Equipment and used Batteries These symbols on the products, packaging, and/or accompanying documents mean that used electrical and electronic products and batteries should not be mixed with general household waste. For proper treatment, recovery and recycling of old products and used batteries, please take them to applicable collection points, in accordance with your national legislation and the...
- Page 18 Important Information This product is intended to be connected to a Panasonic PBX only. Panasonic Communications Company (U.K.) Ltd. declares that this equipment is in compliance with the essential requirements and other relevant provisions of Radio & Telecommunications Terminal Equipment (R&TTE) Directive 1999/5/EC.
-
Page 19: Wall Mounting Template
Wall Mounting Template Wall Mounting Template One screw here WALL MOUNTING TEMPLATE 1. Drive the screws into the wall as indicated. 2. Hook the unit onto the screw heads. Note: Make sure to set the print size to correspond with the size of this page. - Page 20 Panasonic House, Willoughby Road, Bracknell, Berkshire RG12 8FP Copyright: This material is copyrighted by Panasonic Communications Co., Ltd., and may be reproduced for internal use only. All other reproduction, in whole or in part, is prohibited without the written consent of Panasonic Communications Co., Ltd.
Need help?
Do you have a question about the KX-NT321-B and is the answer not in the manual?
Questions and answers