
Related Manuals for Hanna Instruments C 99 series


Summary of Contents for Hanna Instruments C 99 series
- Page 1 Instruction Manual C 99 & C 200 Series Multiparameter Bench Photometers These Instruments are in Manufacturers since 1978 Compliance with the CE Directives...
-
Page 2: Table Of Contents
TOTAL HARDNESS HIGH RANGE ..70 USER NOTES........146 TOTAL HARDNESS MEDIUM RANGE .. 73 All rights are reserved. Reproduction in whole or in part is prohibited without the written consent of the copyright owner, Hanna Instruments Inc., Woonsocket, Rhode Island, 02895 , USA. -
Page 3: Preliminary Examination
PRELIMINARY EXAMINATION PRELIMINARY EXAMINATION PRELIMINARY EXAMINATION PRELIMINARY EXAMINATION PRELIMINARY EXAMINATION Remove the instrument from the packing material and examine it carefully to make sure that no damage has occurred during ship- ment. If there is any damage, notify your Dealer. Each Meter is supplied complete with: •... -
Page 4: Specifications
SPECIFICATIONS SPECIFICATIONS SPECIFICATIONS SPECIFICATIONS SPECIFICATIONS Light Life Life of the instrument Silicon Photocell Light Detector Environment 0 to 50°C (32 to 122°F); max 95% RH non-condensing Power Supply 2 x 9 V batteries / 12 to 20 VDC through voltage adapter Auto-Shut off After 10' of non-use Dimensions... - Page 5 Given that the absorption of a compound strictly depends on the wavelength of the incident light beam, a narrow spectral bandwidth should be selected as well as a proper central wavelength to optimize measurements. The optical system of Hanna's C 99 & C 200 multiparameter photometers is based on special subminiature tungsten lamps and narrow-band interference filters to guarantee both high performance and reliable results.
-
Page 6: Functional Description
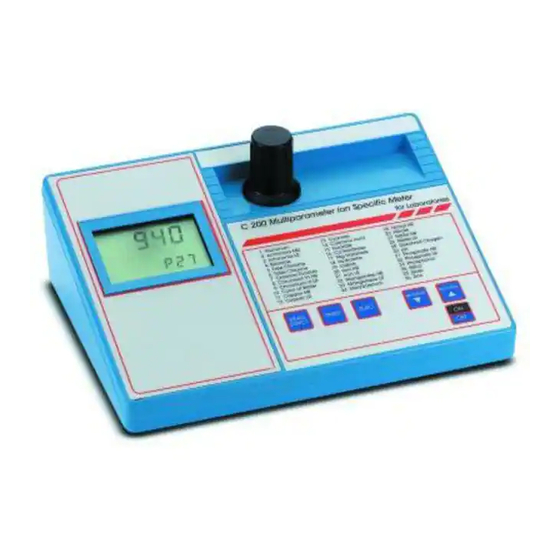
FUNCTIONAL DESCRIPTION FUNCTIONAL DESCRIPTION FUNCTIONAL DESCRIPTION FUNCTIONAL DESCRIPTION FUNCTIONAL DESCRIPTION FRONT PANEL 1) Cuvet Holder 2) Dual Level Liquid Crystal Display 3) Programs List 4) READ DIRECT, to perform measurement immediately 5) TIMER, to perform measurements after a preprogrammed countdown 6) ZERO, to zero the meter prior to measurement 7) Program , to select the desired parameter... -
Page 7: Guide To Display Codes
GUIDE TO DISPLAY CODES GUIDE TO DISPLAY CODES GUIDE TO DISPLAY CODES GUIDE TO DISPLAY CODES GUIDE TO DISPLAY CODES Note: The secondary LCD below shows a generic "P– –", whereas the meter will indicate the exact program number (e.g. in C 200, "P1"... - Page 8 Light over range. The cuvet is not inserted correctly and an eccess ambient light is reaching the detector. If the cuvet is properly inserted, then contact your dealer or the nearest Hanna Customer Service Center. The lamp is not working properly. Contact your dealer or the nearest Hanna Customer Service Center.
- Page 9 b) on sample reading: b) on sample reading: b) on sample reading: b) on sample reading: b) on sample reading: There is too much light for the sample measurement. Please check if the right sample cuvet is inserted. The sample and zero cuvet are inverted. A zero reading was not taken.
-
Page 10: Tips For An Accurate Measurement
TIPS FOR AN ACCURATE MEASUREMENT TIPS FOR AN ACCURATE MEASUREMENT TIPS FOR AN ACCURATE MEASUREMENT TIPS FOR AN ACCURATE MEASUREMENT TIPS FOR AN ACCURATE MEASUREMENT The instructions listed below should be carefully followed during testing to ensure best accuracy. • Color or suspended matter in large amounts may cause interfer- ence, therefore, these should be removed by treatment with active carbon and by prior filtration. - Page 11 • Proper use of the powder reagent packet: (a) use scissors to open the powder packet; (b) push the edges of the packet to form a spout; (c) pour out the content of the packet. • It is important that the sample does not contain any debris. This would corrupt the readings.
-
Page 12: Parameters Reference Tables
PARAMETERS REFERENCE TABLES PARAMETERS REFERENCE TABLES PARAMETERS REFERENCE TABLES PARAMETERS REFERENCE TABLES PARAMETERS REFERENCE TABLES C99 - LABORATORIES, with COD Code Parameter Page Code Parameter Page 22 Manganese HR 1 Aluminum 23 Manganese LR 2 Ammonia MR 24 Molybdenum 3 Ammonia LR 25 Nickel HR 4 Bromine 26 Nitrate... -
Page 13: Code Parameter Page
PARAMETERS REFERENCE TABLES PARAMETERS REFERENCE TABLES PARAMETERS REFERENCE TABLES PARAMETERS REFERENCE TABLES PARAMETERS REFERENCE TABLES C 200 - LABORATORIES Code Parameter Page Code Parameter Page 1 Aluminum 19 Iodine 2 Ammonia MR 20 Iron HR 3 Ammonia LR 21 Iron LR 4 Bromine 22 Manganese HR 5 Free Chlorine... - Page 14 C 205 - BOILERS & COOLING TOWERS Code Parameter Page Code Parameter Page 1 Aluminum 13 Iron HR 2 Ammonia MR 14 Iron LR 3 Ammonia LR 15 Molybdenum 4 Bromine 16 Nitrate 5 Free Chlorine 17 Nitrite HR 6 Total Chlorine 18 Nitrite LR 7 Chlorine Dioxide 19 Oxygen, Dissolved 117...
- Page 15 C 207 - INDUSTRIAL WASTEWATER Code Parameter Page Code Parameter Page 1 Aluminum 11 Nickel HR 2 Free Chlorine 12 Nickel LR 3 Total Chlorine 13 Nitrate 4 Color of Water 14 Oxygen, Dissolved 117 5 Copper HR 15 pH 6 Copper LR 16 Phosphate HR 7 Fluoride...
- Page 16 C 209 - EDUCATION Code Parameter Page Code Parameter Page 1 Ammonia MR 11 Nitrite HR 2 Ammonia LR 12 Nitrite LR 3 Free Chlorine 13 Oxygen, Dissolved 117 14 pH 4 Total Chlorine 5 Chromium VI HR 15 Phosphate HR 6 Chromium VI LR 16 Phosphate LR 7 Color of Water...
- Page 17 C 211 - CHEMICAL MANUFACTURERS Code Parameter Page Code Parameter Page 1 Aluminum 12 Molybdenum 2 Ammonia MR 13 Nickel HR 3 Ammonia LR 14 Nickel LR 4 Chromium VI HR 15 pH 5 Chromium VI LR 16 Phosphate HR 6 Copper HR 17 Phosphate LR 7 Copper LR...
- Page 18 C 213 - MUNICIPAL WASTEWATER Code Parameter Page Code Parameter Page 1 Aluminum 13 Nickel HR 2 Ammonia MR 14 Nickel LR 3 Ammonia LR 15 Nitrate 4 Bromine 16 Nitrite HR 5 Free Chlorine 17 Nitrite LR 6 Total Chlorine 18 Oxygen, Dissolved 117 7 Chromium VI HR 19 pH...
-
Page 19: Operational Guide
OPERATIONAL GUIDE OPERATIONAL GUIDE OPERATIONAL GUIDE OPERATIONAL GUIDE OPERATIONAL GUIDE POWER CONNECTION Plug the 12VDC adapter (HI 710005 - 110VDC, or HI 710006 - 220VDC) into the DC socket. Plug the adapter into the outlet. Alternatively, remove the battery cover on the back of the meter; attach 2 fresh 9V batteries and replace the cover. -
Page 20: Abbreviations
• After the desired program number appears on the secondary display, follow the measurement procedure described in the related chapter. • Select a new parameter measurement procedure by pressing the PROGRAM and PROGRAM keys. Note: in the following measurement sec- tions, a generic "P–... -
Page 21: Aluminum
A L U M I N U M A L U M I N U M A L U M I N U M A L U M I N U M A L U M I N U M SPECIFICATIONS Range 0.00 to 1.00 mg/L... - Page 22 • Fill two cuvets with 10 mL of sample 10 mL 10 mL each (up to the mark). • Add the content of one HI 93712C Bleaching powder packet to one of the two cuvets. Replace the cap and shake vigorously until dissolution is complete.
-
Page 23: Ammonia High Range
AMMONIA HIGH RANGE AMMONIA HIGH RANGE AMMONIA HIGH RANGE AMMONIA HIGH RANGE AMMONIA HIGH RANGE SPECIFICATIONS Range 0.0 to 50.0 mg/L Resolution 0.1 mg/L Accuracy ±0.5 mg/L ±5% of reading Typical EMC ±0.1 mg/L Deviation Light Source Tungsten lamp with narrow band interference filter @ 420 nm Method Adaptation of the ASTM Manual of Water and... - Page 24 • Press ZERO and “SIP” will blink on the display. • Wait for a few seconds and the display will show “-0.0-”. Now the meter is zeroed and ready for measurement. • Remove the cuvet. • Add 4 drops of HI 93733A Nessler Reagent.
-
Page 25: Ammonia Medium Range
AMMONIA MEDIUM RANGE AMMONIA MEDIUM RANGE AMMONIA MEDIUM RANGE AMMONIA MEDIUM RANGE AMMONIA MEDIUM RANGE SPECIFICATIONS Range 0.00 to 10.00 mg/L Resolution 0.01 mg/L Accuracy ±0.05 mg/L ±5% of reading Typical EMC ±0.01 mg/L Deviation Light Source Tungsten lamp with narrow band interference filter @ 420 nm Method Adaptation of the ASTM Manual of Water and... - Page 26 • Remove the cuvet. • Add 4 drops of the First reagent (6 drops in case of seawater analysis). Replace the cap and mix the solution. • Add 4 drops of the Second reagent (10 drops in case of seawater analysis).
-
Page 27: Ammonia Low Range
AMMONIA LOW RANGE AMMONIA LOW RANGE AMMONIA LOW RANGE AMMONIA LOW RANGE AMMONIA LOW RANGE SPECIFICATIONS Range 0.00 to 3.00 mg/L Resolution 0.01 mg/L Accuracy ±0.04 mg/L ±4% of reading Typical EMC ±0.01 mg/L Deviation Light Source Tungsten lamp with narrow band interference filter @ 420 nm Method Adaptation of the ASTM Manual of Water and... - Page 28 • Remove the cuvet. • Add 4 drops of the First reagent (6 drops in case of seawater analysis). Replace the cap and mix the solution. • Add 4 drops of the Second reagent (10 drops in case of seawater analysis). Replace the cap and mix the solution.
-
Page 29: Bromine
B R O M I N E B R O M I N E B R O M I N E B R O M I N E B R O M I N E SPECIFICATIONS Range 0.00 to 8.00 mg/L Resolution 0.01 mg/L Accuracy... - Page 30 • Wait for a few seconds and the display will show “-0.0-”. Now the meter is zeroed and ready for measurement. • Remove the cuvet and add the content of one packet of HI 93716 reagent. Replace the cap and shake gently for about 20 seconds to dissolve most of the reagent.
-
Page 31: Free Chlorine
FREE CHLORINE FREE CHLORINE FREE CHLORINE FREE CHLORINE FREE CHLORINE SPECIFICATIONS Range 0.00 to 2.50 mg/L Resolution 0.01 mg/L Accuracy ±0.03 mg/L ±3% of reading Typical EMC ±0.01 mg/L Deviation Light Source Tungsten lamp with narrow band interference filter @ 525 nm Method Adaptation of the EPA DPD method 330.5. - Page 32 • Press ZERO and “SIP” will blink on the display. • Wait for a few seconds and the display will show “-0.0-”. Now the meter is zeroed and ready for measurement. • Remove the cuvet. Powder reagents procedure • Add the content of one packet of HI 93701 DPD reagent.
- Page 33 Liquid reagents procedure • To an empty cuvet add 3 drops of HI 93701A-F DPD1 indicator and 3 drops of HI 93701B-F DPD1 buffer. Swirl gently to mix, and immediately add 10 mL of unreacted sample. Replace the cap and shake gently again.
-
Page 34: Free Chlorine High Range
FREE CHLORINE HIGH RANGE FREE CHLORINE HIGH RANGE FREE CHLORINE HIGH RANGE FREE CHLORINE HIGH RANGE FREE CHLORINE HIGH RANGE SPECIFICATIONS Range 0.0 to 10.0 mg/L Resolution 0.1 mg/L Accuracy ±0.1 mg/L ±3% of reading Typical EMC ±0.1 mg/L Deviation Light Source Tungsten lamp with narrow band interference filter @ 525 nm... - Page 35 Note: To measure exactly 5 mL of reagent with the syringe, push the plunger completely into the syringe and insert the tip into HI 93734B reagent bottle. Pull the plunger out until the lower edge of the seal is on the 5 mL mark of the syringe. probable level of liquid taken up by syringe 5 mL...
- Page 36 • Remove the cuvet. • Add the content of one packet of HI 93701 DPD reagent. Re- place the cap and shake gently for 20 seconds (or 2 minutes in case of seawater analysis). • Wait for a minute to allow the undissolved reagent to precipitate and reinsert the cuvet into the instrument.
-
Page 37: Total Chlorine
TOTAL CHLORINE TOTAL CHLORINE TOTAL CHLORINE TOTAL CHLORINE TOTAL CHLORINE SPECIFICATIONS Range 0.00 to 3.50 mg/L Resolution 0.01 mg/L Accuracy ±0.03 mg/L ±3% of reading Typical EMC ±0.01 mg/L Deviation Light Source Tungsten lamp with narrow band interference filter @ 525 nm Method Adaptation of the EPA DPD method 330.5. - Page 38 • Press ZERO and “SIP” will blink on the display. • Wait for a few seconds and the display will show “-0.0-”. Now the meter is zeroed and ready for measurement. • Remove the cuvet. Powder reagents procedure • Add 1 packet of HI 93711 reagent.
- Page 39 mL of unreacted sample. Replace the cap and shake gently again. • Reinsert the cuvet into the instrument. • Press TIMER and the display will show the countdown prior to the measurement or, alternatively, wait for 2 minutes and 30 seconds and press READ DIRECT.
-
Page 40: Total Chlorine High Range
TOTAL CHLORINE HIGH RANGE TOTAL CHLORINE HIGH RANGE TOTAL CHLORINE HIGH RANGE TOTAL CHLORINE HIGH RANGE TOTAL CHLORINE HIGH RANGE SPECIFICATIONS Range 0.0 to 10.0 mg/L Resolution 0.1 mg/L Accuracy ±0.1 mg/L ±3% of reading Typical EMC ±0.1 mg/L Deviation Light Source Tungsten lamp with narrow band interference filter @ 525 nm... - Page 41 Note: To measure exactly 5 mL of reagent with the syringe, push the plunger completely into the syringe and insert the tip into HI 93734B reagent bottle. Pull the plunger out until the lower edge of the seal is on the 5 mL mark of the syringe. probable level of liquid taken up by syringe 5 mL...
- Page 42 • Remove the cuvet. • Add 3 drops of HI 93734C reagent to the cuvet. • Add the content of one packet of HI 93701 DPD reagent to the cuvet. Replace the cap and shake gently for 20 sec- onds (or 2 minutes in case of seawater analy- sis).
-
Page 43: Chlorine Dioxide
C H L O R I N E D I O X I D E C H L O R I N E D I O X I D E C H L O R I N E D I O X I D E C H L O R I N E D I O X I D E C H L O R I N E D I O X I D E SPECIFICATIONS... - Page 44 • Add the content of one packet of HI 93738B dechlorinating reagent to only one of the two cylinders (#1), close and invert it several times until it is totally dissolved. This is the blank. • Add precisely 0.5 mL of HI 93738C chlorine dioxide reagent to each cylinder (#1 &...
- Page 45 • Press ZERO and "SIP" will blink on the display. • Wait for a few seconds and the display will show "-0.0-". Now the meter is zeroed and ready for measurement. • Fill another cuvet with 10 mL of the reacted sample (#2) up to the mark and replace 10 mL the cap.
-
Page 46: Chromium Vi High Range
CHROMIUM VI HIGH RANGE CHROMIUM VI HIGH RANGE CHROMIUM VI HIGH RANGE CHROMIUM VI HIGH RANGE CHROMIUM VI HIGH RANGE SPECIFICATIONS Range 0 to 1000 µg/L Resolution 1 µg/L Accuracy ±5 µg/L ±4% of reading Typical EMC ±1 µg/L Deviation Light Source Tungsten lamp with narrow band interference filter @ 525 nm... - Page 47 • Remove the cuvet and add the content of one packet of HI 93723 reagent. Replace the cap and shake vigorously for about 10 seconds. • Reinsert the cuvet into the instrument. • Press TIMER and the display will show the countdown prior to the measurement or, alternatively, wait for 6 minutes and press READ DIRECT.
-
Page 48: Chromium Vi Low Range
CHROMIUM VI LOW RANGE CHROMIUM VI LOW RANGE CHROMIUM VI LOW RANGE CHROMIUM VI LOW RANGE CHROMIUM VI LOW RANGE SPECIFICATIONS Range 0 to 300 µg/L Resolution 1 µg/L Accuracy ±1 µg/L ±4% of reading Typical EMC ±1 µg/L Deviation Light Source Tungsten lamp with narrow band interference filter @ 525 nm... - Page 49 • Remove the cuvet and add the content of one packet of HI 93749 reagent. Replace the cap and shake vigorously for about 10 seconds. • Reinsert the cuvet into the instrument. • Press TIMER and the display will show the countdown prior to the measurement or, alternatively, wait for 6 minutes and press READ DIRECT.
-
Page 50: Color Of Water
COLOR OF WATER COLOR OF WATER COLOR OF WATER COLOR OF WATER COLOR OF WATER SPECIFICATIONS Range 0 to 500 PCU (Platinum Cobalt Units) Resolution 1 PCU Accuracy ±10 PCU ±5% of reading Typical EMC ± 1 PCU Deviation Light Source Tungsten lamp with narrow band interference filter @ 420 nm Method... - Page 51 • Fill another cuvet up to the mark with 10 mL unfiltered sample and replace the cap. This is the apparent color. • Filter 10 mL of sample through a filter with a 0.45 µm membrane into the third cuvet, up to the 10 mL mark and replace the cap.
-
Page 52: Copper High Range
COPPER HIGH RANGE COPPER HIGH RANGE COPPER HIGH RANGE COPPER HIGH RANGE COPPER HIGH RANGE SPECIFICATIONS Range 0.00 to 5.00 mg/L Resolution 0.01 mg/L Accuracy ±0.02 mg/L ±4% of reading Typical EMC ±0.01 mg/L Deviation Light Source Tungsten lamp with narrow band interference filter @ 575 nm Method Adaptation of the EPA method. - Page 53 • Remove the cuvet. • Add the content of one packet of HI 93702 reagent. Replace the cap and shake gently for about 15 seconds. • Reinsert the cuvet into the instrument. • Press TIMER and the display will show the countdown prior to the measurement or, alternatively, wait for 45 seconds and press READ DIRECT.
-
Page 54: Copper Low Range
COPPER LOW RANGE COPPER LOW RANGE COPPER LOW RANGE COPPER LOW RANGE COPPER LOW RANGE SPECIFICATIONS Range 0 to 1000 µg/L Resolution 1 µg/L Accuracy ±10 µg/L ±5% of reading Typical EMC ±1 µg/L Deviation Light Source Tungsten lamp with narrow band interference filter @ 575 nm Method Adaptation of the EPA method. - Page 55 • Remove the cuvet. • Add the content of one packet of HI 93747 reagent. Replace the cap and shake gently for about 15 seconds. • Reinsert the cuvet into the instrument. • Press TIMER and the display will show the countdown prior to the measurement or, alternatively, wait for 45 seconds and press READ DIRECT.
-
Page 56: Cyanide
C Y A N I D E C Y A N I D E C Y A N I D E C Y A N I D E C Y A N I D E SPECIFICATIONS Range 0.000 to 0.200 mg/L Resolution 0.001 mg/L Accuracy... - Page 57 • Remove the cuvet and add 1 level spoon of HI 93714A Cya- nide Reagent. Remember to close the reagent bottle immediately after use. Note: Pay attention to the way the spoon is filled: - do not press the powder; - do not overfill it.
- Page 58 • Press TIMER and the display will show the countdown prior to the measurement or, alternatively, wait for 25 minutes and press READ DIRECT. In both cases "SIP" will blink during measurement. Note: Shake gently the cuvet 4 or 5 times during the first 20 minutes of the countdown prior to the measurement.
-
Page 59: Cyanuric Acid
CYANURIC ACID CYANURIC ACID CYANURIC ACID CYANURIC ACID CYANURIC ACID SPECIFICATIONS Range 0 to 80 mg/L Resolution 1 mg/L Accuracy ±1 mg/L ±15% of reading Typical EMC ±1 mg/L Deviation Light Source Tungsten lamp with narrow band interference filter @ 525 nm Method Adaptation of the turbidimetric method. - Page 60 • Fill a graduated beaker up to the 25 mL mark with the sample, add the content of one packet of HI 93722 reagent and swirl gently to mix. • Fill a second cuvet with 10 mL of the 10 mL reacted sample up to the mark.
-
Page 61: Fluoride
F L U O R I D E F L U O R I D E F L U O R I D E F L U O R I D E F L U O R I D E SPECIFICATIONS Range 0.00 to 2.00 mg/L... - Page 62 • Place the cuvet with the reacted distilled water (# 1) into the holder and ensure that the notch on the cap is positioned securely into the groove. • Press TIMER and the display will show the countdown prior to zeroing the blank or, alternatively, wait for two minutes and press ZERO and "SIP"...
- Page 63 INTERFERENCES Negative interferences may be caused by: Alkalinity (as CaCO ) above 5000 mg/L Aluminum above 0.1 mg/L Iron, ferric above 10 mg/L Positive interferences may be caused by: Chloride above 700 mg/L Phosphate, ortho above 16 mg/L Sodium hexametaphosphate above 1.0 mg/L Sulfate above 200 mg/L Highly colored and turbid samples may require distillation Highly alkaline samples can be neutralized with nitric acid.
-
Page 64: Calcium Hardness
C A L C I U M H A R D N E S S C A L C I U M H A R D N E S S C A L C I U M H A R D N E S S C A L C I U M H A R D N E S S C A L C I U M H A R D N E S S SPECIFICATIONS... - Page 65 • Add 1 drop of HI 93720C EGTA solution to one cuvet (# 1), replace the cap and invert the cuvet several times to mix. This is the blank. • Place the blank (# 1) into the holder and ensure that the notch on the cap is positioned securely into the groove.
- Page 66 Note: The test will detect any calcium contamination in the beaker, measuring syringes or sample cells. To test cleanliness, repeat the test multiple times until you obtain consistent results. Note: For better accuracy wash glassware with HCl 6N. SAMPLE DILUTION This meter is designed to determine low levels of hardness, typically found in water purification systems.
-
Page 67: Magnesium Hardness
M A G N E S I U M H A R D N E S S M A G N E S I U M H A R D N E S S M A G N E S I U M H A R D N E S S M A G N E S I U M H A R D N E S S M A G N E S I U M H A R D N E S S SPECIFICATIONS... - Page 68 • Add 0.5 mL of HI 93719B Alkali solution and swirl to mix. Use this solution to rinse 2 cuvets. • Fill both cuvets up to the 10 mL 10 mL 10 mL mark. • Add 1 drop of HI 93719C EDTA solution to one cuvet (# 1), re- place the cap and invert the cuvet several times to mix.
- Page 69 • Remove the blank (# 1) and insert the sample (# 2) into the instrument, making sure that the notch on the cap is positioned securely into the groove. • Press READ DIRECT. “SIP” will blink during measurement. • The instrument directly displays concentration in mg/L of magne- sium hardness, as CaCO , on the Liquid Crystal Display.
-
Page 70: Total Hardness High Range
TOTAL HARDNESS HIGH RANGE TOTAL HARDNESS HIGH RANGE TOTAL HARDNESS HIGH RANGE TOTAL HARDNESS HIGH RANGE TOTAL HARDNESS HIGH RANGE SPECIFICATIONS Range 400 to 750 mg/L Resolution 5 mg/L Accuracy ±10 mg/L ±2% of reading Typical EMC ±5 mg/L Deviation Light Source Tungsten lamp with narrow band interference filter @ 466 nm... - Page 71 • Add 2 drops of HI 93735B Buffer reagent. • Replace the cap, shake gently to mix and wait for 15 seconds. • Place the cuvet into the holder and ensure that the notch on the cap is positioned securely into the groove. •...
- Page 72 • Press TIMER and the display will show the countdown prior to the measurement or, alternatively, wait for 2 minutes and press READ DIRECT. In both cases "SIP" will blink during measurement. • The instrument directly displays the total hardness in mg/L of CaCO , on the Liquid Crystal Display.
-
Page 73: Total Hardness Medium Range
TOTAL HARDNESS MEDIUM RANGE TOTAL HARDNESS MEDIUM RANGE TOTAL HARDNESS MEDIUM RANGE TOTAL HARDNESS MEDIUM RANGE TOTAL HARDNESS MEDIUM RANGE SPECIFICATIONS Range 200 to 500 mg/L Resolution 5 mg/L Accuracy ±7 mg/L ±3% of reading Typical EMC ±5 mg/L Deviation Tungsten lamp with narrow band interference Light Source filter @ 466 nm... - Page 74 • Add 2 drops of HI 93735B Buffer reagent • Replace the cap and shake gently to mix. Wait for 15 seconds. • Place the cuvet into the holder and ensure that the notch on the cap is positioned securely into the groove. •...
- Page 75 • Press TIMER and the display will show the countdown prior to the measurement or, alternatively, wait for 2 minutes and press READ DIRECT. In both cases "SIP" will blink during measurement. • The instrument directly displays the hardness in mg/L of CaCO on the Liquid Crystal Display.
-
Page 76: Total Hardness Low Range
TOTAL HARDNESS LOW RANGE TOTAL HARDNESS LOW RANGE TOTAL HARDNESS LOW RANGE TOTAL HARDNESS LOW RANGE TOTAL HARDNESS LOW RANGE SPECIFICATIONS Range 0 to 250 mg/L Resolution 1 mg/L from 0 to 100 mg/L 5 mg/L from 100 to 250 mg/L Accuracy ±5 mg/L ±4% of reading Typical EMC... - Page 77 • Add 2 drops of HI 93735B-0 Buffer reagent. • Replace the cap and shake gently to mix. Wait for 15 seconds. • Place the cuvet into the holder and ensure that the notch on the cap is positioned securely into the groove. •...
- Page 78 • Place the cuvet into the holder and ensure that the notch on the cap is positioned securely into the groove. • Press TIMER and the display will show the countdown prior to the measurement or, alternatively, wait for 2 minutes and press READ DIRECT.
-
Page 79: Hydrazine
H Y D R A Z I N E H Y D R A Z I N E H Y D R A Z I N E H Y D R A Z I N E H Y D R A Z I N E SPECIFICATIONS Range 0 to 400 µg/L... - Page 80 • Wait for a few seconds and the display will show a blinking "good". Now the meter is ready to take a zero measurement. • Fill a second cuvet with 10 mL of unreacted 10 mL sample (up to the mark) and replace the cap. •...
- Page 81 • Insert the cuvet with the reacted sample (# 2) into the instrument. Ensure that the notch on the cap is positioned securely into the groove. • Press READ DIRECT and “SIP” will blink during measurement. • The instrument directly displays concentration in µg/L of hydra- zine on the Liquid Crystal Display.
-
Page 82: Iodine
I O D I N E I O D I N E I O D I N E I O D I N E I O D I N E SPECIFICATIONS Range 0.0 to 12.5 mg/L Resolution 0.1 mg/L Accuracy ±0.1 mg/L ±5% of reading Typical EMC ±0.1 mg/L... - Page 83 • Wait for a few seconds and the display will show “-0.0-”. Now the meter is zeroed and ready for measurement. • Remove the cap and add the content of one packet of HI 93718 reagent. Replace the cap and shake gently for about 30 seconds to dissolve most of the reagent.
-
Page 84: Iron High Range
IRON HIGH RANGE IRON HIGH RANGE IRON HIGH RANGE IRON HIGH RANGE IRON HIGH RANGE SPECIFICATIONS Range 0.00 to 5.00 mg/L Resolution 0.01 mg/L Accuracy ±0.04 mg/L ±2% of reading Typical EMC ±0.01 mg/L Deviation Light Source Tungsten lamp with narrow band interference filter @ 525 nm Method Adaptation of the EPA Phenantroline method... - Page 85 • Remove the cuvet and add the con- tent of one packet of HI 93721 reagent. Replace the cap and shake until dissolution is complete. • Reinsert the cuvet into the instrument. • Press TIMER and the display will show the countdown prior to the measurement or, alternatively, wait for 3 minutes and press READ DIRECT.
-
Page 86: Iron Low Range
IRON LOW RANGE IRON LOW RANGE IRON LOW RANGE IRON LOW RANGE IRON LOW RANGE SPECIFICATIONS Range 0 to 400 µg/L Resolution 1 µg/L Accuracy ±10 µg/L ±8% of reading Typical EMC ±1 µg/L Deviation Light Source Tungsten lamp with narrow band interference filter @ 575 nm Method Adaptation of the TPTZ Method. - Page 87 • Place the cuvet into the holder and ensure that the notch on the cap is positioned securely into the groove. • Press ZERO and "SIP" will blink on the display. • Wait for a few seconds and the display will show "-0.0-".
- Page 88 • Insert the sample into the instrument. • Press TIMER and the display will show the countdown prior to the measurement or, alternatively, wait for 30 seconds and press READ DIRECT. In both cases "SIP" will blink during measurement. • The instrument directly displays concentration in µg/L of iron on the Liquid Crystal Display.
-
Page 89: Manganese High Range
MANGANESE HIGH RANGE MANGANESE HIGH RANGE MANGANESE HIGH RANGE MANGANESE HIGH RANGE MANGANESE HIGH RANGE SPECIFICATIONS Range 0.0 to 20.0 mg/L Resolution 0.1 mg/L Accuracy ±0.2 mg/L ±3% of reading Typical EMC ±0.1 mg/L Deviation Light Source Tungsten lamp with narrow band interference filter @ 525 nm Method Adaptation of the Standard Methods for the... - Page 90 • Wait for a few seconds and the display will show “-0.0-”. Now the meter is zeroed and ready for measurement. • Remove the cuvet. • Add the content of one packet of HI 93709A Citrate reagent. Re- place the cap and shake gently until dissolution is complete.
-
Page 91: Manganese Low Range
MANGANESE LOW RANGE MANGANESE LOW RANGE MANGANESE LOW RANGE MANGANESE LOW RANGE MANGANESE LOW RANGE SPECIFICATIONS Range 0 to 300 µg/L Resolution 1 µg/L Accuracy ±2 µg/L ±3% of reading Typical EMC ±1 µg/L Deviation Light Source Tungsten lamp with narrow band interference filter @ 575 nm Method Adaptation of the PAN Method. - Page 92 • Add 0.2 mL of the HI 93748B Alkaline-cya- nide reagent solution to each cuvet, replace the caps and shake gently. • Add 1 mL of the HI 93748C 0.1% PAN in- dicator solution to each cuvet, replace the caps and shake gently.
- Page 93 • Press READ DIRECT. "SIP" will blink during measurement. • The instrument directly displays concentration in µg/L of manga- nese on the display. Note: a temperature above 30°C may cause turbidity. In this case, before zeroing and taking readings, add 2-3 drops of Dispersing Agent (HI 93703-51) to each cuvet and swirl until complete dissolution of the turbidity INTERFERENCES...
-
Page 94: Molybdenum
M O L Y B D E N U M M O L Y B D E N U M M O L Y B D E N U M M O L Y B D E N U M M O L Y B D E N U M SPECIFICATIONS Range... - Page 95 • Wait for a few seconds and the display will show “-0.0-”. Now the meter is zeroed and ready for measurement. • Fill one graduated mixing cylinder up to the 25 25 mL mL mark with the sample. • Add the content of one packet of HI 93730A mo- lybdenum reagent, close the cylinder and invert it...
- Page 96 • Press TIMER and the display will show the countdown prior to the measurement or, alternatively, wait for five minutes and press READ DIRECT. In both cases, "SIP" will blink during measurement. • The instrument directly displays concentration in mg/L of molyb- denum on the Liquid Crystal Display.
-
Page 97: Nickel High Range
NICKEL HIGH RANGE NICKEL HIGH RANGE NICKEL HIGH RANGE NICKEL HIGH RANGE NICKEL HIGH RANGE SPECIFICATIONS Range 0.00 to 7.00 g/L Resolution 0.01 g/L Accuracy ±4% of reading Typical EMC ±0.02 g/L Deviation Light Source Tungsten lamp with narrow band interference filter @ 575 nm Method Adaptation of the photometric method. - Page 98 • Remove the cuvet and add the content of one packet of HI 93726 reagent. Replace the cap and shake gently until dissolu- tion is complete. • Reinsert the cuvet into the instrument. • Press TIMER and the display will show the countdown prior to the measurement or, alternatively, wait for 1 minute and press READ DIRECT.
-
Page 99: Nickel Low Range
NICKEL LOW RANGE NICKEL LOW RANGE NICKEL LOW RANGE NICKEL LOW RANGE NICKEL LOW RANGE SPECIFICATIONS Range 0.000 to 1.000 mg/L Resolution 0.001 mg/L Accuracy ±0.010 mg/L ±7% of reading Typical EMC ±0.001 mg/L Deviation Light Source Tungsten lamp with narrow band interference filter @ 575 nm Method Adaptation of the PAN method. - Page 100 • Add 1 mL of HI 93740B 0.3% PAN solution to each beaker, cap and swirl to mix. • Press TIMER and the display will show a countdown prior to adding reagent C or, alternatively, wait for 15 minutes. Then, in both cases, add one packet of HI 93740C EDTA reagent to each beaker, cap and swirl to mix until complete dissolution.
- Page 101 • Press READ DIRECT and "SIP" will appear during measurement. • The instrument directly displays concentration in mg/L of nickel on the Liquid Crystal Display. Note: a temperature above 30°C may cause turbidity. In this case, before zeroing and taking readings, add 2-3 drops of Dispersing Agent (HI 93703-51) to each cuvet and swirl until complete dissolution of the turbidity.
-
Page 102: Nitrate
N I T R A T E N I T R A T E N I T R A T E N I T R A T E N I T R A T E SPECIFICATIONS Range 0.0 to 30.0 mg/L Resolution 0.1 mg/L Accuracy... - Page 103 • Remove the cuvet and add the content of one packet of HI 93728 reagent. • Replace the cap and im- mediately shake vigorously for exactly 10 seconds by moving the cuvet up and down. Continue to mix by inverting the cuvet gently and slowly for 50 seconds, while taking care not to induce air bubbles.
-
Page 104: Nitrite High Range
NITRITE HIGH RANGE NITRITE HIGH RANGE NITRITE HIGH RANGE NITRITE HIGH RANGE NITRITE HIGH RANGE SPECIFICATIONS Range 0 to 150 mg/L Resolution 1 mg/L Accuracy ±4 mg/L ±4% of reading Typical EMC ±1 mg/L Deviation Light Source Tungsten lamp with narrow band interference filter @ 575 nm Method Adaptation of the Ferrous Sulfate method. - Page 105 • Remove the cuvet. • Add the content of one packet of HI 93708 reagent. Replace the cap and shake gently un- til dissolution is complete. • Reinsert the cuvet into the instrument. • Press TIMER and the display will show the countdown prior to the measurement or, alternatively, wait for 10 minutes and press READ DIRECT.
-
Page 106: Nitrite Low Range
NITRITE LOW RANGE NITRITE LOW RANGE NITRITE LOW RANGE NITRITE LOW RANGE NITRITE LOW RANGE SPECIFICATIONS Range 0.00 to 0.35 mg/L Resolution 0.01 mg/L Accuracy ±0.02 mg/L ±4% of reading Typical EMC ±0.01 mg/L Deviation Light Source Tungsten lamp with narrow band interference filter @ 525 nm Method Adaptation of the EPA Diazotization method... - Page 107 • Remove the cuvet. • Add the content of one packet of HI 93707 reagent. Replace the cap and shake gently for about 15 seconds. • Reinsert the cuvet into the instrument. • Press TIMER and the display will show the countdown prior to the measurement or, alternatively, wait for 6 minutes and press READ DIRECT.
-
Page 108: Oxygen Demand, Chemical Hr
CHEMICAL OXYGEN DEMAND CHEMICAL OXYGEN DEMAND CHEMICAL OXYGEN DEMAND CHEMICAL OXYGEN DEMAND CHEMICAL OXYGEN DEMAND HIGH RANGE HIGH RANGE HIGH RANGE HIGH RANGE HIGH RANGE SPECIFICATIONS Range 0 to 15000 mg/L Resolution 10 mg/L (1 mg/L x 10) Precision Standard deviation ±220 @ 10000 mg/L Typical EMC ±1 mg/L Deviation... - Page 109 • For sample digestion use a block heater reactor with holes to accom- modate digestion vials. Use of the optional HI 740217 safety shield is strongly recommended. Preheat the Hanna Reactor C 9800 to 150 °C (302°F). For correct use of the reactor follow Reactor Instruction Manual. Do not use an oven or microwave because leaking samples can generate a corrosive and possibly explosive atmosphere.
- Page 110 • Leave the vials in the tube rack to cool to room temperature. Do not shake or invert them anymore otherwise the samples may become turbid. • Select the program number corresponding to Oxygen Demand, Chemical (COD) - HR on the secondary LCD by pressing PROGRAM •...
-
Page 111: Oxygen Demand, Chemical Mr
CHEMICAL OXYGEN DEMAND CHEMICAL OXYGEN DEMAND CHEMICAL OXYGEN DEMAND CHEMICAL OXYGEN DEMAND CHEMICAL OXYGEN DEMAND MEDIUM RANGE MEDIUM RANGE MEDIUM RANGE MEDIUM RANGE MEDIUM RANGE SPECIFICATIONS Range 0 to 1500 mg/L Resolution 1 mg/L Precision Standard deviation ±22 @ 1000 mg/L Typical EMC ±1 mg/L Deviation... - Page 112 • For sample digestion use a block heater reactor with holes to accom- modate digestion vials. Use of the optional HI 740217 safety shield is strongly recommended. Preheat the Hanna Reactor C 9800 to 150 °C (302°F). For correct use of the reactor follow Reactor Instruction Manual. Do not use an oven or microwave because leaking samples can generate a corrosive and possibly explosive atmosphere.
- Page 113 • Leave the vials in the tube rack to cool to room temperature. Do not shake or invert them anymore otherwise the samples may become turbid. • Select the program number corresponding to Oxygen Demand, Chemical (COD) - MR on the secondary LCD by pressing PROGRAM •...
-
Page 114: Oxygen Demand, Chemical Lr
CHEMICAL OXYGEN DEMAND CHEMICAL OXYGEN DEMAND CHEMICAL OXYGEN DEMAND CHEMICAL OXYGEN DEMAND CHEMICAL OXYGEN DEMAND LOW RANGE LOW RANGE LOW RANGE LOW RANGE LOW RANGE SPECIFICATIONS Range 0 to 150 mg/L Resolution 1 mg/L Precision Standard deviation ±4 @ 150 mg/L Typical EMC ±1 mg/L Deviation... - Page 115 • For sample digestion use a block heater reactor with holes to accom- modate digestion vials. Use of the optional HI 740217 safety shield is strongly recommended. Preheat the Hanna Reactor C 9800 to 150 °C (302°F). For correct use of the reactor follow Reactor Instruction Manual. Do not use an oven or microwave because leaking samples can generate a corrosive and possibly explosive atmosphere.
- Page 116 • Leave the vials in the tube rack to cool to room temperature. Do not shake or invert them anymore otherwise the samples may become turbid. • Select the program number corresponding to Oxygen Demand, Chemical (COD) - LR on the secondary LCD by pressing PROGRAM •...
-
Page 117: Oxygen, Dissolved
D I S S O L V E D O X Y G E N D I S S O L V E D O X Y G E N D I S S O L V E D O X Y G E N D I S S O L V E D O X Y G E N D I S S O L V E D O X Y G E N SPECIFICATIONS... - Page 118 • Add some more sample, to fill the bottle completely. Replace the cap again and ensure that a part of the sample spills over. This is to make sure that no air bubbles have been trapped inside, which would corrupt the reading. •...
- Page 119 • Wait for a few seconds and the display will show “-0.0-”. Now the meter is zeroed and ready for measurement. • Remove the cuvet. • Fill another cuvet up to the mark with 10 mL of the reacted sample and replace the cap.
- Page 120 SPECIFICATIONS Range 6.5 to 8.5 pH Resolution 0.1 pH Accuracy ±0.1 pH Typical EMC ±0.1 pH Deviation Light Source Tungsten lamp with narrow band interference filter @ 525 nm Method Adaptation of the Phenol Red method. The reaction with the reagent causes a yellow to red tint in the sample.
- Page 121 • Remove the cuvet and add 5 drops of HI 93710 Phenol Red Indicator. Replace the cap and mix the solution. • Reinsert the cuvet into the instrument. • Press the READ DIRECT key and “SIP” will blink on the display during measurement.
-
Page 122: Phosphate High Range
PHOSPHATE HIGH RANGE PHOSPHATE HIGH RANGE PHOSPHATE HIGH RANGE PHOSPHATE HIGH RANGE PHOSPHATE HIGH RANGE SPECIFICATIONS 0.0 to 30.0 mg/L Range Resolution 0.1 mg/L Accuracy ±1 mg/L ±4% of reading Typical EMC Dev. ±0.1 mg/L Light Source Tungsten lamp with narrow band interference filter @ 525 nm Method Adaptation of the Standard Methods for the... - Page 123 • Press ZERO and “SIP” will blink on the display. • Wait for a few seconds and the display will show "-0.0-". Now the meter is zeroed and ready for measurement. • Remove the cuvet. • Add 10 drops of HI 93717A Molybdate reagent.
-
Page 124: Phosphate Low Range
PHOSPHATE LOW RANGE PHOSPHATE LOW RANGE PHOSPHATE LOW RANGE PHOSPHATE LOW RANGE PHOSPHATE LOW RANGE SPECIFICATIONS Range 0.00 to 2.50 mg/L Resolution 0.01 mg/L Accuracy ±0.04 mg/L ±4% of reading Typical EMC ±0.01 mg/L Deviation Light Source Tungsten lamp with narrow band interference filter @ 610 nm Method Adaptation of the Ascorbic Acid method. - Page 125 • Wait for a few seconds and the display will show “-0.0-”. Now the meter is zeroed and ready for measurement. • Remove the cuvet and add the content of one packet of HI 93713 reagent. Replace the cap and shake gently (for about 2 minutes) until the powder is completely dissolved.
-
Page 126: Phosphorus
PHOSPHORUS PHOSPHORUS PHOSPHORUS PHOSPHORUS PHOSPHORUS SPECIFICATIONS Range 0.0 to 15.0 mg/L Resolution 0.1 mg/L Accuracy ±0.3 mg/L ±4% of reading Typical EMC dev. ±0.2 mg/L Light Source Tungsten lamp with narrow band interference filter @ 525 nm Method Adaptation of the Standard Methods for the Examination of Water and Wastewater, 18 edition, Amino Acid method. - Page 127 • Wait for a few seconds and the display will show "-0.0-". Now the meter is zeroed and ready for measurement. • Remove the cuvet. • Add 10 drops of HI 93706A Molybdate x 10 reagent. • Add the content of one packet of HI 93706B-0 Phosphorus Reagent B (Amino Acid) to the cuvet.
-
Page 128: Silica
S I L I C A S I L I C A S I L I C A S I L I C A S I L I C A SPECIFICATIONS Range 0.00 to 2.00 mg/L Resolution 0.01 mg/L Accuracy ±0.03 mg/L ±3% of reading Typical EMC ±0.01 mg/L... - Page 129 • Wait for 1 minute. This is the blank. 1’ • Place the cuvet into the holder and ensure that the notch on the cap is positioned securely into the groove. • Press ZERO and “SIP” will blink on the display. •...
- Page 130 INTERFERENCES Interference may be caused by: Phosphate above 60 mg/L (causes a 2% reduction in reading) Phosphate above 75 mg/L (causes an 11% reduction in reading) Sulfide and high concentration of iron Eliminate color and turbidity interferences by zeroing the meter with the original water sample.
-
Page 131: Silver
S I L V E R S I L V E R S I L V E R S I L V E R S I L V E R SPECIFICATIONS Range 0.000 to 1.000 mg/L Resolution 0.001 mg/L Accuracy ±0.005 mg/L ±10% of reading Typical EMC ±... - Page 132 • Add exactly 1.0 mL of HI 93737B reagent to the other beaker (the sample) and swirl gently to mix. • Press TIMER and the display will show the countdown prior to adding reagent C or, alternatively, wait for 2 minutes. Then, in both cases, add exactly 1.0 mL of HI 93737C reagent to each beaker and swirl.
- Page 133 • Press ZERO and "SIP" will blink on the display. • Wait for a few seconds and the display will show "-0.0.-". Now the meter is zeroed and ready for measurement. • Fill a second cuvet up to the mark with 10 mL of 10 mL the reacted sample.
-
Page 134: Zinc
Z I N C Z I N C Z I N C Z I N C Z I N C SPECIFICATIONS 0.00 to 3.00 mg/L Range Resolution 0.01 mg/L Accuracy ±0.03 mg/L ±3% of reading Typical EMC ±0.01 mg/L Deviation Light Source Tungsten lamp with narrow band interference filter @ 575 nm... - Page 135 • Fill one cuvet with 10 mL of the reacted sample up to the mark. 10 mL • Place the cap and insert the cuvet into the cell and ensure that the notch on the cap is positioned securely into the groove.
- Page 136 • Press TIMER and the display will show the countdown prior to the measurement or, alternatively, wait for 3 minutes and 30 seconds and press READ DIRECT. In both cases "SIP" will blink during measurement. • The instrument directly displays concentration in mg/L of zinc on the Liquid Crystal Display.
-
Page 137: Interface With Pc
With terminal programs such as, for example, Telix , Windows ® Terminal , it is possible to remotely control your Hanna Instruments ® bench meter. Use HI 920010 cable to connect the meter to the PC, start the terminal program and set the communication options as follows: 8, N, 1, no flow control. - Page 138 /PUP - Program Up /PDN - Program Down /PTM - Turn Test Mode On /Brx - Set the baud rate 1 - 300 2 - 600 3 - 1200 4 - 2400 /KBL - Lock Keyboard /KBU - Unlock Keyboard ?PR# - Send Current Program Number ?BRQ - Send current baud rate 1 - 150...
-
Page 139: Standard Methods
S T A N D A R D M E T H O D S S T A N D A R D M E T H O D S S T A N D A R D M E T H O D S S T A N D A R D M E T H O D S S T A N D A R D M E T H O D S Description... -
Page 140: Battery Replacement
BATTERY REPLACEMENT BATTERY REPLACEMENT BATTERY REPLACEMENT BATTERY REPLACEMENT BATTERY REPLACEMENT Besides to the 12 VDC supply, these meters can also be fed by two 9V batteries. To prolong battery life, switch your meter off after use. However, the meter has an auto-shut off feature that will turn itself off after 10 minutes of non-use. -
Page 141: Accessories
ACCESSORIES ACCESSORIES ACCESSORIES ACCESSORIES ACCESSORIES REAGENT SETS HI 93700-01 100 ammonia LR tests HI 93700-03 300 ammonia LR tests HI 93701-01 100 free chlorine tests (powder) HI 93701-03 300 free chlorine tests (powder) HI 93701-F 300 free chlorine tests (liquid) HI 93701-T 300 total chlorine tests (liquid) HI 93702-01 100 copper HR tests HI 93702-03 300 copper HR tests... - Page 142 HI 93723-01 100 chromium VI HR tests HI 93723-03 300 chromium VI HR tests HI 93726-01 100 nickel HR tests HI 93726-03 300 nickel HR tests HI 93728-01 100 nitrate tests HI 93728-03 300 nitrate tests HI 93729-01 100 fluoride tests HI 93729-03 300 fluoride tests HI 93730-01 100 molybdenum tests HI 93730-03 300 molybdenum tests...
-
Page 143: Warranty
If the instrument is to be returned to Hanna Instruments, first obtain a Returned Goods Authorization Number from the Customer Service department and then send it with shipment costs prepaid. When shipping any instrument, make sure it is properly packaged for complete protection. -
Page 144: Ce Declaration Of Conformity
CE DECLARATION OF CONFORMITY CE DECLARATION OF CONFORMITY CE DECLARATION OF CONFORMITY CE DECLARATION OF CONFORMITY CE DECLARATION OF CONFORMITY Recommendations for Users Before using these products, make sure that they are entirely suitable for the environment in which they are used. Operation of these instruments in residential area could cause unacceptable interferences to radio and TV equipments, requiring the operator to take all necessary steps to correct interferences. -
Page 145: Hanna Literature
HANNA LITERATURE HANNA LITERATURE HANNA LITERATURE HANNA LITERATURE HANNA LITERATURE Hanna publishes a wide range of catalogs and handbooks for an equally wide range of applications. The reference literature currently covers areas such as: • Water Treatment • Process • Swimming Pools •... -
Page 146: User Notes
USER NOTES USER NOTES USER NOTES USER NOTES USER NOTES... - Page 148 W W W . H A N N A I N S T . C O M...
Need help?
Do you have a question about the C 99 series and is the answer not in the manual?
Questions and answers