Table of Contents
Advertisement
THIS GRILL IS FOR OUTDOOR USE ONLY.
DANGER
If you smell gas:
1. Shut off gas to the appliance.
2. Extinguish any open flame.
3. Open lid.
4. If odor continues, keep away from the appliance
and immediately call your gas supplier or your
fire department.
Failure to follow these instructions could result in
fire or explosion which could cause property
damage, personal injury or death.
WARNING
1. Do not store or use gasoline or other
flammable liquids or vapors in the vicinity of
this or any other appliance.
2. An LP cylinder not connected for use shall not
be stored in the vicinity of this or any other
appliance.
© 2010 Char-Broil, LLC
• Columbus, GA 31902 •
Printed in China
• Assembly Instructions © 2010
Product Guide
Model 461111811
IMPORTANT: Fill out the product record information below.
Serial Number
See rating label on grill for serial number.
Date Purchased
For support and to register your
grill, please visit us at
www.charbroil.com
If you have questions or need
assistance during assembly,
please call 1-800-241-7548.
Estimated assembly time: 30 minutes
WARNING
This manual contains important information necessary
for the proper assembly and safe use of the appliance.
Read and follow all warnings and instructions before
assembling and using the appliance.
Follow all warnings and instructions when using the
appliance.
Keep this manual for future reference
CAUTION
Some parts may contain sharp edges — especially as
noted in the manual! Wear protective gloves if necessary.
INSTALLER/ASSEMBLER: Leave these instructions with
consumer.
CONSUMER: Keep this manual for future reference.
42804627 • 05-18-11
Advertisement
Table of Contents

Related Manuals for Char-Broil 461111811


Summary of Contents for Char-Broil 461111811
-
Page 1: Product Record Information
2. An LP cylinder not connected for use shall not be stored in the vicinity of this or any other appliance. © 2010 Char-Broil, LLC • Columbus, GA 31902 • Printed in China • Assembly Instructions © 2010... -
Page 2: Table Of Contents
TABLE OF CONTENTS DANGER Product Record Information ......1 1. Never operate this appliance unattended. Safety Symbols. -
Page 3: Installation Safety Precautions
Installation Safety Precautions USE AND CARE • Use grill, as purchased, only with LP (propane) gas and the regulator/valve assembly supplied. WARNING • Grill installation must conform with local codes, or in their absence of local codes, with either the National Fuel Gas Code, ANSI Z223.1/ NFPA 54. - Page 4 LP (Liquefied Petroleum Gas) Propane Cylinder Installation/Removal • Is nontoxic, odorless and colorless when produced. For Your Propane Cylinder Installation: Safety , LP gas has been given an odor (similar to rotten cabbage) so that it can be smelled. 1. Remove cap from end of Propane cylinder (sold separately). •...
-
Page 5: Lighting Instructions
Lighting Instructions CAUTION Important! Remove or raise lid to open position. Attempting to light burner with lid closed may cause an explosion. Do not expose any part of your body or clothing SPIDER ALERT! directly above cooking area when lighting. 1. -
Page 6: Food Safety
Grill Maintenance CAUTION - Allow grill to cool before cleaning. Frequency of cleaning is determined by how often grill is used. • Putting out grease fires by closing the lid is not possible. Grills are well ventilated for safety reasons. - DO NOT use self-cleaning oven to clean any grill part. -
Page 7: Limited Warranty
LIMITED WARRANTY This warranty only applies to units purchased from an authorized retailer. Manufacturer warrants to the original consumer-purchaser only that this product shall be free from defects in workmanship and materials after correct assembly and under normal and reasonable home use for the periods indicated below beginning on the date of manufacture*. -
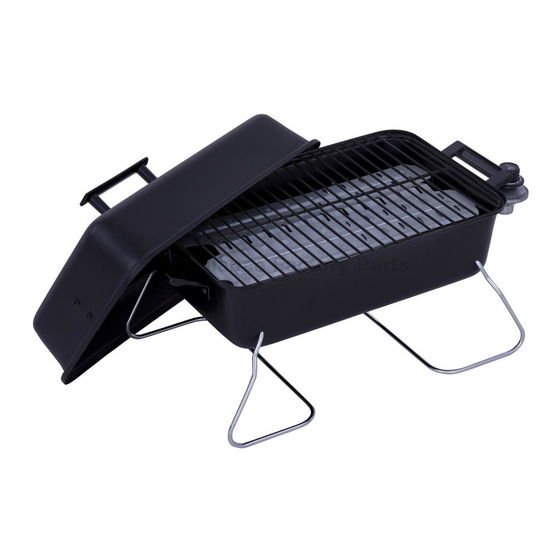
Page 8: Parts List/ Parts Diagram
Parts List Key Qty Description Lid Handle Lid Support Bracket Cooking Grate Heat Distribution Plate Burner Heat Resistant Shield Bottom Side Handle Regulator/Valve Not Shown — Hardware Pack Assembly Instructions, English — NOTE: Some grill parts shown in the assembly steps may differ slightly in appearance from those on your particular grill model. -
Page 9: Assembly
Assembly BURNER (F) - Position Heat Shield (G) as shown at right below and place into Bottom (H). HEAT RESISTANT SHIELD (G) - Insert narrow end of Burner (F) through large hole in side of Bottom (H) and rest burner bracket on Shield (G). - Insert one 1/4-20 x 3/8”... - Page 10 Assembly (Con’t.) #10-24 x 3/4” SCREW (O) HEAT DISTRIBUTION PLATE (E) - Assemble Side Handles (I) to Bottom (H) using two each #10-24 x 3/4” Screws (O), Fiber Washers (L) and #10-24 Flange Nuts (N) SIDE HANDLE (I) per Handle (I). - Rest the notches on ends of Heat Distribution Plate (E) on Side Handles Screws (O) inside Bottom (H).
- Page 11 Assembly (Con’t.) - Before assembly, inspect Regulator (J) for damage, dirt or debris accumulation. Clean out if present. - With knob pointing down, insert Regulator/Valve (J) into end of Burner (F). Notch in Regulator/Valve (J) MUST engage dimple in end of Rotate clockwise to lock Burner (F).
-
Page 12: Troubleshooting
EMERGENCIES: If a gas leak cannot be stopped, or a fire occurs due to gas leakage, call the fire department. Troubleshooting Prevention/Solution is turned on. Problem Possible Cause • Replace Cylinder. Burner will not Light. • Out of Propane • Retighten cylinder. •...
Need help?
Do you have a question about the 461111811 and is the answer not in the manual?
Questions and answers