Alpine IXA-W407 Owner's Manual
Digital media station
Hide thumbs
Also See for IXA-W407:
- Quick reference manual (32 pages) ,
- Quick reference manual (113 pages)
Table of Contents
Advertisement
ALPINE ELECTRONICS MARKETING, INC.
1-1-8 Nishi Gotanda,
Shinagawa-ku,
Tokyo 141-0031, Japan
Phone 03-5496-8231
ALPINE ELECTRONICS OF AMERICA, INC.
19145 Gramercy Place, Torrance,
California 90501, U.S.A.
Phone 1-800-ALPINE-1 (1-800-257-4631)
ALPINE ELECTRONICS OF CANADA, INC.
777 Supertest Road, Toronto,
Ontario M3J 2M9, Canada
Phone 1-800-ALPINE-1 (1-800-257-4631)
Digital Media Station
iXA-W407
• OWNER'S MANUAL
Please read before using this equipment.
• MODE D'EMPLOI
Veuillez lire avant d'utiliser cet appareil.
• MANUAL DE OPERACIÓN
Léalo antes de utilizar este equipo.
ALPINE ELECTRONICS OF AUSTRALIA PTY. LTD.
161-165 Princes Highway, Hallam
Victoria 3803, Australia
Phone 03-8787-1200
ALPINE ELECTRONICS GmbH
Wilhelm-Wagenfeld-Str. 1-3, 80807 München,
Germany
Phone 089-32 42 640
ALPINE ELECTRONICS OF U.K. LTD.
Alpine House
Fletchamstead Highway, Coventry CV4 9TW, U.K.
Phone 0870-33 33 763
ALPINE ELECTRONICS FRANCE S.A.R.L.
(RCS PONTOISE B 338 101 280)
98, Rue de la Belle Etoile, Z.I. Paris Nord Il,
B.P. 50016, 95945 Roissy Charles de Gaulle
Cedex, France
Phone 01-48638989
R R
ALPINE ITALIA S.p.A.
Viale C. Colombo 8, 20090 Trezzano
Sul Naviglio (MI), Italy
Phone 02-484781
ALPINE ELECTRONICS DE ESPAÑA, S.A.
Portal de Gamarra 36, Pabellón, 32
01013 Vitoria (Alava)-APDO 133, Spain
Phone 945-283588
ALPINE ELECTRONICS (BENELUX) GmbH
Leuvensesteenweg 510-B6,
1930 Zaventem, Belgium
Phone 02-725-13 15
Designed by ALPINE Japan
68-14470Z16-B
EN
FR
ES
Advertisement
Table of Contents

Related Manuals for Alpine IXA-W407


Summary of Contents for Alpine IXA-W407
- Page 1 Phone 1-800-ALPINE-1 (1-800-257-4631) ALPINE ELECTRONICS OF CANADA, INC. 777 Supertest Road, Toronto, Ontario M3J 2M9, Canada Phone 1-800-ALPINE-1 (1-800-257-4631) ALPINE ELECTRONICS OF AUSTRALIA PTY. LTD. 161-165 Princes Highway, Hallam Victoria 3803, Australia Phone 03-8787-1200 ALPINE ELECTRONICS GmbH Wilhelm-Wagenfeld-Str. 1-3, 80807 München,...
-
Page 3: Table Of Contents
Contents Operating Instructions WARNING WARNING ... 4 CAUTION ... 4 PRECAUTIONS ... 5 Getting Started Accessory List ... 7 Location of Controls ... 7 Turning Power On or Off ... 7 Adjusting the Volume ... 7 How to view the Display ... 8 Soft button operation ... - Page 4 Visual EQ Visual EQ Setting Operation ... 23 Black Richness Function (BK RICH) ... 23 Selecting the Visual EQ Mode (Factory setting) ... 23 Adjusting Brightness ... 23 Adjusting Color of Picture ... 23 Adjusting Tint of Picture ... 24 Adjusting Image Contrast ...
- Page 5 Receiving the stored information (SIRIUS mode only) ... 49 Deleting the stored Song/Artist/Sports team information (SIRIUS mode only) ... 50 Offset Playback Function (SIRIUS mode only) ... 50 Changer (Optional) Playback ... 50 Selecting a Disc (Changer) (Optional) ... 51 Multi-Changer Selection (Optional) ...
-
Page 6: Operating Instructions
HALT USE IMMEDIATELY IF A PROBLEM APPEARS. Failure to do so may cause personal injury or damage to the product. Return it to your authorized Alpine dealer or the nearest Alpine Service Center for repairing. DO NOT MIX NEW BATTERIES WITH OLD BATTERIES. -
Page 7: Precautions
This will restrict operation of these functions to times when the vehicle is parked. This ensures the focus of the driver’s attention will be on the road and not on the iXA-W407. This has been done for the safety of the driver and passengers. - Page 8 • The Bluetooth word mark and logos are owned by the Bluetooth SIG, Inc. and any use of such marks by Alpine Electronics, Inc. is under license. Other trademarks and trade names are those of their respective owners.
-
Page 9: Getting Started
• The monitor may be dim during low temperature and immediately after turning on the power. The brightness will return to normal as time elapses. • The iXA-W407 is a precision device. With gentle handling, its unique capabilities can be enjoyed for a long time. Adjusting the Volume... -
Page 10: How To View The Display
How to view the Display Soft button operation • Be sure to touch the button lightly with the pad of your finger on the display to protect the display. • If you touch a button and there is no reaction, remove your finger from the display, and try again. -
Page 11: Radio
Radio Display example for FM Radio main screen [DX SEEK]* button: Displays the tuning mode selection list. Displays the preset number /frequency The button displays the current tuning mode. Displayed only when the current station is the preset one. This unit cannot receive HD Radio signals (digital terrestrial radio). In order to activate the digital radio functions described below, an optional HD Radio Tuner module must be connected through the Ai-NET bus. -
Page 12: Presetting Stations Automatically
Tagging lets you tag songs heard on HD Radio stations. Using your new iXA-W407 in conjunction with an optional HD Radio Tuner module, you can preview, buy and download later, songs from your iTunes tagged playlist the next time you sync your iPod. If the unit is connected to a Tagging compatible device, you can use the iTunes Tagging function. -
Page 13: Other Useful Features
Other Useful Features Adjusting the Audio Press and hold SETUP for at least 2 seconds. The SETUP selection screen is displayed. Touch [ ] of Audio Setup. The AUDIO SETUP screen appears. Display example for AUDIO SETUP Screen cursor* * When a setting or search list is activated, a cursor appears. •... -
Page 14: Multi Information Function
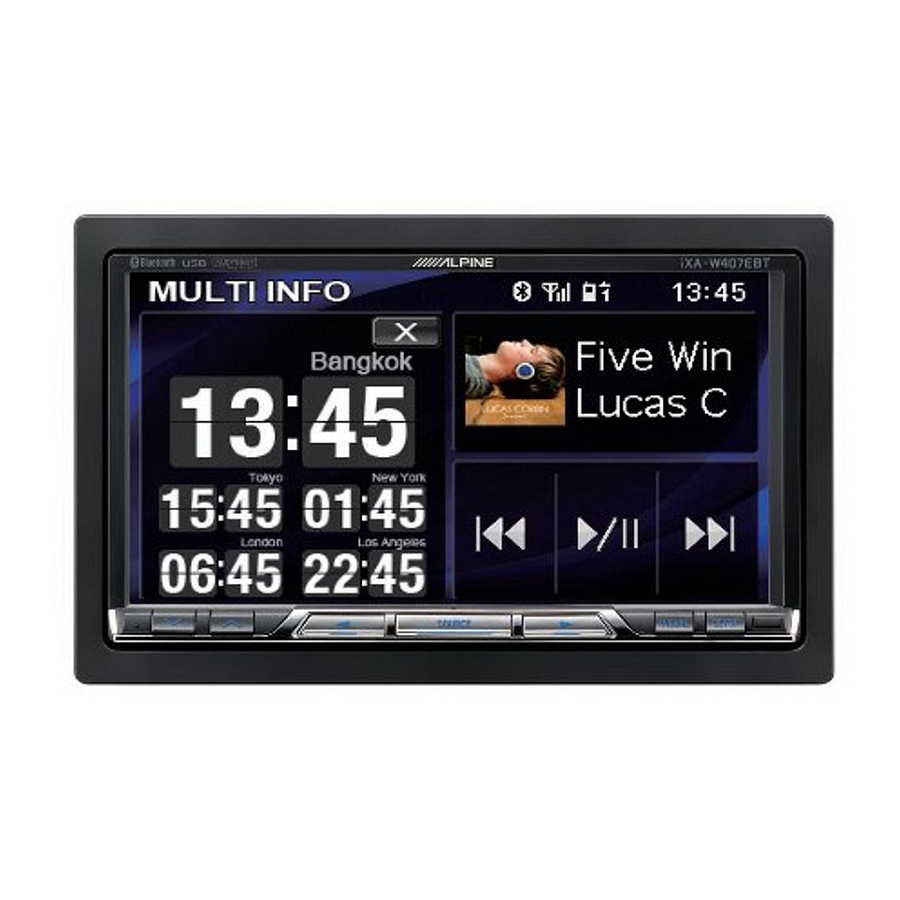
Adjusting Bass/Treble You can change the Bass/Treble frequency emphasis to create your own tonal preference. Touch [ ] to display the Bass/Treble adjusting screen. Touch [ ] or [ ] on the scroll bar to scroll the setup items line by line. - Page 15 This unit can display the times in 4 major cities of the world. To show the time in the desired city, perform the following operations. Touch one of the 4 clocks in previous page). The City selection screen will be displayed. Click the continent that the desired city belongs to in the right column.
-
Page 16: Rear Entertainment Function
Sound Controller (Sound Cont.) By this function, you can adjust Treble level, Bass level and Subwoofer level directly. Adjusting Treble/Bass Touch the dial of Treble/Bass to adjust the desired setting level. Setting contents: Treble level: -7 ~ +7 Bass level: -7 ~ +7 Touch [X] to return to Multi Information main screen. -
Page 17: Setup
Setup Source Setup Source Setup Operation To display the Source mode screen: To watch a video source, your vehicle must be parked with the ignition key in the ACC or ON position. To do this, follow the procedure below. 1 Bring your vehicle to a complete stop at a safe location. -
Page 18: Usb Setup
Setting the sports team announcement type The following operation sets the announcement type for a stored sports team. Setting item: Game Alert Touch [ ] or [ ] of the Game Alert to select ON. The received announcement for all stored sports teams is set. If OFF is set, no announcements will be made. -
Page 19: Setting The Brightness Of The Backlighting
Setting the Brightness of the Backlighting Backlighting is provided by a fluorescent light built into the liquid crystal panel. The illumination control adjusts the brightness of the backlighting based on the car ambient lighting for easier viewing. Setting item: Dimmer Setting contents: OFF / ON / AUTO OFF: Deactivates Auto Dimmer mode to keep the... -
Page 20: General Setup
General Setup General Setup Operation To display the General mode screen: To watch a video source, your vehicle must be parked with the ignition key in the ACC or ON position. To do this, follow the procedure below. 1 Bring your vehicle to a complete stop at a safe location. -
Page 21: Sound (Beep) Guide Function
Sound (Beep) Guide Function Setting item: Beep Setting contents: OFF / ON OFF: Deactivates the Sound Guide mode. The sound guide beep will not be produced when a button on the unit is pressed. Activates the Sound Guide mode. Setting the Scroll Scroll display is available if folder name, file name or tag information is entered. -
Page 22: Setting The External Device Interrupt Mode
Setting the External Device Interrupt Mode If an Alpine Ai-NET Interrupt Box (NVE-K200) is connected to the unit, an Auxiliary Source will be allowed to interrupt the current audio source. For example, you can listen to the voice guidance of your navigation system when it occurs even while you are playing a song stored in the USB memory. -
Page 23: Setting The Picture Output
• Second name can be set only when Primary name is set to USB Video. • Only when an Alpine TV tuner is connected, you can operate the displayed function guide from this unit. • When AUX1 and AUX2 are set to the same name, “1” and “2” will be added after the names, e.g. -
Page 24: Multiinfo Setup
MultiInfo Setup MultiInfo Setup Operation To display the MultiInfo mode screen: To watch a video source, your vehicle must be parked with the ignition key in the ACC or ON position. To do this, follow the procedure below. 1 Bring your vehicle to a complete stop at a safe location. -
Page 25: Visual Eq
Visual EQ Visual EQ Setting Operation The following steps 1 to 3 are common operations to each “Setting item” of Visual EQ setting. Refer to each section for details. After steps 1 and 2 in “Display Setup Operation” (page 16) have been performed, touch [ Visual EQ screen appears. -
Page 26: Adjusting Tint Of Picture
“Selecting the Visual EQ Mode (Factory setting)” (page 23). Data Download Downloading the Background data You can download data (from Alpine’s website) to a USB Memory (optional) (data is written in the root folder), and store the data to the iXA-W407. -
Page 27: External Audio Processor (Optional)
Pro Logic II, DTS and PCM modes) Storing Settings in the Memory (page 31) (Storing all the settings and adjustments made on the iXA-W407 (not only the above settings/adjusts) in the memory) In case of combining the Automatic adjustments etc. -
Page 28: Setting The A.processor
Setting the A.Processor Check that Defeat mode is OFF (page 11). Press and hold SETUP for at least 2 seconds. The SETUP selection screen is displayed. Touch [ ] of Audio Setup. The AUDIO SETUP screen appears. Touch [ ] of A.Processor. The A.PROCESSOR list screen appears. -
Page 29: Using The Pro Logic Ii Mode
Using the Pro Logic II Mode Pro Logic processing can be conducted on the music signals recorded on two channels to achieve Dolby Pro Logic II surround sound. For two-channel Dolby Digital and DTS signals, there is also a “REAR FILL”... -
Page 30: Phase Switching
Performing Time Correction Manually (T.Corr) Because of the particular conditions inside the vehicle, there can be major differences in the distances between the various speakers and the listening position. It is possible to calculate the optimum correction values and eliminate the time error at the listening position yourself using this function. -
Page 31: Parametric Equalizer Adjustments
Adjusting the Level Touch [ ] or [ ] of the desired frequency to adjust the level. • When the speaker is set to the “OFF” mode, the graphic equalizer for that speaker cannot be set. Refer to “Setting the Speakers” (page 29). -
Page 32: Setting Of Dolby Digital
Setting of Dolby Digital Setting item: Multi CH Setup Adjusting the acoustic image (BI-Phantom) In most installations, the center speaker must be placed directly between the front passenger and driver. Using this function, the center channel information is distributed to the left and right speakers. This creates an acoustic image simulating a center speaker directly in front of each listener. -
Page 33: Storing Settings In The Memory
• It takes a few moments to call up the preset memory. IMPRINT Operation (Optional) Alpine introduces IMPRINT - the world’s first technology that thoroughly eliminates in-car acoustic problems that normally degrade sound quality. This enables us to experience music the way the artist intended. -
Page 34: Adjusting Sound Setting In Manual Mode
Adjusting Sound Setting in Manual Mode You can change these sound settings to create your own preference when the MultEQ mode is set to OFF (Manual Mode). Use steps 1 to 5 to select one of the Sound menu modes to modify. See the applicable section below for details about the selected item. -
Page 35: Adjusting The Graphic Equalizer Curve
• When OFF is selected, MX effect of each MX mode will be OFF. • Each music source, such as radio, CD and MP3/WMA/AAC can have its own MX setting. • MX mode does not function when MX is ON for AM radio. •... -
Page 36: Adjusting The Time Correction (T.corr)
Adjusting the Time Correction (T.Corr) Before performing the following procedures, refer to “About Time Correction” (page 36). Setting item: T.Corr Touch [ ] of T.Corr. The T.Corr adjustment screen appears. Adjust the distance (0.0 to 336.6 cm) of a desired speaker by touching the respective [ ] or [ ] button. -
Page 37: Storing Settings In The Memory
Adjusting the Level Touch [ ] or [ ] of Level, then adjust the HPF or LPF level. Adjustable output level: –12 to 0 dB. Adjusting the Slope Touch [ ] or [ ] of Slope, then adjust the HPF or LPF slope. Adjustable slope: FLAT , –6 dB/oct., –12 dB/oct., –18 dB/oct., –24 dB/oct. -
Page 38: About Time Correction
About Time Correction The distance between the listener and the speakers in a car vary widely due to the complex speaker placement. This difference in the distances from the speakers to the listener creates a shift in the sounds image and frequency characteristics. -
Page 39: About The Crossover
0 to outside that recommended may cause damage to the speakers. ---- –12 dB For the recommended crossover frequencies of Alpine speakers, refer to the respective Owner’s Manual. 0 to We are not responsible for damage or malfunction of speakers caused ---- by using the crossover outside the recommended value. -
Page 40: About Imprint
These acoustical problems are so severe that no correction system has been able to overcome them. Until now, with the introduction of IMPRINT, Alpine provides a hardware/software combination that not only solves these problems, it actually improves the sound stage, tonal... -
Page 41: Bluetooth Operation
• Proper function of this unit with all BLUETOOTH compatible devices is not guaranteed. For handling of the BT compatible device, consult your ALPINE dealer or ALPINE website. • Depending on the surroundings, BLUETOOTH wireless connection may be unstable. - Page 42 Setting the BLUETOOTH Device Select one of 5 connected BLUETOOTH compatible devices that you previously registered. Setting item: Paired Device Touch a BLUETOOTH compatible device to use (change connection) from the Paired Device list. • If the connection is successfully changed, “CONNECTED/(Device name)”...
-
Page 43: Hands-Free Phone Control
Owner’s Manual are based upon the latest available information and are believed to be accurate at the time of printing. Alpine reserves the right to change or modify any information or specifications without notice or obligation. Answering a Call Incoming calls are announced by the received call ring tone and a displayed message (Caller name/PHONE No.). -
Page 44: Call History
Call History Call History is recorded for the last dialed/received/missed calls. There are various ways of making calls based on the “Call History”. The following steps 1 to 3 are common to the various ways of making these calls. For details, refer to each individual category for making calls. Check that “TEL”... -
Page 45: Voice Dial Operation
Voice Dial Operation You can call the telephone by performing voice operation. Setting item: Voice Dial Touch [Voice Dial]. A message is displayed. Touch [YES] to activate the voice dial mode. The voice dial mode is activated, and “SPEAK” is displayed. •... -
Page 46: Hce-C107D Operation (Optional)
Switching the Navigation Screen (Optional) If an optional Alpine Navigation System is connected to the iXA-W407, the Navigation screen can be displayed on this unit. • Be sure to set “NAV. IN” to ON before using the navigation, Refer to “Setting the Navigation Mode”... -
Page 47: Auxiliary Device (Optional)
TV/Video unless the vehicle is stopped and the emergency brake is applied. If the iXA-W407 is not installed correctly, the driver will be able to watch the TV/Video while driving the vehicle and may be distracted from looking ahead and cause an accident. -
Page 48: Sat Radio Receiver (Optional)
* XM and its corresponding logos are trademarks of XM Satellite Radio Inc. * SIRIUS and its corresponding logos are trademarks of SIRIUS Satellite Radio Inc. • The SAT Receiver controls on the iXA-W407 are operative only when a SAT Receiver is connected. Press SOURCE to activate mode switching screen. -
Page 49: Changing The Display
This number is a 12 digits number. It is printed on a label found on the SAT Receiver. It can also be displayed on the screen of the iXA-W407 in the following way. While receiving SAT Radio, touch NO. [ ] or [ ] to select channel “0”... -
Page 50: Search Function (Xm Mode)
Search Function (XM mode) In XM mode, touch [ The category search list is displayed. Displayed only when the current station is the preset one The list scrolls one line at a time by touching [ ] or [ ]. Scroll the list one page at a time by touching [ Touch [ ] to return to the previous screen. -
Page 51: Receiving Weather Or Traffic Information From Sat Radio
Receiving Weather or Traffic information from SAT Radio Touch and hold [NO.] or [NAME] for at least 2 seconds in the XM or SIRIUS mode. The received weather or traffic channel is stored. Press and hold /VISUAL (OPTION) for at least 2 seconds. -
Page 52: Deleting The Stored Song/Artist/Sports Team Information (Sirius Mode Only)
Deleting the stored Song/Artist/Sports team information (SIRIUS mode only) The stored Song/Artist/Sports team information can be deleted. After this, it will no longer announce when the deleted Song/Artist/Sports team is being broadcast. Touch [P1/3] twice. The function guide changes. Touch [DELETE]. The display changes to the ALERT DELETE screen. -
Page 53: Selecting A Disc (Changer) (Optional)
Selecting a Disc (Changer) (Optional) When a Disc CD Changer is connected: Touch DISC [ ] / [ ] to select the desired DISC. When an MP3 compatible CD changer is connected: Touch [P1/2] to change the Function Guide display. Touch DISC [ ] / [ ] to select the desired DISC. -
Page 54: Usb Memory/Portable Audio Player (Optional)
USB Memory/ Portable audio player (Optional) A USB memory or Portable audio player can be connected to this unit through the USB Connector of this unit. If a USB memory device or Portable audio player is connected to the unit, MP3/WMA/AAC files of USB memory and MP3/WMA files of Portable audio player can be played back. -
Page 55: Repeat Play
Repeat Play Only Repeat One is available for this mode. Repeat One: A single song is repeatedly played back. Touch [ The file will be played repeatedly. (Repeat One) (off) To cancel repeat play, touch [ • When set Repeat to off, turns to gray. -
Page 56: Selecting Playlists/Artists/Albums/Genres/Composers
Selecting Playlists/Artists/Albums/ Genres/Composers Playlists/Artists/Albums/Genres/Composers can be easily changed. For example, if you listen to a song from a selected album, the album can be changed. Touch [ ] or [ ] to select the desired Playlists/Artists/ Albums/Genres/Composers. • If search selection mode is not activated, a Songs search is not possible. -
Page 57: Iphone/Ipod (Optional)
ID3 tags/WMA tags This device supports ID3 tag v1 and v2.2.0, v2.3.0 and WMA tag. The following files do not support compression, coding, grouping or non-synchronization. If tag data is in an MP3/WMA/AAC file, this device can display the title (track title), artist name, and album name ID3 tag/WMA tag data. -
Page 58: Playback
Playback Press SOURCE to activate mode switching screen. Slide the display horizontally with your finger to select Audio/Visual mode. Each time you slide the display, the mode switches circularly in the following order : Audio/Visual Navigation Camera Multi Info Audio/Visual Slide the display vertically with your finger, or press SOURCE repeatedly to select iPod source. -
Page 59: Page Skip Function/Percent Skip Function/Alphabet Skip Function
Select the desired artist. To play back the artist directly 1 Touch and hold the artist’s name for at least 2 seconds. All songs of the selected artist are played back. To search for the album of an artist 1 Touch the artist’s name. The Albums search screen of the selected artist is displayed. -
Page 60: Random Play Shuffle (M.i.x.)
Random Play Shuffle (M.I.X.) The Shuffle function of the iPhone/iPod is displayed as unit. Shuffle ALL All songs in the iPhone/iPod are played back in random sequence. Any one song does not play back again until all songs have been played back. Shuffle Albums The songs on each album are played back in proper order. -
Page 61: When Using The Remote Control
Button Radio mode: Chooses the tuning mode. By pressing it more than 2 seconds, Automatic Memory will be operated. SAT mode: Switches between CH No. and CH name. MP3/WMA/AAC iPod mode: Switches between play and pause. Audio Processor Button Press the button to display AUDIO SETUP screen. Press the button to display A.PROCESSOR list screen when the external audio processor is connected.* * For the operation of external audio processor, refer to the Owner’s... -
Page 62: Information
Information List of World Clock (For details, see page 12.) -6:00 -6:00... -
Page 63: In Case Of Difficulty
This guide will help you isolate the problem if the unit is at fault. Otherwise, make sure the rest of your system is properly connected, or then consult your authorized Alpine dealer. Basic No function or display. - Page 64 - The indicator will disappear when the temperature returns to within operation range. • Malfunction in the CD Changer. - Consult your Alpine dealer. Press the magazine eject button and pull out the magazine. Check the indication. Insert the magazine again.
- Page 65 • There are no songs in the iPhone/iPod. - Download songs to the iPhone/iPod and connect to the iXA-W407. • Communication error. - Turn the ignition key off, and then set to ON again. - Check the display by reconnecting between the iPhone/iPod and the unit, using the iPhone/iPod cable.
-
Page 66: Specifications
Specifications MONITOR SECTION Screen Size 7" LCD Type Transparent type TN LCD Operation System TFT active matrix Number of Picture Elements 93,600 pcs. (400 × 234) Effective Number of Picture 99% or more Elements Illumination System CCFL FM TUNER SECTION Tuning Range 87.7 –... -
Page 67: Installation And Connections
(e.g. on-board computer). Do not tap into these leads to provide power for this unit. When connecting the iXA-W407 to the fuse box, make sure the fuse for the intended circuit of the iXA-W407 has the appropriate amperage. -
Page 68: Installation
Connect each input lead coming from an amplifier or equalizer to the corresponding output lead coming from the left rear of the iXA-W407. Connect all other leads of the iXA-W407 according to details described in the CONNECTlONS section. - Page 69 • The diagram and the fuse amperage shown above are in the case when iXA-W407 is used individually. • If the switched power (ignition) lead of the iXA-W407 is connected directly to the positive (+) post of the vehicle’s battery, the iXA-W407 draws some current (several hundred milliamperes) even when its switch is placed in the OFF position and the battery may be discharged.
-
Page 70: Connections
Connections To USB memory/ To iPhone/iPod Portable audio player • Set the system switches to “NORM” when only a changer is connected (when the Ai-NET compatible equalizer is not used). When the IMPRINT audio processor is connected, set to EQ/DIV position. * The two system switches are located on the bottom of the unit. - Page 71 Connect this lead to the remote control input lead. This lead outputs the controlling signals from the remote control. Remote Control Input Lead (White/Brown) Connect the external Alpine product to the remote control output lead. Reverse Lead (Orange/White) Use only when a back-up camera is connected. Connect to the plus side of the car’s reverse lamp.
-
Page 72: System Example
System Example Connect the Ai-NET compatible audio processor (Fiber optic digital compatible), Navigation system, DVD player and changer. NVE-N872A/NVE-M300/PMD-B200W Navigation system (Sold Separately) Ai-NET cable DVD Video Player (White/Brown) (Ai-NET) (White/Brown) (DVA-5210 etc.) REMOTE OUT REMOTE IN (Sold Separately) • When the NVA-N751AS is connected for the Navigation System, use the RGB conversion cable KWE-503N (Sold separately). Please observe the following when using Fiber Optic Cable (Optical Digital Cable). - Page 73 RGB Cable (Included with Navigation) RGB Input Terminal Connect this to the RGB output terminal of the Navigation System. System Switches When connecting an equalizer or divider using Ai-NET feature, place the two switches in the EQ/DIV position. When no device is connected, leave the switches in the NORM position.
- Page 74 When Connecting External Equipment (White/Pink) * Connect this to the touch panel-compatible rear monitor. (White/Brown) (White/Brown) (White/Brown) (Orange/White) System Switches When connecting an equalizer or divider using Ai-NET feature, place the two switches in the EQ/DIV position. When no device is connected, leave the switches in the NORM position.
-
Page 75: Limited Warranty
ALPINE ELECTRONICS OF AMERICA, INC. AND ALPINE OF CANADA INC. (“Alpine”), are dedicated to quality craftsmanship and are pleased to offer this Warranty. We suggest that you read it thoroughly. Should you have any questions, please contact your Dealer or contact Alpine at one of the telephone numbers listed below. - Page 76 Información de producto Modelo Descripción Marca Importador País de origen Fuente de alimentación iXA-W407 Estación de Medios Digitales ALPINE AMPLIAUDIO Hecho en China 12V C.C. Negativo a chasis...
Need help?
Do you have a question about the IXA-W407 and is the answer not in the manual?
Questions and answers