Table of Contents
Advertisement
Quick Links
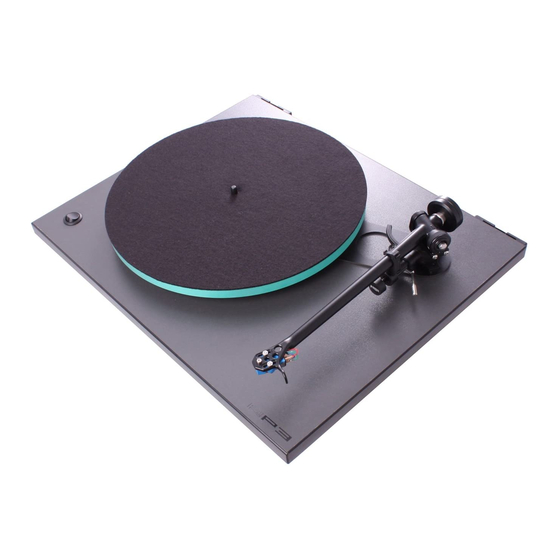
Rega Planar Three
The RP3 has been designed and engineered to achieve outstanding
performance way beyond the expectations of a product at this price
point. Excellent build quality, reliability and ease of use combine to
make a product which, if used correctly, will offer you a lifetime of
musical enjoyment. Omitting unnecessary gimmicks allows us to
concentrate the manufacturing costs on the high quality parts
necessary to reproduce records accurately. The RP3 is fitted with a
hand assembled RB303 tonearm, precision main bearing and a low
vibration low noise 24v motor assembly which is individually hand
tuned to its circuit to further reduce vibration. The minimalist design of
the Rega RP3 and the use of extremely high quality components
ensure that your turntable should last for many years. The tips on the
reverse of these instructions will help increase the life of your turntable
and ensure optimum performance.
Design features / DB Technology ( D ouble Brace Technology )
" M ass absorbs energy - lost energy equals lost music " ! Rega has
pioneered the use of lightweight rigid plinths. Clever use of lightweight
particulate core with a highly rigid phenolic resin skin became the
foundations of the high level of performance achieved by the now
iconic Planar turntable range. The latest generation of Rega turntables
takes this design philosophy to the next level. A super lightweight plinth
combined with a phenolic resin double brace mounted specifically
where the increased rigidity is required
mounting and the main hub bearing ) forms a structurally sound
" s tressed beam" assembly. This rigid plinth design prevents energy
absorption and unwanted resonances which will add unnatural
distortions to the music. Equally, heavier mass can transfer more
unwanted energy such as motor or bearing noise directly into the
rotating record. The use of braces instead of the complete skin allows
double thickness phenolic resin in these key areas while providing
further weight reduction to the plinth which directly addresses the issue
of mass absorption and unwanted energy transmission.
Manual speed change 33 RPM 45 RPM
You can change playing speed by simply removing the platter and
moving the belt to either the 33rpm or 45rpm wheel of the drive pulley
see fig 1. Electronic speed change is available via the TT-PSU ( sold
separately ) .
fig 1
( b etween the tonearm
33
rpm
1/3
45 rpm
RB303 Tonearm - Making the best better
Designed using the latest 3D CAD technology the new RB303 is the
culmination of more than 30 years of tonearm design experience. Due
to advances in technology we have been able to fine tune the iconic
RB300 tonearm design. Featuring a brand new tube with increased
rigidity to the bearing housing, arm carrier and headshell coupled with
intelligent redistribution of mass, ensure this arm will exhibit fewer
points of possible resonance. Extreme stability with almost friction free
movement from the high precision bearing assemblies guarantee to
gather more information from your vinyl than ever before.
Setting up your RB303 tonearm
With the cartridge mounted correctly and set up using the alignment
protractor ( supplied ) . Ensure that the tracking force control and bias
adjustment slider are set to zero. ( P ull the bias adjustment fully out to
set zero ) . Slide the balance weight along its shaft until the stylus is
" f loating " just 1mm clear of the record. The recommended tracking
force can now be applied via the tracking force control shown in fig 3.
Always use a force which corresponds to the upper limit of the cartridge
makers recommended range. Push the bias adjustment slider to the
same number as the tracking force control. ie a recommended 2.0g
tracking force = 2.0 on the bias slider. Ensure the cartridge mounting
hardware is fitted correctly as shown in fig 2.
fig 2
Third fixing
Drive Pulley
Drive Belt
On/Off
Glass Platter
Connection to the amplifier
The tonearm external phono leads must be connected to your amplifier.
Connect as follows : Red right channel / Black left channel. If your
amplifier does not have an integrated phono stage you will require an
external stage ( sold separately ) .
Cartridge mounting hardware
The nut should be mounted to
the top of the headshell. Do not
over tighten. NB Third fixing not
included with all cartridges.
Top Brace
Balance
Weight
Tracking
Force
Control
Bias adjustment
Alignment Protractor
fig 3
Advertisement
Table of Contents

Related Manuals for Rega RP3


Summary of Contents for Rega RP3
- Page 1 3. “ M ass absorbs energy - lost energy equals lost music ” ! Rega has Always use a force which corresponds to the upper limit of the cartridge pioneered the use of lightweight rigid plinths.
- Page 2 If the centre hub is removed Thank you for purchasing the RP3 turntable. this film may be disturbed and the accuracy of the Details of the full Rega range and upgrade path are turntable could be affected. available on www.rega.co.uk or from your retailer.
Need help?
Do you have a question about the RP3 and is the answer not in the manual?
Questions and answers