Blackberry RIM 857 Wireless Handheld Installation & User Manual
Wireless handheld
Hide thumbs
Also See for RIM 857 Wireless Handheld:
- Installation & getting started manual (104 pages) ,
- Installation and user manual (215 pages) ,
- User manual (140 pages)
Table of Contents
Advertisement
Quick Links
Advertisement
Table of Contents

Related Manuals for Blackberry RIM 857 Wireless Handheld


Summary of Contents for Blackberry RIM 857 Wireless Handheld
- Page 1 Installation and User’s Guide RIM 857 Wireless Handheld...
- Page 2 Research In Motion Limited. For more information on BlackBerry, call 1-877-BLK-BERRY. Research In Motion Limited 295 Phillip Street, Waterloo, Ontario, Canada N2L 3W8 Tel.
-
Page 3: Fcc Compliance Statement (Usa)
FCC compliance statement (USA) FCC Class B Part 15 This device complies with Part 15 of the FCC Rules. Operation is subject to the following two conditions: • This device may not cause harmful interference, and • This device must accept any interference received, including interference that may cause undesired operation. -
Page 4: Industry Canada Certification
• Consult the dealer or an experienced radio/TV technician for help. Industry Canada Certification This device complies with Industry Canada RSS 119, under certification number 2503 195 677A. IC Class B compliance This device complies with the Class B limits for radio noise emis- sions as set out in the interference-causing equipment standard enti- tled “Digital Apparatus,”... -
Page 5: Table Of Contents
Contents FCC compliance statement (USA) ..........3 Industry Canada Certification ..........4 IMPORTANT SAFETY INFORMATION........9 IMPORTANT UL SAFETY INSTRUCTIONS .....11 Welcome to your wireless solution ..........13 New for version 2.0..............14 Upgrading to version 2.0 ............14 Contents of your package ............15 System Requirements .............15 About this guide..............16 About Research In Motion.............16 Customer support ..............17... - Page 6 Installation and setup .............55 Loading handheld applications ..........56 Backing up files from handheld to the PC ......57 Synchronizing PIM ..............59 Summary ..................60 Composing and sending messages..........61 Setting message options............61 Setting level of importance ............62 Choosing a send method ............63 Sending one-time messages...........64 Sending messages to many contacts ........65 Attaching Address Book entries ...........66 Using AutoText ...............67...
- Page 7 Adding addresses ..............110 Viewing addresses ..............114 Editing addresses ..............115 Deleting addresses ..............116 Searching addresses..............116 Summary and tips..............117 Managing Tasks and Appointments........119 Using the Tasks function .............119 Using the Calendar function ..........124 Summary and tips..............137 Using the MemoPad and Calculator ........139 Using the MemoPad function ..........139 Using the Calculator function ..........142 Summary and tips..............146...
- Page 8 Index ....................179...
-
Page 9: Important Safety Information
IMPORTANT SAFETY INFORMATION Please read these safety instructions and the operation instructions provided in this manual before operating the RIM 857 Wireless Handheld or its charging cradle. Retain these instructions for future use. Remember to follow any special regulations governing the use of the RIM 857 Wireless Handheld and always switch it off in areas where radio devices are forbidden, or when it may cause interference or danger. - Page 10 questions. Additionally, while most modern equipment is adequately shielded from radio signals such that your handheld will not interfere with the operation of such equipment, certain electronic equipment, including automotive systems, may not be shielded against the radio signals from your handheld. You should check with the manufacturer of your motor vehicle or the manufacturer’s representative to determine whether the use of the handheld will present any safety issues.
-
Page 11: Important Ul Safety Instructions
instructions starting on page 21 for more information on the battery and power supply. Do not overload wall outlets, extension cords, or integral convenience receptacles as this may result in a risk of fire or electric shock. Never push objects of any kind into the RIM 857 Wireless Handheld through openings as they may short-out parts and this may result in a fire or electric shock. - Page 12 Unplug this apparatus during lightning storms or when used for long periods of time. Refer all servicing to qualified service personnel. Servicing is required when the apparatus has been damaged in any way, such as when the power-supply cord or plug has been damaged, liquid has been spilled or objects have fallen into the apparatus, it has been exposed to rain or moisture, does not operate normally, or has been dropped.
-
Page 13: Welcome To Your Wireless Solution
Welcome to your wireless solution The RIM 857 Wireless Handheld is a powerful computer with a full- featured Address Book, Appointment Calendar, MemoPad, and Task List. Unlike other PIM products, the RIM 857 Wireless Handheld includes an integrated wireless modem. Your package will also include the RIM 857 Wireless Handheld Charging Cradle and the Desktop Software, which allows you to synchronize with popular desktop personal information management (PIM) software. -
Page 14: New For Version 2.0
Welcome to your wireless solution — New for version 2.0 • Calculator: Perform basic mathematical operations and conversions. • Options: Customize the way the handheld notifies you of new messages; set the password; add, edit, and delete AutoText entries; set the current date; program the automatic on/off feature. -
Page 15: Contents Of Your Package
Welcome to your wireless solution — Contents of your package perform a backup to store the contents of your handheld (such as Address Book entries, messages, and calendar items) on your PC. See Chapter 3 or the Backup and Restore online help for instructions on performing a backup. -
Page 16: About This Guide
Welcome to your wireless solution — About this guide About this guide This guide provides information for operating the handheld and for installing the Desktop Software. Note Notes will appear in this format and will contain additional information to help you perform the task being described. Tips provide information about performing tasks and offer different options to perform tasks. -
Page 17: Customer Support
Welcome to your wireless solution — Customer support Customer support For customer support, contact your service provider. Installation and User’s Guide... -
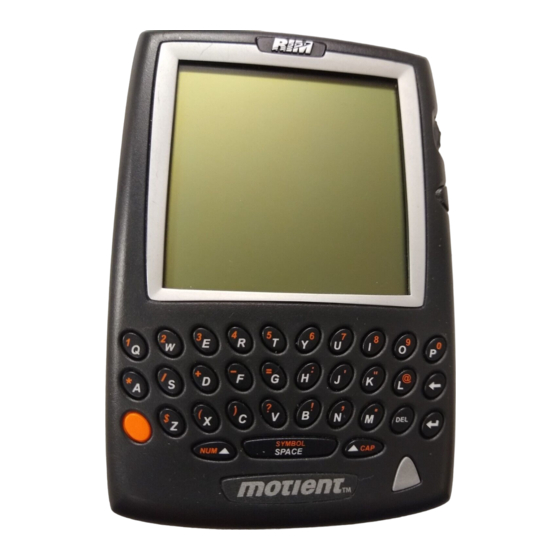
Page 19: Get To Know Your Handheld
Get to know your handheld This chapter will help you get acquainted with your handheld before you start sending and receiving email. Handheld components Figure 1: Front view of handheld Here are some details on the handheld’s main components: LCD screen The LCD screen is your interface with functions such as composing and reading messages, setting tasks and appointments, viewing and editing contact information, customizing device options, and... - Page 20 Get to know your handheld — Handheld components performing basic mathematical calculations. The Home screen displays the current signal strength and battery level of the handheld. In low light conditions, you can increase the readability of the LCD by using the backlighting feature. To activate backlighting, press the silver key once.
-
Page 21: Serial Port
Get to know your handheld — Handheld components you pull the handheld out of the holster and quickly replace it, notification stops but the message will remain marked unread. See “Setting message notification” on page 37 for information on notification options. Serial port The serial port on the bottom of the handheld fits into the prongs of the docking cradle. -
Page 22: Turning On Your Handheld
Get to know your handheld — Turning on your handheld icon will change to a charging icon. Once the handheld is fully charged, the battery icon will replace the charging icon. See page 33 for a list of handheld status icons. The handheld can be kept at a full charge by “topping up”... -
Page 23: Turning Off The Handheld
Get to know your handheld — Turning off the handheld To select a function, scroll to the appropriate icon and click the trackwheel to open that function’s screen. You can also select a function by pressing the underlined character in the function’s name. For example, press M for Messages. - Page 24 Get to know your handheld — Description of keys Function Scrolling and selecting • Roll the trackwheel with your thumb to scroll up and down through screen lines, fields, and menu items. TRACKWHEEL • Click (press down) the trackwheel with your thumb to open menus and select options, similar to the click function of a mouse used with your PC.
- Page 25 Get to know your handheld — Description of keys Function Horizontal scroll and changing options • Hold the key while you roll the trackwheel to move the cursor horizontally across screen lines (except in the Home screen where will move the ROLL cursor vertically).
- Page 26 Get to know your handheld — Description of keys Function NUM lock • Press ) to activate num LEFT SHIFT lock mode. Any key that you press in the upper row will be typed in its numeric form. Press again to return to regular mode. SHIFT Select multiple messages •...
- Page 27 Get to know your handheld — Description of keys Function Delete characters ahead of cursor, delete messages • Press the key to erase characters to the right of the cursor position. • Press the key while composing a message to delete the selected character only.
-
Page 28: Lcd Interface
Get to know your handheld — Description of keys Function Open symbols library for extra characters • Press to open the Select Symbol SPACE screen, from which you can insert the symbol you need. Symbols screen As described in the chart above, you can press to open SPACE the Select Symbol screen. - Page 29 Get to know your handheld — Description of keys sections provide details on the handheld’s screens, menus, and icons. Backlighting • When the handheld is on, press the silver key to activate backlighting. • Backlighting is disabled after 20 seconds if you do not press a key or move the trackwheel.
- Page 30 Get to know your handheld — Description of keys The following chart shows each function icon and describes the corresponding function: Icon Description Receive, read, reply to, compose, forward, save, file, and delete messages. Messages Type and send messages to Internet email addresses.
- Page 31 Get to know your handheld — Description of keys Icon Description Add, edit, and delete tasks and mark tasks as complete. Tasks Set the alarm on the handheld to sound daily. Alarm Compose, edit, and delete important notes and memos. MemoPad Perform basic mathematical operations and conversions.
- Page 32 Get to know your handheld — Description of keys Icon Description Turn the handheld’s radio off when it may interfere with other radio communications, such as during flight. You will not be able to send or Turn receive messages until you turn the radio on Wireless again.
- Page 33 Get to know your handheld — Description of keys Icons and graphical tools Home screen components The Home screen appears when you turn on the handheld. It is your starting point for using the handheld’s functions. Home screen display In any of the function screens, press the key to return to this Home screen.
-
Page 34: Message Status Icons
Get to know your handheld — Description of keys Icon Description Charging indicator Data is being sent Data is being received key mode is activated key mode is activated SHIFT lock mode is activated Unread messages waiting Message status icons These icons appear on the handheld’s LCD screen to indicate the status of pending, sent, and received messages. - Page 35 Get to know your handheld — Description of keys Icon Description Composed message has been saved (not sent yet) Unread message transmission error Message returned, message transmission error New, unread message has been received Message has been read. Status of message is high Scrolling through options The handheld provides alternate methods of performing the same function (e.g.
- Page 36 Get to know your handheld — Description of keys • + roll. Hold the key while rolling the trackwheel to scroll through the options. Release the key once you reach your desired setting. • Use the keyboard. You can press the letter or number which represents your choice.
-
Page 37: Setting The Date And Time
Get to know your handheld — Setting the date and time Setting the date and time In the Home screen, scroll to the OPTIONS icon and click. In the Device Options screen, scroll to Date/Time and click. The Date/Time screen appears. Scroll to the field you would like to set, then press the key to scroll through your SPACE... -
Page 38: Using Password Protection
Get to know your handheld — Using password protection In the Device Options screen, scroll to Notify and click. The Notify screen appears. Scroll to the field you would like to set, then press the key to scroll through your options. SPACE Click the trackwheel to view the menu. - Page 39 Get to know your handheld — Using password protection If you do not want the password security screen to appear, you must disable your password in the Security screen. Password security screen Note If you have entered information in the Owner screen of the Options function, it will appear on the password security screen.
- Page 40 Get to know your handheld — Using password protection In the Device Options screen, scroll to Security and click. The Security screen appears. While in the Password field, press the key to enable the password. A dialog box appears, SPACE prompting you to enter a minimum 4 character password.
-
Page 41: To Change Your Password
Get to know your handheld — Using password protection Manager. With the handheld in the cradle, you must type your password before you can gain access to the Desktop Manager tools. Note The password security screen will show your contact information (if you have entered it in the Owner screen) or it will prompt you to “Press any key”. - Page 42 Get to know your handheld — Using password protection In the Device Options screen, scroll to Security and click. A dialog box appears, asking you to type your password. Once you do so, press to open the Security screen. ENTER Click to view the menu.
- Page 43 Get to know your handheld — Using password protection In the Device Options screen, scroll to Security and click. A dialog box appears, asking you to type your password. Once you do so, press to open the Security screen. ENTER While in the Password field of the Security screen, press the key to change the Password option to Disabled.
-
Page 44: Summary And Tips
Get to know your handheld — Summary and tips Summary and tips In this chapter, you learned about the various components and features of the handheld. You’ve also performed a basic setup including setting the date and time, setting message notification, and enabling password protection. -
Page 45: Start Sending Email
Start sending email Now that you’re more familiar with the handheld, you can start sending and receiving email! The following steps will help you get started: Turn on the radio. Register with the wireless network (if necessary). Install the Desktop Software on your PC. Connect the handheld to your PC using the cradle. -
Page 46: Registering With The Network
Start sending email — Registering with the network You will notice that the TURN WIRELESS ON icon was an antenna, but when you select the icon, the function name changes to TURN WIRELESS OFF and the icon changes to an airplane. The airplane icon is a reminder to turn off your handheld’s radio when on an airplane, in a hospital, or any place where it may interfere with other radio transmissions and frequencies. - Page 47 Start sending email — Registering with the network in the top right corner of the Home screen.) Register your handheld using this procedure. In the Home screen, scroll to the OPTIONS icon and click. In the Device Options screen, scroll to Network Settings and click.
-
Page 48: Installing The Desktop Software
Start sending email — Installing the Desktop Software Installing the Desktop Software You must install the Desktop Software in order to synchronize your Personal Information Management data, and use the other Desktop Software tools. Insert the CD-ROM into the appropriate drive. The Setup program starts automatically. - Page 49 Start sending email — Connect the handheld to your PC Secure the handheld in the cradle by inserting the connector port on the bottom edge of the handheld into the connector prongs of the cradle and press firmly in place. Note If the password is enabled, you must enter it before you can connect to the desktop.
-
Page 50: Sending A Message
Start sending email — Sending a message Sending a message You can send a message to an existing contact or add a new contact while composing your message. Note You can also compose a message while in the Messages, Address Book, or Saved Messages screens. Click the trackwheel to view the menu. - Page 51 Start sending email — Sending a message Type a subject line and press to begin typing your ENTER message. When you are finished composing your message, click the trackwheel to view the menu; select Send Message by clicking again. The Messages screen shows a list of message headers for each message you’ve sent or received;...
-
Page 52: Reading A Message
Start sending email — Reading a message one of the following icons to the left of the message header to indicate the message’s status. Message is being sent Message has been sent out to the network Message is pending (will be sent later). This icon will appear if you are out of a coverage area or the network is busy. - Page 53 Start sending email — Reading a message Press to return to the Messages screen or click the trackwheel to view the menu, then scroll to select your next option. See Chapter 5 for more information on receiving and reading messages. Note If you slide the handheld out of the holster within five seconds of notification, the notification stops and the most...
-
Page 54: Summary
Start sending email — Summary Summary You’ve just sent and received a wireless email message. In this chapter, you learned the steps that are required for email redirection to occur. You can turn on the radio, register with the network, install the Desktop Software on your PC, connect the handheld to your PC, and enable email redirection. -
Page 55: Using The Desktop Software
Using the Desktop Software The Desktop Software can synchronize your messages, contacts, appointments, memos, and tasks between your PC and handheld. You can also backup any important information from the handheld to your PC, edit the Address Book and AutoText files, restore data back to the handheld, and load new applications onto the handheld, all using the Desktop Software’s convenient Windows interface. -
Page 56: Loading Handheld Applications
Using the Desktop Software — Loading handheld applications Loading handheld applications If necessary, use the Application Loader tool to update the software on the handheld and add any new applications that might be available. Note Before updating your handheld with new software using the Application Loader, use the Backup and Restore tool to save any important information from the handheld to your PC. -
Page 57: Backing Up Files From Handheld To The Pc
Using the Desktop Software — Backing up files from handheld to the PC delete the information on your handheld (including your messages and address book entries). If you select this check box, ensure that any important information is backed up first. In the Applications section, select the check box if you wish to erase the applications from your handheld before loading updated ones. - Page 58 Using the Desktop Software — Backing up files from handheld to the PC AutoText files: create new entries, edit existing entries, and delete the entries on your PC. Note Before updating your handheld with new software using the Application Loader, use the Backup and Restore tool to save any important information from the handheld to your See the online help topic “Advanced backup and restore”...
-
Page 59: Synchronizing Pim
Using the Desktop Software — Synchronizing PIM To restore everything that was saved previously from your handheld, click the Restore button. The Select file for Full Restore window appears. Select the file name that contains the information you want to restore and click Open. A dialog box will chart the progress of the data transfer from the PC to your handheld. -
Page 60: Summary
Using the Desktop Software — Summary In the Intellisync window, click Configure PIM... to customize your synchronization settings. Handheld Configuration window appears. Select a PIM application (Address Book, Calendar, MemoPad, or Tasks) and click Choose. In the Choose Translator window, select the PC program (called the “translator”) that you use and click OK. -
Page 61: Composing And Sending Messages
Composing and sending messages In the previous chapters of this guide, you learned about your handheld’s main components, the general procedures required for sending and reading messages, and the Desktop Software’s tools. This chapter explains the different features that the handheld offers for advanced composing and sending capabilities. -
Page 62: Setting Level Of Importance
Composing and sending messages — Setting level of importance The Message List Options screen appears. Scroll to the field you would like to set, then press the key to scroll SPACE through your options. Release the key once you have set SPACE the option to your preference. -
Page 63: Choosing A Send Method
Composing and sending messages — Choosing a send method The Current Message Options screen appears. In the Importance field, press the key to change the importance SPACE level of the message you are composing from Normal to High. Click to view the menu. Scroll to Save Options and click. You return to the message you are composing. -
Page 64: Sending One-Time Messages
Composing and sending messages — Sending one-time messages To choose a send method In the Home screen, scroll to the COMPOSE icon and click. The To: screen appears. Scroll to a contact’s name and click. A menu appears, listing the send methods available for that contact. -
Page 65: Sending Messages To Many Contacts
Composing and sending messages — Sending messages to many contacts Type a subject and press to begin composing your ENTER message. When you are ready to send the message, click the trackwheel to view the menu. Scroll to Send Message and click. From the Messages screen you can view the sent message’s status. -
Page 66: Attaching Address Book Entries
Composing and sending messages — Attaching Address Book entries name.) Click the trackwheel to view the menu, then scroll to Continue and click. You return to the To: screen where the additional recipient appears in the list. Type your subject in the Subject field and press to begin composing your message. -
Page 67: Using Autotext
Composing and sending messages — Using AutoText While you are composing your message, click the trackwheel to view the menu. Scroll to Attach Address and click. The Attach: screen appears, listing all of your contacts’ names. Scroll to a contact and click to view the menu. Scroll to Use Address and click. - Page 68 Composing and sending messages — Using AutoText • Automatically replace abbreviations and acronyms with complete words. • Automatically enter commonly-used strings of words into a message by typing only one keyword. • Automatically insert punctuation and symbols into your message without using the key or symbols library.
- Page 69 Composing and sending messages — Using AutoText To add a new AutoText entry You may want to customize your AutoText database by adding specific AutoText entries. In the Home screen, scroll to the OPTIONS icon and click. The Device Options screen appears. Scroll to AutoText and click.
- Page 70 Composing and sending messages — Using AutoText You can test your new entry by typing the keyword while you compose your message. To add a new AutoText entry using a macro You can use AutoText macros to quickly enter standard items such as dates, times, and owner information.
- Page 71 Composing and sending messages — Using AutoText Once the appropriate macro is in the Replace it with field, click the trackwheel to view the menu. Scroll to Save Item and click. The new AutoText entry will appear in the AutoText entries list in alphabetical order.
- Page 72 Composing and sending messages — Using AutoText Click the trackwheel to view the menu. Scroll to Save Item and click. You will return to the AutoText screen where you can view your changes. Note You can also edit AutoText entries while you’re composing a message.
-
Page 73: Automatic Formatting
Composing and sending messages — Automatic formatting The Device Options screen appears. Scroll to AutoText and click. In the AutoText screen, type the first letter or first few letters of the entry you would like to find. For this example, type the letter ‘t’. - Page 74 Composing and sending messages — Automatic formatting Auto punctuation You can insert a period automatically at the end of a sentence or word by pressing the key twice. The next letter you type will SPACE be capitalized. Email fields You can type an email address in an Email field of the Address Entry screen without pressing the key! Begin typing an email address;...
-
Page 75: Inserting Symbols
Composing and sending messages — Inserting symbols Inserting symbols You can enhance your messages by inserting symbols from the handheld’s symbols library. Note You can insert symbols into screens other than To (such as the New Address, Edit Address, Search Messages, and AutoText screens) by following steps 3-4. -
Page 76: Summary And Tips
Composing and sending messages — Summary and tips You return to your message in the To: screen and the symbol has been inserted. You can also insert international characters and characters with accents into your messages. When composing a message or entering text, press and hold a letter key while rolling the trackwheel to scroll through international characters and characters with accents. - Page 77 Composing and sending messages — Summary and tips Composing and sending messages - Tips AutoText • While composing a message, press br + to enter an open angle SPACE bracket. • While composing a message, press ld + to enter the current SPACE date.
-
Page 79: Receiving And Reading Messages
Receiving and reading messages In this chapter, you will learn about your options for received messages, how to receive more of a long message, and how to open file and Address Book attachments. When you receive a new message, the handheld will display visual notification on the Home screen, and may provide other notification, depending on how you have set your notification options. - Page 80 Receiving and reading messages — Received message options Forward Message — Forwards (sends) the open message to another contact. If an attachment is included with the message, it will be forwarded with the message. Reply with Text — Sends a reply to the sender of the open message. The text of the original message appears below your reply.
-
Page 81: Receiving Long Messages
Receiving and reading messages — Receiving long messages Receiving long messages Occasionally, the message you receive may be longer than what the network can transmit. In this case, the maximum amount of data allowed is sent to your handheld and the remainder is stored in your email Inbox. -
Page 82: Sending File Attachments
Receiving and reading messages — Sending file attachments existing part of the message. Press to resume reading the message where you last left off. Note You can also return to the Messages screen and you will be notified when the handheld receives the remaining part of the message. -
Page 83: Managing Address Book Attachments
Receiving and reading messages — Managing Address Book attachments Click the trackwheel to view the menu. Scroll to Forward Message and click. Select a recipient and a send method. You can type a message before you click to view the menu and select Send Message. - Page 84 Receiving and reading messages — Managing Address Book attachments Open a received message and read it. (If there are attachments to the message, the number of attachments is displayed at the top of the message.) Scroll to the end of the message; if there is an Address Book attachment for you to open, you will see its name and size.
-
Page 85: Adding Contacts To Address Book
Receiving and reading messages — Adding contacts to Address Book Adding contacts to Address Book When you receive a new message from someone who is not currently in your handheld’s Address Book, you can add the address from the open message. Note Please contact your service provider to determine if this functionality is supported. -
Page 86: Summary And Tips
Receiving and reading messages — Summary and tips Click to view the menu and select Save Address by clicking again. The contact is added to your Address Book and you return to the open message. Summary and tips In this chapter, you learned about reading and receiving messages. You can set received message options, retrieve long messages, manage file attachments, open address book attachments, and add attachments to your Address Book. - Page 87 Receiving and reading messages — Summary and tips Receiving and reading messages - Tips • Press T to go to the top of a list or open message. • Press B to go to the bottom of a list or open message. •...
-
Page 89: Managing Messages
Managing messages Chapters 4 and 5 discuss the features and functions that the handheld provides for sending and receiving messages. Now, find out how you can organize, customize, and search your list of messages more efficiently. Saving messages Save important messages by copying them to a separate list. It is important to save any messages you want to keep for future reference. - Page 90 Managing messages — Saving messages the screen and the message is copied to the Saved Messages screen but also remains in the Messages screen. Return to the Messages screen by clicking to view the menu, scrolling to and clicking Close. Exit to the Home screen. In the Home screen, scroll to the SAVED MESSAGES icon and click.
- Page 91 Managing messages — Saving messages Now that the message has been saved, you can delete the message from the Messages screen. See page 99 for more information on deleting messages. To remove messages from the Saved Messages screen You can remove sent and received messages from the Saved Messages screen by deleting them.
- Page 92 Managing messages — Saving messages The Messages screen appears. An icon beside the message indicates that the message is saved but has not been sent. The message you save while composing is saved in the Messages screen, not in the Saved Messages screen. To resume composing, scroll to the saved message and click to view the menu.
-
Page 93: Searching Messages
Managing messages — Searching messages Searching messages Use the handheld’s search function to locate specific messages. You can specify and save the terms of several searches and use them at any time. You can also perform a one-time search. Two default searches (Inbox and Outbox) are saved on the handheld. - Page 94 Managing messages — Searching messages Select the types of messages that you want the results of the search to show. In the Show field, press the key to select SPACE the type of messages to show. The default is to show all sent and received messages.
- Page 95 Managing messages — Searching messages The results of your search are displayed in the Search screen. Note Once you have saved a search and specified a hotkey, you can use + the hotkey to carry out the search in the Messages or Saved Messages screens.
- Page 96 Managing messages — Searching messages Your saved searches are listed. Select the search that you want to edit then click to view the menu. Scroll to Edit Search and click. The Save Search screen appears. In this window, you can change any of the information in the fields.
- Page 97 Managing messages — Searching messages To edit a search once In the Home screen, scroll to the SEARCH MESSAGES icon and click. The Search Messages screen appears. Click the trackwheel to view the menu. Scroll to Recall Search and click. Your saved searches are listed.
- Page 98 Managing messages — Searching messages To delete a search In the Home screen, scroll to the SEARCH MESSAGES icon and click. The Search Messages screen appears. Click the trackwheel to view the menu. Scroll to Recall Search and click. Your saved searches are listed. Select the search that you want to delete then click to view the menu.
-
Page 99: Deleting Messages
Managing messages — Deleting messages In the Home screen, scroll to the MESSAGES icon and click. Select a received message from the contact for which you want to search then click to view the menu. Scroll to Search Sender and click. All messages from that sender are shown in the Search screen. - Page 100 Managing messages — Deleting messages In the Home screen, scroll to the MESSAGES icon and click. In the Messages screen, scroll to the message that you want to delete and click to view the menu. Scroll to Delete Message and click.
- Page 101 Managing messages — Deleting messages Open the message you want to delete by clicking to view the menu, scrolling to Open Message and clicking. Click the trackwheel to view the menu. Scroll to Delete Message and click. A dialog box appears, asking if you want to delete the message.
-
Page 102: Editing Messages
Managing messages — Editing messages A dialog box appears, asking if you are sure you want to delete all messages sent or received prior to and including that date. Click Yes. You return to the Messages screen and you can see that the messages are no longer listed. -
Page 103: Resending A Message
Managing messages — Resending a message click. In the open message, click to view the menu. Scroll to Edit Message and click. The text of the message will appear where you can make your changes. Once you have finished making changes, click to view the menu. -
Page 104: Marking A Message As Unread
Managing messages — Marking a message as unread The text of the message will appear. Click to view the menu. Scroll to Resend Message and click. You return to the Messages screen and your message will be sent again. Note If you are resending the message due to a failed transmission, scroll to the top of the original message to find out why the message did not send properly. -
Page 105: Marking All Messages Read
Managing messages — Marking all messages read The message will be marked unread. Note You can also mark an open message unread by clicking to view the menu, scrolling to Mark Unread and clicking again. You can also mark multiple messages as unread. In the Messages screen, hold the key while rolling the SHIFT... -
Page 106: Summary And Tips
Managing messages — Summary and tips Click to view the menu. Scroll to Mark Prior Read and click. All messages in the list will be marked as read. You can also mark a set of messages as read. In the Messages screen, hold the key while rolling the SHIFT... - Page 107 Managing messages — Summary and tips Managing messages - Tips • Press V to go to the Saved Messages screen while in the Home screen or Messages screen. • Press + U to toggle between marking a message unread or read. •...
-
Page 109: Using The Address Book
Using the Address Book The handheld contains an Address Book for storing various contact information. The Address Book allows you to keep a customized record of email addresses, mailing addresses, titles, and pager, fax, business, and home phone numbers. It also stores personal information about specific contacts in the form of notes. -
Page 110: Adding Addresses
Using the Address Book — Adding addresses • Allow Duplicate Names: Select whether or not you want to allow more than one entry for the same name. By default, this is set to Yes. Scroll to the field you would like to set, then press the SPACE key to scroll through your options. - Page 111 Using the Address Book — Adding addresses In the Address Book screen, click to view the menu. Scroll to New Address and click. Type your contact’s information and press after each ENTER field. You can also type your contact’s full name in the First or Last field and press .
- Page 112 Using the Address Book — Adding addresses Your new contact’s name will appear in alphabetical order in your Address Book. Address Book fields The New Address screen has the following fields: First: Type your contact’s first name. This field supports alpha- numeric and symbol characters.
- Page 113 Using the Address Book — Adding addresses PIN: Type your contact’s LLI, or PIN number. This number, unique to each handheld, is assigned by the wirelss data network service. Note To enter hexadecimal characters, you must press the ALT key when pressing the associated letter. For example, to enter an ‘e’...
-
Page 114: Viewing Addresses
Using the Address Book — Viewing addresses Address 2: Type any further information for the address. (A second address field is provided for long addresses.) This field supports alpha-numeric and symbol characters. City: Type your contact’s city. This field supports alpha-numeric and symbol characters. -
Page 115: Editing Addresses
Using the Address Book — Editing addresses A virtual business card appears listing all the information you’ve entered for this contact. To jump to a number or email field in the business card, press the first letter of the field name. For example, if you have entered a fax number and you press F in this screen, you move to the Fax field. -
Page 116: Deleting Addresses
Using the Address Book — Deleting addresses Deleting addresses You can delete old addresses from your Address Book to save memory space. In the Home screen, scroll to the ADDRESS BOOK icon and click. In the Address Book screen, scroll to the contact that you want to delete. -
Page 117: Summary And Tips
Using the Address Book — Summary and tips To return to your complete list of contacts, click to view the menu. Scroll to View All and click. Note The handheld searches the First, Last, and Company names of contacts to find the first instance of your search. As you type more letters for your search, fewer matches will appear. -
Page 119: Managing Tasks And Appointments
Managing Tasks and Appointments The handheld includes a Tasks function and a Calendar function to help you manage and schedule appointments and tasks. Use the Tasks function to make a list of tasks to be completed. Use the Calendar function to keep track of appointments and events, including the duration of the appointment, the location, and any additional notes. - Page 120 Managing Tasks and Appointments — Using the Tasks function The Tasks Options screen appears, displaying the following two options: • Sort By: Select how you want to sort the tasks in your Tasks screen. Choose from Subject, Priority, Due Date, or Status.
- Page 121 Managing Tasks and Appointments — Using the Tasks function To add tasks In the Home screen, scroll to the TASKS icon and click. In the Tasks screen, click the trackwheel to view the menu. Scroll to New Task and click. In the New Task screen, complete the information for the task.
- Page 122 Managing Tasks and Appointments — Using the Tasks function Icon Description The task has been deferred or is waiting. The task has not been started or is in progress. Task fields The Tasks screen contains the following fields: Task: Type the subject of the task. Status: Choose the status of the task.
- Page 123 Managing Tasks and Appointments — Using the Tasks function Once you have finished viewing or editing the task, click to view the menu. Scroll to Save Task and click. You return to the Tasks screen. To delete tasks In the Home screen, scroll to the TASKS icon and click. In the Tasks screen, scroll to the task you want to delete, then click to view the menu.
-
Page 124: Using The Calendar Function
Managing Tasks and Appointments — Using the Calendar function The task’s status is changed. Note You can only change the status of a completed task to “In Progress”. You can mark a task “Completed” if it is marked “Deferred”, “Waiting”, “Not Started”, or “In Progress”. To change a task to a status other than “Completed”... - Page 125 Managing Tasks and Appointments — Using the Calendar function Click the trackwheel to view the menu. Scroll to Save Options and click. You return to the Calendar screen. To switch views In the Calendar screen, click to view the menu. Scroll to View Day, View Week, View Month, or View Agenda and click, depending on which view you would like to use.
- Page 126 Managing Tasks and Appointments — Using the Calendar function Week view This view displays all appointments for the current week; you can scroll vertically through them. All appointments are marked with an outlined box spanning the length of the appointment. If the appointment is an all-day appointment, dots will span the entire day.
- Page 127 Managing Tasks and Appointments — Using the Calendar function Month view When you first switch to Month view, your cursor will be on today’s date and you can scroll horizontally through the days of the month. Days with appointments will have a black bar to the left of the day. The size of the bar depends on the length of the appointment.
- Page 128 Managing Tasks and Appointments — Using the Calendar function To add appointments In the Home screen, scroll to the CALENDAR icon and click. In the Calendar screen, click to view the menu. Scroll to New Appointment and click. In the New Appointment screen, use the trackwheel to go from field to field, adding information for the appointment.
- Page 129 Managing Tasks and Appointments — Using the Calendar function In the Reminder field, select how early you want to be notified of the appointment. If you do not wish to be reminded of the appointment, set this field to None. If the appointment will occur regularly, set the Recurrence field to reflect how often the appointment should appear in your calendar.
- Page 130 Managing Tasks and Appointments — Using the Calendar function End Time: Select the end time for the appointment. The default is an hour after the start time. (You can change the hour and minutes settings by pressing the key.) SPACE Reminder: Select how early you want to be notified of the appointment.
- Page 131 Managing Tasks and Appointments — Using the Calendar function In the Recur field, press the key until the desired option SPACE appears on screen. Your options are: Day, Week, Month, and Year. (For this example, select Day to set an appointment recurring on a daily basis.) In the Every field, press the key until the desired amount...
- Page 132 Managing Tasks and Appointments — Using the Calendar function In the End field, set the specific date on which the recurring appointment should end. (By setting this field to Never, you will have a constant recurring appointment.) Note If you set your appointment to recur weekly, you can specify the day(s) of the week on which it should recur.
- Page 133 Managing Tasks and Appointments — Using the Calendar function In Month view, you can view the appointments for the selected day by following this procedure: In the Home screen, scroll to the CALENDAR icon and click. The Calendar screen appears. Switch to Month view by clicking to view the menu, scrolling to View Month and clicking.
- Page 134 Managing Tasks and Appointments — Using the Calendar function To view today’s appointments In the Home screen, scroll to the CALENDAR icon and click. In the Calendar screen, click the trackwheel to view the menu. Scroll to Today and click. The appointments for today’s date appear in your chosen Calendar view.
- Page 135 Managing Tasks and Appointments — Using the Calendar function The appointments for that date appear, in your chosen Calendar view. To edit appointments In the Home screen, scroll to the CALENDAR icon and click. In the Calendar screen (in either Day or Agenda view), scroll to an appointment and click to view the menu.
- Page 136 Managing Tasks and Appointments — Using the Calendar function Click to view the menu, then scroll to Save Recurrence and click. Click the trackwheel to view the menu, then select Save Appointment by clicking again. You return to the Calendar screen. Note If you are in Week or Month view, you can either switch to Day or Agenda view to edit the appointment, or view the...
-
Page 137: Summary And Tips
Managing Tasks and Appointments — Summary and tips Summary and tips In this chapter, you learned how you can organize your time and projects using the Tasks and Calendar functions. You can add, view, edit, delete, and set options for both tasks and appointments. In the Tasks screen, you can modify the status of your tasks so that you know which of your projects have been completed. - Page 138 Managing Tasks and Appointments — Summary and tips Managing tasks and appointments - Tips • Press to create an appointment at a selected time or view an ENTER appointment if one is highlighted. • Press and roll the trackwheel in Day or Week view to highlight SHIFT the hours during which an appointment will take place.
-
Page 139: Using The Memopad And Calculator
Using the MemoPad and Calculator The handheld contains a MemoPad for recording lists, notes, or other important information that you type aside from email messages. A Calculator function is also included, which helps you to perform simple mathematical operations and conversions. Using the MemoPad function You can use the MemoPad function to add, edit, view, and delete important memos. - Page 140 Using the MemoPad and Calculator — Using the MemoPad function Type a title for your memo and press . Then type the ENTER body of the memo. Once you have finished composing the memo, click to view the menu. Select Save by clicking again. You return to the MemoPad screen where your new memo appears in alphabetical order.
- Page 141 Using the MemoPad and Calculator — Using the MemoPad function The full memo appears on the screen. Note You can edit a memo you are viewing by clicking to view the menu. Scroll to Edit Memo and click. To edit memos In the Home screen, scroll to the MEMOPAD icon and click.
-
Page 142: Using The Calculator Function
Using the MemoPad and Calculator — Using the Calculator function You return to the MemoPad screen and you can see that the memo is no longer listed. Note You can delete memos only in the MemoPad screen. Using the Calculator function Use the handheld’s calculator function to perform simple mathematical operations and conversions. - Page 143 Using the MemoPad and Calculator — Using the Calculator function To use the tape You can use the Calculator’s Tape feature to record and display your series of calculations. You can review, edit, delete, or insert entries on the tape. In the Home screen, scroll to the CALCULATOR icon and click.
- Page 144 Using the MemoPad and Calculator — Using the Calculator function The results of your change are shown on the main calculator display. To return to the calculator, click to view the menu. Scroll to Return to Calculator and click. Note You can clear the entries on the tape by clicking to view the menu, scrolling to Clear Tape and clicking.
- Page 145 Using the MemoPad and Calculator — Using the Calculator function Scroll to Menu and click. Scroll to From Metric or To Metric and click, depending on which way you want to convert the number. (For this exercise, select From Metric.) A second menu appears where you can select the type of conversion to perform.
-
Page 146: Summary And Tips
Using the MemoPad and Calculator — Summary and tips Summary and tips In this chapter, you learned how to use the MemoPad function and the Calculator function. You can add, edit, and view memos in the MemoPad screen, and you can also perform mathematical operations, use the tape, and perform conversions in the Calculator screen. - Page 147 Using the MemoPad and Calculator — Summary and tips Using the MemoPad and Calculator - Tips • Press S to divide. • Press Z or ( key) to change the sign. SPACE • Press V to find the square root of a number. •...
-
Page 149: Customizing Your Handheld's Options
Customizing your handheld’s options In the “Get to know your handheld” chapter, you learned about the procedure for setting message notification options. Now, refer to this chapter to learn how to customize the handheld’s many other options to suit your specific needs. Setting the alarm The handheld has an Alarm function that you can set to tone at the same time every day. - Page 150 Customizing your handheld’s options — Setting the alarm Once you have set the Alarm to your preference, click to view the menu. Scroll to Save Options and click. Note When the alarm sounds, press any key to silence it. This action will not disable the alarm;...
-
Page 151: Customizing Handheld Options
Customizing your handheld’s options — Customizing handheld options Customizing handheld options You can customize any of the handheld’s options by following this general procedure: In the Home screen, scroll to the OPTIONS icon and click. The Device Options screen appears. Scroll to the handheld option that you want to change and click the trackwheel. -
Page 152: Handheld Options
Customizing your handheld’s options — Handheld options Handheld options The following pages list the handheld’s options and provide page references for further information. About The About screen contains handheld copyright information. You cannot change the information in this screen. Press the key to return to the Device Options screen. - Page 153 Customizing your handheld’s options — Handheld options Date/Time Set the date and time so that your messages contain the correct time stamp. Note You can set the date and time automatically by synchronizing your handheld with your PC. See the Intellisync online help for more information.
-
Page 154: Message Services
Customizing your handheld’s options — Handheld options Message Services Message Services: This setting is reserved for future development. Network Settings Roaming: Choose the country you are in - either Canada or the United States. Subscribers in each respective country will have their home country as the default setting. - Page 155 Customizing your handheld’s options — Handheld options Vibrate, Vibrate+Tone, or None. The default notification setting is Vibrate+Tone. Out of Holster: Customize the way that the handheld notifies you of a new message when it is out of the holster. Choose from: Tone, Vibrate, Vibrate+Tone, or None.
- Page 156 Customizing your handheld’s options — Handheld options • LED Only - the LED will flash for 15 minutes • Off - you will not be reminded. Note If you have set your In Holster and Out of Holster notification to None, the only reminder notification you will receive will be the flashing LED.
- Page 157 Customizing your handheld’s options — Handheld options Screen Contrast: Adjust the screen’s contrast if you’re having trouble seeing the interface. If you are using the handheld in low light, try the backlighting feature instead. Font Size: Set the size of the font to be used on the screen. Choose from Small Font or Large Font.
- Page 158 Customizing your handheld’s options — Handheld options Security Timeout: Set the duration of time (in minutes) that the handheld is idle before the password security screen appears. The default setting is 2 minutes. Note The password security screen will prompt you to “Press any key”.
- Page 159 Customizing your handheld’s options — Handheld options Address Book: Shows the current version of the Address Book function. AutoText: Shows the current version of the AutoText feature. Calculator: Shows the current version of the Calculator function. Calendar: Shows the current version of the Calendar and Tasks functions.
-
Page 160: Summary
Customizing your handheld’s options — Summary In the Device Options screen, scroll to Storage Mode and click. The following message appears: “Storage mode powers off device to save battery life. Continue?” Scroll to Yes and click. The following message appears: “Entering storage mode will lose current time. -
Page 161: Frequently Asked Questions
Frequently asked questions This chapter includes answers to some common questions about the handheld. Alarm Why is my alarm not sounding when I’ve set the time? • Ensure that you have enabled the alarm by setting the Alarm On/Off field to ‘On.’ When the alarm is set, a bell icon appears on the Home screen. -
Page 162: Storage
Frequently asked questions — Storage • If the handheld will not turn on after charging the battery, reset the handheld. See page 166 for more information. Storage What should I do if I won’t be using my handheld for a short period of time? •... -
Page 163: Home Screen
Frequently asked questions — Home screen longer have the correct date and time or encryption key. To reset the date and time, follow the instructions in “Customizing your handheld’s options” on page 151, or to update it automatically, simply synchronize the handheld with the Desktop Software’s Intellisync tool. -
Page 164: Messages
Frequently asked questions — Messages The backlighting on my display screen keeps disappearing. • The LCD backlighting will turn off after 20 seconds if you have not pressed a key or the trackwheel. Messages Why did I have two messages on my handheld before I turned on the radio? •... - Page 165 Frequently asked questions — Messages Are there any pre-defined responses that can be used when replying to messages from the handheld? You can compose a message that contains a list of responses from which another handheld user can choose when replying to your message.
-
Page 166: Punctuation
Frequently asked questions — Punctuation Punctuation Where can I find the period (.) and other punctuation marks on my keyboard? • The quickest way to type a period (.) is to press the SPACE twice at the end of a sentence. The next letter is capitalized automatically. - Page 167 Frequently asked questions — Resetting the handheld There is also a reset hole on the back of the handheld, located in the information label. Normally, you will not need to use this method of reset. However, if the handheld ‘locks up’ (no longer responds when you press keys or use the trackwheel) you can use this method to reset the handheld.
-
Page 169: Specifications
Specifications Mechanical Properties Weight: Approx. 5oz Size (LXWXH): 4.6”X3.1”X0.70” Memory: 5 MB Flash memory 0.5 MB SRAM Display and control features Display: Full graphic LCD with backlighting, 160 x 160 pixel viewing area Controls: Thumb-operated trackwheel; PC-style keyboard Message Red LED indicator; audible beeper; Notification: mechanical vibrator, on-screen notification;... -
Page 170: Radio Specifications
Specifications Power Battery: Internal lithium cell Temperature Operating: 0 C to +50 C Storage: 10 C to +30 C Relative 5-95% Non-condensing Humidity: Radio specifications Network 800 MHz DataTAC networks Support Interface MDC4800 v3.2/3.3, RD-LAP v3.2/3.3 Protocols: Frequency Transmitting: 806 to 825 MHz Receiving: 851 to 870 MHz Regulatory compliance... -
Page 171: Research In Motion Limited Software License Agreement
Research In Motion Limited Software License Agreement Terms and Conditions This is a legal agreement between you, the Customer (“You”), and Research In Motion Limited (“RIM”). BY INSTALLING, USING OR MAKING ONE OR MORE COPIES OF THIS SOFTWARE (OR ANY COMBINATION OF THE FOREGOING), YOU ARE AGREEING TO BE BOUND BY THE TERMS OF THIS AGREEMENT. - Page 172 Research In Motion Limited Software License Agreement Product. Any such Third Party in whole or in part, except that Software shall be governed by (if the software is not copy an End User Software License protected) You may copy the accompanying relating SOFTWARE on to the hard...
- Page 173 Research In Motion Limited Software License Agreement Software in any country other copies You have made of it. Any than the United States and replacement disk that Canada, and you agree to supplied is warranted for the indemnify hold remainder original harmless from any damage warranty period.
- Page 174 Research In Motion Limited Software License Agreement limitations or exclusions may WARRANTY, OR UNDER ANY not apply to You. OTHER LAW OR FORM OF ACTION. EVENT 4.5 IN NO EVENT SHALL RIM SHALL RIM’S LIABILITY TO BE LIABLE FOR ANY OTHER YOU EXCEED THE COST OF DAMAGES WHATSOEVER...
-
Page 175: Limited Warranty
Limited Warranty Research In Motion Limited ("RIM"), the manufacturer of the RIM 857 Wireless Handheld (which together with the Holster and RIM 857 Wireless Handheld Cradle comprise the RIM 857 Wireless Handheld Hardware), and the RIM 857 Wireless Handheld Desktop Software, warrants to YOU, the end-user ("YOU"), that the RIM 857 Wireless Handheld Hardware will be free from defects in workmanship and materials for a period of one (1) year from the... - Page 176 Limited Warranty lease or other means of acquiring the RIM 857 Wireless Handheld Hardware, or any damage caused by the leakage or any other malfunction of an external battery or any other accessory or peripheral equipment. The Limited Warranty also does not apply if the malfunction results from the use of the RIM 857 Wireless Handheld Hardware in conjunction with accessories, products, services or ancillary or peripheral equipment not approved or...
- Page 177 Limited Warranty LAWS OF THE STATE OF TEXAS, AND THE LAWS OF THE SEVERAL STATES OF THE UNITED STATES, THIS LIMITED WARRANTY IS IN LIEU OF ALL OTHER WARRANTIES, EXPRESS OR IMPLIED, INCLUDING ANY IMPLIED WARRANTY MERCHANTABILITY AND/OR FITNESS PARTICULAR USE OR PURPOSE AND/OR ANY APPLIED WARRANTY OF NON-INFRINGEMENT.
- Page 178 Limited Warranty OR REPLACING THE RIM 857 WIRELESS HANDHELD HARDWARE, WHICHEVER GREATER. THE LIMITED WARRANTY WITH RESPECT TO THE RIM 857 WIRELESS HANDHELD DESKTOP SOFTWARE, DOCUMENTATION AND TO ANY FIRMWARE RESIDING ON THE RIM 857 WIRELESS HANDHELD HARDWARE IS SET FORTH SEPARATELY SOFTWARE...
- Page 179 Index setting options, 109 summary, 117 about tips, 117 Research in Motion, 16 using, 109 this guide, 16 viewing entries, 114 AC adapter agenda, see calendar connecting to cradle, 48 alarm activating your handheld, 22 description of, 13, 31 adding FAQs, 161 addresses, 110 fields, 150...
- Page 180 Index automatic on/off, description summary, 146 of, 152 tips, 146 using, 142 autotext using tape, 143 adding entries, 69 adding entries using a calendar macro, 70 adding appointments, 128 deleting entries, 72 agenda view, 127 description of, 68 appointment fields, 129 editing entries, 71 day view, 125 searching for entries, 72...
- Page 181 Index charger, description of, 21 chart of hot keys, 23 date and time, setting, 37, 153 choosing deleting send method, 63 addresses, 116 components appointments, 136 handheld, 19 autotext entries, 72 LCD screen, 28 entries on tape, 143 memos, 141 composing messages, 99 description of, 13, 30...
- Page 182 Index tasks, 13, 31 trackwheel, 20 FCC compliance, 3 turn radio on/off, 14, 32 file attachments desktop software sending, 82 application loader, 56 filing messages, 89 backup and restore, 57 FAQs, 166 formatting installing, 48, 55 automatic intellisync, 59 capitalization, 73 summary, 60 automatic punctuation, 74 using, 55...
- Page 183 Index home screen description of, 33 handheld FAQs, 163 changing password, 41 icons, 33 charger, 21 hot keys, 23 components, 19 connecting to PC, 48 cradle, 21 customizing options, 149 icons getting started, 19 function, 30 holster, 20 handheld status, 33 keyboard, 20 message status, 34 LCD screen, 19...
- Page 184 Index function menus, 32 messages function screens, 29 adding contacts from, 85 graphics, 36 attaching address book entries, 66 LED notification, 156 automatic level of importance, setting, 62 capitalization, 73 license agreement, 171 automatic punctuation, 74 composing, 50 limited warranty, 175 composing and sending locking the handheld, 14, 31, 41 tips, 76...
- Page 185 Index removing from saved messages list, 91 one-time messages, sending, 64 resending, 103 options saving, 89 description of, 14, 31 saving sent or received, 89 handheld, 149 saving while LED notification, 156 composing, 91 received messages, 79 searching, 93 scrolling through, 35 searching by sender, 98 setting for address sending, 50...
- Page 186 Index finding, 49, 158 entries from tape, 143 memos, 141 power on/off, description messages, 99 of, 14, 32 multiple messages, 101 punctuation open messages, 100 automatic, 74 searches, 98 FAQs, 166 tasks, 123 replying to response lists, 165 resending messages, 103 radio resetting the handheld, 166 turning off, 45...
- Page 187 Index performing one-time, 93 date and time, 37, 153 recalling, 95 handheld options, 149 saving, 93 level of importance, 62 search by sender, 98 message delete, 38 specifying terms, 93 message notification tips, 106 options, 37, 154 message options, 61 searching password security addresses, 116...
- Page 188 Index description of, 13, 31 editing, 122 unread messages, marking, 104 fields, 122 upgrading to version 2.0, 14 managing, 119 setting options, 119 using status icons, 121 address book, 109 summary, 137 application loader, 56 tips, 137 autotext, 68 using, 119 autotext to compose a viewing, 122 message, 67...
Need help?
Do you have a question about the RIM 857 Wireless Handheld and is the answer not in the manual?
Questions and answers