
Related Manuals for Grundig GDR730DABSOL


Summary of Contents for Grundig GDR730DABSOL
- Page 1 Gener8 Series The Gener8 Series DAB+ RECHARGEABLE & SOLAR DIGITAL RADIO GDR720DAB GDR730DABSOL The Gold Technical Support Line: 1902 215 259 Personal Product Support (Charges will apply at $2.95 per minute)
- Page 2 Gener8 Series Introduction Thank you for buying this GRUNDIG product, which is designed to give you many years of trouble-free service. You may already be familiar with using a similar unit, but please take time to read these instructions. Safety is important Your safety and the safety of others is very important.
-
Page 3: Safety Instructions
Gener8 Series Safety Instructions Ensure that you read all of the safety instructions before using this unit. Safety Considerations Position the power cable and other connected cables so that they are not likely to be walked on, pinched or where items can be placed on or against them. -
Page 4: Table Of Contents
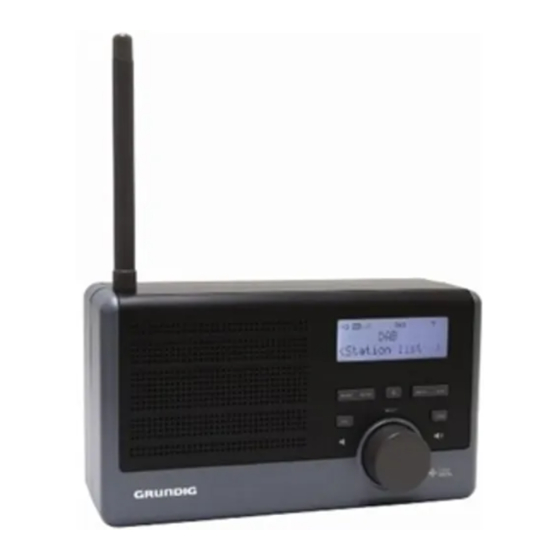
Gener8 Series Contents Safety Instructions …..…………………………………………………………………………….……………..Contents …..……..…..……………………………………………………………..…………….……………..Your DAB+ Radio …..…………………………………………………………………………….……………..What is DAB+………………………………………………………………………..…………….……………... Getting Started …………………………………………………………………….……………...……………… Using the AC Adaptor …………………………………………….……………….……………...……………… Using Solar Power ………………………………...……………………………….……………...……………… Using DAB+ Radio...……………………..…………………………………………….……………...…………. 10-16 Using DAB+ and FM Radio...……………………..…………………………………………….…………….… Using FM Radio …………………………………………………………………….……………...…………….. 18-21 Using AUX IN. - Page 5 Gener8 Series Your DAB+ Radio Note: Only for GDR730DABSOL, solar panel located on the top of the unit. Telescopic Aerial TUNE Button DC Input Socket LCD Display SELECT Knob Aerial Storage Slot PRESET & MODE Button VOLUME Button Battery Compartment MENU &...
-
Page 6: Your Dab+ Radio
Gener8 Series What is DAB+ DAB+ was developed in Europe by a consortium of broadcasters and manufacturers. DAB+ uses digital compression techniques to transform the source material, i.e. music and speech, into better quality audio. Interference Free Reception Analogue systems suffer from an effect called “multipath distortion”. This is because waves do not behave in an orderly fashion, but bounce and reflect off buildings etc. -
Page 7: Getting Started
Gener8 Series Getting Started Carefully remove your DAB+ Receiver from the box. You may wish to keep the packaging for future use. In the Box Inside the box you will find: DAB+ Radio (Main Unit) Power Adapter User Guide Positioning your DAB+ Radio Place your DAB+ Receiver on a flat / stable surface. -
Page 8: Using The Ac Adaptor
Gener8 Series Using the AC Adaptor Both the GDR730DABSOL and GDR720DAB can be powered by using an AC adaptor (supplied), see instructions above, The GDR730DABSOL can be powered by solar power and both can be powered by rechargeable batteries, making these radios environmentally friendly and cost effective. Recharging via the AC Adaptor For prolonged life, the internal rechargeable battery pack should be charged for 24 hours prior to the first operation. -
Page 9: Using Solar Power
Gener8 Series Using Solar Power (for GDR730DABSOL only) Note: The solar panel will only deliver power to the radio, or charge the batteries under natural sunlight. It will not deliver charge in artificial light Recharging via Solar Power 1. Position the radio so that the built-in solar panel is in direct sunlight. ... -
Page 10: Using Dab+ Radio
Gener8 Series Using DAB+ Radio Tuning your DAB+ Radio 1. Remove the aerial from its storage slot at the back of the radio and carefully screw it into the whole provided on the top left of the radio. Carefully extend the telescopic aerial. 2. - Page 11 Gener8 Series Using DAB+ Radio DAB+ Menu Options...
-
Page 12: How To Browse Station Information
Gener8 Series Using DAB+ Radio Using DAB+ Radio How to Browse Station Information Whilst listening to your desired DAB+ Radio program, you can browse the station information by pressing the Button repeatedly. Please refer to the flow chart for direction. Signal Strength: Shows a signal bar with the strength of the current station you are listening to. -
Page 13: How To Show The Signal Strength
Gener8 Series Using DAB+ Radio Using DAB+ Radio How to Show the Signal Strength 1. Press the Button during play, the LCD screen will display a signal bar to show the signal strength. The indicator on the signal bar shows the minimum acceptable signal level. - Page 14 Gener8 Series Using DAB+ Radio Conducting a Manual Scan Press the Button and then turn the SELECT Knob until you see Manual Tune on the display. 2. Press the SELECT Knob to confirm, the display will show the channel number and frequency list. 3.
- Page 15 Gener8 Series Using DAB+ Radio 2. Press the SELECT knob to confirm. 3. Turn the SELECT Knob to select the desired DRC Mode and press the SELECT Knob to confirm. Changing Station Order 1. Press the Button and then turn the SELECT Knob until the Station Order menu is displayed. 2.
- Page 16 Gener8 Series Using DAB+ Radio How to Trim the Station Order Note: This will remove all inactive stations (stations with low reception) station list. 1. Press the Button and then turn the SELECT Knob until the Trim Stations menu appears on the display. 2.
-
Page 17: Using Dab+ And Fm Radio
Gener8 Series Using DAB+ & FM Radio Setting Station Presets Your radio can store 20 DAB+ & 20 FM Station Presets. To Store Presets: 1. While playing the station you wish to set as a preset, press and hold the Button. -
Page 18: Using Fm Radio
Gener8 Series Using FM Radio Converting to FM mode 1. Press the Button to switch between FM and DAB+ Modes. 2. Once you have selected FM mode the radio will show the beginning of the FM frequency range (87.50MHz) or will play the last FM station you were listening to. - Page 19 Gener8 Series Using FM Radio FM Menu Options...
- Page 20 Gener8 Series Using FM Radio To View Station Information in FM Mode Whilst listening to your desired FM Radio program, you can browse the station information by pressing the Button repeatedly. Please refer to the flow chart for direction. Program Type (PTY): This is a description of the type of program provided by the FM station or by the broadcaster.
- Page 21 Gener8 Series Using FM Radio Scan Setting 1. Press the Button and then turn the SELECT Knob, until the Scan Setting menu is displayed on screen. Press the SELECT Knob to confirm. Note: You can choose between ‘Strong Stations Only’ and ‘All Stations’. If you choose ‘Strong Stations Only’ the station list will show only the stations with strong signal strength.
-
Page 22: Using Aux In
Gener8 Series Using AUX IN AUX IN Operation Mode 1. Whilst your radio is in On mode, connect one end of your Auxiliary cable to the Headphone (or Auxiliary Output) Socket of your source device (MP3 Player or iPod). Then connect the other end to AUX IN Socket on the rear of your radio. -
Page 23: System Setup
Gener8 Series System Setup System Setup System Setup 1. Press the Button and then turn the SELECT Knob until you see the System Menu on the display. 2. Press the SELECT Knob to confirm. 3. Once in the System Menu, turn the SELECT Knob to cycle through the Menu options, including „Sleep‟, „Time‟, „Backlight‟, „Language‟, „Factory Reset‟... -
Page 24: Setting The Clock
Gener8 Series System Setup Setting the Clock 1. After entering the System Menu, select the Time option and press the SELECT Knob to confirm. Note: a. You can set the clock by two ways, ‘Manually’ or ‘Auto Update’. b. Auto Update is updated from your DAB+ broadcaster. Choose 12/24 Hour Format When you have entered the Time Menu, you will be asked to set either 12 or 24 hour format. - Page 25 Gener8 Series System Setup b.) Turn the SELECT Knob to change the hours and then press the SELECT Knob to confirm. c.) Once hours have been confirmed. Turn the SELECT Knob change the minutes. Press the SELECT Knob to confirm. You will now be asked to set the date. d.) Using the same method as above set the date as desired.
- Page 26 Gener8 Series System Setup System Setup Setting the Backlight Level 1. In the System Menu you will be able to select Backlight option. To change these settings press the SELECT Knob to confirm. 2. Once in the Backlight Menu, turn the SELECT Knob to select the Backlight level you desire to be displayed during On mode.
- Page 27 Gener8 Series System Setup Conducting a Factory Reset Note: Conducting a Factory Reset will reset and delete all of the settings and stored stations. It will return the radio to its original factory settings. 1. In the System Menu, turn the SELECT knob to select the Factory Reset option. Press the SELECT Knob to confirm.
-
Page 28: Troubleshooting And Technical Specification
Gener8 Series Troubleshooting and Technical Specification Troubleshooting If a fault occurs, first check the points listed below before taking the radio for repair. If you are unable to solve a problem by following the below hints we suggest you consult you retailer or service professional. WARNING: Under no circumstances should you try to repair the unit yourself, as this would invalidate the warranty. -
Page 29: Warranty
In the unlikely event that your product fails to work normally, please contact the GRUNDIG Warranty on 1800 509 394 (Australia) or 0800 450 259 (New Zealand) and have your receipt of purchase on hand. - Page 30 Gener8 Series PO BOX 6287 Silverwater NSW 1811 www.grundig.net.au...
Need help?
Do you have a question about the GDR730DABSOL and is the answer not in the manual?
Questions and answers