Table of Contents
Advertisement
Advertisement
Table of Contents

Related Manuals for Grundig GDR740DABER


Summary of Contents for Grundig GDR740DABER
- Page 1 REPLAY Series...
- Page 2 REPLAY Series Congratulations Congratulations on purchasing this GRUNDIG product, which is designed to give you many years of trouble-free service. You may already be familiar with using a similar unit, but please take time to read these instructions. Safety is important Your safety and the safety of others is very important.
-
Page 3: Safety Instructions
REPLAY Series Safety Instructions Ensure that you read all of the safety instructions before using this unit. Safety Considerations Position the power cable and other connected cables so that they are not likely to be walked on, pinched or where items can be placed on or against them. -
Page 4: Table Of Contents
REPLAY Series Contents Safety Instructions …..………………………………………………………………………….……………..………………..…………….…………… Your DAB+ Radio …..………………………………………………………………………….……………..…………………..……….……………..What is DAB+ ……………………………………………………………………..…………….……………...………………..…………….……………..Getting Started ………………………………………………………………….……………...………………………………..…………….……………... Using DAB+ Radio ...……………………..………………………………………….……………...………….…..……………..…………….……………. Presets ……………..……………………..………………………………………….……………...………….…..……………..…………….……………. Setting Timed Recordings ……………………………………………………………………………………………………………………… Using and Recording from the EPG ………………………………………………………………………………………………..……… Setting a One Touch Recording ……………………………………………………………………………………………………………… Using FM Radio …………………………………………………………………….……………...……………..……………….…………….…………….. -
Page 5: Your Dab+ Radio
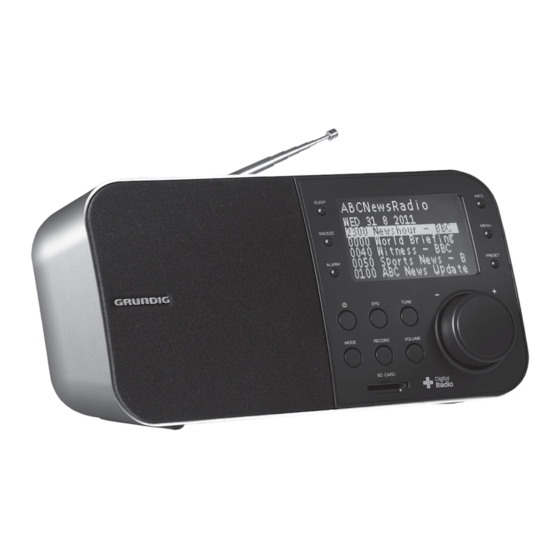
REPLAY Series Your DAB+ Radio Front Back Button & sockets Descriptions Press to turn On/Off Radio STANDBY Button MODE Button Press to switch between modes (DAB+/FM/Aux In/SD Card) RECORD Button Press to record and set recordings (in DAB+ and FM mode only) SD CARD slot Input SD Card in order to record to this device The Electronic Program Guide (EPG) provides start/finish times and program... -
Page 6: What Is Dab
REPLAY Series What is DAB+ Antenna Position Antenna for better signal of DAB+/FM programs of your radio DAB+ was developed in Europe by a consortium of broadcasters and manufacturers. DAB+ uses digital compression techniques to transform the source material, i.e. music and speech, into better quality audio. Interference Free Reception Analogue systems suffer from an effect called “multipath distortion”. -
Page 7: Getting Started
REPLAY Series Getting Started Carefully remove your DAB+ Receiver from the box. You may wish to keep the packaging for future use. In the Box Inside the box you will find: DAB+ Radio (Main Unit) Power Adapter User Guide Positioning your DAB+ Radio Place your DAB+ Receiver on a flat / stable surface. -
Page 8: Using Dab+ Radio
REPLAY Series Using DAB+ Radio Turning the Unit On Connect the Power Adaptor to the DC socket on the back of the unit. Then insert the Power Adaptor into the desired wall outlet. Press the Button to turn on the unit, and then carefully extend antenna. ... - Page 9 REPLAY Series Using DAB+ Radio DAB+ Menu Options...
- Page 10 REPLAY Series Using DAB+ Radio Using DAB+ Radio Browsing Station Information Whilst listening to your desired DAB+ Radio program, you can browse the station information by pressing the INFO Button repeatedly. Please refer to the flow chart for direction. Dynamic Label Segment (DLS): DLS is the scrolling text information supplied by the DAB+ station or by the broadcaster.
-
Page 11: Presets
REPLAY Series Using DAB+ Radio/Setting Timed Recordings Using DAB+ Radio/Presets Changing to Other Stations 1. While playing a DAB+ program, press the TUNE Button to enter the Station list. 2. Turn the SELECT Knob until the station you wish to listen to appears on the screen. 3. -
Page 12: Setting Timed Recordings
REPLAY Series Setting Timed Recordings 3. Once you have found your desired Preset position, press and hold the SELECT Knob until it says: “Preset # stored” ( # stands for the preset numbers 1-12 Playing a Preset Station To select a stored station: 1. - Page 13 REPLAY Series Setting Timed Recordings 4. Turn the SELECT Knob to scroll through options1/2/3, and press the SELECT Knob to confirm the one you wish, let us take setting Timed Recording 1 for instance. 5. Turn the SELECT Knob to scroll through recording timer1 options: Off/ Once/ Every Day/ Weekly/ Weekday/ Weekends, and press the SELECT Knob to confirm the one you favored.
-
Page 14: Using And Recording From The Epg
REPLAY Series Using and Recording from the EPG 9. Turn the SELECT Knob to starting hour as you wish, press the SELECT Knob to confirm. 10. Using the same method as step 9 set the minutes of your recording and duration in turn. ... -
Page 15: Setting A One Touch Recording
REPLAY Series Setting a One Touch Recording 4. Turn the SELECT Knob to navigate between programs based on the time that they are broadcast, and then press the SELECT Knob to select the program that you wish to view information for. Alternatively, you can press the Record button in order to set a recording for this program. -
Page 16: Using Fm Radio
REPLAY Series Using FM Radio 2. Once in FM mode, it will start at the beginning of the FM frequency range (87.50MHz), or will play the last FM station you were listening to. Automatic Scanning 1. Press the MENU Button, and it will say tune Mode. 2. - Page 17 REPLAY Series Using FM Radio FM Menu Options...
- Page 18 REPLAY Series Using FM Radio View Station Information in FM Mode Whilst listening to your desired FM Radio program, you can browse the station information by pressing the INFO Button repeatedly. Please refer to the flow chart for direction. Radio Text This is scrolling text information supplied by the FM station.
-
Page 19: Playing Aux In
REPLAY Series Playing AUX IN Playing Audio in AUX IN Mode Note: Your radio has an auxiliary audio input which you can use to allow your radio to be used as an external amplifier for MP3 players, compact disc players and similar devices. 1. - Page 20 REPLAY Series SD Card Playback/System Settings a. To fast forward, turn the SELECT Button Clockwise.. At the same time, the LCD will display “>>”. While the unit fast forwards, turn the SELECT Button counter-clockwise, or press this knob, the unit will resume playback at normal speed.
-
Page 21: System Settings
REPLAY Series System Settings 3. Turn the SELECT Knob to scroll through EQ Mode options: FLAT/POP/JAZZ/CLASSICAL/BASS, and press the SELECT Knob to confirm the one you preferred. Setting the Time Note: if your radio is displaying an incorrect time, you may find it is difficult for operating recordings via SD CARD. 1. - Page 22 REPLAY Series System Settings 3. Setting Alarm1 for example, turn the SELECT Knob to shift “OFF” to “ON”, corresponding alarm icon would be displayed on screen the moment you turn that alarm to “ON”. 4. Press the SELECT Knob to confirm “ON”, now, it indicates you to set Alarm Type: BEEP/DAB/FM. 5.
-
Page 23: Setting The Contrast
REPLAY Series System Settings System Setup The Alarm will sound again 9 minutes later, at this time, if you press the SNOOZE button again, it should count down again. To Turn Off the Alarm Note: a. If you want to turn alarm off temporarily, while alarm is on, press the button. -
Page 24: System Reset
REPLAY Series System Settings Setting Back Light for standby mode: Continue above step 2, turn the SELECT Knob to standby. Press the SELECT Knob to enter standby mode backlight setting. iii) Turn the SELECT Knob to cycle through options: High/Middle/Low, while your ideal one shows up, press the SELECT Knob to confirm, setting to low is recommended. -
Page 25: Adjusting The Volume
REPLAY Series System Setup Adjusting the Volume 1. Press the VOLUME Button and then turn the SELECT Knob to select your ideal volume level. -
Page 26: Troubleshooting And Technical Specification
REPLAY Series Troubleshooting and Technical Specifications Troubleshooting If a fault occurs, first check the points listed below before taking the radio for repair. If you are unable to solve a problem by following the below hints we suggest you consult your retailer or service professional. WARNING: Under no circumstances should you try to repair the unit yourself, as this would invalidate the warranty. -
Page 27: Warranty
In the unlikely event that your product fails to work normally, please contact GRUNDIG Warranty on 1800 509 394 (Australia) or 0800 450 259 (New Zealand) and have your receipt of purchase on hand. - Page 28 REPLAY Series PO BOX 6287 Silverwater NSW 1811 www.grundig.net.au...
Need help?
Do you have a question about the GDR740DABER and is the answer not in the manual?
Questions and answers