Table of Contents
Advertisement
Advertisement
Table of Contents

Related Manuals for Euromaid WM5


Summary of Contents for Euromaid WM5
- Page 1 Washing Machine...
-
Page 2: Safety Instructions
1 Warnings Safety instructions • This appliance must be connected to General Safety an earthed outlet protected by a fuse of • Never place your machine on a carpet suitable capacity. covered floor. Otherwise, lack of airflow • The supply and draining hoses must from below of your machine may cause always be securely fastened and remain in electrical parts to overheat. This may cause an undamaged state. problems with your washing machine. • Fit the draining hose to a washbasin or • If the power cable or mains plug is bathtub securely before starting up your damaged you must call Authorized Service machine. There may be a risk of being for repair. scalded due to high washing temperatures! • Fit the drain hose into the discharge • Never open the loading door or remove the housing securely to prevent any water filter while there is still water in the drum. leakage and to allow machine to take in • Unplug the machine when it is not in use. and discharge water as required. It is very • Never wash down the appliance with a important that the water intake and drain water hose! There is the risk of electric hoses are not folded, squeezed, or broken... -
Page 3: Installation Removing Packaging Reinforcement
2 Installation Removing packaging reinforcement Tilt the machine to remove the packaging reinforcement. Remove the packaging reinforcement by pulling the ribbon. • If you are going to use your double water- Opening the transportation locks inlet machine as a single (cold) water-inlet Transportation safety bolts must be unit, you must install the stopper*, supplied removed before operating the washing with your machine to the hot water valve. machine! Otherwise, the machine will be • If you want to use both water inlets of the damaged! product, you can connect the hot water 1. Loosen all the bolts with a spanner until hose after removing the stopper and they rotate freely (“C”) gasket group from the hot water valve. -
Page 4: Detergents And Softeners
Electrical connection Detergents and softeners Connect the machine to an earthed outlet Detergent Drawer protected by a fuse of suitable capacity. The detergent dra wer is composed of three compartments: Important: • Connection should comply with national The detergent dispenser may be in two regulations. -
Page 5: Program Selection
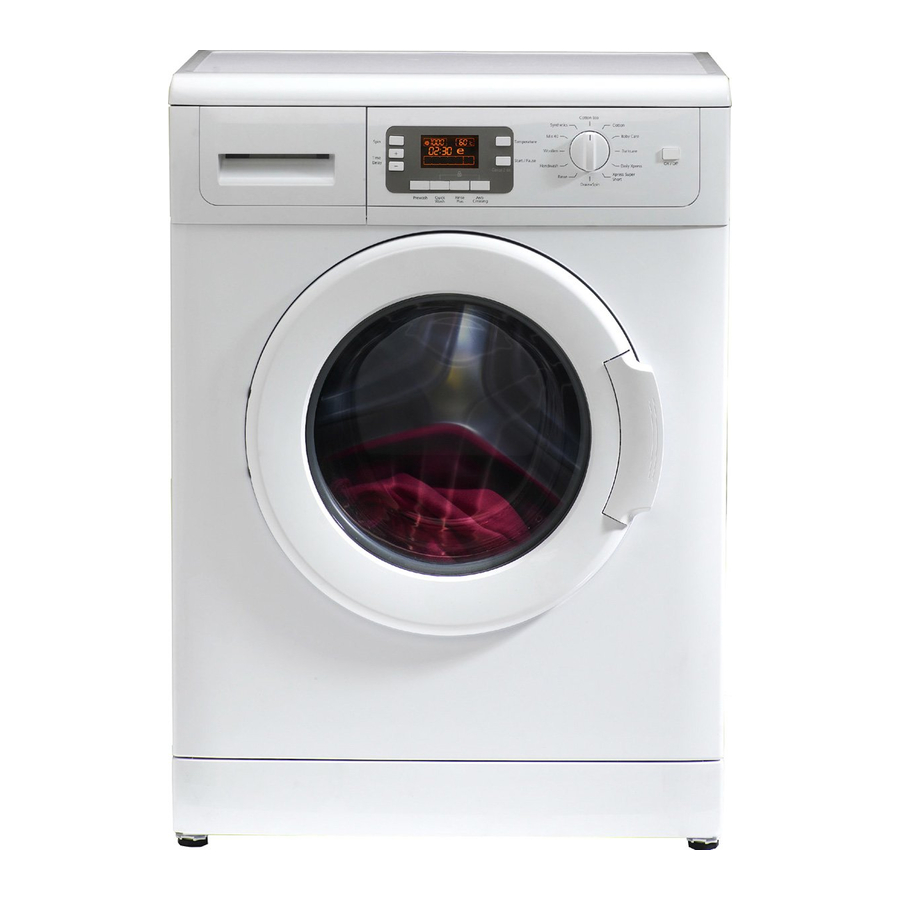
4 Selecting a Program and Operating Your Machine Control panel Figure 1 1 - Spin Speed Adjustment Button 5 - Auxiliary Function Keys 2 - Time Delaying Button (+/-) 6 - Program Selection Knob 3 - Temperature Adjustment Button 7 - Display 4 - Start/Pause/Cancel Button 8 - On/Off Button Display symbols... -
Page 6: Additional Programs
• Cotton programme washes your laundry with You can wash normally soiled durable cotton low mechanical movements and at low clothes with this program. Your laundry will temperature. We recommend you to use be washed with vigorous washing movements liquid detergent or woolen shampoo for dark during a longer washing cycle. -
Page 7: Consumption Table
rinse hold and no spin options are shown spin your laundry after the rinse hold function: respectively. - Adjust the spin speed. Rinse hold is shown with “ ” and no spin is - Press “Start/Pause/Cancel” button. shown with “ ” symbols. Program resumes. Your machine drains the water and spins your laundry. If you do not want to unload your clothes You can use no spin function in order to drain immediately after the program, you may use the water without spinning at the end of the... -
Page 8: Changing Selections After Program Has Started
and amount of laundry, auxiliary functions Auxiliary functions selected, and changes in the supply voltage. Auxiliary Function Selection Buttons Select the required auxiliary functions Time delay before starting the program. With the “Time delay” function you can delay Some combinations cannot be selected the program start up to 24 hours. Setting can together. (Ex.: Pre-wash) (Figure 1-5a) and be made in intervals of 30 minutes. -
Page 9: Maintenance And Cleaning
5 Maintenance and cleaning Switching the machine to standby Detergent Drawer mode Remove any powder residue buildup in the Press “Start/Pause/Cancel” button drawer. To do this; momentarily to switch your machine to the 1. Press the dotted point on the siphon in the standby mode. Auxiliary functions can be softener compartment and pull towards cancelled or selected in accordance with you until the compartment is removed from... -
Page 10: Cleaning The Pump Filter
Draining any remaining water and by pulling out the plug at the end of the hose. If the amount of water to be drained cleaning the pump filter off is greater than the volume of the Your product is equipped with a filter system container, replace the plug, pour the water which ensures a cleaner water discharge that out, then resume the draining process. extends pump life by preventing solid items • After draining process is completed, such as buttons, coins and fabric fibers from replace the plug into the end of the hose clogging the pump propeller during discharge and fit the hose back into its place. -
Page 11: Troubleshooting
6 Solution suggestions for problems Cause Explanation / Suggestion Program cannot be started or selected. • Machine may have switched to self • Reset your machine by pressing “Start/ protection mode due to an infrastructure Pause/Cancel” button for 3 seconds. (see, problem (such as line voltage, water Canceling a Program) pressure, etc.). There is water coming from the bottom of the machine. • Be sure the seals of the water inlet hoses are securely fitted. • There might be problems with hoses or • Tightly attach the drain hose to the tap. the pump filter. • Make sure that the pump filter is completely closed. Machine stopped shortly after the program started. • Machine can stop temporarily due to low • It will resume operating when the voltage is voltage. back to the normal level. It continuously spins. Remaining time does not count down. (For models with a display) • The automatic spin correction system might have been activated due to the unbalanced distribution of the laundry in the drum. -
Page 12: Specifications
7 Specifications Models Maximum dry laundry capacity (kg) Height (cm) Width (cm) Depth (cm) Net Weight (±4 kg) 220-240 V / 50Hz Electricity (V/Hz.) Total Current (A) 2000-2350 Total Power (W) 1000 Spinning cycle (rpm max.) Specifications of this appliance may change without notice to improve the quality of the product. Figures in this manual are schematic and may not match your product exactly. Values stated on the machine labels or in the documentation accompanying it are obtained in laboratory in accordance with the relevant standards. - Page 13 13 - EN...
- Page 14 14 - EN...
- Page 15 EMAIL: s ales@euromaid.com.au W EBSITE: ...
- Page 16 FOR O UTSIDE S ERVICE A REAS P LEASE C ONTACT O UR S ERVICE & C ARE C ENTRE A T N EWCASTLE 02 ...
Need help?
Do you have a question about the WM5 and is the answer not in the manual?
Questions and answers