Table of Contents
Advertisement
Advertisement
Table of Contents

Related Manuals for AEG COMPETENCE B8100-1


Summary of Contents for AEG COMPETENCE B8100-1
- Page 1 COMPETENCE B8100-1 The Versatile Built-in Oven Operating Instructions...
-
Page 2: Dear Customer
Dear customer, Please read these operating instructions carefully. Pay particular attention to the section “Safety information” on the first few pages. Please retain these operating instructions for later refer- ence. Pass them on to possible new owners of the appliance. The following symbols are used in the text: Safety instructions Warning: Information concerning your personal safety. -
Page 3: Table Of Contents
Contents Safety ............Disposal . - Page 4 Defrosting ........... . . 55 Defrosting Table .
-
Page 5: Safety
Safety Electrical Safety • The appliance may only be connected by a registered specialist. • In the event of any faults or damage to the appliance: remove fuses or switch off. • It is not permissible to clean the appliance with a steam or high pressure cleaner for safety reasons! •... - Page 6 To Avoid Damaging Your Appliance • Do not line your oven with aluminium foil and do not place a baking tray or dish on the oven floor, otherwise the oven enamel will be damaged by the resulting build up of heat. •...
-
Page 7: Disposal
Disposal Disposing of the packaging material All materials used can be fully recycled. Plastics are marked as follows: • >PE< for polyethylene, as used for the outer wrapping and the bags inside. • >PS< for polystyrene foam, e.g., as used for the padding materials. They are completely free of CFCs. -
Page 8: Description Of The Appliance
Description of the Appliance General Overview... -
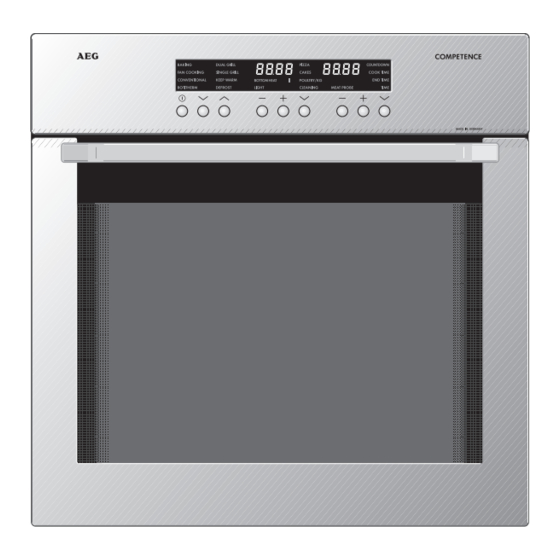
Page 9: Control Panel
Control Panel Mains button For switching the entire appliance on and off. Mains button on appliances with a metal front In the following text and in the illustrations the symbol N is always used to indicate the mains but- ton. -
Page 10: Oven Features
Oven Features Oven steam vent Steam from the oven is fed out below the door handle. Relates only to appliances with a metal front: Steam from the oven is fed out between the upper door edge and the control panel. -
Page 11: Oven Accessories
Oven accessories Combination shelf For dishes, cake tins, items for roasting and grilling. Baking tray For cakes and biscuits Fat tray For roasting or for collecting fat. Meat probe For determining exactly how far joints of meat are cooked. -
Page 12: Before Using For The First Time
Before Using for the First Time Setting the Time The oven will only operate when the time has been set. After connection to the mains or following a power failure “12.00” is illuminated and “TIME” flashes. 1. Using buttons + or - set the cur- rent time. -
Page 13: Initial Cleaning
Initial Cleaning Before using the oven for the first time you should clean it thoroughly. Important: Do not use any caustic, abrasive cleaners! The surface could be damaged. Tip: Use commercially available cleaners for metal fronts. Switch on the appliance using the mains button. -
Page 14: Using The Oven
Using the Oven The Electronic Oven Control General information • Always switch the appliance on first using the mains button N. • When the selected function is illuminated the oven starts to heat up and the set time begins to count down. •... -
Page 15: Oven Functions
Oven Functions The oven has the following functions: The BAKING, CONVENTIONAL and ROTITHERM functions include an au- tomatic fast warm up. This ensures that the selected temperature is reached as quickly as possible. BAKING Suggested temperature: 150 °C For baking cakes on one level and for pastries that need more brown- ing and a crispy base. - Page 16 DUAL GRILL Suggested temperature: 300 °C For grilling larger quantities of flat foods such as steaks, escalopes or fish, or for toasting. Top heat and the grill heating element are in use. SINGLE GRILL Suggested temperature: 300 °C For grilling flat foods placed on the middle of the shelf such as steaks, escalopes or fish, or for toasting.
-
Page 17: Changing The Oven Temperature
Switching On Oven Functions 1. Switch the appliance on with the mains button N. 2. Press selection button X or Y un- til the required function is illumi- nated. A suggested temperature will ap- pear in the temperature display. The temperature pilot light comes on while the oven is heating up. -
Page 18: Switching The Oven Off
Switching the Oven Off To switch the oven off press selec- tion button X or Y repeatedly un- til none of the oven functions is illuminated. Cooling fan The fan comes on automatically when the oven is in use in order to keep the surfaces of the appliance cool. -
Page 19: Inserting The Shelf And Universal Baking Tray
Inserting the Shelf and Universal Baking Tray Anti-tip device All slide-in units have a small bulge on the left and right. This bulge is an anti-tip device and must always point to the rear of the oven. Tray or universal baking tray: The anti-tip device must point to- wards the rear of the oven. -
Page 20: Inserting/Removing The Fat Filter
Inserting/Removing the Fat Filter The fat filter protects the rear wall heating element against splashes of fat when roasting. Inserting the fat filter Holding the fat filter by the tab, in- sert the two retainers into the opening on the rear wall of the oven (fan opening) from the top downwards. -
Page 21: Additional Functions
Additional Functions PIZZA To bake ready meals such as pizza, lasagne, foods au gratin and chips from the freezer. There is no need to pre-heat the oven as recommended on the packag- ing when this special additional function is used. Refer to the maker's instructions for preparation. - Page 22 CAKES For baking prepared cakes and cake mixtures. There is no need to pre- heat the oven as recommended on the packaging when this special ad- ditional function is used. Refer to the maker's instructions for preparation. Use the oven temperature for hot air. 1.
- Page 23 POULTRY To roast whole poultry on an automatic program where all you need to do is set the weight. 1. Prepare the poultry for roasting then place it breast down in the roast- ing dish and insert it on the shelf in the first oven position from the bottom.
-
Page 24: Meat Probe
Meat Probe To switch the oven off when the precise meat core temperature has been reached. Important: Only the meat probe delivered with the oven should be used! If a replacement is required use only an original spare part. 1. Push the tip of the meat probe as far as possible into the food that is to be cooked so that the tip is right in the centre of the food. - Page 25 After approx. 5 seconds the current meat core temperature will be shown in the time display on the right. The meat core temperature is dis- played from 30 °C upwards. Checking or changing the meat core temperature – The set meat core temperature can be displayed by pressing buttons + or - once.
-
Page 26: Clock Functions
Clock Functions COUNTDOWN To set a countdown. A signal sounds after the time has elapsed. This function does not affect the functioning of the oven. COOK TIME To set how long the oven is to be in use. END TIME To set when the oven is to switch off again. - Page 27 COUNTDOWN 1. Press clock function selection but- ton Y repeatedly until COUNT- DOWN is flashing. 2. Using buttons + or - set the re- quired countdown. (Max. 2 hours and 30 minutes.) After approx. 5 seconds the display will show the remaining time. COUNTDOWN is illuminated.
- Page 28 COOK TIME 1. Select oven function and temperature. 2. Press clock function selection but- ton Y repeatedly until COOK TIME flashes. 3. Using buttons + or - set the re- quired cooking time. After approx. 5 seconds the display will switch to the time. COOK TIME is illuminated.
- Page 29 END TIME 1. Select oven function and temperature. 2. Press clock function selection but- ton Y repeatedly until END TIME is flashing. 3. Using the + button set the time at which you want the oven to switch off. After approx. 5 seconds the display will revert to the time.
- Page 30 COOK TIME and END TIME Combined COOK TIME and END TIME can be used together if the oven is to switch on and off automatically at a later time. 1. Select oven function and temperature. 2. Using the COOK TIME function set the time required for the dish to cook.
- Page 31 Changing TIME 1. Press clock function selection button Y repeatedly until TIME flashes. 2. Using buttons + or - set the cur- rent time. 3. After approx. 5 seconds the flashing will stop and the clock will display the set time. The appliance is ready for use again.
-
Page 32: Other Functions
Other Functions Switching Off the Time Display By switching off the time display you can save energy. Switching off the time display 1. If necessary switch off the appliance with the mains button. 2. Press clock functions Y and + simultaneously until the display goes dark (approx. -
Page 33: Oven Child Safety Feature
Oven Child Safety Feature The oven is equipped with a child safety feature. As soon as the child safety feature is activated, the oven cannot be used. There must be no oven function selected if the child safety feature is to be switched on. -
Page 34: Button Locking Feature
Button Locking Feature To prevent a set oven function being adjusted unintentionally. Activating the button locking feature 1. If necessary, switch on the appli- ance using the mains button. 2. Select oven function. 3. Hold down oven function selec- tor buttons X and Y simulta- neously for approx. -
Page 35: Oven Safety Cut-Out
Oven safety cut-out If not switched off after a certain time, or if the temperature does not change, the oven switches off automatically. The indication "0.00" flashes, the temperature indicator light flashes, and a signal sounds. The oven switches off at temperatures of: 30 - 120°... -
Page 36: Uses, Tables And Tips
Uses, Tables and Tips Baking Use the BAKING, FAN COOKING or CONVENTIONAL oven functions for baking. Baking tins • Cake tins made of dark metal and coated tins are suitable for CON- VENTIONAL. • Baking tins made of light metal are also suitable for BAKING and FAN COOKING. - Page 37 General information • Remove the fat filter when baking, as otherwise the baking time is longer and the surface will brown unevenly. • Always count the shelf positions from the bottom upwards. • Insert baking sheets with the bevelled edge to the front! •...
-
Page 38: Baking Table
Baking Table Baking on one shelf position Type of cake or pastry Cakes in cake tins Ring-shaped or bowl-shaped cakes Madeira cake/ king cake Sponge cake Shortcrust pastry flan base Sponge flan base Covered apple flan Savoury flan (e.g., quiche lorraine) Cheesecake Cakes and pastries on baking trays... - Page 39 Type of cake or pastry Fruit flan (with a yeast dough/sponge base) Fruit flans on shortcrust pastry base Tarts with delicate fillings (e.g., curd cheese, cream, sugar-topped cakes) Pizza (with deep topping) Pizza (thin) Unleavened bread Flat sweet or savoury pies Biscuits Shortcrust biscuits Small piped biscuits...
- Page 40 Baking on several shelf positions Type of cake or pastry Cakes and pastries on baking sheets Cream puffs/eclairs Dry streusel cake Biscuits Shortcrust biscuits Small piped biscuits Sponge fingers Meringues Macaroons Small pastries made with yeast dough Small pastries made with puff pastry Bread rolls FAN COOKING...
-
Page 41: Tips For Baking
Tips for Baking Baking result The cake is under- Wrong shelf position cooked at the bottom The cake collapses Cooking temperature too high (is sticky, soft in the middle, damp patches) Cooking time too short Too much liquid in mixture Cake is too dry Cooking temperature too low Cooking time too long... -
Page 42: Pies And Gratin Table
Pies and Gratin Table Pasta bake Lasagne Vegetables au gratin Pizza ba- guettes Sweet soufflés Fish pies Stuffed vege- tables 1) Pre-heat the oven. Information printed in bold type indicates the best oven function for the dish. CONVENTIONAL Shelf posi- Tempera- Shelf posi- tion from... -
Page 43: Frozen Ready Meals Table
Frozen Ready Meals Table Food to be Shelf posi- cooked tion from bottom Frozen pizza Chips (300-600 g) Baguettes Fruit flan 1) Comment: Turn chips 2-3 times during cooking. When frozen foods are used the trays inserted may distort during cook- ing. -
Page 44: Roasting
Roasting Use the ROTITHERM or CONVENTIONAL oven functions for roasting. Ovenware for roasting • Any heat-resistant dish is suitable for roasting (refer to the manufac- turer's instructions!). • If the dish has plastic handles, check that they are heat-resistant (re- fer to manufacturer's instructions!). - Page 45 Notes on the roasting table Information is given in the table on suitable oven functions, tempera- ture settings, cooking times and shelf positions for various types of meat. The information is for guidance. • We recommend roasting meat and fish with a minimum weight of 1kg in the oven.
-
Page 46: Roasting Table
Roasting Table Type of meat Quantity Weight Beef Pot roast 1-1.5 kg Roast beef or fil- per cm of - rare thickness per cm of - medium rare thickness per cm of - well done thickness Pork Shoulder, neck 1-1.5 kg ham joint Chop, smoked 1-1.5 kg... - Page 47 Type of meat Quantity Weight Game Saddle of hare, up to haunch of hare 1 kg Saddle of venison 1.5-2 kg Haunch of venison 1.5-2 kg Poultry Poultry portions 200- 4-6 pieces 250 g Chicken halves 400- 2-4 pieces 500 g Chicken, 1-1.5 kg poulard...
-
Page 48: Meat Probe Table
Meat Probe Table Food to be Cooked Beef Pot roast Rib steak or fillet steak rare medium well done Pork Shoulder of pork, ham joint, neck Chop (saddle), smoked pork loin Meat loaf Veal Roast veal Knuckle of veal Mutton / lamb Leg of mutton Saddle of mutton Roast lamb, leg of lamb... -
Page 49: Grilling
Grilling To grill use the DUAL GRILL or SINGLE GRILL oven function with a tem- perature setting of 300 °C. Important: Always grill with the oven door closed. Always pre-heat the empty oven for 5 minutes using the grill func- tions! Ovenware for grilling •... -
Page 50: Bio-Functions
Bio-Functions The low temperatures that can be set on this oven enable meat to be cooked so that it is particularly tender and juicy. Yoghurt can also be made, dough proven and fruit dried in the oven. Caution: The suggested temperature must be changed for all bio- functions! When roasting at low temperatures you will need up to 20 percent less energy than when roasting conventionally. - Page 51 Notes on low temperature roasting The roasting times are only for guidance and are dependent on the type and quality of the meat or fish. • The thicker and heavier a piece of meat, the longer the browning time and subsequent final roasting time. •...
-
Page 52: Low Temperature Roasting Table
Low Temperature Roasting Table Food to be roasted Meat Roast beef Beef, veal fillet Saddle of veal Game Saddle of venison Leg of venison Fish Sea trout Salmon (middle piece) Zander / pike We recommend low temperature roasting for: tender, lean pieces of meat and fish. Low temperature roasting is not suitable for: e.g., pot roast, pork joints. -
Page 53: Making Yoghurt
Making Yoghurt Use the CONVENTIONAL oven function to prepare yoghurt. Ovenware for making yoghurt • Use cups or glasses of approx. 150ml capacity as containers for yo- ghurt and cover with foil or a lid. Shelf position • Place the shelf in the 3rd position from the bottom. 1. -
Page 54: Drying
Drying Use the FAN COOKING oven function for drying. Ovenware for drying • Line the shelf or baking tray with parchment or greaseproof paper. Shelf positions • You can dry foods on up to 2 positions simultaneously. • Insert the shelf or baking tray in the 1st and 4th position from the bottom. -
Page 55: Defrosting
Defrosting To defrost use the oven function DEFROST without setting a tempera- ture. Dishes for defrosting • Remove packaging and place the food on a plate on the shelf. • Do not use a plate or dish to cover as these significantly increase the defrosting time. -
Page 56: Preserving
Preserving Use the BOTTOM HEAT oven function for preserving. Preserving jars • For preserving use only commercially available preserving jars that are all the same size. Screw-top jars, jars with a bayonet fastening and metal containers are unsuitable. Shelf positions •... -
Page 57: Preserving Table
Preserving Table The stated times and temperatures are for guidance only. Preserves Soft fruit Strawberries, blueber- ries, raspberries, ripe 160-170 gooseberries Unripe gooseberries 160-170 Stone fruit Pears, quinces, plums 160-170 Vegetables Carrots 160-170 Mushrooms 160-170 Gherkins 160-170 Mixed Pickles 160-1700 Kohlrabi, peas, asparagus 160-170 Beans 160-170... -
Page 58: Cleaning And Care
Cleaning and Care Warning: For safety reasons cleaning the appliance with a steam jet cleaner or high-pressure water cleaner is not permissible! Exterior of the Appliance Wipe the front of the appliance with a soft cloth dipped in warm soapy water. -
Page 59: Accessories
“CLEANING” oven function Using the CLEANING oven function you can pre-heat the oven to the optimum temperature for oven sprays to take effect. Important: Only use oven sprays that require a heated oven. Refer to the manufacturer's instructions! 1. Press additional functions selection button Y repeatedly until “CLEAN- ING”... -
Page 60: Shelf Support Rails
Shelf Support Rails The shelf support rails on the left and right hand sides of the oven can be removed for cleaning the side walls. Removing the shelf support rails First pull the front of the rail away from the oven wall (1) and then un- hitch at the back (2). -
Page 61: Oven Lighting
Oven Lighting Warning: There is a danger of electric shock! Prior to changing the oven light bulb: – Switch off the oven! – Remove the fuses in the fuse box or switch off the circuit breaker. Place a cloth on the oven floor to protect the oven light and glass cover. -
Page 62: Cleaning The Oven Ceiling
Cleaning the Oven Ceiling The upper heating element can be folded down to make it easier to clean the oven ceiling. Folding down the heating ele- ment Warning: Only fold down the heat- ing element when the oven is switched off and there is no risk of being burnt! 1. -
Page 63: Oven Door
Oven Door The oven door of your appliance may be removed for cleaning. Removing the oven door 1. Open the oven door completely. 2. Completely fold back the brass- coloured clamping lever on both door hinges. 3. Grip the oven door with both hands on the sides and close it to about 3/4 going past the point of resist- ance. -
Page 64: Oven Door Glass
Oven Door Glass The oven door is fitted with three glass panels mounted one behind the other. The inner panels may be removed for cleaning. Warning: Carry out the following steps only when the oven door is un- hinged! When left on its hinges, the door could rise rapidly due to the lighter weight when the glass is removed and could cause injury. - Page 65 Inserting the middle door glass 1. Insert the middle glass panel at an angle from above into the section of the door in which the handle is located. 2. Lower the middle glass panel and slide it under the lower bracket to- wards the lower door edge as far as it will go.
-
Page 66: What To Do If
What to do if ... Symptom The oven does not heat The oven lighting does not come on. If you cannot rectify the fault with the help of the information given above, please contact your specialist dealer or customer service. Warning: Repairs to the appliance may only be carried out by qualified specialists. -
Page 67: Technical Data
Technical Data Oven Interior Dimensions Height x Width x Depth Capacity (usable capacity) Regulations, Standards, Directives This appliance meets the following standards: • EN 60 335-1 and EN 60 335-2-6 relating to the safety of electric appliances for household use and similar purposes and •... -
Page 70: Index
Index Accessories ..... . .11 Additional Functions ....21 Baking . -
Page 71: Service
Service The section "What do I do if...“ lists some faults that you can remedy yourself. Look there first if a fault occurs. Is it a technical fault? Then contact your nearest customer service centre. (Addresses and tele- phone numbers can be found under "Customer Service Centres“.) Always prepare in advance for the discussion. - Page 72 AEG Hausgeräte GmbH Postfach 1036 D-90327 Nürnberg http://www.aeg.hausgeraete.de © Copyright by AEG 822 947 538-A-101201-07 Subject to change without notice...
Need help?
Do you have a question about the COMPETENCE B8100-1 and is the answer not in the manual?
Questions and answers