D-Link DNS-1100-04 Product Manual
4-bay
Hide thumbs
Also See for DNS-1100-04:
- Quick installation manual (88 pages) ,
- Quick installation manual (77 pages)
Table of Contents
Advertisement
Quick Links
Advertisement
Table of Contents

Related Manuals for D-Link DNS-1100-04


Summary of Contents for D-Link DNS-1100-04
-
Page 2: Table Of Contents
System.Management.>.Email.Alerts......72 Getting Started ..............17 System.Management.>.Firmware.Upgrade....74 Connecting.To.The.Web.UI............17 System.Management.>.Logs...........75 Using.the.Setup.Wizard.............19 Network.Services.................77 Configuring.Additional.Hard.Drives........26 Network.Services.>.File.Sharing........77 Network.Services.>.Dynamic.DNS........82 Using The Web UI .............30 Network.Services.>.SNMP..........83 Overview.Of.The.Web.UI............30 Network.Services.>.Network.Discovery.Services..84 My.Favorites..................31 Status....................32 D-Link ShareCenter Pro 1100 User Manual... - Page 3 Appendix C: Setting Up a USB Print Server ....112 Appendix D: iSCSI Drive Mapping ........120 Appendix E: Hot-Swapping ...........129 Appendix F: Using Non-English Character Files ..130 Appendix G: Warranty ...........131 Appendix H: Registration ..........136 D-Link ShareCenter Pro 1100 User Manual...
-
Page 4: Product Overview
Section 1 - Product Overview Product Overview Introduction The.D-Link.ShareCenter®.Pro.1100.(DNS-1100-04).4-Bay.Network.Attached.Storage.handles.the.ever-growing.data.storage. requirements.for.households/SOHO.and.SMB.users..The.need.for.data.consolidation.and.data.sharing.makes.the.DNS-1100-04. an.ideal.storage.solution..Its.iSCSI.capability.delivers.blistering.transfer.rates.and.provides.an.extra.layer.of.stability..Additionally,. the.DNS-1100-04.supports.a.wide.array.of.features.and.functions.that.help.you.access.and.archive.the.files.you.need. The. DNS-1100-04. CD. contains. the. D-Link’s. EZ. Search. Utility..This. utility. allows. you. to. locate. the. ShareCenter®. Pro. 1100. automatically.and.map.drives.to.your.computer.on.the.fly..The.D-Link.EZ.Storage.Utility.allows.you.to.configure.the.device. and.set.IP.addresses.. Once.set.up.and.configured.on.your.network,.the.DNS-1100-04,.acts.as.a.FTP,.Web,.Music,.and.Multimedia.server..Windows®,. Mac®,.and.Linux.computers.on.the.network.can.access.data.stored.on.the.server.without.requiring.software.installation,.and. thanks.to.a.powerful.feature.set,.sensitive.data.can.be.securely.managed. D-Link ShareCenter Pro 1100 User Manual... -
Page 5: Package.contents
. „ Quick.Installation.Guide . „ Power.Cord . „ CAT5E.Ethernet.Cable . „ Front.Panel.Lock.Key Note: Use.the.power.supply.that.came.with.your.device..Failure.to.do.so.might.damage.the.unit.and.void.the.warranty.. Note: The.ShareCenter®.Pro.1100.should.only.be.maintained.by.authorized.staff.or.an.IT.administrator..The.front.panel.key.locks. the.device.and.keeps.intruders.from.tampering.with.the.device. If.any.of.the.above.items.are.missing,.please.contact.your.reseller. System Requirements For.best.results,.the.following.minimum.requirements.are.recommended.on.any.system.used.to.configure.and.access. the.ShareCenter®.Pro: . „ Computer.with.at.least:.1.Ghz.processor./.512.MB.RAM./.200.MB.available.space./.CD-ROM.drive. . „ Internet.Explorer.7,.Firefox.3.0,.Safari,.Chrome.3.0,.Opera.10.or.higher . „ Windows®.7/Vista®/XP.(SP3) . „ 3.5”.SATA.hard.drive(s). D-Link ShareCenter Pro 1100 User Manual... -
Page 6: Features
. „ iSNS . „ Power.management.to.conserve.energy.and.extend.hard. . „ Virtual.Disks drive.life . „ Thin-provisioning . „ Scheduled.power.on/off . „ . „ DDNS Hard.disk.hibernation . „ . „ Volume.Snapshot Smart.Fan.Speed.Control . „ . „ Up.to.64.iSCSI.Targets D-Link.Green.Ethernet D-Link ShareCenter Pro 1100 User Manual... -
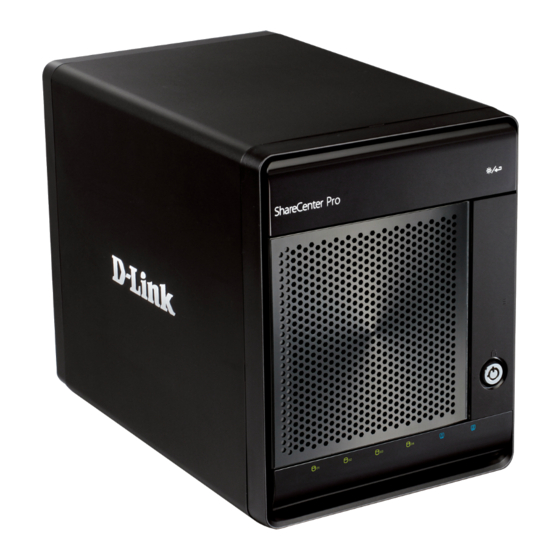
Page 7: Hardware.overview
Section 1 - Product Overview Hardware Overview Front Panel OLED.Screen OLED.Button Drive.Trays Front.Panel.Lock Power.Button COMPONENT DESCRIPTION Turn.the.key.to.the.up.position.to.unlock..Turn.key.to.left.position.to.lock. Front.Panel.Lock OLED.Button This.button.switches.the.OLED.screen.to.display.System,.HD.Volume.Information.and.Error.Messages. Drive.Trays The.drive.trays.allow.you.to.easily.install.and.change.hard.drives. Use.this.button.to.switch.the.device.on.or.off. Power.Button To.switch.on.the.device.press.the.button.once. To.switch.off.the.device.hold.the.button.down.for.5.seconds.. This.screen.displays.detailed.information.about.System.Information,.HD.Volume.Information,.and.Error. OLED.Screen Messages. D-Link ShareCenter Pro 1100 User Manual... -
Page 8: Hardware Overview
Section 1 - Product Overview Hardware Overview Front Panel Disk.LEDs.(1-4) LAN.LEDs.(1-2) Component Color Status Description Static Disk.is.ready Green Blinking Disk.is.being.accessed Disk.LED No.disk.installed.in.this.bay Static Disk.error.. Cannot.read/write Static A.network.connection.is.available Blinking The.network.is.active LAN.LED Blue The.network.is.inactive D-Link ShareCenter Pro 1100 User Manual... -
Page 9: Rear.panel.(Connections)
Section 1 - Product Overview Rear Panel (Connections) Cooling.Fan Reset.Button USB.Ports Gigabit.Ethernet.Ports Power.Connector Component Description Two.Gigabit.Ethernet.Ports.connect.the.ShareCenter®.Pro.1100.to.the.local.network.. Gigabit.Ethernet.Ports Connect.the.included.power.adapter.to.the.power.connector. Power.Connector The.USB.ports.can.be.connected.to.print.servers,.USB.storage.drives,.or.a.UPS.for.monitoring. USB.Ports Press.this.button.with.an.unfolded.paperclip.for.more.than.5.seconds. Reset.Button to.reset.the.unit.back.to.the.factory.default.sitting. The.cooling.fan.is.used.to.cool.the.hard.drives,.and.features.speed.control. Cooling.Fan D-Link ShareCenter Pro 1100 User Manual... -
Page 10: Using.the.oled.display
The. ShareCenter®. Pro. 1100. features. an. OLED. display. that. enables. the. administrator. to. easily. view. information. about. the. ShareCenter®.Pro.. The.OLED.screen.displays.system.information,.hard.drive.volume.information,.and.error.messages: System Information -.This.screen.shows.the.following.information: The.hostname.of.the.ShareCenter®.Pro The.IP.address.of.the.ShareCenter®.Pro The.hard.drive.slots.information Hard Drive Volume Information -.This.screen.shows.the.percentage.of.space.used.on.the.hard.drives. Error Messages -.This.screen.shows.error.messages.from.the.ShareCenter®.Pro. Press.the. button.to.cycle.between.the.different.Status.screens. D-Link ShareCenter Pro 1100 User Manual... -
Page 11: Hardware Setup
Section 2 - Hardware Setup Hardware Setup The.D-Link.ShareCenter®.Pro.1100.is.a.flexible.NAS.that.can.hold.four.hot-swappable.drives,.provides.auto.encryption.and.has. dual.Ethernet.ports..Let’s.take.a.closer.look. Installing Hard Drives The.D-Link.ShareCenter®.Pro.1100.takes.four.3.5”.hard.disk.drives..The.hard.drives.do.not.have.to.be.the.same.size..However,. to.create.a.RAID,.it.would.be.preferable.to.have.all.hard.drives.the.same.size..In.this.guide.we.show.how.to.take.the.hard.drive. cases.apart,.install.the.drives.and.turn.on.the.device.. To.install.a.hard.drive,.refer.to.the.following.steps: Step 1: Remove.a.hard.drive.cage.from.the.enclosure. D-Link ShareCenter Pro 1100 User Manual... - Page 12 Section 2 - Hardware Setup Installing Hard Drives (cont.) Step 2: Remove.the.plastic.bracket.inside.the.hard.drive.cage. Step 3: Place.a.3.5”.SATA.hard.drive.into.the.drive.tray,.and.screw.it.into.place.using.the. four.holes.on.the.sides.of.the.drive.tray. Step 4: Slide.the.drive.tray.into.the.enclosure. D-Link ShareCenter Pro 1100 User Manual...
- Page 13 Section 2 - Hardware Setup Installing Hard Drives (cont.) Step 5: Swing. the. drive. tray. door. closed. until. it. clicks. to. secure. the. drive. tray. in. the. enclosure. Follow.this.process.for.all.the.hard.drives.you.wish.to.install. D-Link ShareCenter Pro 1100 User Manual...
-
Page 14: Connecting.to.the.network
Section 2 - Hardware Setup Connecting To The Network Step 1: Plug.in.one.end.of.the.included.CAT5e.cable..into.one.of.the.Gigabit.Ethernet.ports. Step 2: Plug.the.other.end.of.the.CAT5e.cable.into.your.network.router.or.switch. D-Link ShareCenter Pro 1100 User Manual... -
Page 15: Connecting Power
Section 2 - Hardware Setup Connecting Power Step 1: Plug.the.power.adapter.into.the.power.connector.on.the.back.of.the.ShareCenter®. Pro. Step 2: Plug.the.other.end.of.the.power.adapter.into.a.power.outlet. D-Link ShareCenter Pro 1100 User Manual... -
Page 16: Powering.on.the.device.initially
Section 2 - Hardware Setup Powering On The Device Initially Before.connecting.to.the.ShareCenter®.Pro,.test.to.see.if.the.device.is.powered.on.correctly. Step 1: The.first.time.you.power.on,.eject.all.hard.drives.from.the.ShareCenter®.Pro. Step 2: Press.the.Power.button.on.front.of.the.ShareCenter®.Pro.and.wait.for.the.OLED. screen.to.display.Welcome to ShareCenter® Pro.. After.the.device.has.successfully.powered.on,.you.can.insert.and.lock.the.hard.drives. D-Link ShareCenter Pro 1100 User Manual... -
Page 17: Software Setup
Section 3 - Software Setup Software Setup Installing,.configuring,.and.creating.shares.on.the.fly.is.easy.with.the.ShareCenter®.Pro;.let’s.take.a.closer.look. Default IP Address During.the.initial.boot.sequence,.the.ShareCenter®.Pro.waits.to.be.assigned.a.DHCP.IP.address..If.it.does.not.receive.a.DHCP. assigned.IP.address,.the.ShareCenter®.Pro.reverts.to.its.Auto-IP.address..The.Auto-IP.address.information.is.located.on.the.label. located.on.the.back.of.the.device..The.Auto-IP.address.will.look.similar.to.169.254.xxx.xxx..The.default.Username.and.Password. information.is.just.below.the.IP.address.information. It.is.recommended.that.you.use.the.D-Link.EZ.Search.Utility.when.accessing.and.configuring.the.ShareCenter®.Pro.for.the. first.time,.as.it.will.be.able.to.automatically.find.the.ShareCenter®.Pro.on.your.network.and.allows.you.to.manually.set.its.IP. address..If.you.want.to.change.the.IP.address.before.logging.in.or.are.unable.to.connect.to.the.ShareCenter®.Pro’s.IP.address,. you.can.use.the.EZ.Search.Utility.provided.on.the.included.CD.to.locate.the.device.on.your.network.and.make.any.changes. D-Link ShareCenter Pro 1100 User Manual... -
Page 18: Running.the.ezsearch.utility
Section 3 - Software Setup Running The EZSearch Utility To.use.the.EZSearch.utility,.place.the.included.CD.into.your.computer’s.CD-ROM.drive,.and.open.it.. Step 1: Double-click.the.easy_search.file.to.start.the.EZSearch.utility.. Step 2: Select.the.device.you.want.to.configure,.then.click.the.Configuration.button..This. will.launch.your.default.web.browser.and.go.to.the.IP.address.listed.for.the.device.. Make.sure.your.browser.is.not.configured.to.use.a.proxy.server. Alternatively,.open.your.web.browser.and.type.in.the.IP.address.of.your.ShareCenter®. Pro. Note:.The.computer.used.to.access.the.web-based.configuration.manager.must.be. on.the.same.subnet.as.the.ShareCenter®.Pro..If.your.network.is.using.a.DHCP.server. and.the.computer.receives.IP.settings.from.the.DHCP.server,.the.ShareCenter®.Pro. will.automatically.be.in.the.same.subnet. D-Link ShareCenter Pro 1100 User Manual... - Page 19 Section 3 - Software Setup Running The EZSearch Utility (cont.) Here.is.a.closer.look.at.the.EZ.Search.Utility: Network Storage Device: The. EZ. Search. Utility. displays. all. detected. D-Link. NAS. or. ShareCenter®.Pro.devices.on.the.network.here. Refresh: Click.Refresh.to.refresh.the.device.list. Configuration: Click.Configuration.to.access.the.Web.based.configuration.of. the.ShareCenter®.Pro. LAN: Configure.the.LAN.Settings.for.the.ShareCenter®.Pro.here. Apply: Click.Apply.to.save.changes.to.the.LAN.Settings. iSCSI Drive Mapping: Displays.the.available.iSCSI.targets.on.the.ShareCenter®.Pro. Connect: Click.Connect.to.connect.to.the.iSCSI.target.
-
Page 20: Getting Started
Section 4 - Getting Started Getting Started Connecting To The Web UI Log. in. to. the. ShareCenter®. Pro. by. selecting. System Administrator (Admin).and.leaving.the.Password.field.blank,.then.click.the.Login. button. After.logging.in,.the.default.Web.UI.homepage.will.open.. page.will.open. If.there.are.no.drives.installed,.the.Disk Management.>.Volume.page. will.open. D-Link ShareCenter Pro 1100 User Manual... - Page 21 Section 4 - Getting Started Connecting To The Web UI (cont.) If.you.have.new.drives.installed,.the.Create Volume.window.will.appear.. The.ShareCenter®.Pro.will.detect.the.capacity.of.the.drive(s).and.will. prompt.you.to.select.a.RAID.level..Please.refer.to.Creating Your First Volume.in.the.next.section.for.more.information. Note:.If.there.is.only.one.drive.installed.in.the.system,.no.RAID.volume. can.be.created.and.the.hard.drive.will.act.as.a.standalone.volume. D-Link ShareCenter Pro 1100 User Manual...
-
Page 22: Using.the.setup.wizard
Section 4 - Getting Started Using the Setup Wizard The.Setup.Wizard.is.the.easiest.and.fastest.way.to.set.up.your.ShareCenter®.Pro..Once.you.have.entered.your.IP.address.into. the.browser,.follow.these.steps.to.get.started: Note: If.the.Create.Volume.window.is.open,.close.it.before.continuing. Step 1: Return.to.the.Web.UI.homepage.by.clicking.the. .icon.at.the.top.left. Step 2: Click.the.Setup.Wizard.icon. D-Link ShareCenter Pro 1100 User Manual... - Page 23 Section 4 - Getting Started Using the Setup Wizard (cont.) Step 3: The.ShareCenter®.Pro.System.Wizard.will.start.. Click.Next.to.continue. Step 4: Enter.the.settings.for.your.LAN.1.connection. Select.DHCP Client.if.your.network.environment.uses.DHCP. Otherwise,.select.Static IP.and.enter.the.IP Address,.Subnet Mask,.Jumbo Frame,. and.Gateway.details.provided.by.your.system.administrator..Leave.Jumbo Frame. as.Disabled.if.your.network.does.not.support.it. Set.up.the.VLAN.settings.according.to.your.virtual.LAN.. Enable.Port.Bonding.according.to.your.specified.needs.. Click.Next.to.continue. D-Link ShareCenter Pro 1100 User Manual...
- Page 24 Using the Setup Wizard (cont.) Step 5: Enter.the.settings.for.your.LAN.2.connection. Select.DHCP Client.if.your.network.environment.uses.DHCP. Otherwise,.select.Static IP.and.enter.the.IP Address,.Subnet Mask,.Jumbo Frame,. and.Gateway.details.provided.by.your.system.administrator..Leave.Jumbo Frame. as.Disabled.if.your.network.does.not.support.it. Set.up.the.VLAN.settings.according.to.your.virtual.LAN.. Click.Next.to.continue. Note:.If.you.are.not.configuring.the.ShareCenter®.Pro.to.use.the.LAN.2.port,.just. select.DHCP Client and.click.Next to.continue. Step 6: Enter.the.Host Name,.Primary DNS,.Secondary DNS,.and.Default Gateway.LAN. connection.you.wish.to.use. Click.Next.to.continue. D-Link ShareCenter Pro 1100 User Manual...
- Page 25 Section 4 - Getting Started Using the Setup Wizard (cont.) Step 7: Choose.whether.you.want.to.enable.or.disable.the.following.file.sharing.features: CIFS:. Common.Internet.File.System.provides.shared.access.to.files,.printers,. and.serial.ports. FTP:. File.Transfer.Protocol.provides.a.way.to.transfer.files.to.and.from.remote. computers. NFS:. Network.File.System.allows.a.client.computer.to.access.files.over.the. network.as.if.the.device.is.part.of.local.storage. DFS:. Distributed.File.System.is.a.remote.file.access.protocol.that.provides. faster.performance.over.slower.networks. Quota:. This.allows.you.to.set.disk.and.network.quotas. Click.Next.to.continue. D-Link ShareCenter Pro 1100 User Manual...
- Page 26 Select.a.RAID.level,.use.the.check.boxes.to.decide.which.drives.to.include.in.the. RAID.array,.then.click.Next.to.continue.. Standalone Standalone.requires.only.one.hard.drive.in.the.array..Each.hard. drive.is.its.own.volume. JBOD: JBOD.requires.a.minimum.of.two.hard.drives,.concatenates.the. hard.drives.in.a.linear.fashion,.and.creates.one.large.volume. geared.towards.maximum.available.space. RAID 0: RAID.requires.a.minimum.of.two.hard.drives..The.data.is.stored. in.a.striped.fashion.and.geared.towards.maximum.available. space.and.performance. Caution:.RAID.0.does.not.provide.data.redundancy. RAID 1: RAID.1.requires.a.minimum.of.two.hard.drives.and.mirrors.the. hard.drives.for.data.redundancy. RAID 5: RAID.5.requires.a.minimum.of.three.hard.drives.and.provides. data.striping.with.distributed.parity. RAID 6: RAID.6.requires.a.minimum.of.four.hard.drives,.and.stripes.data. and.double-parity.information.across.all.of.the.member.drives. Array: Click.the.check.box.to.select.the.corresponding.hard.drive.to. be.part.of.the.volume. Spare: Click.the.check.box.to.select.the.corresponding.hard.drive.as. a.spare.for.the.volume. D-Link ShareCenter Pro 1100 User Manual...
- Page 27 Section 4 - Getting Started Using the Setup Wizard (cont.) Step 9: If.you.are.using.a.RAID.1,.5,.or.6.array,.select.whether.you.want.to.enable.the.Auto- rebuild.function,.which.will.automatically.rebuild.the.RAID.when.a.failed.drive.has. been.replaced.with.a.new.one. Select.whether.you.want.to.enable.drive.encryption..If.you.enable.this.feature,. enter.a.password.to.use.in.both.of.the.text.boxes..Tick.Auto Unlock to.unlock.the. hard.drive.automatically.when.the.ShareCenter®.Pro.is.powered.on,.or.select.USB Key.to.save.the.password.on.an.external.USB.drive,.which.must.then.be.inserted. into.the.ShareCenter®.Pro.in.order.to.unlock.the.corresponding.encrypted.volume.. Click.Apply.to.save.your.settings.and.continue. Note:.You.can.only.select.Auto Unlock.or.USB Key;.you.cannot.enable.both. Step 10: A.summary.screen.of.your.changes.will.appear. Click.Apply.to.save.your.changes.and.continue,.or.click.Previous to.go.back.and. change.your.settings. D-Link ShareCenter Pro 1100 User Manual...
- Page 28 Section 4 - Getting Started Using the Setup Wizard (cont.) Step 11: A.confirmation.screen.will.appear.to.ensure.that.you.want.to.delete.all.data.on.the. disks.selected.for.your.new.volume. If.you.are.sure.you.want.to.continue,.click.Yes to.continue..The.new.volume.will.be. created,.and.may.take.a.while.to.complete. Step 12: After.creating.the.volume,.the.volume.will.be.formatted,.and.may.take.a.while.to. complete. Setup.of.the.ShareCenter®.Pro.is.complete,.and.you.can.start.using.it,.or.you.can. adjust.advanced.settings.by.using.the.Web.UI. D-Link ShareCenter Pro 1100 User Manual...
-
Page 29: Configuring.additional.hard.drives
Section 4 - Getting Started Configuring Additional Hard Drives You.can.install.up.to.four.hard.drives.in.the.ShareCenter®.Pro.1100..The.drives.can.be.individually.configured.and.configured. into.a.RAID.volume..Once.a.new.drive.is.installed,.a.volume.will.be.created.and.formatted.according.to.your.specifications.. Once.the.hard.drives.are.installed.in.the.ShareCenter®.Pro.1100,.the.drives.can.be.formatted.and.configured. Step 1: Install.your.additional.hard.drives.as.detailed.in.“Installing.Hard.Drives”.on.page.8. Step 2: Open.a.web.browser.and.go.to.the.IP.Address.displayed.on.the.ShareCenter®.Pro’s. OLED.screen,.and.log.in.to.the.Web.UI. If.you.cannot.see.the.IP.information.on.the.top.OLED.screen,.press.the.OLED.button. to.the.right.of.the.display.until.it.appears. Note:.For.more.information.on.connecting.to.the.Web.UI,.please.refer.to.“Using. the.Setup.Wizard”.on.page.19.. D-Link ShareCenter Pro 1100 User Manual... - Page 30 Section 4 - Getting Started Configuring Additional Hard Drives (cont.) Step 3: Click.Disk Management on.the.left,.then.click.Volume. Step 4: In.the.window.that.appears,.select.the.RAID.level.you.want.to.use.for.the.volume,. and.select.the.drives.you.want.to.use.for.the.volume..Click.OK.to.continue. D-Link ShareCenter Pro 1100 User Manual...
- Page 31 If. you. are. using. a. RAID. 1,. 5,. or. 6. array,. select. whether. you. want. to. enable. the. Auto-rebuild.function,.which.will.automatically.rebuild.the.RAID.when.a.failed.drive. has.been.replaced.with.a.new.one. Select.whether.you.want.to.enable.drive.encryption..If.you.enable.this.feature,. enter.a.password.to.use.in.both.of.the.text.boxes..Tick.Auto Unlock to.unlock.the. hard.drive.automatically.when.the.ShareCenter®.Pro.is.powered.on,.or.select.USB Key.to.save.the.password.on.an.external.USB.drive,.which.must.then.be.inserted. into.the.ShareCenter®.Pro.in.order.to.unlock.the.corresponding.encrypted.volume.. Click.Apply.to.save.your.settings.and.continue. Note:.You.can.only.select.Auto Unlock.or.USB Key;.you.cannot.enable.both. Step 6: A.confirmation.screen.will.appear.to.ensure.that.you.want.to.delete.all.data.on.the. disks.selected.for.your.new.volume. If.you.are.sure.you.want.to.continue,.click.Yes to.continue..The.new.volume.will.be. created,.and.may.take.a.while.to.complete. D-Link ShareCenter Pro 1100 User Manual...
- Page 32 Section 4 - Getting Started Configuring Additional Hard Drives (cont.) Step 7: After.creating.the.volume,.the.volume.will.be.formatted,.and.may.take.a.while.to. complete. Setup.of.the.ShareCenter®.Pro.is.complete,.and.you.can.start.using.it,.or.you.can. adjust.advanced.settings.by.using.the.Web.UI. D-Link ShareCenter Pro 1100 User Manual...
-
Page 33: Using The Web Ui
Contains.settings.for.Network,.Time.and.Date,.System.Settings,.Power. Management Management,.Email.Alerts,.Firmware.Upgrade,.and.Logs. Network Contains.settings.for.File.Sharing,.Dynamic.DNS,.SNMP,.and.Network. Services Discovery.Services. Applications Contains. settings. for. the. Web. File. Manager. and. Download. Management. Backup Contains. settings. for.Volume. Snapshot,. Local. Backup,. Remote. Backup.and.External.Bakup. Extension Pack Allows.the.ShareCenter®.Pro.administrator.to.add.more.applications. to.the.device. These.pages.and.their.configuration.options.will.be.discussed.in.detail.in.the.following.pages.of.this.manual. Note:.After.logging.in.to.the.ShareCenter®.Pro.for.the.first.time,.it.is.recommended.that.you.add.a.password.to.the.admin. account. D-Link ShareCenter Pro 1100 User Manual... -
Page 34: My.favorites
Section 5 - Using The Web UI My Favorites Click.the. .(Home.page).icon.to.see.the.My.Favorites.field.at.the.lower.half.of.the.window..To.add.a.category.in.My.Favorites,. click.an.arrow.key.next.to.a.folder.icon.to.display.all.categories.within.the.folder.in.the.left.window,.and.drag.the.category.to. the.My.Favorites.field..To.delete.a.category.in.My.Favorites,.drag.the.category.in.My.Favorites.field.to.the.left.window..Once. the.category.is.added.to.My.Favorites,.click.the. .icon.to.see.the.category.in.the.list..Click.to.directly.link.to.the.window.of.the. category. D-Link ShareCenter Pro 1100 User Manual... -
Page 35: Status
System Status. Step 2: Here,.you.can.find.various.information.about.the.current.status.of.the.ShareCenter®. Pro. Basic Information: Displays. the. model. name,. current. firmware. version. and. current.temperature.of.the.device. LAN 1/2 Info: Displays.the.local.network.settings.of.the.LAN.1.and.2.ports. Network Settings: Displays.the.host.name.and.DNS.information. Date and Time: Displays.the.current.date.and.time.settings. USB Disk: Displays.information.for.a.connected.USB.printer,.USB.storage. Information: drive,.or.UPS..Click.the.Unmount.button.to.remove.the.device. from.the.ShareCenter®.Pro. D-Link ShareCenter Pro 1100 User Manual... -
Page 36: Status.>.Hard.drive.status
Section 5 - Using The Web UI Status > Hard Drive Status Step 1: Click.on.the.Status folder.in.the.left.pane.of.the.ShareCenter®.Pro,.then.click.on. Hard Drive Status. Step 2: This.window.displays.information.about.the.vendor,.model.name,.temperature,. and.size.of.each.hard.disk.installed.in.the.ShareCenter®.Pro,.along.with.the.slot. they.are.installed.in. D-Link ShareCenter Pro 1100 User Manual... - Page 37 Section 5 - Using The Web UI Status > Hard Drive Status (cont.) Step 3: Double-click.a.hard.drive.to.open.a.window.that.displays.its.S.M.A.R.T..information. Click.the.Close.or. .button.to.go.back.to.the.Hard.Drive.Status.window. D-Link ShareCenter Pro 1100 User Manual...
-
Page 38: Disk.management
Section 5 - Using The Web UI Disk Management The.D-Link.ShareCenter®.Pro.1100.allows.you.to.manage.various.aspects.of.the.machine.-.primarily.the.disks..Let’s.take.a.look. Disk Management > Volume Step 1:Click.on.the.Disk Management.folder.in.the.left.pane.of.the.ShareCenter®.Pro,. then.click.on.Volume. Step 2:Here,.you.can.view.information.about.the.volumes.set.up.on.your.ShareCenter®. Pro..You.can.click.the.buttons.above.the.table.to.perform.various.actions: Create: Click.this.button.to.create.a.new.volume.. Delete: Click.this.button.to.delete.a.volume. Extend/Spare: Click.to.add.a.hard.drive(s).to.extend.a.volume,.or.set.a.spare.for. a.volume Migrate: Click.to.change.the.RAID.level.of.a.volume. Expand: Click.to.enlarge.a.volume.by.replacing.one.of.the.existing.hard. drive.with.a.larger.capacity.hard.drive. Unlock: Click.to.unlock.an.encrypted.volume Encryption: Click.to.configure.the.encryption.settings.of.the.volume. Auto Rebuild: Click.to.enable.or.disable.the.auto-rebuild.function. D-Link ShareCenter Pro 1100 User Manual... - Page 39 Section 5 - Using The Web UI Disk Management > Volume (cont.) Create:.Please.refer.to.“Using.the.Setup.Wizard”.on.page.19.. Extend/Spare:.Click.a.volume.and.the.Extend/Spare.button.to.see.the.following. window. Array: Click.the.check.box.to.extend.the.volume. Spare: Click.the.check.box.to.select.the.disk.to.be.a.spare.disk. Disk: Displays.the.configured.disk.number. Size: Displays.the.size.of.the.hard.disk. D-Link ShareCenter Pro 1100 User Manual...
- Page 40 Section 5 - Using The Web UI Disk Management > Volume (cont.) Migrate:.Click.a.volume.and.the.Migrate.button.to.see.the.following.window. The.windows.allows.you.to.change.the.RAID.level.of.the.volume..Choose.a.RAID. level.and.select.the.hard.disks.to.be.used.in.the.migration. Expand:.Click.the.Expand.button.to.see.the.following.window. Click.Yes.to.continue. Follow.the.instruction.in.the.State.column.to.expand.the.Volume. D-Link ShareCenter Pro 1100 User Manual...
- Page 41 The.Encryption.window.appears.and.there.are.four.tabs.in.the.window..This.window. displays.the.settings.in.the.Change.tab. Change Click. the. check. box. and. enter. the. new. password. in. New Password: Password.and.Confirm Password.fields. Auto Unlock: Click.the.check.box.to.automatically.unlock.the.volume.when. the.system.starts. USB Key: Click.the.check.box.to.save.the.password.to.a.USB.drive. This.window.displays.the.setting.in.the.Save.tab. Click.Save.to.save.the.password.to.local. This.window.displays.the.setting.in.the.Load.tab..Click.the.Load.button.to.get.the. password.from.the.local. Load Click.the.Browse.button.to.locate.the.path.of.the.password. password that.is.saved.to.the.local.computer. from local: D-Link ShareCenter Pro 1100 User Manual...
-
Page 42: Disk.management.>.Iscsi.target
Disk Management > Volume (cont.) This.window.displays.the.setting.in.the.Mail.tab. Click.Mail.to.send.the.password.to.the.administrator. Disk Management > iSCSI Target Step 1: Click.on.the.Disk Management.folder.in.the.left.pane.of.the.ShareCenter®.Pro,. then.click.on.iSCSI Target. Step 2: Click.the.iSCSI Manager.tab.to.see.the.following.window. Enable iSCSI Target: Click.the.check.box.to.enable.the.iSCSI.function.. Enable iSNS: Click.the.check.box.to.enable.the.Internet.Storage. Name.Service.function. iSNS Server IP: Enter.the.iSNS.server.IP.address.in.the.field. D-Link ShareCenter Pro 1100 User Manual... - Page 43 Section 5 - Using The Web UI Disk Management > iSCSI Targets (cont.) Step 3: Click.the.iSCSI Target.tab.to.see.the.following.window..An.iSCSI.target.shares.its. storage.capacity.with.the.iSCSI.initiator. Create: Click.the.button.to.add.a.new.target. Edit: Select.a.target.and.click.the.button.to.change.the.settings. Delete: Select.a.target.and.click.the.button.to.remove.the.target.from. the.list. Step 4: Click.the.Create.button. Pre-allocate: Click.the.Yes.radio.button.to.reserve.a.certain.amount.of.capacity. on.the.target.in.advance..Click.No.that.enables.thin.provisioning. to.provide.just.enough.storage.space.for.immediate.use. Name: Enter.a.name.in.the.text.box.to.identify.the.new.iSCSI.Target. Volume: Use.the.drop-down.list.to.select.the.volume.for.the.target. Size: Specify.the.size.of.the.iSCSI.target.in.gigabytes. Click.Next.to.continue.to.continue. D-Link ShareCenter Pro 1100 User Manual...
- Page 44 Section 5 - Using The Web UI Disk Management > iSCSI Targets (cont.) Step 5: After.clicking.Next,.the.CHAP.Settings.screen.will.appear. Enable: If. the. iSCSI. initiator. supports. Challenge. Handshake. Authentication. Protocol. (CHAP),. click. the. Yes. radio. button.. Click.the.No.radio.button.to.disable.it. Name: If.enabling.CHAP,.enter.the.CHAP.username.in.the.field. Password: If.enabling.CHAP,.enter.the.CHAP.password.in.the.field. Click.Apply.to.save.the.settings. D-Link ShareCenter Pro 1100 User Manual...
-
Page 45: Disk.management.>.Virtual.volumes
Step 1: Click.on.the.Disk Management.folder.in.the.left.pane.of.the.ShareCenter®.Pro,. then.click.on.Virtual Volumes. Step 2: The.Virtual.Volumes.screen.will.list.the.current.virtual.volumes,.and.has.buttons. for.the.following.functions: Create: Click.the.button.to.add.a.virtual.volume. Edit: Select.a.target.and.click.the.button.to.change.the.settings. Delete: Select.a.target.and.click.the.button.to.remove.the.virtual.volume. from.the.list. Format: When.using.the.virtual.volume.for.the.first.time,.the.volume.must. be.formatted.before.mounting.to.the.ShareCenter®.Pro. Connect/ Click. Connect. to. link. to. a. virtual. volume.. Click. Disconnect. to. Disconnect: terminate.the.connection. D-Link ShareCenter Pro 1100 User Manual... - Page 46 Disk Management - Virtual Volumes (cont.) Create:.Click.the.Create.button.to.open.the.Create Virtual Volume.window. Device IP: Enter.the.IP.address.of.the.device. Port: Enter.the.port.for.the.device. Search: Click.the.button.to.search.for.the.iSCSI.targets.on.the.network. Targets: Displays.the.available.iSCSI.targets. Share Folder: Enter.a.name.for.the.share.folder.to.access. Authentication: Click. the. Yes. radio. button. to. enable. the. authentication. function. User Name: Enter.the.user.name.for.authentication. Password: Enter.the.password.for.authentication Click.Apply.to.save.the.settings. D-Link ShareCenter Pro 1100 User Manual...
-
Page 47: Disk.management.>.Disk.diagnostic
Diagnostic.. Step 2: This. window. is. used. to. run. a. SMART. (Self-Monitoring. Analysis,. and. Reporting. Technology).or.Scan.test..The.hard.drive.is.grayed.out.if.it.does.not.support.SMART. Quick test: Click.to.run.a.quick.SMART.test..The.test.checks.the.electrical. mechanical,.and.read.performance.of.the.hard.drive. Extended test: Click.to.run.an.extended.SMART.test..This.takes.longer.time,. but.checks.more.thoroughly.and.complete.than.the.quick.test. Schedule: Click.to.configure.a.scheduled.test.for.the.selected.hard.drive. Stop: Click.to.stop.a.test Scan: Click.to.scan.if.there.are.any.errors.or.if.there.is.any.corruption. on.the.file.system. Format: Click.to.format.a.volume..All.data.on.the.volume.will.be.deleted. D-Link ShareCenter Pro 1100 User Manual... - Page 48 Section 5 - Using The Web UI Disk Management - Disk Diagnostic (cont.) Schedule:.Click.the.Schedule.button.to.open.this.window..Click.OK.to.save.your. changes. Schedule: Use. the. drop-down. menu. to. select. the. frequency. of. the. self-test.schedule. Type: Click.the.radio.buttons.to.select.the.type.of.the.test. Time: Use.the.drop-down.menu.to.select.hour.and.minute.of.the. day. Weekday: Use.the.drop-down.menu.to.select.which.day.of.the.week. Date: Use.the.drop-down.menu.to.select.a.date. Scan:.Click.the.Scan.button.to.see.this.window. Select.a.volume.and.click.Scan.to.start.to.check.the.file.system. D-Link ShareCenter Pro 1100 User Manual...
- Page 49 Section 5 - Using The Web UI Disk Management - Disk Diagnostic (cont.) Format:.Click.the.Format.button.to.see.this.window. Select.a.volume.and.click.Format.to.format.the.volume. A.warning.message.appears.to.make.sure.you.know.that.all.data.will.be.erased.on. the.volume.you.wish.to.format..To.format.the.volume,.click.Yes.to.continue. D-Link ShareCenter Pro 1100 User Manual...
-
Page 50: Account.management
The.D-Link.ShareCenter®.Pro.1100.allows.you.to.create.and.change.the.Administrator.Password..Let’s.take.a.look. Account Management > Admin Password Step 1: Click.on.the.Account Management folder.in.the.left.pane.of.the.ShareCenter®.Pro,. then.click.on.Admin Password. Step 2: Enter.the.administrator.user.name.and.the.original.password,.then.type.the.new. password.in.both.the.New.Password.and.Confirm.Password.text.boxes. Click.Apply.to.continue. Step 3: A. confirmation. window. will. appear. to. inform. you. that. the. changes. have. been. saved..Click.OK.to.continue. D-Link ShareCenter Pro 1100 User Manual... -
Page 51: Account.management.>.Users
Section 5 - Using The Web UI Account Management > Users Step 1: Click.on.the.Account Management folder.in.the.left.pane.of.the.ShareCenter®.Pro,. then.click.on.Users. Step 2: The.Users.screen.shows.a.list.of.the.users.currently.created.on.the.ShareCenter®.Pro.. Create: Create.a.new.user. Edit: Edit.an.existing.user. Delete: Delete.a.user. Import Users: Import.users.from.a.list. Create Batch: Create. users. automatically. by. creating. them. through. a. batch.process. D-Link ShareCenter Pro 1100 User Manual... - Page 52 Section 5 - Using The Web UI Account Management > Users (cont.) Create:.The.Create User.window.will.appear. Click.Next.to.continue. Enter.the.User.Name.and.Password.you.want.to.use.for.your.new.user..If.you.want. to.set.a.quota.for.the.user,.click.the.Set Quota.user.checkbox.and.enter.a.quota. in.megabytes. Click.Next to.continue. D-Link ShareCenter Pro 1100 User Manual...
- Page 53 Section 5 - Using The Web UI Account Management > Users (cont.) Select.the.groups.you.want.to.add.the.user.to. Click.Next to.continue. Select.the.share.folders.you.want.the.user.to.have.access.to. Click.Next.to.continue. D-Link ShareCenter Pro 1100 User Manual...
- Page 54 Section 5 - Using The Web UI Account Management > Users (cont.) A.summary.screen.will.show.you.all.the.details.of.the.user.you.just.created. Click.Apply.to.save.your.settings. Delete:.To.delete.users, click.the.checkbox.next.to.the.users.you.want.to.delete,. then.click.the.Delete button. Confirm.that.you.want.to.delete.the.selected.users.from.the.User.List,.then.click.Yes. D-Link ShareCenter Pro 1100 User Manual...
- Page 55 Next.to.continue. Click. Browse...,. and. select. the. user. list. text. file. you. want. to. import.. Click. the. checkbox. next. to. Overwrite duplicate accounts if. you. want. to. overwrite. any. existing.accounts.with.those.in.the.file.you.are.importing.from. Click.Next.to.continue. Note: Click.the.Download.button.to.see.an.example.user.list..txt.file..If.you.are.not. sure.how.to.create.this.file,.consult.a.systems.administrator.or.a.programmer.to. design.the.script.for.this.file. D-Link ShareCenter Pro 1100 User Manual...
- Page 56 Section 5 - Using The Web UI Account Management > Users (cont.) A.window.will.appear.with.all.the.users.from.the.file.. Click.Next.to.continue. Note: If.there.are.any.problems.with.the.users.detected.from.the.user.list.file,.you. will.see.error.messages.in.the.State.column,.and.you.will.need.to.fix.the.problems. with.the.file.before.you.can.continue. A.window.will.appear.showing.you.a.summary.of.the.users.that.were.imported. Click.Apply.to.save.the.settings.and.finish.the.import. D-Link ShareCenter Pro 1100 User Manual...
- Page 57 Create Number: Enter.the.total.number.of.the.users. Password: Enter.the.password.of.the.users Confirm Password: Retype.the.password Overwrite duplicate Click.the.check.box.to.replace.duplicate.accounts. Accounts: Set Quota: Click. the. Set. Quota. check. box. to. limit. the. storage. capacity. (in. megabyte). for. the. user..The. value. of. 0. means.an.unlimited.quota.size. Click.Next.to.continue D-Link ShareCenter Pro 1100 User Manual...
- Page 58 Account Management > Users (cont.) This.window.is.used.to.add.the.users.to.groups..If.there.is.no.entry.in.the.list,.you. can.go.to.Account Management.>.Groups.to.create.groups. Search: Enter.the.search.keyword.and.click. .to.search.for. the.group..Click. .to.clear.the.search.field.and.all. groups’.information.appears. Add: Click.the.corresponding.check.box.to.add.the.users. to.the.groups. Page: Displays. number. of. pages..You. can. enter. a. page. number.in.the.field.to.jump.to.the.specific.page..Click. First.Page.( ),.Previous.Page.( ),.Next.Page.( ).or. Last.page.( ).to.search.for.the.group. Refresh: Click. .to.update.the.group.list. Click.Next.to.continue. D-Link ShareCenter Pro 1100 User Manual...
- Page 59 Click. First. Page. . ( ),.Previous.Page.( ),.Next.Page.( ).or.Last.page.( ).to.browse.the.shared.folder.list. Refresh: Click. .to.update.the.folder.list. Click.Next.to.continue. D-Link ShareCenter Pro 1100 User Manual...
- Page 60 Section 5 - Using The Web UI Account Management > Users (cont.) This.window.displays.a.summary.of.the.configured.information. Click.Previous.to.modify.the.settings. Click.Apply.to.save.the.settings..Depending.on.the.number.of.users,.the.procedure. may.take.a.few.hours. D-Link ShareCenter Pro 1100 User Manual...
-
Page 61: Account.management.>.Groups
Section 5 - Using The Web UI Account Management > Groups The.D-Link.ShareCenter®.Pro.1100.allows.you.to.create.groups.for.users/shared.folders.to.access..Let’s.take.a.look. Step 1: Click.on.the.Account Management folder.in.the.left.pane.of.the.ShareCenter®.Pro,. then.click.on.Groups. Step 2: Here.you.can.manage.the.configured.groups.for.the.ShareCenter®.Pro. Create: Create.a.new.group. Edit: Edit.an.existing.group. Delete: Delete.an.existing.group. D-Link ShareCenter Pro 1100 User Manual... - Page 62 Section 5 - Using The Web UI Account Management > Groups (cont.) Create:.After.clicking.the.Create.button,.the.Create.Group.wizard.will.appear..Under. Group.Name,.type.in.the.name.of.the.group.you.want.to.create.and.click.Next.to. continue. Click.the.checkboxes.next.to.the.users.you.want.to.add.to.the.group,.then.click. Apply..The.new.group.will.now.appear.in.the.group.list. D-Link ShareCenter Pro 1100 User Manual...
-
Page 63: Account.management.>.Shared.folders
Section 5 - Using The Web UI Account Management > Shared Folders The.D-Link.ShareCenter®.Pro.1100.allows.you.to.create.shared.folders.for.users.to.access..Let’s.take.a.look. Step 1: Click.on.the.Account Management folder.in.the.left.pane.of.the.ShareCenter®.Pro,. then.click.on.Shared Folders. The. Shared. Folders. list. shows. the. shared. folders. currently. configured. on. your. ShareCenter®.Pro. Create: Create.a.new.shared.folder. Edit: Edit.an.existing.shared.folder. Delete: Delete.an.existing.shared.folder. D-Link ShareCenter Pro 1100 User Manual... - Page 64 Recycle Bin: When. enabled,. deleted. files. will. be. moved. to. a. recycle. bin.. If. this. is. disabled,. deleted. files. will. be. deleted.immediately,.and.cannot.be.recovered. Quota: If. the. checkbox. is. ticked,. the. share. folder. will. be. limited.to.the.quota.size.specified.in.the.text.box. After.making.your.changes,.click.Next.to.continue. D-Link ShareCenter Pro 1100 User Manual...
- Page 65 Section 5 - Using The Web UI Account Management > Shared Folders (cont.) Select.whether.you.want.all.users.to.be.able.to.use.the.shared.folder.or.only.specific. users,.then.click.Next.to.continue. For.the.selected.users,.select.what.access.rights.they.should.have.for.the.shared. folder.you.are.creating,.then.click.Next.to.continue. D-Link ShareCenter Pro 1100 User Manual...
- Page 66 Section 5 - Using The Web UI Account Management > Shared Folders (cont.) A.summary.window.will.show.you.the.shared.folder.settings.you.configured..Click. Apply.to.save.your.changes..The.new.shared.folder.will.now.appear.in.your.shared. folder.list. D-Link ShareCenter Pro 1100 User Manual...
-
Page 67: System.management
Section 5 - Using The Web UI System Management The.D-Link.ShareCenter®.Pro.1100.allows.you.to.manage.key.system.functions.of.your.NAS..Let’s.take.a.look. System Management > Network Step 1: Click.on.the.System Management.folder.in.the.left.pane.of.the.ShareCenter®.Pro,. then.click.on.Network. D-Link ShareCenter Pro 1100 User Manual... - Page 68 Subnet Mask: Enter.the.subnet.mask.for.the.IP.address. Jumbo Frame: Use.the.drop-down.menu.to.select.the.larger.frame.size.than. standard.Ethernet.frame.size. Gateway: Enter.the.gateway.IP.address.for.the.ShareCenter®.Pro. VLAN: Enable.or.disable.the.VLAN. VLAN ID: Enter.a.VLAN.ID.when.VLAN.is.enabled. Port Bonding: Enable.or.disable.port.bonding,.which.is.also.known.as.port. trunking..(LAN.1.screen.only) Option: Use.the.drop-down.menu.to.select.the.port.bonding.method.. Available. methods. are. Round. Robin,. Active. Backup,. XOR,. Broadcast,. 802.3ad,. Adaptvie.Transmit. Load. Balancing,. and. Adaptive.Load.Balancing..(LAN.1.screen.only) D-Link ShareCenter Pro 1100 User Manual...
- Page 69 Page: If.there.are.more.routes.than.the.window.can.display,.they. will. be. shown. across. multiple. pages..You. can. enter. a. page. number.in.the.field.to.jump.to.the.specific.page..Click.First.Page. . ( ),. Previous. Page. ( ),. Next. Page. ( ). or. Last. page. ( ). to. browse.the.route.list. Refresh: Click. .to.update.the.route.list. D-Link ShareCenter Pro 1100 User Manual...
- Page 70 Section 5 - Using The Web UI System Management > Network (cont.) Route > Create:.Click.the.Create.button.to.create.a.new.routing.path..After.you. finish.entering.the.details.of.the.new.routing.path,.click.Apply.to.save.the.new. routing.path. Network Address: Enter.the.IP.address.of.the.routing.path. Subnet Mask: Enter.the.subnet.mask.for.the.IP.address. Metric: Enter.an.integer.cost.metric.for.the.route. Interface: Use.the.drop-down.menu.to.select.the.interface. Gateway: Enter.the.forwarding.or.next.hop.IP.address. D-Link ShareCenter Pro 1100 User Manual...
-
Page 71: System.management.>.Time.and.date
This. screen. lets. you. set. the. time. and. date. of. your. ShareCenter®. Pro,. which. is. important.for.status.logs.and.scheduling. Current Time: Displays.the.current.time.of.the.ShareCenter®.Pro. Time Zone: Use.the.drop-down.menu.to.select.the.time.zone.of.your.area. Set from Click.the.radio.button.to.synchronize.the.ShareCenter®.Pro’s. Computer: time.with.your.computer. Set Manually: Click.the.radio.button.to.set.the.time.and.date.manually. Set from Click.the.radio.button.and.select.a.NTP.server.to.synchronize. NTP Server: the.ShareCenter®.Pro’s.time.with.the.NTP.server. D-Link ShareCenter Pro 1100 User Manual... -
Page 72: System.management.>.System.settings
Default Click.Restore.to.reset.the.ShareCenter®.Pro.back.to.the. Configuration: factory.default.settings. Web Timeout: Enter.a.period.of.time..If.the.web.is.idle.longer.than.the. time,.it.will.be.automatically.logged.out. System Overheat Toggle. between. Celsius. and. Fahrenheit. and. enter. a. Temperature: temperature.. Once. the. system. temperature. is. over. the. entered. temperature;,. the. ShareCenter®. Pro. will. automatically.shut.down. D-Link ShareCenter Pro 1100 User Manual... -
Page 73: System.management.>.Power.management
OLED Display: Use.the.drop-down.menu.to.select.an.idle.time,.after. which.the.OLED.will.be.turned.off. Auto Power Recovery: Click. Enable. to. have. the. power. restored. when. encountering.a.power.failure. Type: Use. the. drop-down. menu. to. select. the. fan. speed. modes.. Available. choices. are. Auto. (Off/Low/High),. Auto.(Low/High).and.Manual.(Always.on.High). D-Link ShareCenter Pro 1100 User Manual... - Page 74 Section 5 - Using The Web UI System Management > Power Management (cont.) Schedule Power On/Off Settings:.Click.the.Schedule.Power.On/Off.Settings.tab.to. open.this.window,.where.you.can.configure.schedule.for.turning.the.ShareCenter®. Pro.on.and.off.automatically..This.function.will.be.deactivated.if.the.scheduled. power.off.time.is.configured.for.the.same.time.as.a.firmware.update..After.changing. your.settings,.click.Apply.to.save.your.settings. Schedule Click.Enable.to.set.a.schedule.for.automatic.system.power. Power On/Off: on.and.off. Schedule On & Use.the.checkboxes.to.select.days.to.run.scheduled.power.on/ Schedule Off: off.for,.then.use.the.drop-down.menus.to.select.the.times.to. turn.the.device.on.and.off. D-Link ShareCenter Pro 1100 User Manual...
-
Page 75: System.management.>.Email.alerts
Section 5 - Using The Web UI System Management > Email Alerts Step 1: Click.on.the.System Management folder.in.the.left.pane.of.the.ShareCenter®.Pro,. then.click.on.Email Alerts. D-Link ShareCenter Pro 1100 User Manual... - Page 76 Enter. the. e-mail. address. to. include. as. the. sender. e-mail. address.for.e-mail.notifications. Receiver E-mail: Enter. the. e-mail. address. that. the. e-mail. alerts. should. be. sent.to. Test E-mail: Click.the.Test E-Mail.button.to.send.a.test.e-mail.using.the. settings.specified. Event Alert Use.the.check.boxes.to.select.events.you.want.e-mail.alerts. Settings: to.be.sent.out.for. D-Link ShareCenter Pro 1100 User Manual...
-
Page 77: System.management.>.Firmware.upgrade
Section 5 - Using The Web UI System Management > Firmware Upgrade Step 1: Click.on.the.System Management.folder.in.the.left.pane.of.the.ShareCenter®.Pro,. then.click.on.Firmware Upgrade. Step 2: Here,.you.can.update.the.firmware.of.your.ShareCenter®.Pro..Click.Choose File,. select.the.firmware.file.you.want.to.use,.then.click.Apply.to.update.your.firmware. Current Firmware Displays.the.version.of.the.firmware.currently.installed.on. Version: the.ShareCenter®.Pro. Firmware Date: Displays.the.date.of.the.firmware. File Path: Click.the.Browse.button.to.locate.the.firmware..You.must. save.the.firmware.to.the.local.hard.drive.of.your.computer. before.upgrading.the.firmware. D-Link ShareCenter Pro 1100 User Manual... -
Page 78: System.management.>.Logs
Section 5 - Using The Web UI System Management > Logs Step 1: Click.on.the.System Management.folder.in.the.left.pane.of.the.ShareCenter®.Pro,. then.click.on.Logs. Step 2: Log Settings:.Here,.you.can.configure.the.log.settings.based.on.your.needs..You. can.enable.the.following.logs: System Log: Keeps.a.log.of.your.system.stats. NFS: Enable.Network.File.Systems.to.access.files.over. the.network. CIFS: Provides.shared.access.to.files. FTP: File.transfer.Protocol.to.setup.file.transfer. Event: To.monitor.your.events.on.your.NAS. D-Link ShareCenter Pro 1100 User Manual... - Page 79 Save Log: Save.the.log.to.a.local.file. Page: If.there.are.more.log.entries.than.the.window. can.display,.they.will.be.shown.across.multiple. pages..You.can.enter.a.page.number.in.the.field. to. jump. to. the. specific. page.. Click. First. Page. . ( ),. Previous. Page. ( ),. Next. Page. ( ). or. Last. page.( ).to.browse.the.log.entries. Refresh: Click. .to.update.the.route.list. D-Link ShareCenter Pro 1100 User Manual...
-
Page 80: Network.services
Section 5 - Using The Web UI Network Services The.D-Link.ShareCenter®.Pro.1100.allows.you.to.monitor.and.configure.Network.Services..Let’s.take.a.look. Network Services > File Sharing Step 1: Click.on.the.Network Services.folder.in.the.left.pane.of.the.ShareCenter®.Pro,.then. click.on.File Sharing. Step 2: File Sharing:.Here,.you.can.configure.how.the.ShareCenter®.Pro.does.file.sharing.. You.can.enable.or.disable.CIFS,.FTP,.NFS,.DFS,.and.Quotas.by.using.the.radio.buttons.. After.making.your.changes,.click.Apply.to.save.your.changes. D-Link ShareCenter Pro 1100 User Manual... - Page 81 Click. Enable. to. restrict. the. bandwidth. of. each. FTP. connection.. Enter. the. number. in. KB/s. to. set. the. maximum.upload.and.download.speeds. Anonymous Support: Click.Enable.to.allow.anonymous.FTP.users.to.log.in. SSL/TLS Connection Only: Click. Enable. to. only. allow. SSL. or.TLS. connection. requests.from.FTP.clients. D-Link ShareCenter Pro 1100 User Manual...
- Page 82 C lick. F irst. P age. . ( ),.Previous.Page.( ),.Next.Page.( ).or.Last.page.( ).to. browse.through.the.share.folders. Refresh: Click. .to.update.the.group.list. D-Link ShareCenter Pro 1100 User Manual...
- Page 83 Select.this.if.the.device.will.be.part.of.a.workgroup.. Enter.the.name.of.the.workgroup.in.the.field. Active Directory: Select. this. if. the. device. will. be. part. of. an. Active. Directory.(AD). User Name: Enter.the.AD.server.account.name. Password: Enter.the.AD.server.account.password. DNS: Enter.a.DNS.IP.address.to.analyze.the.domain.name. of.the.AD.server. Workgroup: Enter.the.name.of.the.workgroup.which.should.be. the.same.as.the.computer’s.on.the.network. Realm Name: Enter.the.AD.server.domain.name. AD Server Name: Enter.the.AD.server.hostname. D-Link ShareCenter Pro 1100 User Manual...
- Page 84 .to.clear.the.search.field.and.see.all.the.entries. Page: If.there.are.more.shares.than.the.window.can.display,.they.will. be.shown.across.multiple.pages.. Y ou.can.enter.a.page.number. in.the.field.to.jump.to.the.specific.page..Click.First.Page. . ( ),.Previous.Page.( ),.Next.Page.( ).or.Last.page.( ).to. browse.through.the.shares. Refresh: Click. .to.update.the.group.list. DFS > Create:.Click.the.create.button.to.add.a.new.DFS.share. Host: Enter.an.IP.address,.a.host.name.or.a.URL.in.the.field. Remote share Enter.a.remote.share.folder.location.manually,.or.click. folder: the.Get Host Share Folder.button.to.search.for.one. Local share name: Enter.the.local.share.name.in.the.field. D-Link ShareCenter Pro 1100 User Manual...
-
Page 85: Network.services.>.Dynamic.dns
This. screen. allows. you. to. set. up. the. ShareCenter®. Pro’s. Dynamic. DNS. settings,. which.allows.you.to.automatically.update.your.dynamic.DNS.service.with.your. current.IP.address. Dynamic DNS: Click.the.radio.button.to.enable.or.disable.the.dynamic.DNS. function. Server Address: Use.the.drop-down.menu.to.select.a.dynamic.DNS.service. provider. Host Name: Enter.the.host.name. Username or Key: Enter.the.username.or.key.provided.by.the.dynamic.DNS. service.provider. Password or Key: Enter.the.password.or.key.provided.by.the.dynamic.DNS. service.provider. Verify Password Re-type.the.password.or.key. or Key: Timeout: Enter.a.time.in.hours.for.periodic.updates.from.the.dynamic. DNS.provider. Status: Displays.the.current.status.to.the.server. D-Link ShareCenter Pro 1100 User Manual... -
Page 86: Network.services.>.Snmp
Section 5 - Using The Web UI Network Services > SNMP Step 1: Click.on.the.Network Services.folder.in.the.left.pane.of.the.ShareCenter®.Pro,.then. click.on.SNMP. Step 2: Here.you.can.configure.the.ShareCenter®.Pro’s.SNMP.settings..SNMP.is.used.to. monitor.the.conditions.of.network-attached.devices. SNMP: Enable.or.Disable.SNMP. SNMP Community: Enter.the.name.of.the.SNMP.community. Notification: Enable.or.Disable.SNMP.notifications. Notification IP: Enter.the.IP.address.to.send.SNMP.notifications.to. D-Link ShareCenter Pro 1100 User Manual... -
Page 87: Network.services.>.Network.discovery.services
Step 2: The.Network.Discovery.Services.settings.are.as.follows: UPnP Discovery: Click. Enable. to. allow. the. ShareCenter®. Pro. to. be. discovered. on. a. network. via. the. UPnP. discovery. protocol. LLTD: Click. Enable. to. allow. the. ShareCenter®. Pro. to. be. discovered.by.the.network.map.function.on.Windows. Vista®.or.Windows®.7. D-Link ShareCenter Pro 1100 User Manual... -
Page 88: Applications
Select. whether. you. want. to. enable. or. disable. the.web.file.server. HTTP Port: Enter.the.port.number.for.the.web.file.server.to. use..Port.80.cannot.be.used.since.it.is.used.for. administration.purposes. SSL Connection: Choose. whether. to. enable. or. disable. HTTPS. connection.for.the.web.file.server. SSL Port: Enter. the. port. number. to. use. for. the. HTTPS. connections.to.the.web.file.server. D-Link ShareCenter Pro 1100 User Manual... -
Page 89: Applications.>.Download.manager
Click. the. First. Page. . ( ),.the.Previous.Page.( ),.the.Next.Page.( ).or.the. Last.page.( ).to.browse.through.downloads. Refresh: Click. .to.update.the.group.list. D-Link ShareCenter Pro 1100 User Manual... - Page 90 Enter. the. FTP,. HTTP. or. local. site. address. for. the. scheduled.download..Click.the.Test.button.to.see. if.the.URL.can.be.connected. Save To: Click.the.field.to.show.the.available.folders..Click.the. Create.button.to.add.a.new.folder..Double-click.a. folder.to.select.it. On.the.next.screen,.specify.the.download.schedule.for.the.job,.then.click.Apply.to. save.your.changes.and.create.the.download.job. Recurring Use.the.drop-down.menu.to.schedule.a.recurring. Download: download.time.every.day,.week,.or.month..Select. None.to.disable.the.recurring.download.job. When: Click. .to.select.the.year.and.date.for.downloading. Time: Use.the.drop-down.menu.to.select.the.downloading. time. Weekly: Select.a.day.of.the.week.for.the.recurring.download. Monthly: Select.the.month.of.the.recurring.download. D-Link ShareCenter Pro 1100 User Manual...
-
Page 91: Backup
Step 1: Click.on.the.Backup folder.in.the.left.pane.of.the.ShareCenter®.Pro,.then.click.on. Volume Snapshot. Step 2: The.Volume.Snapshot.page.is.used.to.create,.edit,.or.delete.a.snapshot.job..It.also. allows.you.to.take.a.snapshot.of.a.volume..The.ShareCenter®.Pro.supports.up.to. 10.snapshots.and.each.job.can.have.a.maximum.of.20.snapshots. Create: Click.to.add.a.new.snapshot.job. Edit: Select.an.entry.and.click.the.button.to.edit. Delete: Select. an. entry. and. click. the. button. to. remove. the. entry.from.the.list. Take Click.the.button.to.take.a.snapshot.of.a.volume. snapshot: Show Click.the.button.to.show.the.calendar.indicating.on. snapshot: which.dates.a.snapshot.has.been.taken. D-Link ShareCenter Pro 1100 User Manual... - Page 92 Folder: Click.the.field.to.show.available.folders..Click.a.folder.to.see. its.sub-folders..Double-click.a.folder.to.select.it. Count: Use. the. drop-down. menu. to. select. the. number. of. snapshots.for.this.job. Schedule: Use.the.drop-down.menu.to.select.whether.to.manually. schedule. the. job,. or. schedule. the. snapshot. on. a. daily,. weekly,.or.monthly.basis. Time: Use.the.drop-down.menus.to.select.hour.and.minute.of. the.day. Weekday: Use.the.drop-down.menu.to.select.the.day.of.the.week. Date: Use.the.drop-down.menu.to.select.the.day.of.the.month. D-Link ShareCenter Pro 1100 User Manual...
- Page 93 Click. the. First. Page. . ( ),.the.Previous.Page.( ),.the.Next.Page.( ).or.the. Last.page.( ).to.browse.through.snapshots. Refresh: Click. .to.update.the.group.list. D-Link ShareCenter Pro 1100 User Manual...
-
Page 94: Backup.>.Local.backup
Click. the. First. Page. . ( ),.the.Previous.Page.( ),.the.Next.Page.( ).or.the. Last.page.( ).to.browse.through.backup.jobs. Refresh: Click. .to.update.the.group.list. D-Link ShareCenter Pro 1100 User Manual... - Page 95 Enter.the.path.manually,.or.click.Local.to.locate.the.file/folder. to.be.backed.up..Click.the.Test.button.to.check.to.make.sure. the.file/folder.is.accessible. Save To: Select. a. folder. to. save. backups. to. by. clicking. the. field. to. show.available.folders..Click.the.Create.button.to.add.a.new. folder..Double-click.a.folder.to.select.it. Incremental Click. the. check. box. to. enable. incremental. backups;. all. Backup: backups.after.the.first.full.backup.will.be.on.an.incremental. basis,.which.minimizes.the.amount.of.data.that.needs.to.be. backed.up..Only.files.changed.since.the.last.backup.will.be. backed.up. D-Link ShareCenter Pro 1100 User Manual...
- Page 96 Select. None. to. disable. recurring. backups. When: Click. .to.select.the.year.and.date.for.backup. Time: Use. the. drop-down. menu. to. select. the. time. for. backup. Weekly: Select.a.day.of.the.week.for.recurring.backup. Monthly: Select.the.month.for.recurring.backup. D-Link ShareCenter Pro 1100 User Manual...
-
Page 97: Backup.>.Remote.backup
Backup > Remote Backup Step 1: Click.on.the.Backup folder.in.the.left.pane.of.the.ShareCenter®.Pro,.then.click.on. Remote Backup. Step 2: Remote Backup Server:.The.Remote.Backup.Server.tab.allows.you.to.enable.the. remote.backup.server.function.of.the.ShareCenter®.Pro..After.making.any.changes,. click.Apply.to.save.your.changes. Enable Remote Click.the.check.box.to.enable.the.remote.backup.server. Backup: function. Password: Enter.the.password.for.backing.up.files.and.folders.to. or.from.the.ShareCenter®.Pro..This.will.be.the.remote. backup. password..The. password. for. the. remote. NAS. should.be.the.same.as.the.password.of.the.ShareCenter®. Pro. D-Link ShareCenter Pro 1100 User Manual... - Page 98 Click. the. First. Page. . ( ),.the.Previous.Page.( ),.the.Next.Page.( ).or.the. Last.page.( ).to.browse.through.backup.jobs. Refresh: Click. .to.update.the.list. Remote Backup Job > Create:.Clicking.the.Create.button.will.open.the.Create. Remote.Backup.Job.wizard..Select.a.server.type,.then.click.Next to.continue. Server Type: Use.the.drop-down.menu.to.select.between.D-Link. NAS.Server.or.Rsync.Server. D-Link ShareCenter Pro 1100 User Manual...
- Page 99 Backup > Remote Backup (cont.) Remote Backup Job > Create (cont.):.Enter.the.Job.Name.and.Folder.Path,.then. click.Next.to.continue. Job Name: Enter.the.name.of.the.remote.backup.job. Folder Path: Click.the.field.to.select.the.source.file/folder.to.be. backed.up.remotely. Enter.the.Destination.Settings,.then.click.Next. IP of Remote Enter.the.IP.address.of.the.server. Server: Password: Enter.the.password.of.the.destination.server. Encryption Select.the.check.box.to.enable.SSH.encryption. Support: Keep Existing Select.the.check.box.to.keep.the.existing.files.(do. File: not.overwrite).if.there.are.duplicates,.and.create. backup.copies.instead. D-Link ShareCenter Pro 1100 User Manual...
- Page 100 Recurring Use. the. drop-down. menu. to. enable. a. recurring. Backup: remote.backup..This.can.be.done.on.a.daily,.weekly,. or.monthly.basis..Select.Backup now.to.start.the. backup.on.the.specified.date.and.time. When: Click. . to. select. the. year. and. date. to. run. the. backup. Time: Use.the.drop-down.menu.to.select.the.time.for.the. backup. Weekly: Select.a.day.of.the.week.for.recurring.backup. Monthly: Select.the.month.for.recurring.backup. D-Link ShareCenter Pro 1100 User Manual...
-
Page 101: Backup.>.External.backup
Select. the. USB. port. that. you. connected. your. USB. storage.drive.to. Select Path: Click. the. field. to. show.available. folders.to.save. the. backup.to..Click.the.Create.button.to.add.a.new.folder.. Double-click.a.folder.to.select.it. Mode: Select.the.Incremental Backup.check.box.to.enable. incremental. backups;. all. backups. after. the. first. full. backup.will.be.on.an.incremental.basis,.and.only.files. changed.since.the.last.backup.will.be.backed.up. D-Link ShareCenter Pro 1100 User Manual... -
Page 102: Extension.packs
Click. the. First. Page. . ( ),.the.Previous.Page.( ),.the.Next.Page.( ).or.the. Last.page.( ).to.browse.through.extension.packs. Page Click. .to.update.the.list. D-Link ShareCenter Pro 1100 User Manual... -
Page 103: Remote User Access
Section 6 - Remote User Access Remote User Access The.D-Link.ShareCenter®.Pro.1100.allows.users.to.access.the.DNS-1100-04.from.any.location.. Accessing The ShareCenter® Pro Remotely Step 1: Open.your.browser.and.enter.the.IP.address.of.your.ShareCenter®.Pro. Step 2: Enter.your.account.name.and.password,.then.click.the.Login.button.. Note:.If.you.do.not.know.your.account.name.and.password.please.contact.your. system.administrator. D-Link ShareCenter Pro 1100 User Manual... -
Page 104: Remote.user.access.>.Changing.your.password
Section 6 - Remote User Access Remote User Access > Changing your Password Step 1: Click.on.the.Account Management.folder.in.the.left.pane.of.the.ShareCenter®.Pro,. then.click.on.User Password. Step 2: To.change.your.password,.enter.your.user.name.and.current.password,.then.enter. your.new.password.in.the.New Password and.Confirm Password text.boxes,.then. click.Apply. D-Link ShareCenter Pro 1100 User Manual... -
Page 105: Remote.user.access.>.Web.file.manager
Section 6 - Remote User Access Remote User Access > Web File Manager Step 1: Click.on.the.Applications.folder.in.the.left.pane.of.the.ShareCenter®.Pro,.then.click. on.Web File Manager. Note:.You.must.have.the.Web.File.Manager.feature.enabled..For.more.information,. refer.to.“Applications.>.Web.File.Manager”.on.page.85. Step 2: The.AjaXplorer.interface.will.open..This.interface.allows.you.to.access.the.Shared. Folders.from.your.web.browser. D-Link ShareCenter Pro 1100 User Manual... - Page 106 Section 6 - Remote User Access Remote User Access - Web File Manager (cont.) Creating A New Directory:.In.the.browser.window.click.the.New Dir icon.and. enter.a.name.for.your.directory.and.click.OK. Creating A New File:.To.create.a.new.empty.file,.click.the.New File.icon.and.enter. a.name.for.your.file.and.click.OK. D-Link ShareCenter Pro 1100 User Manual...
- Page 107 Section 6 - Remote User Access Remote User Access - Web File Manager (cont.) Uploading files:.Click.the.Upload.icon,.then.click.the.Browse.button.and.select. the.files.you.want.to.upload. Downloading Files:.To.download.files,.click.the.file.you.want.to.download,.then. click.the.Download.button. D-Link ShareCenter Pro 1100 User Manual...
- Page 108 Section 6 - Remote User Access Remote User Access - Web File Manager (cont.) Renaming Files:.To.rename.a.file,.click.the.file.you.want.to.rename,.then.click.the. Rename button..Enter.the.new.name.for.the.file,.then.click.OK. Copying/Moving Files:.To.copy.or.move.a.file.to.another.location,.click.the.file.you. want.to.copy/move,.then.click.the.Copy or Move button..Select.the.location.you. want.to.copy.or.move.the.file.to,.then.click.OK. D-Link ShareCenter Pro 1100 User Manual...
- Page 109 Section 6 - Remote User Access Remote User Access - Web File Manager (cont.) Deleting Files:.Select.the.file.you.want.to.delete,.then.click.the.Delete.button.. Click.OK to.confirm.that.you.want.to.delete.the.file. Logging Out:.To.log.out.of.the.web.file.manager,.click.the.Log Out button. D-Link ShareCenter Pro 1100 User Manual...
-
Page 110: Appendix A: What Is Raid
The.ShareCenter®.Pro.supports.JBOD,.RAID 0,.RAID 1,.RAID 5,.and.Standalone. RAID 0: RAID 1: RAID.1.provides.mirroring.over.multiple.disks,.with.the. RAID.0.provides.data.striping,.which.spreads.out. same.read/write.speed.of.a.single.disk..A.RAID.1.array.can. blocks.of.data.over.all.drives,.but.does.not.provide. only.be.as.large.as.it’s.smallest.member.disk. data.redundancy. Because.the.data.is.stored.on.multiple.disks, Although. performance. is. improved,. the. lack. of. RAID. 1. provides. fault. tolerance. and. protection,. in. fault.tolerance.means.that.if.one.drive.fails,.all.data. addition.to.performance.advantages. in.the.array.will.be.lost. D-Link ShareCenter Pro 1100 User Manual... - Page 111 Appendix A - What Is RAID? RAID 5: RAID.5.provides.data.striping.with.distributed.parity,.which.stores.information.that.can.be.used.to.reconstruct.data..A.RAID.5. array.will.be.the.size.of.all.the.combined.disks.capacity.minus.the.capacity.of.one.disk,.e.g..If.there.are.4x.80GB.disks.in.the.array,. the.arrays.capacity.will.be.240GB.(3x80GB). Implementing.RAID.5.to.the.ShareCenter®.Pro.allows.it.to.continue.operating.even.if.one.of.the.disks.fails. The.diagram.below.indicates.the.operation.of.RAID.5: D-Link ShareCenter Pro 1100 User Manual...
-
Page 112: Appendix B: Mapping A Drive
Appendix B - Mapping a Drive Appendix B: Mapping a Drive You.can.use.the.D-Link.EZ.Search.Utility.to.map.drives.to.your.computer..Insert.the.ShareCenter®.Pro.CD.into.your.CD-ROM.drive. Click.Easy.Search.Utility. The.EZ.Search.Utility.will.load.and.detect.any.ShareCenter®.Pro.devices.that.are.on.the.local.network. D-Link ShareCenter Pro 1100 User Manual... - Page 113 Appendix B - Mapping a Drive If.the.ShareCenter®.Pro.you.are.working.with.does.not.show.up.in.the.device.list,.click.Refresh.. Highlight.an.available.ShareCenter®. Available. volumes. will. be. displayed. under. Drive. Mapping.. Highlight. the. volume.you.want.to.map. Select.an.available.drive.letter.from.the. drop-down.menu.and.click.Connect. Once.connected,.your.mapped.drive(s).will.appear.in.My.Computer. D-Link ShareCenter Pro 1100 User Manual...
- Page 114 Appendix B - Mapping a Drive Double-click. the. My. Computer. icon.on.your.desktop. Double-click.the.mapped.drive.to. access.the.files.and.folders. D-Link ShareCenter Pro 1100 User Manual...
-
Page 115: Appendix C: Setting Up A Usb Print Server
Appendix C - Setting Up a USB Print Server Appendix C: Setting Up a USB Print Server The.ShareCenter®.Pro.features.a.built-in.USB.print.server,.giving.users.the.ability.to.share.a.printer.on.their.local.network...Connect.a.USB.printer.to. the.USB.port.on.the.back.of.the.ShareCenter®.Pro..It.is.important.to.ensure.that.any.of.the.printer.manufacturer’s.drivers.are.already.installed.on. any.computer.you.want.to.print.from. To.add.a.printer: Click Start.and.select.Printers and Faxes. D-Link ShareCenter Pro 1100 User Manual... - Page 116 Appendix C - Setting Up a USB Print Server Select.Add a printer. The.Windows .Add.Printer.Wizard.will.launch: ® Click.Next.to.continue. D-Link ShareCenter Pro 1100 User Manual...
- Page 117 Appendix C - Setting Up a USB Print Server When.prompted.to.choose.a.local,.or.network. printer,.select.“A network printer, or a printer attached to another computer.”.. Click.Next to.continue. Select. “Browse for a printer”. and. click. Next to.continue. D-Link ShareCenter Pro 1100 User Manual...
- Page 118 Appendix C - Setting Up a USB Print Server Select. Double-click. DNS-1100-04. from. the. Shared.Printers.list.to.expand.the.tree. Select.the.available.USB.printer,.and.click.Next. to.continue. D-Link ShareCenter Pro 1100 User Manual...
- Page 119 Appendix C - Setting Up a USB Print Server The.following.printer.driver.messages.will.appear: Click.Yes to.continue. Click.OK.to.continue.and.select.a.printer.driver. Select.the.appropriate.printer.driver.from.the.list. and.click OK.to.complete.the.wizard..If.the.driver. is.not.in.the.list,.select.Have Disk. D-Link ShareCenter Pro 1100 User Manual...
- Page 120 Appendix C - Setting Up a USB Print Server Insert. the. print. driver. CD. or. browse. to. the. appropriate.directory. Select.the.appropriate.driver.file,.and.click.Open. to.continue. Click.OK.to.continue. D-Link ShareCenter Pro 1100 User Manual...
- Page 121 Appendix C - Setting Up a USB Print Server Verify.that.the.driver.is.correct,.and.click.OK.to. continue. The.wizard.will.install.the.printer.drivers,.and. return.a.completion.screen..Click.Finish. D-Link ShareCenter Pro 1100 User Manual...
- Page 122 Appendix C - Setting Up a USB Print Server The. printer. should. now. appear. as. an. available.printer. D-Link ShareCenter Pro 1100 User Manual...
-
Page 123: Appendix D: Iscsi Drive Mapping
Appendix D - iSCSI Drive Mapping Appendix D: iSCSI Drive Mapping The.iSCSI.Drive.Mapping.is.used.to.manage.the.iSCSI.settings.on.the.ShareCenter®.Pro.. Carry.out.the.following.to.configure.the.iSCSI.settings: 1..Click.the.listed.ShareCenter®.Pro. 2..The.available.iSCSI.target.names.in.the.. . iSCSI.Drive.Mapping.section.appear. Note:.If.you.cannot.see.the.latest.list,.click.the.Refresh button.to.update.the.status. Note:.You.will.need.to.create.iSCSI.volume.in.the.Disk Management >.iSCSI Target..Click.the.iSCSI.Targets.tab.to.see.the.iSCSI. target.name.in.this.section. D-Link ShareCenter Pro 1100 User Manual... - Page 124 Appendix D - iSCSI Drive Mapping The.different.parameters.in.the.iSCSI.Drive.Mapping.section.are.described.below: Name: Displays.the.names.of.the.available.iSCSI. targets.on.the.ShareCenter®.Pro. Active: Displays.Yes.if.the.target.is.active..Displays. No.if.the.target.is.not.active. Connect/ Choose. a. target. from. the. list. and. click. Disconnect: the. Connect/Disconnect. button. to. activate/deactivate. the.Target.. If. CHAP. authentication.has.been.enabled,.then.a. username.and.password.will.be.required. Management: Click.the.button.to.see.the.Management. window..The.window.allows.you.to.add,. delete,.mount.and.unmount.the.partition. D-Link ShareCenter Pro 1100 User Manual...
- Page 125 Appendix D - iSCSI Drive Mapping Configuring Targets 1..When. attempting. to. connect. a. target. . . for.the.first.time,.choose.the.target.from. . . the.list 2..Click.the.Connect.button. 3.. If. the. CHAP. is. enabled,. you. will. see. . . this.window.appears.requesting.CHAP .. User.and.Password. D-Link ShareCenter Pro 1100 User Manual...
- Page 126 (in. megabytes).in.the.Megabytes.field.. Format Type: Choose. whether. to. format. the. new. partition.with.NTFS.or.FAT32.by.ticking.the. appropriate.checkbox. Drive Letter: Choose.the.drive.letter.that.you.want.to. allocate. to. the. iSCSI. partition. from. the. drop-down.menu. When.you.have.finished.configuring.the.Target.Settings,.click.the.Format.button.to.see.the.window.below. D-Link ShareCenter Pro 1100 User Manual...
- Page 127 Appendix D - iSCSI Drive Mapping Configuring Disks This.window.appears.after.clicking.the.Format.button..Or,.select.a.target.in.the.iSCSI.Drive.Mapping.list.and.click.the.Management.button.to.see. the.window. The.Management.window.allows.you.to.manage.the.partition.on.the.disks.installed.in.the.ShareCenter®.Pro.and.Mount./.Unmount.the.disks. installed.in.the.ShareCenter®.Pro. The.Disk.Management.section.displays.the.following.parameters: Disk: Displays.the.ID.number.of.the.disk.installed. in.the.ShareCenter®.Pro. Partition: Displays.the.partition.number.of.the.disks. partition.. Volume: Displays.the.drive.letter.that.the.partition. is.mapped.to.on.the.client.machine. File System: Displays.the.File.System.that.the.partition. was.formatted.with. Capacity: Displays.the.total.capacity.of.the.partition. Target: Displays. the. iSCSI. target. name. of. the. partition. D-Link ShareCenter Pro 1100 User Manual...
- Page 128 Format Type: Choose. whether. to. format. the. new. partition.with.NTFS.or.FAT32.by.selecting. the.appropriate.checkbox. Drive Letter: Choose.the.drive.letter.that.you.want.to. allocate. to. the. iSCSI. partition. from. the. drop-down.menu. When.you.have.finished.configuring.the.partition.settings,.click.the.Format.button.to.add.the.new.partition. D-Link ShareCenter Pro 1100 User Manual...
- Page 129 Appendix D - iSCSI Drive Mapping Deleting an existing partition Right-click.an.existing.partition.and.click. Delete. D-Link ShareCenter Pro 1100 User Manual...
- Page 130 Appendix D - iSCSI Drive Mapping Mounting Disks When.a.partition.is.not.mounted,.a.*.(star).symbol.will.appear.in.the.Volume.column.in.the.Disk Management.list. Carry.out.the.following.steps.to.mount.a.disk: 1..Right-click.an.unmounted.partition.. . and.click.Mount. The.Drive.Select.window.appears. 2.. Select. the. drive. letter. in. the.Device .. drop-down.list. 3..Click.the.OK.button. D-Link ShareCenter Pro 1100 User Manual...
- Page 131 Appendix D - iSCSI Drive Mapping 3..The. mounted. disk. is. displayed. in. the. . . Disk Management.list. 4..The. newly. mounted. disk. is. displayed. .. in.the.My.Computer.window.and.can. .. be.used.as.if.it.was.a.locally.attached .. disk.. D-Link ShareCenter Pro 1100 User Manual...
-
Page 132: Appendix E: Hot-Swapping
Appendix E - Hot-Swapping Appendix E: Hot-Swapping The.ShareCenter®.Pro.supports.hot-swap.drive.trays..You.can.eject.or.insert.3.5”.SATA.hard.drive(s).when.the.ShareCenter®.Pro. is.operating. However,.if.the.hard.drives.are.created.into.various.levels.of.RAID,.you.cannot.hot.swap.all.the.hard.drives.at.the.same.time.. Hot.swapping.all.the.hard.drives.will.cause.a.loss.of.data,.and.the.RAID.volume.will.need.to.be.re-created.again..Different.levels. of.RAID.required.various.numbers.of.hard.drives.remaining.in.the.ShareCenter®.Pro. Standalone/JBOD/RAID O:.. T he.data.will.be.lost.and.the.volume.will.crash,.if.any.of.the.hard.drives.are.hot.swapped. RAID 1:.. Y ou.can.hot.swap.the.hard.drives.as.long.as.one.of.the.hard.drives.in.the.mirror.is.still.in.the.ShareCenter®.Pro..Removal. of.all.hard.drives.will.result.in.a.loss.of.all.data.and.volume.will.have.crashed. RAID 5:.. I n.a.RAID.5.volume,.it.is.only.possible.to.hot.swap.1.hard.drive.at.a.time.without.losing.all.data..This.is.because.a.RAID. 5.volume.can.only.tolerate.the.loss.of.1.hard.drive.and.still.continue.to.work..After.hot.swapping.a.hard.drive,.the. volume.must.first.be.rebuilt.before.another.hard.drive.can.be.hot.swapped,.otherwise.this.will.also.result.in.a.loss.of. all.data.and.the.RAID.volume.will.have.crashed. You.can.check.the.RAID.configuration.from.the.Disk Management.->.Volume.page.on.the.Web.UI..When.hot.swapping. hard.drives,.you.will.see.the.changes.in.the.Disk(s).column..Hot.swap.one.of.the.hard.drives,.make.sure.the.Disk.number.has. disappeared.from.the.Disk(s).column,.and.then.hot.swap.the.next.hard.drive. D-Link ShareCenter Pro 1100 User Manual... -
Page 133: Appendix F: Using Non-English Character Files
Appendix F - Using Non-English Character Files Appendix F: Using Non-English Character Files By.default,.the.ShareCenter®.Pro.supports.Unicode,.which.is.an.industry.standard.allowing.computers.to.consistently.represent. and.manipulate.text.expressed.in.most.of.the.world’s.writing.formats. D-Link ShareCenter Pro 1100 User Manual... -
Page 134: Appendix G: Warranty
Appendix G - Warranty Appendix G: Warranty Subject.to.the.terms.and.conditions.set.forth.herein,.D-Link.Systems,.Inc..(“D-Link”).provides.this.Limited.Warranty: •. Only.to.the.person.or.entity.that.originally.purchased.the.product.from.D-Link.or.its.authorized.reseller.or.distributor,.and •. Only.for.products.purchased.and.delivered.within.the.fifty.states.of.the.United.States,.the.District.of.Columbia,.U.S..Possessions. or.Protectorates,.U.S..Military.Installations,.or.addresses.with.an.APO.or.FPO. Limited Warranty: D-Link.warrants.that.the.hardware.portion.of.the.D-Link.product.described.below.(“Hardware”).will.be.free.from.material.defects.in.workmanship and.materials.under.normal.use.from.the.date.of.original.retail.purchase.of.the.product,.for.the.period.set.forth.below.(“Warranty.Period”),.except as.otherwise.stated.herein. •. Hardware.(excluding.power.supplies.and.fans):.Five.(5).year •. Power.supplies.and.fans:.One.(1).year •. Spare.parts.and.spare.kits:.Ninety.(90).days The.customer’s.sole.and.exclusive.remedy.and.the.entire.liability.of.D-Link.and.its.suppliers.under.this.Limited.Warranty.will.be,.at D-Link’s.option,.to.repair.or.replace.the.defective.Hardware.during.the.Warranty.Period.at.no.charge.to.the.original.owner.or.to.refund.the.actual purchase.price.paid..Any.repair.or.replacement.will.be.rendered.by.D-Link.at.an.Authorized.D-Link.Service.Office..The.replacement.hardware need.not.be.new.or.have.an.identical.make,.model.or.part..D-Link.may,.at.its.option,.replace.the.defective.Hardware.or.any.part.thereof.with.any reconditioned.product.that.D-Link.reasonably.determines.is.substantially.equivalent.(or.superior).in.all.material.respects.to.the.defective.Hardware. Repaired.or.replacement.hardware.will.be.warranted.for.the.remainder.of.the.original.Warranty.Period.or.ninety.(90).days,.whichever.is.longer, and.is.subject.to.the.same.limitations.and.exclusions..If.a.material.defect.is.incapable.of.correction,.or.if.D-Link.determines.that.it.is.not.practical to.repair.or.replace.the.defective.Hardware,.the.actual.price.paid.by.the.original.purchaser.for.the.defective.Hardware.will.be.refunded.by.D-Link upon.return.to.D-Link.of.the.defective.Hardware..All.Hardware.or.part.thereof.that.is.replaced.by.D-Link,.or.for.which.the.purchase.price.is.refunded, shall.become.the.property.of.D-Link.upon.replacement.or.refund. D-Link ShareCenter Pro 1100 User Manual... - Page 135 •. The. customer. must. submit. with. the. product. as. part. of. the. claim. a. written. description. of. the. Hardware. defect. or. Software. nonconformance.in.sufficient.detail.to.allow.D-Link.to.confirm.the.same,.along.with.proof.of.purchase.of.the.product.(such.as.a. copy.of.the.dated.purchase.invoice.for.the.product).if.the.product.is.not.registered. •. The.customer.must.obtain.a.Case.ID.Number.from.D-Link.Technical.Support.(USA.1-877-453-5465.or.Canada.1-800-361-5265),.who. will.attempt.to.assist.the.customer.in.resolving.any.suspected.defects.with.the.product..If.the.product.is.considered.defective,.the. customer.must.obtain.a.Return.Material.Authorization.(“RMA”).number.by.completing.the.RMA.form..Enter.the.assigned.Case.ID. Number.at.https://rma.dlink.com/.(USA.only).or.https://rma.dlink.ca.(Canada.only). •. After.an.RMA.number.is.issued,.the.defective.product.must.be.packaged.securely.in.the.original.or.other.suitable.shipping.package. to.ensure.that.it.will.not.be.damaged.in.transit,.and.the.RMA.number.must.be.prominently.marked.on.the.outside.of.the.package.. Do.not.include.any.manuals.or.accessories.in.the.shipping.package..D-Link.will.only.replace.the.defective.portion.of.the.product. and.will.not.ship.back.any.accessories. D-Link ShareCenter Pro 1100 User Manual...
- Page 136 •. USA residents.send.to.17595.Mt..Herrmann,.Fountain.Valley,.CA.92708..D-Link.will.not.be.held.responsible.for.any.packages.that. are.lost.in.transit.to.D-Link..The.repaired.or.replaced.packages.will.be.shipped.to.the.customer.via.UPS.Ground.or.any.common. carrier.selected.by.D-Link..Return.shipping.charges.shall.be.prepaid.by.D-Link.if.you.use.an.address.in.the.United.States,.otherwise. we.will.ship.the.product.to.you.freight.collect..Expedited.shipping.is.available.upon.request.and.provided.shipping.charges.are. prepaid.by.the.customer..D-Link.may.reject.or.return.any.product.that.is.not.packaged.and.shipped.in.strict.compliance.with.the. foregoing.requirements,.or.for.which.an.RMA.number.is.not.visible.from.the.outside.of.the.package..The.product.owner.agrees.to. pay.D-Link’s.reasonable.handling.and.return.shipping.charges.for.any.product.that.is.not.packaged.and.shipped.in.accordance. with.the.foregoing.requirements,.or.that.is.determined.by.D-Link.not.to.be.defective.or.non-conforming. •. Canadian residents.send.to.D-Link.Networks,.Inc.,.2525.Meadowvale.Boulevard.Mississauga,.Ontario,.L5N.5S2.Canada..D-Link.will. not.be.held.responsible.for.any.packages.that.are.lost.in.transit.to.D-Link..The.repaired.or.replaced.packages.will.be.shipped.to. the.customer.via.Purolator.Canada.or.any.common.carrier.selected.by.D-Link..Return.shipping.charges.shall.be.prepaid.by.D-Link. if.you.use.an.address.in.Canada,.otherwise.we.will.ship.the.product.to.you.freight.collect..Expedited.shipping.is.available.upon. request.and.provided.shipping.charges.are.prepaid.by.the.customer..D-Link.may.reject.or.return.any.product.that.is.not.packaged. and.shipped.in.strict.compliance.with.the.foregoing.requirements,.or.for.which.an.RMA.number.is.not.visible.from.the.outside.of. the.package..The.product.owner.agrees.to.pay.D-Link’s.reasonable.handling.and.return.shipping.charges.for.any.product.that.is. not.packaged.and.shipped.in.accordance.with.the.foregoing.requirements,.or.that.is.determined.by.D-Link.not.to.be.defective.or. non-conforming...RMA.phone.number:.1-800-361-5265.Hours.of.Operation:.Monday-Friday,.9:00AM.–.9:00PM.EST What Is Not Covered: The.Limited.Warranty.provided.herein.by.D-Link.does.not.cover: Products.that,.in.D-Link’s.judgment,.have.been.subjected.to.abuse,.accident,.alteration,.modification,.tampering,.negligence,.misuse,.faulty.installation,. lack.of.reasonable.care,.repair.or.service.in.any.way.that.is.not.contemplated.in.the.documentation.for.the.product,.or.if.the.model.or.serial.number. has.been.altered,.tampered.with,.defaced.or.removed;.Initial.installation,.installation.and.removal.of.the.product.for.repair,.and.shipping.costs;. Operational.adjustments.covered.in.the.operating.manual.for.the.product,.and.normal.maintenance;.Damage.that.occurs.in.shipment,.due.to.act. of.God,.failures.due.to.power.surge,.and.cosmetic.damage;.Any.hardware,.software,.firmware.or.other.products.or.services.provided.by.anyone. other.than.D-Link;.and.Products.that.have.been.purchased.from.inventory.clearance.or.liquidation.sales.or.other.sales.in.which.D-Link,.the.sellers,. or.the.liquidators.expressly.disclaim.their.warranty.obligation.pertaining.to.the.product. While.necessary.maintenance.or.repairs.on.your.Product.can.be.performed.by.any.company,.we.recommend.that.you.use.only.an.Authorized.D-Link. Service.Office..Improper.or.incorrectly.performed.maintenance.or.repair.voids.this.Limited.Warranty. D-Link ShareCenter Pro 1100 User Manual...
- Page 137 EXCEPT.FOR.THE.LIMITED.WARRANTY.SPECIFIED.HEREIN,.THE.PRODUCT.IS.PROVIDED. “ AS-IS”.WITHOUT.ANY.WARRANTY.OF.ANY.KIND.WHATSOEVER. INCLUDING,.WITHOUT.LIMITATION,.ANY.WARRANTY.OF.MERCHANTABILITY,.FITNESS.FOR.A.PARTICULAR.PURPOSE.AND.NONINFRINGEMENT.. IF.ANY.IMPLIED.WARRANTY.CANNOT.BE.DISCLAIMED.IN.ANY.TERRITORY.WHERE.A.PRODUCT.IS.SOLD,.THE.DURATION.OF.SUCH.IMPLIED.WARRANTY. SHALL.BE.LIMITED.TO.THE.DURATION.OF.THE.APPLICABLE.WARRANTY.PERIOD.SET.FORTH.ABOVE..EXCEPT.AS.EXPRESSLY.COVERED.UNDER.THE. LIMITED.WARRANTY.PROVIDED.HEREIN,.THE.ENTIRE.RISK.AS.TO.THE.QUALITY,.SELECTION.AND.PERFORMANCE.OF.THE.PRODUCT.IS.WITH.THE. PURCHASER.OF.THE.PRODUCT. Limitation of Liability: TO.THE.MAXIMUM.EXTENT.PERMITTED.BY.LAW,.D-LINK.IS.NOT.LIABLE.UNDER.ANY.CONTRACT,.NEGLIGENCE,.STRICT.LIABILITY.OR.OTHER.LEGAL. OR.EQUITABLE.THEORY.FOR.ANY.LOSS.OF.USE.OF.THE.PRODUCT,.INCONVENIENCE.OR.DAMAGES.OF.ANY.CHARACTER,.WHETHER.DIRECT,.SPECIAL,. INCIDENTAL.OR.CONSEQUENTIAL.(INCLUDING,.BUT.NOT.LIMITED.TO,.DAMAGES.FOR.LOSS.OF.GOODWILL,.LOSS.OF.REVENUE.OR.PROFIT,.WORK. STOPPAGE,.COMPUTER.FAILURE.OR.MALFUNCTION,.FAILURE.OF.OTHER.EQUIPMENT.OR.COMPUTER.PROGRAMS.TO.WHICH.D-LINK’S.PRODUCT. IS.CONNECTED.WITH,.LOSS.OF.INFORMATION.OR.DATA.CONTAINED.IN,.STORED.ON,.OR.INTEGRATED.WITH.ANY.PRODUCT.RETURNED.TO.D-LINK. FOR.WARRANTY.SERVICE).RESULTING.FROM.THE.USE.OF.THE.PRODUCT,.RELATING.TO.WARRANTY.SERVICE,.OR.ARISING.OUT.OF.ANY.BREACH.OF. THIS.LIMITED.WARRANTY,.EVEN.IF.D-LINK.HAS.BEEN.ADVISED.OF.THE.POSSIBILITY.OF.SUCH.DAMAGES..THE.SOLE.REMEDY.FOR.A.BREACH.OF. THE.FOREGOING.LIMITED.WARRANTY.IS.REPAIR,.REPLACEMENT.OR.REFUND.OF.THE.DEFECTIVE.OR.NONCONFORMING.PRODUCT..THE.MAXIMUM. LIABILITY.OF.D-LINK.UNDER.THIS.WARRANTY.IS.LIMITED.TO.THE.PURCHASE.PRICE.OF.THE.PRODUCT.COVERED.BY.THE.WARRANTY..THE.FOREGOING. EXPRESS.WRITTEN.WARRANTIES.AND.REMEDIES.ARE.EXCLUSIVE.AND.ARE.IN.LIEU.OF.ANY.OTHER.WARRANTIES.OR.REMEDIES,.EXPRESS,.IMPLIED. OR.STATUTORY. Governing Law: This.Limited.Warranty.shall.be.governed.by.the.laws.of.the.State.of.California..Some.states.do.not.allow.exclusion.or.limitation.of.incidental.or. consequential.damages,.or.limitations.on.how.long.an.implied.warranty.lasts,.so.the.foregoing.limitations.and.exclusions.may.not.apply..This. Limited.Warranty.provides.specific.legal.rights.and.you.may.also.have.other.rights.which.vary.from.state.to.state. Trademarks: D-Link.is.a.registered.trademark.of.D-Link.Systems,.Inc..Other.trademarks.or.registered.trademarks.are.the.property.of.their.respective.owners. Copyright Statement: No.part.of.this.publication.or.documentation.accompanying.this.product.may.be.reproduced.in.any.form.or.by.any.means.or.used.to.make.any. derivative.such.as.translation,.transformation,.or.adaptation.without.permission.from.D-Link.Corporation/D-Link.Systems,.Inc.,.as.stipulated.by.the. United.States.Copyright.Act.of.1976.and.any.amendments.thereto..Contents.are.subject.to.change.without.prior.notice. Copyright.2011.by.D-Link.Corporation/D-Link.Systems,.Inc..All.rights.reserved. D-Link ShareCenter Pro 1100 User Manual...
- Page 138 Appendix G - Warranty CE Mark Warning: This.is.a.Class.A.product..In.a.domestic.environment,.this.product.may.cause.radio.interference,.in.which.case.the.user.may.be.required.to.take. adequate.measures. FCC Statement: This.equipment.has.been.tested.and.found.to.comply.with.the.limits.for.a.Class.A.digital.device,.pursuant.to.part.15.of.the.FCC.Rules..These.limits.are. designed.to.provide.reasonable.protection.against.harmful.interference.in.a.residential.installation..This.equipment.generates,.uses,.and.can.radiate. radio.frequency.energy.and,.if.not.installed.and.used.in.accordance.with.the.instructions,.may.cause.harmful.interference.to.radio.communication.. However,.there.is.no.guarantee.that.interference.will.not.occur.in.a.particular.installation..If.this.equipment.does.cause.harmful.interference.to.radio. or.television.reception,.which.can.be.determined.by.turning.the.equipment.off.and.on,.the.user.is.encouraged.to.try.to.correct.the.interference.by. one.or.more.of.the.following.measures: •. Reorient.or.relocate.the.receiving.antenna. •. Increase.the.separation.between.the.equipment.and.receiver. •. Connect.the.equipment.into.an.outlet.on.a.circuit.different.from.that.to.which.the.receiver.is.connected. •. Consult.the.dealer.or.an.experienced.radio/TV.technician.for.help. For.detailed.warranty.information.applicable.to.products.purchased.outside.the.United.States,.please.contact.the.corresponding.local.D-Link. office. D-Link ShareCenter Pro 1100 User Manual...
-
Page 139: Appendix H: Registration
Appendix H - Registration Registration Register your product at registration.dlink.com Product.registration.is.entirely.voluntary.and.failure.to.complete.or.return.this.form.will.not.diminish.your.warranty.rights. Version.1.0 July.1,.2011 D-Link ShareCenter Pro 1100 User Manual...
Need help?
Do you have a question about the DNS-1100-04 and is the answer not in the manual?
Questions and answers