
Related Manuals for Acesonic PK-6000


Summary of Contents for Acesonic PK-6000
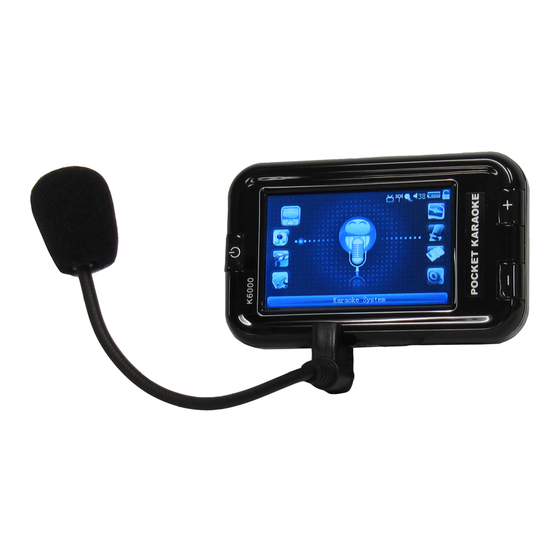
- Page 1 ® User Manual Version 1.0 PK-6000 Pocket Karaoke PK-6000 POCKET-SIZE ENTERTAINMENT SYSTEM RECORD MUSIC, VIEW PHOTOS AND VIDEOS & BROADCAST YOUR PERFORMANCE!
-
Page 2: Table Of Contents
TABLE OF CONTENTS Welcome ..................... 4 PK-6000 Package Contents | Minimum Computer Requirements | About this User Manual Connect to Your Computer ................5 Product Overview ..................6 Your New PK-6000 | Proper Care of Your PK-6000 | Safe Operations | Initial Setup and System Settings | FM Wireless Notes | Battery Charging | Common Connection Scheme | Battery Indication | Initial Performance Settings Using the PK-6000: General ............... - Page 3 Transmission Band | FM Transmission Band Selection | FM Interference Test | Score | Record | TV Output Enable/Disable | Song Selection | EQ Setting | Playing Modes FAQ (Frequently Asked Questions) .............. 39 Troubleshooting and Help ................42 PK-6000 Technical Specifications .............. 44 Acesonic Value-Added Service ..............45...
-
Page 4: Welcome
Earbuds (1) | MiniUSB-to-USB Cable (1) | MiniUSB-to-Composite Video Cable (1) | Acesonic Media Converter Software, sample files | User Manual (1) | Microphone (1) | Touchscreen Stylus (1) | 900mAh Lithium-Ion Battery (1) | AC Adapter (1) | Warranty... -
Page 5: Connect To Your Computer
CONNECT TO YOUR COMPUTER The PK-6000 connects to your computer with the included MiniUSB-to-USB cable. Because it adheres to computer industry standards for a “USB mass storage device,” the PK-6000 connects to both Macintosh computers (OS X 10.1 or newer) and PCs (Windows 98 to Windows 7) with no special drivers. -
Page 6: Product Overview
PRODUCT OVERVIEW Your New PK-6000 The PK-6000 is a powerful multimedia device that can be used for entertainment, performing, reading, recording and making presentations. Its fully integrated Karaoke system plays MP3+G music/lyric files, while its video output, built-in mini-boom mic, wireless FM broadcasting and computer connectivity give you total control over the use and presentation of movies, videos, FM radio, MIDI files and more. -
Page 7: Your New Pk-6000 | Proper Care Of Your Pk-6000 | Safe Operations | Initial Setup
Stylus. Use fully charged batteries and follow the instructions on page 11 under First Use of the PK-6000. Although other software may work, use Format Factory v2.30 or Acesonic Media Converter Software (on included CD) to ensure that all files are converted properly. -
Page 8: And System Settings | Fm Wireless Notes | Battery Charging | Common Connection
PK-6000, as the system looks for files automatically every time you turn it on. See Connect to Your Computer on page 5 for more information. Always back up your data. Acesonic is not responsible for any loss caused by missing data. FM Wireless Notes The PK-6000 can transmit through an external radio over FM. -
Page 9: Scheme | Battery Indication | Initial Performance Settings
Common Connection Scheme (Figure B): For karaoke use, enable FM transmission so that mixed sound from mic and music will broadcast over radio as shown. Connect earphones to monitor yourself, connect mic for singing and use USB-to-Composite-Video cable to connect to TV. -
Page 10: Scheme | Battery Indication | Initial Performance Settings
Battery Indication Always refer to the battery charge icon before use to view the charge level, and ensure that the PK-6000 is fully charged before each use. When the battery icon displays full bars, the power is at its highest level. The indicator bars in the battery icon will decrease over a period of time according to your usage. -
Page 11: Using The Pk-6000: General
USING THE PK-6000: GENERAL First Use of the PK-6000 The first time you use this device, ensure that you have installed fully charged batteries. Hold down the power button for several seconds to start the device. To calibrate the Stylus for continued use, enter “Menu Settings” and select “Screen Calibration.” You will be taken through several steps as shown below to click the touchscreen with the Stylus to ensure its correct operation. -
Page 12: First Use Of The Pk-6000 | Unlocking The Screen | Main Interface
Unlocking the Screen Figure 01 Figure 02 In Figures 01 and 02, note the lock icon at the upper right of the screens (unlocked in 01, locked in 02). Click and hold for 2 to 3 seconds to toggle between the settings. In Karaoke and Video modes, automatic locking is disabled (you can do it manually). -
Page 13: First Use Of The Pk-6000 | Unlocking The Screen | Main Interface
Main Interface Figure 03 Legend for Figure 03: (1) Karaoke, (2) Music, (3) Movies, (4) Image Browser, (5) Radio, (6) Recording, (7) Text Reader, (8) Settings, (9) TV Output, (10) Microphone, (11) FM Transmission, (12) SD Expansion Card, (13) Volume, (14) Battery Power Display, (15) Locking Key. -
Page 14: Nested Functions And Global Controls
NESTED FUNCTIONS AND GLOBAL CONTROLS Controls for FM Transmission, Microphone settings, Echo delay and other functions are located on the right-hand Shortcut Options Menu (see page 27), which is only displayed when you are in a mode that can make use of these functions. On the Shortcut Options Menus you will initially see each function with a green “Off ”... -
Page 15: Settings Mode
SETTINGS MODE The Settings icon is the fourth and final icon in the right-hand row of the Main Interface. We will take the others in order, but will start with Settings because you should make as many settings as possible before using the PK-6000. Click on the Settings icon and the center screen icon will change to match. -
Page 16: Listening To Music
LISTENING TO MUSIC The second icon in the first (left) row is for Music (see Figure 03, page 13). Click on it to enter Music mode. The large center icon will become the Music icon, and clicking on this will bring up the Playlist and controls. The currently selected track will be scrolling at the top of the display, so if you want to play it simply click on the ▶... -
Page 17: Playing Movies
(see previous page). The PK-6000 plays movie files in various formats (AVI, MP4, VOB, ASF, WMV), but not all files or conversion software is the same. For best performance, use the Acesonic Media Converter Software that is provided on the included CD. -
Page 18: Browsing Images
IMAGE BROWSER The bottom icon in the left row of the Main Interface is the Image Browser. Click on the icon and, as with other functions, the center screen icon changes to match. Click on this and you will enter the browsing mode, which allows you to view image files in JPG, JPEG, GIF and BMP formats. -
Page 19: Fm Radio: Listening And Recording
FM RADIO: LISTENING AND RECORDING Clicking on the first icon in the Main Interface’s right row will enter the FM Radio mode. The currently tuned station will be displayed top center, and you can move through the FM band with the |<< and >>| controls (one click at a time or hold down to move more quickly). -
Page 20: Audio Recording
AUDIO RECORDING The second icon in the right-hand list of the Main Interface is for Audio Recording. Click on the icon and the center screen icon will change to match, then click on that to enter Audio Recording mode. You will see that Source indicates “Mic” and there is a center display that gives you recording controls (|| for pause, an orange circle for start, a black box for stop). -
Page 21: Text Viewer
TEXT READER Clicking on the third icon in the right-hand list will display the larger Text Reader icon in the center of the screen. Another click on it will bring you to a list of all text (.txt) files located anywhere on the PK-6000. For a sufficiently long list you will use the left and right arrow controls (<... -
Page 22: Other Functions And Settings
OTHER FUNCTIONS AND SETTINGS Professional Line-In Recording You can use your PK-6000 as a portable digital line-in recorder and get professional results. The USB-to-Composite-Video cable has a standard 1/8-inch mini-jack on the same end as the mini-USB connector that connects to the PK-6000. Plug the mini-jack into the microphone input, then connect the white and red RCA connectors at the other end into the left and right audio outs of the equipment from which you wish to record (receiver, CD player or any other device with RCA connectors). -
Page 23: Karaoke Functions
KARAOKE FUNCTIONS Karaoke Song Selection System Figure 04 Click on the Karaoke function icon in the Main Interface of the machine to enter this mode. Legend for Figure 04: (1) Audio button = MP3+G, (2) Video = AVI, (3) MIDI = KAR, (4) MIDI LTB = MIDI Library, (5) Esc, (6) Locking key, (center icon) Play. -
Page 24: Karaoke Song Selection System | Song Lists | Audio Songs Play | Song Selection
Karaoke Song Lists Figure 05 In the Karaoke Song Selection Interface, see song lists by clicking on “Audio,” “Video” or “MIDI” icons (see Figure 03, previous page). Click on “Search” (Figure 5) and use keyboard input to enter a song number, or initials of the song title words, to locate it. The selected song will be marked with a check (√). -
Page 25: Interface | Shortcut Options Menu | Enable/Disable | Microphone Volume | Delay
Karaoke Audio Songs Play Figure 06 Song background pictures, stored as JPG and BMP formats in each song file, will be switched automatically, depending on the size and resolution of the images. Mixing voice while recording accompaniment is exclusively available for songs in the Music menu and Music Library. -
Page 26: Effects Setting | Mpx Selection | Fm Transmission Enable/Disable And Fm Id | Fm
Karaoke Song Selection Interface Figure 07 Clicking on any blank space of the player screen will cause the Karaoke Song Selection Interface to appear (see Figure 07): (1) Music list, (2) List forward, (3) List backward, (4) Last music (long press to skip backward), (5) Next music (long press to skip forward), (6) Karaoke function selection, (7) FM transmission function selection, (8) Music function, (9) Return. -
Page 27: Interface | Shortcut Options Menu | Enable/Disable | Microphone Volume | Delay
Karaoke Shortcut Options Menu Figure 08: (1) Radio band adjustment, (2) Microphone volume adjustment area, (3) Reverb adjustment area, (4) Volume adjustment, (5) Songs selection, (6) Singing mode switch (vocal/ instrumental). Figure 08 Figure 09: (1) Radio band adjustment, (2) Microphone volume up, (3) Microphone volume down, (4) Echo lengthened adjustment, (5) Echo Shortened adjustment, (6) Adjusting volume higher, (7) Adjusting volume lower,... -
Page 28: Transmission Band | Fm Transmission Band Selection | Fm Interference Test | Score
Karaoke Shortcut Options Menu (cont.) Figure 10: (1) Radio transmission band display, (2) Microphone volume display, (3) Adjustable Echo time display, (4) Adjustable volume control, (5) Singing mode switch (stereo). Figure 10 Figure 11: (1) Radio transmission switch (enable/disable), (2) Microphone switch (enable/disable), (3) Echo switch (enable/disable), (4) Sing mode switch (original singing). -
Page 29: Interface | Shortcut Options Menu | Enable/Disable | Microphone Volume | Delay
Karaoke Enable/Disable Click on “Switch” to enable the Karaoke mode (Figure 12). Figure 12 Background Music Adjustment Click “Volume” to adjust the volume of the song to your preference (Figure 13). Micro- phone volume will be unchanged. Figure 13 (29) -
Page 30: Interface | Shortcut Options Menu | Enable/Disable | Microphone Volume | Delay
Microphone Volume Click on “Mic Vol” to set the level of microphone volume according to your preference (Figure 14). The background sound volume should remain unchanged). Figure 14 Delay Effects Setting Click on “Delay” to select the optional Echo settings (Figure 15). -
Page 31: Effects Setting | Mpx Selection | Fm Transmission Enable/Disable And Fm Id | Fm
MPX Selection Click on “MPX” to select Karaoke “Right” or “Left” and click on “Monitor” to listen to singer on earphones (Figure 16). If FM transmission functions are enabled, you will hear the instrumental music plus your voice on the receiver (or radio). While on monitor mode, the original vocalist will guide you with the lyrics and rhythms. -
Page 32: Interface | Shortcut Options Menu | Enable/Disable | Microphone Volume | Delay
FM Transmission Enable/Disable and FM ID Click “FM TX” to show this interface and turn FM transmission on/off (Figure 17). “FM ID” can be enabled/disabled when FM transmission is on. Figure 17 (32) -
Page 33: Effects Setting | Mpx Selection | Fm Transmission Enable/Disable And Fm Id | Fm
FM Transmission Band Click on “Band” (or “Freq” in the latest PK-6000 version) for transmission band adjustment. Note: Without headsets, the PK-6000 will still emit FM station signals but signal strength will be weak. Plug in the earphones and they will act as an antenna to maximize the transmission strength. -
Page 34: Effects Setting | Mpx Selection | Fm Transmission Enable/Disable And Fm Id | Fm
FM Transmission Band Selection Click “|<<” and “>>|” to select the band accurately or directly click on the band scale slider to move through the band range (Figure 19). Figure 19 (34) -
Page 35: Effects Setting | Mpx Selection | Fm Transmission Enable/Disable And Fm Id | Fm
FM Interference Test After you select the emission band, the system will perform an automatic interference test (Figure 20). Note: If your selection is less than optimum, the PK-6000 will alert you to interference so that you can change the band for best results. Figure 20 (35) -
Page 36: Record | Tv Output Enable/Disable | Song Selection | Eq Setting | Playing Modes
Score After you enable “Score” the PK-6000 will score for you automatically when you finish a song (Figure 21). Figure 21 Record Voice mixed with background instrumental will be recorded in the WAV format (Figure 22). Make sure the microphone is turned on. Figure 22 (36) -
Page 37: Karaoke Song Selection System | Song Lists | Audio Songs Play | Song Selection
TV Output Enable/Disable Click on “TV” to enable/disable the connection between the PK-6000 and TV, monitor or other output device (Figure 23). Figure 23 Song Selection Click on “Select” to choose new music from the music library and add it to the Playlist (Figure 24). -
Page 38: Record | Tv Output Enable/Disable | Song Selection | Eq Setting | Playing Modes
EQ Setting Click on “EQ” to choose various effect settings (Figure 25). A new hierarchical menu will appear to the right of the EQ menu with such presets as “Jazz” and “Pop.” Figure 25 Playing Modes Click on “Mode” to choose various settings for playing music (Figure 26). -
Page 39: Faq (Frequently Asked Questions)
FAQ (Frequently Asked Questions) 1. Why am I not able to record sounds while playing video files in MIDI and AVI formats in the Karaoke menu? Files in MIDI and AVI format occupy more resources even when sound recording is disabled. 2. - Page 40 PC); and/or (d) the player may be infected by a virus (terminate the virus, update the program then format the player). Please refer to the CD or Acesonic site for updated firmware and files. 9. Why is the FM transmission function disabled when TV-out function is enabled, and...
- Page 41 please select a frequency in the 76-87.5 MHz range to avoid interference. 11. Why does it take the PK-6000 long time to start? It takes a certain amount of time to build and load the device’s database. The larger and more numerous the files are, the more time it will take to start up the unit.
-
Page 42: Troubleshooting And Help
Troubleshooting and Help Some downloaded files in the WMA format cannot be played. Music of various formats is now available online. Among the most popular are WMA (Windows Media Audio) files. Some music in the WMA format is protected by the copyright safeguard features of the DRM (Digital Rights Management) license. - Page 43 There is data loss occurring. Some data loss is caused by power instability in the process of downloading. This company takes no responsibility for any data loss. We suggest Data backup to prevent from files being lost. Some downloaded files that are smaller than the remaining storage space do not play.
-
Page 44: Pk-6000 Technical Specifications
PK-6000 Technical Specifications Internal Memory Capacity: 2GB MicroSD Expansion Slot Memory: Takes cards to a maximum of 16GB USB Specification: USB 1.1 (12Mbps) Battery Capacity: 900 mAh/3.7 V Signal-to-Noise: ≥85 DB Frequency Response: 20Hz-20KHz Earphone Output Power: ≥3 mW+3 mW FM Transmission, Frequency Range and Power: From 76-108MHz at <3mW Overall Max Power Output: <1.5W Static Current: ≤50uA... -
Page 45: Acesonic Value-Added Service
Acesonic Value-Added Service Visit www.acesonic.com to leave product feedback, find software/firmware updates and enjoy high-quality customer service assistance with any and all issues. Make sure to fill out any and all Warranty Cards that come with your PK-6000, and mail them in immediately for your protection. - Page 46 Pocket Karaoke & Media Player One (1) Year Manufacturer Warranty City of Industry Lifetime Technical Support CA 91746-3208 Designed in U.S.A. U.S.A. Technical Support: (626) 820-0645 techsupport@acesonic.com © 2010 Acesonic USA, Inc. • All rights reserved Web site: www.acesonic.com (46)
Need help?
Do you have a question about the PK-6000 and is the answer not in the manual?
Questions and answers