ASROCK ZH77 Pro3 Quick Installation Manual
Quick installation guide
Hide thumbs
Also See for ZH77 Pro3:
- Installation manual (4 pages) ,
- Installation and configuration manual (11 pages) ,
- User manual (70 pages)
Table of Contents
Advertisement
Quick Links
Copyright Notice:
No part of this installation guide may be reproduced, transcribed, transmitted, or trans-
lated in any language, in any form or by any means, except duplication of documentation
by the purchaser for backup purpose, without written consent of ASRock Inc.
Products and corporate names appearing in this guide may or may not be registered
trademarks or copyrights of their respective companies, and are used only for identifi ca-
tion or explanation and to the owners' benefi t, without intent to infringe.
Disclaimer:
Specifi cations and information contained in this guide are furnished for informational use
only and subject to change without notice, and should not be constructed as a commit-
ment by ASRock. ASRock assumes no responsibility for any errors or omissions that may
appear in this guide.
With respect to the contents of this guide, ASRock does not provide warranty of any kind,
either expressed or implied, including but not limited to the implied warranties or condi-
tions of merchantability or fi tness for a particular purpose. In no event shall ASRock, its
directors, offi cers, employees, or agents be liable for any indirect, special, incidental, or
consequential damages (including damages for loss of profi ts, loss of business, loss of
data, interruption of business and the like), even if ASRock has been advised of the pos-
sibility of such damages arising from any defect or error in the guide or product.
This device complies with Part 15 of the FCC Rules. Operation is subject to the following
two conditions:
(1) this device may not cause harmful interference, and
(2) this device must accept any interference received, including interference that
may cause undesired operation.
CALIFORNIA, USA ONLY
The Lithium battery adopted on this motherboard contains Perchlorate, a toxic substance
controlled in Perchlorate Best Management Practices (BMP) regulations passed by the
California Legislature. When you discard the Lithium battery in California, USA, please
follow the related regulations in advance.
"Perchlorate Material-special handling may apply, see
www.dtsc.ca.gov/hazardouswaste/perchlorate"
ASRock Website: http://www.asrock.com
Published June 2012
Copyright©2012 ASRock INC. All rights reserved.
1
ASRock ZH77 Pro3 Motherboard
Advertisement
Table of Contents

Related Manuals for ASROCK ZH77 Pro3


Summary of Contents for ASROCK ZH77 Pro3
-
Page 1: Copyright Notice
ASRock. ASRock assumes no responsibility for any errors or omissions that may appear in this guide. With respect to the contents of this guide, ASRock does not provide warranty of any kind, either expressed or implied, including but not limited to the implied warranties or condi- tions of merchantability or fi... -
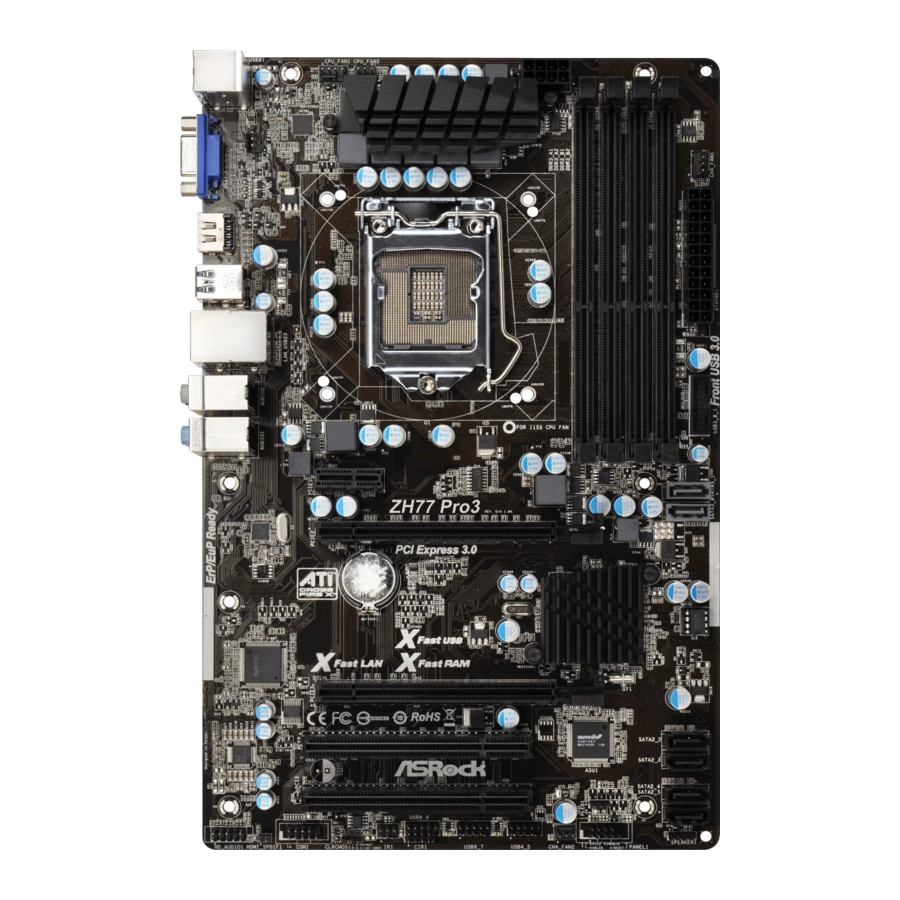
Page 2: Motherboard Layout
PCI Express 2.0 x16 Slot (PCIE3, Black) SATA2 Connectors (SATA2_4, Black) PCI Express 3.0 x16 Slot (PCIE2, Black) SATA2 Connectors (SATA2_5, Black) PCI Express 2.0 x1 Slot (PCIE1, Black) Chassis Speaker Header (SPEAKER1, Black) Power Fan Connector (PWR_FAN1) ASRock ZH77 Pro3 Motherboard... - Page 3 See the table below for connection details in accordance with the type of speaker you use. TABLE for Audio Output Connection Audio Output Channels Front Speaker Rear Speaker Central / Bass Line in (No. 7) (No. 4) (No. 5) (No. 6) ASRock ZH77 Pro3 Motherboard...
- Page 4 “ok”. Choose “2CH”, “4CH”, “6CH”, or “8CH” and then you are allowed to select “Realtek HDA Primary output” to use Rear Speaker, Central/Bass, and Front Speaker, or select “Realtek HDA Audio 2nd output” to use front panel audio. ASRock ZH77 Pro3 Motherboard...
-
Page 5: Package Contents
In case any modifi cations of this manual occur, the updated version will be available on ASRock website without further notice. You may fi nd the latest VGA cards and CPU support lists on ASRock website as well. -
Page 6: Specifications
Sandy Bridge CPU - Max. shared memory 1760MB (see CAUTION 5) - Dual VGA Output: support HDMI and D-Sub ports by independent display controllers - Supports HDMI 1.4a Technology with max. resolution up to 1920x1200 @ 60Hz ASRock ZH77 Pro3 Motherboard... - Page 7 - 4 x SATA2 3.0 Gb/s connectors, support RAID (RAID 0, RAID 1, RAID 5, RAID 10, Intel Rapid Storage and Intel Smart Response Technology), NCQ, AHCI and Hot Plug functions - 2 x SATA3 6.0Gb/s connectors ASRock ZH77 Pro3 Motherboard...
- Page 8 - Drivers, Utilities, AntiVirus Software (Trial Version), CyberLink MediaEspresso 6.5 Trial, ASRock MAGIX Multimedia Suite - OEM Unique Feature - ASRock Extreme Tuning Utility (AXTU) (see CAUTION 8) - ASRock Instant Boot - ASRock Instant Flash (see CAUTION 9) - ASRock APP Charger (see CAUTION 10)
- Page 9 ® Vista / XP. For Windows OS with 64-bit CPU, there is no such limita- tion. You can use ASRock XFast RAM to utilize the memory that Win- ® dows cannot use. Only PCIE2 slot supports Gen 3 speed. To run the PCI Express in Gen 3 speed, please install an Ivy Bridge CPU.
- Page 10 Please visit our website for the operation procedures of ASRock Extreme Tuning Utility (AXTU). ASRock website: http://www.asrock.com ASRock Instant Flash is a BIOS fl ash utility embedded in Flash ROM. This convenient BIOS update tool allows you to update system BIOS ®...
- Page 11 14. ASRock XFast RAM is a new function that is included into ASRock Ex- treme Tuning Utility (AXTU). It fully utilizes the memory space that cannot ®...
- Page 12 18. ASRock On/Off Play Technology allows users to enjoy the great audio experience from portable audio devices, such as MP3 players or mobile phones to your PC, even when the PC is turned off (or in ACPI S5 mode)! This motherboard also provides a free 3.5mm audio cable (optional) that ensures users the most convenient computing environment.
-
Page 13: Screw Holes
Before you install or remove any component, ensure that the power is switched off or the power cord is detached from the power supply. Failure to do so may cause severe damage to the motherboard, peripherals, and/or components. ASRock ZH77 Pro3 Motherboard... -
Page 14: Cpu Installation
Plate ets more protection and make the instal- Load Lever lation process easier, ASRock has added Cover a new protection cover on top of the load plate to replace the former PnP caps that were under the load plate. For the installa-... - Page 15 The protection cover will automatically come off by itself. Please save and replace the cover if the processor is removed. The cover must be placed if you wish to return the motherboard for after service. ASRock ZH77 Pro3 Motherboard...
-
Page 16: Installation Of Cpu Fan And Heatsink
Please be noticed that this motherboard supports Combo Cooler Option (C.C.O.), which provides fl exible options to adopt three dif- ferent CPU cooler types, Socket LGA 775, LGA 1155 and LGA 1156. The white throughholes are for Socket LGA 1155/1156 CPU fan. ASRock ZH77 Pro3 Motherboard... -
Page 17: Installation Of Memory Modules (Dimm)
It is not allowed to install a DDR or DDR2 memory module into DDR3 slot; otherwise, this motherboard and DIMM may be dam- aged. Some DDR3 1GB double-sided DIMMs with 16 chips may not work on this motherboard. It is not recommended to install them on this motherboard. ASRock ZH77 Pro3 Motherboard... -
Page 18: Installing A Dimm
DIMM if you force the DIMM into the slot at incorrect orientation. Step 3. Firmly insert the DIMM into the slot until the retaining clips at both ends fully snap back in place and the DIMM is properly seated. ASRock ZH77 Pro3 Motherboard... -
Page 19: Installing An Expansion Card
PCIE slots: PCIE1 (PCIE 2.0 x1 slot) is used for a PCI Express x1 lane width card, such as a Gigabit LAN card, SATA2 card or ASRock Game Blaster, etc. PCIE2 (PCIE 3.0 x16 slot) is used for PCI Express x16 lane width... -
Page 20: Tm And Quad Crossfirex
AMD graphics card manuals for detailed installation guide. Step 1. Insert one Radeon graphics card into PCIE2 slot and the other Radeon graphics card to PCIE3 slot. Make sure that the cards are properly seated on the slots. ASRock ZH77 Pro3 Motherboard... - Page 21 Connect the DVI monitor cable to the DVI connector on the Radeon graphics card on PCIE2 slot. (You may use the DVI to D-Sub adapter to convert the DVI connector to D-Sub interface, and then connect the D-Sub monitor cable to the DVI to D-Sub adapter.) ASRock ZH77 Pro3 Motherboard...
-
Page 22: Driver Installation And Setup
Then you will fi nd “ATI Catalyst Control Center” on your Windows taskbar. ATI Catalyst Control Center Step 6. Double-click “ATI Catalyst Control Center”. Click “View”, select “CrossFi- ”, and then check the item “Enable CrossFireX ”. Select “2 GPUs” and click “Apply”. ASRock ZH77 Pro3 Motherboard... - Page 23 AMD Technologies Inc., and is used only for identifi cation or explanation and to the owners’ benefi t, without intent to infringe. * For further information of AMD CrossFireX technology, please check AMD’s website for updates and details. ASRock ZH77 Pro3 Motherboard...
-
Page 24: Dual Monitor And Surround Display Features
If you haven’t installed the onboard VGA driver yet, please install the onboard VGA driver from our support CD to your system and restart your computer. ASRock ZH77 Pro3 Motherboard... - Page 25 F. Set the appropriate “Screen Resolution” and “Color Quality” for the second monitor. Click “Apply” or “OK” to apply these new values. G. Repeat steps C through E for the display icon identifi ed by the numbers three to six. ASRock ZH77 Pro3 Motherboard...
- Page 26 HDTV set-top-boxes, as well as few entertainment PCs requires a secure connection to a compliant display. Due to the increase in manufacturers employing HDCP in their equipment, it is highly recommended that the HDTV or LCD monitor you purchase is compatible. ASRock ZH77 Pro3 Motherboard...
-
Page 27: Asrock Smart Remote Installation Guide
The Multi-Angle CIR Receiver does not support Hot-Plug function. Please install it before you boot the system. * ASRock Smart Remote is only supported by some of ASRock motherboards. Please refer to ASRock website for the motherboard support list: http://www.asrock.com... -
Page 28: Jumpers Setup
fi rst, and then shut it down before you do the clear-CMOS ac- tion. Please be noted that the password, date, time, user default profi le, 1394 GUID and MAC address will be cleared only if the CMOS battery is removed. ASRock ZH77 Pro3 Motherboard... -
Page 29: Onboard Headers And Connectors
I/O panel, there are (9-pin USB4_5) three USB 2.0 headers on this (see p.2, No. 22) motherboard. Each USB 2.0 header can support two USB 2.0 ports. (9-pin USB6_7) (see p.2, No. 23) ASRock ZH77 Pro3 Motherboard... - Page 30 B. Connect Audio_R (RIN) to OUT2_R and Audio_L (LIN) to OUT2_L. C. Connect Ground (GND) to Ground (GND). D. MIC_RET and OUT_RET are for HD audio panel only. You don’t need to connect them for AC’97 audio panel. ASRock ZH77 Pro3 Motherboard...
- Page 31 When connecting your chassis front panel module to this header, make sure the wire assignments and the pin assign-ments are matched correctly. Chassis Speaker Header Please connect the chassis SPEAKER speaker to this header. (4-pin SPEAKER 1) DUMMY +5V DUMMY (see p.2, No. 18) ASRock ZH77 Pro3 Motherboard...
- Page 32 Pin 1-3. Pin 1-3 Connected 3-Pin Fan Installation (3-pin CPU_FAN2) +12V (see p.2, No. 2) CPU_FAN_SPEED ATX Power Connector Please connect an ATX power supply to this connector. (24-pin ATXPWR1) (see p.2, No. 8) ASRock ZH77 Pro3 Motherboard...
- Page 33 SPDIF audio output to HDMI (2-pin HDMI_SPDIF1) VGA card, allows the system to (see p.2, No. 29) SPDIFOUT connect HDMI Digital TV/ projector/LCD devices. Please connect the HDMI_SPDIF connector of HDMI VGA card to this header. ASRock ZH77 Pro3 Motherboard...
-
Page 34: Raid Functions
STEP 1: Set Up UEFI. A. Enter UEFI SETUP UTILITY Advanced screen Storage Confi guration. B. Set the option “SATA Mode Selection” to [IDE]. ® STEP 2: Install Windows XP / XP 64-bit OS on your system. ASRock ZH77 Pro3 Motherboard... - Page 35 A. Enter UEFI SETUP UTILITY Advanced screen Storage Confi guration. B. Set the option “SATA Mode Selection” to [AHCI]. ® STEP 2: Install Windows 7 / 7 64-bit / Vista / Vista 64-bit OS on your system. ASRock ZH77 Pro3 Motherboard...
-
Page 36: Bios Information
It will display the Main Menu automatically if “AUTORUN” is enabled in your computer. If the Main Menu does not appear automatically, locate and double-click on the fi le “ASSETUP.EXE” from the BIN folder in the Support CD to display the menus. ASRock ZH77 Pro3 Motherboard... - Page 37 1. 제품소개 ASRock 의 ZH77 Pro3 메인 보드를 구매하여 주신것에 대하여 감사 드립니다 . 이 메 인보드는 엄격한 품질관리 하에 생산되어진 신뢰성 있는 메인보드 입니다 . 이 제품 은 고 품격 디자인과 함께 ASRock 의 우수한 품질과 최고의 안정성을 자랑하고 있습...
- Page 38 - 최대 해상도 1920x1200 @ 60Hz 까지 HDMI 1.4a 지원 - 최대 해상도 2048x1536 @ 75Hz 까지 D-Sub 지원 - 자동 립 싱크 (Auto Lip Sync), 딥 컬러 (Deep Color)(12bpc), xvYCC, HBR( 고비트율 오디오 ), HDMI 지원 ASRock ZH77 Pro3 Motherboard...
- Page 39 - 소비자용 적외선 모듈 헤더 1 개 - COM 포트 헤더 1 개 - HDMI_SPDIF 헤더 1 개 - 전원 LED 헤더 1 개 - CPU 팬 커넥터 2 개 (4 핀 1 개 , 3 핀 1 개 ) ASRock ZH77 Pro3 Motherboard...
- Page 40 MediaEspresso 6.5 평가판 , ASRock MAGIX Multimedia Suite - OEM 특점및 특성 - ASRock Extreme Tuning Utility (AXTU) ( 주의 8 참조 ) - ASRock Instant Boot - ASRock Instant Flash ( 주의 9 참조 ) - ASRock APP Charger ( 주의 10 참조 ) - ASRock SmartView ( 주의...
- Page 41 / XP 에서 시스템 용도로 예약된 실제 메모리 크기는 4 GB 이하일 수 있습니다 . 64 비트 CPU 와 Windows ® 의 경우 그런 한계가 없습니다 . ASRock XFast RAM 을 사용하여 Windows ® 에서 사용할 수 없는 메모리를 이용할 수 있습니다 .
- Page 42 체제에 들어가지 않고도 시스템 BIOS 를 업데이트할 수 있습니다 . POST 중 에 BIOS 셋업 메뉴에서 <F6> 키를 누르거나 <F2> 키를 누르면이 유틸리티로 ASRock Instant Flash 에 액세스할 수 있습니다 .. 이제 이 툴을 시작하여 USB 플래시 드라이브 , 플로피 디스크 또는 하드 드라이브에 새 BIOS 파일을 저장...
- Page 43 Photoshop 속도를 5 배 증가 시킵니다 . ASRock XFast RAM 의 또 다른 장점 은 SSD 또는 HDD 의 액세스 빈도를줄여 수명을 확장 늘입니다 . 15. ASRock Crashless BIOS 로 실패 없이 BIOS 를 업데이트할 수 있습니다 . BIOS 업데이트 중에 전원 공급이 끊긴 후 전원이 다시 공급되면 ASRock Crashless BIOS 가...
- Page 44 삭제해야 하는 경우 먼저 시스템을 부팅하고 CMOS 를 종료하고 삭제 작업을 해 야 합니다 . CMOS 배터리를 제거할 경우에만 암호 , 날짜 , 시간 , 사용자 기본 프 로파일 , 1394 GUID, MAC 주소가 삭제됩니다 . ASRock ZH77 Pro3 Motherboard...
- Page 45 에도 USB 2.0 헤더가 3 개 있습 (2 페이지 , 22 번 항목 참조 ) 니다 . 각각의 USB 2.0 헤더는 2 개의 USB 2.0 포트를 지원할 수 있습니다 . (9 핀 USB6_7) (2 페이지 , 23 번 항목 참조 ) ASRock ZH77 Pro3 Motherboard...
- Page 46 Audio_R (RIN) 을 OUT2_R 에 연결하고 , Audio_L (LIN) 을 OUT2_L 에 연결합 니다 . Ground (GND) 을 Ground (GND) 에 연결합니다 . MIC_RET 및 OUT_RET 는 HD 오디오 패널 전용입니다 . 이들을 AC’97 오디오 패널에 연결 하지 않아도 됩니다 . ASRock ZH77 Pro3 Motherboard...
- Page 47 등으로 구성되어 있습니다 . 섀시 전면 패널 모듈을 이 헤더에 연결할 때 와이어 할당과 핀 할당이 정확히 일치하는지 확인합니다 . 새시 스피커 헤더 새시 스피커를 이 헤더에 연결하 십시오 . (4 핀 SPEAKER 1) (2 페이지 , 18 번 항목 참조 ) ASRock ZH77 Pro3 Motherboard...
- Page 48 3 핀 팬 설치 (3 핀 CPU_FAN2) +12V (2 페이지 , 2 번 항목 참조 ) CPU_FAN_SPEED ATX 전원 헤더 ATX 전원 공급기를 이 헤더에 연결하십시오 . (24 핀 ATXPWR1) (2 페이지 , 8 번 항목 참조 ) ASRock ZH77 Pro3 Motherboard...
- Page 49 (2 핀 HDMI_SPDIF1) HDMI_SPDIF 헤더는 시스템이 (2 페이지 , 29 번 항목 참조 ) SPDIFOUT HDMI 디지털 TV/ 프로젝터 / LCD 장치에 연결할 수 있게 합 니다 . HDMI VGA 카드의 HDMI_SPDIF 커넥터를 이 헤 더에 연결하십시오 . ASRock ZH77 Pro3 Motherboard...
- Page 50 뉴를 모니터에 디스플레이 시켜 줄 것입니다 . 만일 자동으로 메인 메뉴가 나타나지 않는다면 , 보조 CD 의 디스플레이 메뉴 안에 있는 BIN 폴더 ASSETUP.EXE 파일을 더블 클릭하여 주시기 바랍니다 . (D: \ BIN \ ASSETUP.EXE, D: 는 CD-ROM 드라이브 ) ASRock ZH77 Pro3 Motherboard...
- Page 51 1.1 パッケージ内容 ASRock ZH77 Pro3 マザーボード: (ATX フォームファクター : 12.0-in x 7.6-in, 30.5 cm x 19.3 cm) ASRock ZH77 Pro3 クイックインストレーションガイド ASRock ZH77 Pro3 サポート CD 2 x シリアル ATA (SATA) データケーブル(オプション) 1 x I/O パネルシールド ASRockからのお知らせ ASRockからのお知らせ ...
- Page 52 Quick Sync Video 2.0、Intel ® InTru 3D、Intel ® Clear ® ® Video HD Technology、Intel Insider 、Intel Graphics 2500/4000 ® - Intel Ivy Bridge CPU を搭載した DirectX 11、Pixel Shader 5.0。Intel ® Sandy Bridge CPU を搭載した DirectX 10.1、Pixel Shader 4.1。 ASRock ZH77 Pro3 Motherboard...
- Page 53 - 1 x フロント USB 3.0 ヘッダ (USB 3.0 ポート 2 基対応 )、USB 1.0/2.0/3.0 に最高 5Gb/s まで対応 コネクター - 4 x SATA2 3.0Gb/ 秒コネクタが、RAID (RAID 0, RAID 1, RAID 5, RAID 10, Intel Rapid Storage および Intel Smart Response 技術 ) をサポート , NCQ, AHCI および Hot ASRock ZH77 Pro3 Motherboard...
- Page 54 ( 注意 16 を参照 ) - ASRock Internet Flash ( 注意 17 を参照 ) - ASRock UEFI システムブラウザ - ASRock オン / オフ再生技術 ( 注意 18 を参照 ) - ASRock 除湿機機能 ( 注意 19 を参照 ) - ハイブリッドブースタ ASRock ZH77 Pro3 Motherboard...
- Page 55 - ASRock U-COP ( 注意 20 を参照 ) - 起動障害保護 (Boot Failure Guard:B.F.G.) - コンボクーラーオプション (C.C.O.) ( 注意 21 を参照 ) - グッドナイト LED モニター - CPU 温度検知 - マザーボード温度検知 - CPU/ シャーシ / 電源ファンタコメータ - CPU 静音ファン(CPU 温度によりシャーシファン速度の自動調整が 可能)...
- Page 56 7 64-bit / 7 / Vista 64-bit / Vista で使用できます。 マイク入力の場合、このマザーボードはステレオとモノラルモードをどちらもサ ポートします。オーディオ出力の場合、このマザーボードは 2 チャンネル、4 チャ ンネル、6 チャンネルと 8 チャンネルモードをサポートします。正しい接続につ いては、3 ページの表をチェックしてください。 ASRock Extreme Tuning Utility (AXTU) は、分かりやすいインター フェイスでさまざまなシステム機能を微調整するオールインワンツールで、 ハードウェアモニタ、ファンコントロール、オーバークロッキング、OC DNA、ES な どを含んでいます。ハードウェアモニタでは、システムの主要な読み込みを 示します。ファンコントロールでは、調整するファン速度と温度を示します。オー バークロッキングでは、CPU 周波数をオーバークロックして最適のシステムパ フォーマンスを出すことができます。OC DNA では、プロファイルとして OC 設...
- Page 57 提供します。LAN アプリケーション優先順位:アプリケーションの理想的な優先 順位を設定し、新しいプログラムを追加することができます。ゲームの低いレ イテンシ : オンラインゲームの優先順位を高く設定した後に、ゲームのレイテン シを下げることができます。トラフィックの成形 :Youtube HD ビデオを視聴し ながらファイルをダウンロードできます。データのリアルタイムの分析 : ステー タスウィンドウがあれば、現在転送しているデータストリームを容易に認識でき ます。 ASRock XFast RAM は、ASRock Extreme Tuning Utility (AXTU) ® を含む新機能です。Windows オペレーティングシステム 32 ビット CPU の 下では使用できないメモリ空間を利用します。 ASRock XFast RAM は、以 前に訪れたウェブサイトの表示にかかる時間を短縮し、これまで以上に迅速に ネットサーフィンを行えるようにします。 また、Adobe Photoshop の処理速...
- Page 58 ASRock オン / オフ技術により、ユーザーは PC の電源がオフになっている場 合でも(または ACPI S5 モードで)、MP3 プレーヤーや携帯電話などのポータ ブルオーディオデバイスから PC に転送された素晴らしいオーディオ体験をお 楽しみいただけます。 このマザーボードは無料の 3.5mm オーディオケーブル (オプション)も付属しているため、もっとも便利なコンピューティング環境を利 用することもできます。 「除湿機機能」を有効にすれば、湿気によるマザーボードの破損を防止できま す。除湿機機能を有効にすると、コンピュータが自動的にオンになって、S4/ S5 状態になるとシステムから湿気を取り除きます。 CPU のオーバーヒートが検出されますと、システムは自動的にシャットダウンさ れます。システムのレジュームを行う前に、マザーボード上の CPU 冷却ファン が正しく機能しているか確認してから電源コードを外し、そして再度つないでく ださい。放熱効果を高める為には、PC システムのインストール時に、CPU とヒー トシンクの間に放熱グリースをスプレイするのが効果的です。 コンボクーラーオプション (C.C.O.) では、Socket LGA 775、LGA 1155 と...
- Page 59 デフォルト設定 CMOS の消去 注 : CLRCMOS1 により、CMOS のデータをクリアできます。システムパラメータをクリアしデフォルト設定にリ セットするには、コンピュータの電源をオフにし、電源装置から電源コードを抜いてください。15 秒待って から、ジャンパキャップを使用して CLRCMOS1 のピン 2 とピン 3 を 5 秒間ショートしてください。ただし、 BIOS 更新の後すぐには CMOS をクリアしないでください。BIOS の更新の終了後直ちに CMOS をクリア する必要がある場合、まずシステムを起動してからシャットダウンし、その後クリア CMOS アクションを実 行する必要があります。パスワード、日付、時刻、ユーザーデフォルトのプロファイルを忘れずにメモして ください。1394 GUID と MAC アドレスは、CMOS バッテリを取り外した場合のみ消去されます。 ASRock ZH77 Pro3 Motherboard...
- Page 60 I/O パネルには、デフォルトの 4 つの USB 2.0 ポート以外に、このマザーボ (9 ピン USB4_5) ードに 3 つの USB 2.0 ヘッダが搭載 ページ 2, アイテム 22 を参照 されています。それぞれの USB 2.0 ヘッダは 2 つの USB 2.0 ポートをサ ポートできます。 (9 ピン USB6_7) ページ 2, アイテム 23 を参照 ASRock ZH77 Pro3 Motherboard...
- Page 61 ページ 2, アイテム 30 を参照 ターフェイスです。 OUT2_L J_SENSE OUT2_R MIC2_R MIC2_L ハイディフィニションオーディオはジャックセンシングをサポートしますが、 正しく機能するためにシャーシのパネルワイヤが HDA をサポートする必 要があります。このマニュアルとシャーシのマニュアルの指示に従って、シ ステムを取り付けてください。 AC’97 オーディオパネルを使用する場合、次のように前面パネルのオー ディオヘッダに取り付けてください。 Mic_IN (MIC) を MIC2_L に接続します。 Audio_R (RIN) を OUT2_R に、Audio_L (LIN) を OUT2_L に接続します。 Ground (GND) を Ground (GND) に接続します。 ASRock ZH77 Pro3 Motherboard...
- Page 62 がフリーズし、 正常な再起動をしない場合は、 リセットスイッチを押してコンピュー タを再起動します。 PLED ( システム電源 LED): シャーシの前面パネルに付いている電源ステータスインジケータに接続しま す。LED は、システムが動作しているときに点灯します。LED はシステムが S1/S3 スリープ状態のときに点滅します。システムが S4 スリープ状態になる か、電源オフ (S5) になると、LED は消灯します。 HDLED ( ハードドライブアクティビティ LED): シャーシの前面パネルに付いているハードドライブアクティビティ LED に接続 します。LED は、ハードドライブがデータの読み込みまたは書き込み動作をし ているときに点灯します。 前面パネルのデザインはシャーシによって異なります。前面パネルモジュール は、主に電源スイッチ、リセットスイッチ、電源 LED、ハードドライブアクティビティ LED、スピーカーなどから構成されています。シャーシの前面パネルモジュー ルをこのヘッダに接続する際は、ワイヤとピンの割り当てが正しく対応してい ることを確認してください。 ASRock ZH77 Pro3 Motherboard...
- Page 63 ン速度コントロール機能がない場合でも、3 ピン CPU ファンは正常に作動します。3 ピン CPU ファンをこのマザーボードの CPU ファンコネクタに接続しようとしている場合、ピン 1-3 に接続してください。 接続されたピン 1-3 3 ピンファンのインストール (3 ピン CPU_FAN2) +12V ページ 2, アイテム 2 を参照 CPU_FAN_SPEED ATX パワーコネクタ ATX 電源コネクタを接続します。 (24 ピン ATXPWR1) ページ 2, アイテム 8 を参照 ASRock ZH77 Pro3 Motherboard...
- Page 64 ページ 2, アイテム 28 を参照 HDMI_SPDIF ヘッダ HDMI_SPDIF ヘッダは、SPDIF 音声 出力を HDMI VGA カードに提供し、 (2- ピン HDMI_SPDIF1) システムで HDMI デジタル TV/ プロ ページ 2, アイテム 29 を参照 SPDIFOUT ジェクタ /LCD デバイスに接続できる ようにします。HDMI VGA カードの HDMI_SPDIF コネクタを、このヘッダに 接続してください。 ASRock ZH77 Pro3 Motherboard...
- Page 65 7 / 7 64-bit / Vista / Vista bit / XP / XP 64-bit といった様々なマイクロソフト ウインドウズ オペレーティングシ ステムをサポートします。マザーボードに付属しているサポート CD はマザーボードの特徴 を有効にするために必要なドライバやユーティリティを含んでいます。サポート CD を使用 するには、CDROM ドライブに CD を挿入してください。AUTORUN 機能が有効な場合、自 動的にメインメニュウが立ち上がります。AUTORUN 機能が無効な場合、サポート CD 内の BIN フォルダにある ASSETUP.EXE をダブルクリックすることにより、メインメニュウが立ち 上がります。 ASRock ZH77 Pro3 Motherboard...
- Page 66 1. 主板簡介 謝謝你采用了華擎 ZH77 Pro3 主板 , 本主板由華擎嚴格制造 , 質量可靠 , 穩定性好 , 能夠獲得卓越的性能。本安裝指南介紹了安裝主板的步驟。更加詳細的主板信息可參 看驅動光盤的用戶手冊。 由于主板規格和 BIOS 軟件將不斷升級 , 本手冊之相關內容變更恕不另行 通知。請留意華擎网站上公布的升級版本。你也可以在華擎網站找到最新 的顯卡和 CPU 支持表。 華擎网址:http://www.asrock.com 如果您需要與此主板有關的技術支持 , 請參觀我們的網站以了解您使用機 種的規格信息。 www.asrock.com/support/index.asp 1.1 包裝盒內物品 華擎 ZH77 Pro3 主板 (ATX 規格 : 12.0 英吋 X 7.6 英吋 , 30.5 厘米 X 19.3 厘米 ) 華擎...
- Page 67 - 支持 HDMI 1.4a, 最高分辨率達 1920x1200 @ 60Hz - 支持 D-Sub, 最高分辨率達 2048x1536 @ 75Hz - 支持 HDMI, 可支持 Auto Lip Sync、Deep Color (12bpc)、 xvYCC 與 HBR( 高位速音頻 )( 需配備兼容 HDMI 的顯示器 ) ( 詳見警告 6) ASRock ZH77 Pro3 Motherboard...
- Page 68 - 2 x CPU 風扇接頭 (1 x 4 針 , 1 x 3 針 ) - 2 x 機箱風扇接頭 (1 x 4 針 , 1 x 3 針 ) - 1 x 電源風扇接頭 (3 針 ) - 24 針 ATX 電源接頭 ASRock ZH77 Pro3 Motherboard...
- Page 69 支持光盤 - 驅動程序 , 工具軟件 , 殺毒軟件(測試版本 ),CyberLink MediaEspresso 6.5 試用版 , 華擎 MAGIX 多媒体套件 - OEM 獨家功能 - ASRock Extreme Tuning Utility (AXTU)(詳見警告 8) - 華擎即時開機功能 - 華擎 Instant Flash(見警告 9) - 華擎 APP Charger(見警告 10) - 華擎 SmartView(見警告 11)...
- Page 70 64 位元 /Vista 支持 HBR。 7、 在麥克風輸入方面,這款主板支持立體聲和單聲道這兩種模式。在音頻輸 出方面,這款主板支持 2 聲道、4 聲道、6 聲道以及 8 聲道模式。請查閱 第 3 頁的表格瞭解正確的連接方式。 8、 ASRock Extreme Tuning Utility (AXTU) 是一個多合一的工具,可在用戶 友好的界面中微調不同的系統功能,包括硬件監控、風扇控制、超頻、O C DNA 和 IES。在 Hardware Monitor(硬件監控)中,顯示系統的主要參數。 在 Fan Control(風扇控制)中,顯示風扇速度和溫度,以便您進行調整。 在 Overclocking(超頻)中,您可以對 CPU 進行超頻,以优化系統性能。 在 OC DNA 中,您可以將自己的 OC 設置保存為配置文件,并与您的朋友共...
- Page 71 存在差异。 13、 華擎 XFast LAN 可提供更快的网絡訪問,包括以下諸多好處。网絡應用程 序优先級:您可以設置理想的應用程序优先級,并可以添加新程序。游戲 更少延遲:將在線游戰設置為較高的优先級,可降低游戰中的延遲。流量 定形:您可以在觀看 Youtube 高清視頻的同時進行文件下載。實時分析您 的數据:通過狀態窗口,您可以清楚地看到目前正在傳輸的是哪個數据流。 14、華擎 XFast RAM 是 ASRock Extreme Tuning Utility (AXTU) 中加入的一項 ® 新功能。它能充分利用 Windows 操作系統 32-bit CPU 無法使用的內存空 間。華擎 XFast RAM 可縮短之前訪問過的网站的加載時間,從而加快网絡 衝浪速度。此外,它還能提升 Adobe Photoshop 運行的速度高達五倍之多。 華擎 XFast RAM 的另一項优勢是它能減少訪問 SSD 或 HDD 的頻次,從而延...
- Page 72 消耗必須在 1.00W 以下。為滿足 EuP 標準 , 您需要同時具備支持 Eu P 的主 ® 板和支持 EuP 的電源供應器。根據 Intel 的建議 , 支持 EuP 的電源供應器 必須滿足在 100m A 電流消耗時 ,5V s b 電源效率高于 50%。有關支持 E u P 的 電源供應器選擇方面的更多細節 , 我們建議您諮詢電源供應器的製作商。 ASRock ZH77 Pro3 Motherboard...
- Page 73 線帽將 C L R C M O S1 上的插針 2 和插針 3 短接 5 秒。但是,請勿在更新 B I O S 后 立即清除 C M O S。如果需要在更新 B I O S 后立即清除 C M O S,必須在執行 C M O S 清除操作之前,先啟動然后關閉系統。請注意,只有取出 C M O S 電池,密碼、 日期、時間、用戶默認配置文件、1394 GUID 和 MAC 地址才會被清除。 ASRock ZH77 Pro3 Motherboard...
- Page 74 三組 USB 2.0 接針。 這組 USB 2.0 ( 見第 2 頁第 22 項 ) 接針可以支持兩個 USB 2.0 接 口。 (9 針 USB6_7) ( 見第 2 頁第 23 項 ) USB_PWR (9 針 USB8_9) ( 見第 2 頁第 24 項 ) DUMMY USB_PWR ASRock ZH77 Pro3 Motherboard...
- Page 75 XP / XP 64 位元操作系統中 : 選擇”Mixer”。選擇”Recorder”。接著點擊”FrontMic”。 在 Windows ® 7 / 7 64 位元 / Vista / Vista 64 位元操作系統中 : 在 Realtek 控制面板中點擊”FrontMic”。調節”Recording Volume”。 系統面板接頭 這個接頭提供數個系統前面板功 能。 (9 針 PANEL1) ( 見第 2 頁第 20 項 ) ASRock ZH77 Pro3 Motherboard...
- Page 76 ( 見第 2 頁第 21 項 ) (3 針 PWR_FAN1) ( 見第 2 頁第 35 項 ) +12V PWR_FAN_SPEED CPU 風扇接頭 請將 CPU 風扇連接線接到這個接 FAN_SPEED_CONTROL CPU_FAN_SPEED 頭,讓黑線與接地的針腳相接。 (4 針 CPU_FAN1) +12V ( 見第 2 頁第 1 項 ) 1 2 3 4 ASRock ZH77 Pro3 Motherboard...
- Page 77 雖然此主板提供 8-pin ATX 12V 電源接口 , 但是您仍然可以使用傳統的 4-pin ATX 12V 電源。為了使用 4-pin ATX 12V 電源 , 請順著 Pin 1 和 Pin 5 插上電 源接頭。 4-Pin ATX 12V 電源安裝說明 串行接口連接器 這個 COM1 端口支持一個串行接 口的外設。 (9 針 COM1) ( 見第 2 頁第 28 項 ) ASRock ZH77 Pro3 Motherboard...
- Page 78 進行常規檢驗。如果你需要在開機自檢 ( P O S T ) 之后進入 B I O S 設置程序,請按下 <Ctrl>+<Alt>+<Delete> 鍵重新啟動電腦,或者按下系統面板上的重啟按鈕。有關 BIOS 設置的詳細信息,請查閱隨機支持光盤裡的用戶手冊 (PDF 文件 )。 3. 支持光盤信息 本主板支持各種微軟視窗操作系統:Microsoft ® Windows ® 7/7 64 位元 /Vista Vista 64 位元 /XP/XP 64 位元。主板隨機支持光盤包含各種有助于提高主板效能的 必要驅動和實用程序。請將隨機支持光盤放入光驅裡,如果電腦的“自動運行”功能 已啟用,屏幕將會自動顯示主菜單。如果主菜單不能自動顯示,請查找支持光盤內 BIN 文件夾下的“ASSETUP.EXE”,并雙擊它,即可調出主菜單。 ASRock ZH77 Pro3 Motherboard...
- Page 79 明。 有害物質或元素 部件名稱 鉛 (Pb) 鎘 (Cd) 汞 (Hg) 六价鉻 (Cr(VI)) 多溴聯苯 (PBB) 多溴二苯醚 (PBDE) 印刷電路板 及電子組件 外部信號連 接頭及線材 O: 表示該有毒有害物質在該部件所有均質材料中的含量均在 SJ/T 11363-2006 標準規定 的限量要求以下。 X: 表示該有毒有害物質至少在該部件的某一均質材料中的含量超出 SJ/T 11363-2006 標準 規定的限量要求,然該部件仍符合歐盟指令 2002/95/EC 的規範。 備註 : 此產品所標示之環保使用年限,系指在一般正常使用狀況下。 ASRock ZH77 Pro3 Motherboard...
- Page 80 1. 主機板簡介 謝謝你採用了華擎 ZH77 Pro3 主機板 , 本主機板由華擎嚴格製造 , 品質可靠 , 穩定 性好 , 能夠獲得卓越的性能。此快速安裝指南包括了主機板介紹和分步驟安裝指導。 您可以查看支持光碟裡的使用手冊了解更詳細的資料。 由於主機板規格和 BIOS 軟體將不斷更新 , 本手冊之相關內容變更恕不另 行通知。請留意華擎網站上公布的更新版本。你也可以在華擎網站找到最 新的顯示卡和 CPU 支援列表。 華擎網址:http://www.asrock.com 如果您需要與此主機板有關的技術支援 , 請參觀我們的網站以了解您使用 機種的規格訊息。 www.asrock.com/support/index.asp 1.1 包裝盒內物品 華擎 ZH77 Pro3 主機板 (ATX 規格 : 12.0 英吋 x 7.6 英吋 , 30.5 公分 x 19.3 公分 ) 華擎...
- Page 81 - 雙 VGA 輸出 : 透過獨立顯示控制器提供 DVI-D 和 D-Sub 接口 - 支援 HDMI 1.4a, 最高解析度達 1920x1200 @ 60Hz - 支援 D-Sub, 最高解析度達 2048x1536 @ 75Hz - 支援 HDMI, 可支援 Auto Lip Sync、Deep Color (12bpc)、 xvYCC 與 HBR( 高位元率音效 )( 需具備相容 HDMI 的銀幕 ) ASRock ZH77 Pro3 Motherboard...
- Page 82 - 2 x CPU 風扇接頭 (1 x 4 針 , 1 x 3 針 ) - 2 x 機箱風扇接頭 (1 x 4 針 , 1 x 3 針 ) - 1 x 電源風扇接頭 (3 針 ) - 24 針 ATX 電源接頭 ASRock ZH77 Pro3 Motherboard...
- Page 83 支援光碟 - 驅動程式 , 工具軟體 , 防毒軟體(試用版本 ),CyberLink MediaEspresso 6.5 試用版 , 華擎 MAGIX 多媒體套餐 - OEM 獨家功能 - ASRock Extreme Tuning Utility (AXTU)(詳見警告 8) - 華擎即時開機功能 - 華擎 Instant Flash(見警告 9) - 華擎 APP Charger(見警告 10) - 華擎 SmartView(見警告 11)...
- Page 84 64 位元 /Vista 支援 HBR。 7、 在麥克風輸入方面,這款主機板支援立體聲和單聲道這兩種模式。在音效 輸出方面,這款主機板支援 2 聲道、4 聲道、6 聲道以及 8 聲道模式。請 參閱第 3 頁的表格瞭解正確的連接方式。 8、 ASRock Extreme Tuning Utility (AXTU) 是一款多合一的工具,易於操 作的使用者介面便於微調不同的系統功能(例如:Hardware Monitor、 Fan Control、Overclocking、OC DNA 及 IES)。Hardware Monitor 可顯 示系統的主要讀數;Fan Control 可顯示並可供您調整風扇速度及溫度; Overclocking 可供您進行 CPU 超頻以獲得最佳系統效能。透過 OC DNA,...
- Page 85 12、 華擎 XFast USB 可提升 USB 儲存裝置的效能(效能可能須視裝置特性而定)。 13、 華擎 XFast LAN 可提供更快的互聯網連接,包含以下諸多優勢。局域網優先 應用:您可以設置理想的優先應用程式,並可以添加新程式。減少遊戲延遲: 在設置優先級更高的網路遊戲時,可降低遊戲中的延遲。流量定形:您可以 在觀看 Youtube 高解析影片的同時還進行文件下載。及時分析您的數據:透 過狀態窗口,您可以清楚地看到目前正在傳輸的是哪個數據流。 14、 華擎 XFast RAM 是 ASRock Extreme Tuning Utility (AXTU) 中加入的一項 ® 新功能。它能充分利用 Windows 操作系統 32-bit CPU 無法使用的記憶體空 間。華擎 XFast RAM 可縮短之前訪問過的網站的讀取時間,從而加快網路瀏 覽速度。此外,它還能提升 Adobe Photoshop 執行的速度高達五倍之多。華...
- Page 86 23、 EuP, 全稱 Energy Using Product( 能耗產品 ), 是歐盟用來定義完整系統耗 電量的規定。根據 EuP 的規定 , 一個完整系統在關機模式下的交流電總消耗 必須在 1.00W 以下。為符合 EuP 標準 , 您需要同時具備支援 EuP 的主機板和 ® 支援 EuP 的電源供應器。根據 Intel 的建議 , 支援 EuP 的電源供應器必須 符合在 100mA 電流消耗時 ,5Vsb 電源效率高於 50%。有關支援 EuP 的電源供 應器選擇方面的詳情 , 我們建議您諮詢電源供應器的製造商。 ASRock ZH77 Pro3 Motherboard...
- Page 87 註: C L R C M O S1 可供您清除 C M O S 中的資料。若要清除及重設系統參數並恢復為預設設 定,請先關閉電腦電源,並從電源插座中拔下電源線,等待 15 秒鐘之後,使用跳 線帽使 CLRCMOS1 的 pin2 及 pin3 短路 5 秒的時間。但請勿於更新 BIOS 後立即清除 CMOS。如需於更新 BIOS 後立即清除 CMOS,您必須先開機再關機,然後再執行 CMOS 清除操作。請注意,只有在移除 C M O S 電池的情況下,密碼、日期、時間、使用者 預設設定檔、1394 GUID 及 MAC 位址才會清除。 ASRock ZH77 Pro3 Motherboard...
- Page 88 組 USB 2.0 接針。每組 USB 2.0 ( 見第 2 頁第 22 項 ) 接針可以支援兩個 USB 2.0 接 口。 (9 針 USB6_7) ( 見第 2 頁第 23 項 ) USB_PWR (9 針 USB8_9) ( 見第 2 頁第 24 項 ) DUMMY USB_PWR ASRock ZH77 Pro3 Motherboard...
- Page 89 XP / XP 64 位元作業系統中 : 選擇"Mixer"。選擇"Recorder"。接著點選"FrontMic"。 在 Windows ® 7 / 7 64 位元 / Vista / Vista 64 位元作業系統中 : 在 Realtek 控制面板中點選"FrontMic"。調整"Recording Volume"。 系統面板接頭 可接各種不同燈,電源開關及重 啟鍵等各種連線。 (9 針 PANEL1) ( 見第 2 頁第 20 項 ) ASRock ZH77 Pro3 Motherboard...
- Page 90 CHA_FAN_SPEED +12V CHA_FAN1 和 CHA_FAN2 支援風扇 ( 見第 2 頁第 7 項 ) 控制。 (3 針 CHA_FAN2) ( 見第 2 頁第 21 項 ) (3 針 PWR_FAN1) ( 見第 2 頁第 35 項 ) +12V PWR_FAN_SPEED ASRock ZH77 Pro3 Motherboard...
- Page 91 4-pin ATX 12V 電源。為了使用 4-pin ATX 12V 電源 , 請 順著 Pin 1 和 Pin 5 插上電源接頭。 4-Pin ATX 12V 電源安裝說明 序列埠 這個序列埠 COM1 支援一個序列 埠的裝置。 (9 針 COM1) ( 見第 2 頁第 28 項 ) ASRock ZH77 Pro3 Motherboard...
- Page 92 運行需要時,測試和初始化元件。有關 B I O S 設置的詳細訊息,請查閱隨機支援光碟 裡的使用手冊 (PDF 文件 )。 3. 支援光碟訊息 ® ® ® 本主板支援各種微軟 Windows 操作系統:Microsoft Windows 7/7 64 位元 / Vista /Vista 64 位元 /XP/XP 64 位元。主板附帶的支援光碟包含各種有助於提高主 板效能的必要驅動和實用程式。請將隨機支援光碟放入光碟機裡,如果系統的“自動 運行"功能已啟用,銀幕將會自動顯示主菜單。如果主菜單不能自動顯示,請查閱支 援光碟內 BIN 文件夾下的 ASSETUP.EXE 文件並雙點它,即可調出主菜單。 ASRock ZH77 Pro3 Motherboard...
-
Page 93: Isi Paket
1. Penjelasan Terima kasih telah membeli motherboard ASRock ZH77 Pro3, motherboard andal yang diproduksi berdasarkan kontrol kualitas tinggi ASRock secara konsisten. Motherboard ini memberikan performa terbaik dengan desain yang kokoh sesuai komitmen ASRock untuk kualitas dan daya tahan. Panduan Pemasangan Ringkas ini berisi pendahuluan tentang motherboard dan panduan pemasangan langkah demi langkah. - Page 94 - Pixel Shader 5.0, DirectX 11 dengan Intel Ivy Bridge CPU, ® Pixel Shader 4.1, DirectX 10.1 dengan Intel Sandy Bridge - Ingatan sama Max. 1760MB - Output VGA Ganda: mendukung port HDMI dan D-Sub melalui pengontrol tampilan independen ASRock ZH77 Pro3 Motherboard...
- Page 95 - 4 x penghubung SATA2 3.0Gb/s, dapat menggunakan RAID (RAID 0, RAID 1, RAID 5, RAID 10, Intel Rapid Storage dan Intel Smart Response Technology), NCQ, AHCI dan fungsi Hot Plug - 2 x penghubung SATA3 6.0Gb/s ASRock ZH77 Pro3 Motherboard...
- Page 96 1.8V PLL, VTT, VCCSA Sokongan CD - Driver, Utilitas, Perangkat Lunak Antivirus (Versi Percobaan), CyberLink MediaEspresso 6.5 Versi Percobaan, ASRock MAGIX Multimedia Suite - OEM Fitur Unik - ASRock Extreme Tuning Utility (AXTU) - ASRock Instant Boot - ASRock Instant Flash...
- Page 97 7 / 7 64-bit / Vista Vista 64-bit / XP / XP 64-bit Sertifi kasi - FCC, CE, WHQL - ErP/EuP Ready (memerlukan catu daya ErP/EuP ready) * Untuk informasi rinci, silakan kunjungi website kami: http://www.asrock.com ASRock ZH77 Pro3 Motherboard...
- Page 98 (“xxx” is the device which contains your Windows installation fi les. Normally it is an optical drive.) You can also press <F11> to launch boot menu at system POST and choose the item “UEFI:xxx“ to boot. ® 4. Start Windows installation. ASRock ZH77 Pro3 Motherboard...
-
Page 99: Installing Os On A Hdd Larger Than 2Tb In Raid Mode
RAID drivers into a USB fl ash disk. You can download the driver from ASRock's website and unzip the fi le into a USB fl ash disk OR copy the fi le from ASRock motherboard support CD. (please copy the fi les under following directory: 32 bit: ..\i386\Win7_Vista_Intel_.. - Page 100 's suggested solution: A. Disable System Restore. a. Type “systempropertiesprotection” in the Start Menu. Then press "Enter". b. De-select Local Disks for System Restore. Then Click “Turn System Restore Off” to confi rm. Then Press “Ok”. ASRock ZH77 Pro3 Motherboard...
- Page 101 B. Disable “Volume Shadow Copy” service. a. Type “computer management” in the Start Menu, then press “Enter”. b. Go to “Services and Applications>Services”; Then double click “Volume Shadow Copy”. ASRock ZH77 Pro3 Motherboard...
- Page 102 (This may take a long time; >30 mins.) C. Reboot your system. (It may take about 5 minutes to reboot.) ® D. Windows will install this hotfi x then reboot by itself. E. Please start to install motherboard drivers and utilities. 6. Finish. ASRock ZH77 Pro3 Motherboard...
Need help?
Do you have a question about the ZH77 Pro3 and is the answer not in the manual?
Questions and answers