Table of Contents
Advertisement
Available languages
Available languages
Quick Links
Advertisement
Chapters
Table of Contents

Related Manuals for LG KG195


Summary of Contents for LG KG195
-
Page 1: User Guide
ENGLISH हं दी KG195 USER GUIDE Some of contents in this manual may differ from your phone depending on the software of the phone or your service provider. LG Electronics Inc. P/N : MMBB0249401 0678 http://www.lgmobile.com (1.0) - Page 2 Bluetooth QD ID B012984...
- Page 3 ENGLISH KG195 USER GUIDE Some of contents in this manual may differ from your phone depending on the software of the phone or your service provider.
-
Page 4: Table Of Contents
Contents General information ....................6 Battery care ..........................6 Access codes ..........................6 Care and Maintenance ......................7 Important safety information ....................8 Emergency calls ........................11 Your phone ........................12 Front /Side View of Phone ....................12 Key Function List ........................13 Standby mode ........................14 Getting Started ......................15 Installing the SIM card and the battery ..............15 Charging the battery ......................16 Switching the phone on and off ..................16... - Page 5 Contents Call history ........................29 All calls [Menu 2-1] ......................29 Missed calls [Menu 2-2] ....................29 Dialled calls [Menu 2-3] .....................29 Received calls [Menu 2-4] ....................30 Delete call log [Menu 2-5] ....................30 Call time [Menu 2-6] ......................30 Call cost [Menu 2-7] ......................31 Text message counter [Menu 2-8] ................31 GPRS counter [Menu 2-9] ....................31 Tools ..........................32...
- Page 6 Contents Music player [Menu 4-6] ....................45 Voice recorder [Menu 4-7] ....................46 Melody composer [Menu 4-8] ..................47 FM radio [Menu 4-9] ......................49 Schedule FM record [Menu 4-0] ...................50 Messaging ........................51 Text Messages (SMS) [Menu 5-1] ................51 Multimedia message (MMS) [Menu 5-2] ..............55 Chat [Menu 5-3] ........................61 Voice mail server [Menu 5-4] ..................63 Broadcast message [Menu 5-5] ..................63...
- Page 7 Contents Settings .........................72 Time & Date [Menu 9-1] ....................72 Display [Menu 9-2] ......................73 Phone [Menu 9-3] ........................74 Call [Menu 9-4] ........................75 Bluetooth [Menu 9-5] ......................77 Network [Menu 9-6] ......................82 Security [Menu 9-7] ......................83 Restore factory settings [Menu 9-8] ................84 Troubleshooting ......................85 Accessories .......................87 Technical data ......................88...
-
Page 8: General Information
General information Battery care Your phone is powered by a rechargeable battery. • The battery can be charged and discharged hundreds of times but it will eventually wear out. When the operating time (talk-time and standby time) is noticeably shorter than normal, you should buy a new battery at that time. -
Page 9: Care And Maintenance
General information ! Note If you key in an incorrect PIN code three times in succession, you may need to key in PUK code. PIN2 code The PIN2 code may be supplied with the SIM card. Some functions will require PIN2 support, such Set tariff. ! Note Your may need to obtain the password from your service provider. -
Page 10: Important Safety Information
• Treat your mobile phone with care, keep it in a clean and dust free place. • Do not use the phone if the antenna is damaged. If a damaged antenna contacts skin, it may cause a light burn. Please contact an LG Authorized Service Center to replace the damaged antenna. - Page 11 • While there may be differences between the SAR levels of various LG phone models, they are all designed to meet the relevant guidelines for exposure to radio waves.
- Page 12 General information Pacemaker Mobile phones may affect the operation of some implanted cardiac pacemakers and other medically implanted equipment. Pacemaker manufacturers recommend that a minimum separation of 20 cm (6 inches) be maintained between a hand-held wireless phone and a pacemaker to avoid potential interference with the pacemaker.
-
Page 13: Emergency Calls
General information Sparks in such areas could cause an explosion or fire resulting in bodily injury or even death. Areas with a potentially explosive atmosphere are often, but not always, clearly marked. They include fuelling areas, such as petrol station, below deck on boats, fuel or chemical transfer or storage facilities, and areas where the air contains chemicals or particles, such as grain, dust, or metal powders;... -
Page 14: Your Phone
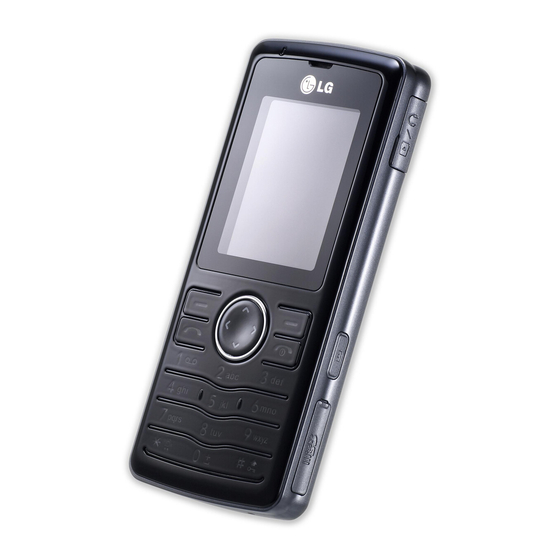
Your phone Front/Side view of Phone Main display Navigation key Right soft key Left soft key Talk key/ Yes key Power on / End call * key # key Microphone Earphone Jack & Mini USB Volume key Camera key MicroSD... -
Page 15: Key Function List
Your phone Key Function List • Side key – Volume (+, –) During a call, adjusts the earpiece volume. • Side key – Camera Q The side key is used to capture image when in camera mode.. • Soft key < > The current functions are displayed in the bottom line of LCD. -
Page 16: Standby Mode
Your phone Standby mode In the main display, you may see several icons showed on your status bar. The meaning of icons are explained in the below: You are in roaming. The signal strength of the cellular network at your When missing the current location. -
Page 17: Getting Started
Getting Started Installing the SIM card and the battery You need to insert the SIM card and charge the battery before using the phone. • Keep all miniature SIM cards out of the reach of little children. • Be careful to handle, insert or remove the SIM card since the SIM card and its contacts can easily be damaged by scratched or bending. -
Page 18: Charging The Battery
Getting Started Charging the battery You must fully charge the battery before using your phone for the first time. 1. Connect the lead from the travel adapter to the socket situated on the side of your phone (A). 2. Connect the charger to an AC wall outlet. ! Note You can use the phone while the charger is connected. -
Page 19: Making A Call
Call functions This gives you the information about all calling services that are supported in your phone. Making a call • In standby mode, key in the number, including the area code, press S key. Making a call from the Contacts 1. -
Page 20: Call Waiting
Call functions Call waiting You can answer another incoming call while you have a call in progress. 1. During a call, press < left soft key (LSK) to enter option menu and answer the incoming call. (your first call will be on hold automatically). Make a conference call You can make conference call while you have multi calls in progress. - Page 21 Call functions 6. Voice recorder: to record your conversation during an active phone call. 7. Mute on/off: set On/ Off to mute the call during the conversation. 8. DTMF: set On/Off for DTMF (Dual Tone Multi-Frequency) tone dialing system. If you connect to a consequitive waiting call then following options will be displayed.
-
Page 22: Input Method
Input method You can key in text by using the traditional method or predictive smart input. Your phone is designed to support English and Hindi. To select input method 1. When key in text, press Option and select Input method. Quick way to change input method •... - Page 23 Input method Hindi Characters ँ ं ः ् ़ 1 ा ि ी ु ू ृ अ आ इ ई उ ऊ ऋ 2 े ै ॅ ो ौ ॉ ए ऐ ऍ ओ औ ऑ 3 क ख ग घ ङ 4 क़ ख़ ग़ च...
- Page 24 Multitap ABC Numeric T9 Smart Hindi (Hindi Smart mode) T9अइ Numeric अआइ Multitap Hindi (Hindi) Numeric...
-
Page 25: Listing Of Functions
Listing of Functions 5. Headset Browser [Menu 1] Multimedia [Menu 4] 6. Silent 1. WAP 1. Games & Apps 7. Bluetooth 2. Data account 2. Camera 3. Image viewer 4. Video recorder Contacts [Menu 8] Call history [Menu 2] 5. Video player 1. -
Page 26: Browser
Browser Service described in the following are supported by your service provider. If you cannot connect either one of those services, you might contact with your service provider for further information. WAP [Menu 1-1] Your phones support Web Browser. You can obtain various services such as up-to date news, weather, sport, and other information as well as use e- mail and other Internet services. - Page 27 Browser • Delete all: Allow you to delete all bookmarks at once. • Add bookmark: Allow you to add URL address. Recent pages [Menu 1-1-3] You can view the recent pages you have visited. Press Goto to connect the selected page. Enter address [Menu 1-1-4] You can key in the URL address and enter the address followed by selecting Done.
-
Page 28: Activate Wap Settings
Browser WAP setting • If the settings have made by the service provider, you may begin immediately. • If access profiles have assigned by your service provider, select a profile and activate it. • Otherwise, you may key in setting manually. For appropriate settings, contact your network operator or service provider. -
Page 29: Data Account [Menu 1-2]
Browser Service message settings You can choose either receive or not receive the service message that saved in the service inbox sent by your service provider. Clear cache The information or date you have accessed are all stored in the cache of the phone. - Page 30 Browser GSM data [Menu 1-2-1] Press Edit to change the data account settings, including: Account name, Number, User name, Password, Line Type, Speed and DNS. GPRS [Menu 1-2-2] Press Edit to change the data account settings, including: Account name, APN, User name, Password and Auth. type.
-
Page 31: Call History
Call history Your phone can save information for missed, received and dialled calls and the length and cost of your calls. ! Note Once the call list exceeds the memory limitation, the oldest one is deleted. ! Note For Missed, Dialled & Received calls, you can press talk key S to have a quick review. -
Page 32: Received Calls [Menu 2-4]
Call history • Edit: Allow you to edit the number. • Send text message: Allow you to send a text message the number showed in the screen. • Send multimedia message: Allow you to send a multimedia message the number showed in the screen. Received calls [Menu 2-4] Your phone allows you to view the last 40 received calls. -
Page 33: Call Cost [Menu 2-7]
Call history Call cost [Menu 2-7] This function allows you to check the cost while making phone call. Your phone provides the following selections for your option: • Last call cost: Last call you made • Total cost: Sum of costs you made so far •... -
Page 34: Tools
Tools Calendar [Menu 3-1] This feature allows you to keep track of your schedule and tasks that are saved in calendar. You can also switch on alarm with the task for reminding. To make a note and reminder in Calendar first time 1. -
Page 35: To Do [Menu 3-2]
Tools To do [Menu 3-2] This feature list out all your tasks you have added from calendar option. You can also view, edit or delete the tasks from the options under this feature. For first time use, you will need to do the following steps: 1. -
Page 36: World Clock [Menu 3-4]
Tools World clock [Menu 3-4] You can pick up the city simply using left and right key of Navigator. When the cross point out certain city, it will show the local date and time. Also, you may press Options to turn on/off Daylight saving time for foreign region and Set as the home city you have selected in the pervious menu. -
Page 37: Unit Converter [Menu 3-6]
Tools Unit converter [Menu 3-6] This feature helps you to either convert the weight or length in different unit. With Weight converter, you can convert Kg units into Pound or Ounce units. Within Length converter, you can have the following options: •... -
Page 38: Stk [Menu 3-9]
Tools Menstrual [Menu 3-8-2] This feature helps to calculate lady’ s menstrual cycle and provide the information including: • Probability of becoming pregnant on the current date • Period during which it is possible to become pregnant date of next period To check the menstrual cycle, you will need 1. -
Page 39: Multimedia
Games & Apps [Menu 4-1] Games [Menu 4-1-1] KG195 builds in 3 creative games (Fruits Go!!, Bunny Golf & Thunder of Wizard) for this product. You may use navigation key to select the games you would like to play. Then press OK to select the game. After entering the... - Page 40 Multimedia User can also down java application from WAP. 1. After downloading the application from WAP, select Application to function. 2. Select one of java application downloaded from WAP and press Options to launch, update the application, adjust the setting, view the information, or delete the application.
-
Page 41: Camera [Menu 4-2]
Multimedia – Messaging: allow you to decide how to receive/send message. – Recording: allow you to decide how to record audio. 3. Information: allow you to check and read the information of java games and application including: name of application, memory size, application version, name of vender and authorized source. - Page 42 Multimedia To start using Camera 1. In Multimedia menu, select Camera and press OK. 2. To zoom screen in and out, please press volume key (right up 2 side keys). ! Note The photo will be saved in the folder called Photo of My stuff menu. You can also view the picture from by selecting Album from option list and you will jump to Image viewer.
-
Page 43: Image Viewer [Menu 4-3]
Multimedia Effect off / Grayscale / Sepia / Sepia Green / Sepia Blue / Color Invert / Gray Invert / Effect Setting Blackboard / Whiteboard / Copper Carving / Blue Carving / Embossment / Contrast & Sketch Auto WB/ Daylight/ Tungsten/ Fluorescent/ White Balance Cloud/Incandescence EV-4 / EV-3 / EV-2 / EV-1 / EV 0 / EV+1 /... -
Page 44: Video Recorder [Menu 4-4]
Multimedia • Storage: Allow you to choose to store your pictures either in phone or memory card. ! Note Sending picture via MMS, the default size cannot be larger than 300KB. However, your service provider will determine the maximum size of sending picture via MMS. Video recorder [Menu 4-4] You can record the video clip through build-in camera. - Page 45 Multimedia To setup the Video recorder 1. On the preview mode, you can press “Options”. All options will be displayed in the bottom of screen, and you can adjust the setting through the preview mode directly and your setting will be displayed on the top of screen.
-
Page 46: Video Player [Menu 4-5]
Multimedia EV-4 / EV-3 / EV-2 / EV-1 / EV 0 / EV+1 / EV+2 / EV+3 / EV+4 Night Mode Auto / Night Banding 50/60 Hz Format 3GP / MP4 Restore You can restore the factory setting by Settings selecting this option. -
Page 47: Music Player [Menu 4-6]
Multimedia • Sort: Allow you to sort the video clips by name, type, time, or size. • Storage: Allow you to check the video’ s memory and format and play the video clip either from phone or memory card. Music player [Menu 4-6] You may enter the music player via main menu. -
Page 48: Voice Recorder [Menu 4-7]
Multimedia ! Note Your mobile phone is designed to be able play the music during flight. You have to go to Setting ➞ Phone ➞ Flight mode to change your setting for flight security concern. • Setting In the music player menu, you may press List to access the following setting. -
Page 49: Melody Composer [Menu 4-8]
Multimedia To start recording 1. In Multimedia menu, choose Voice recorder, press OK. 2. Press Options and select Record, choose OK to start it. ! Note During recording, you may pause or stop the voice recording anytime by pressing soft keys. ! Note After recording, the file is saved as AMR or WAV format. - Page 50 Multimedia 3. After finishing to compose, the melody will be saved as IMY format. Definition Definition Change the beat length of current musical note also change current note between backlight and LED. Navigation key down to flat one octave of musical note.
-
Page 51: Fm Radio [Menu 4-9]
Multimedia Your phone provides the following selections for your option when you have saved several melodies. • Play: Allow you to listen the melody you have made. • Edit: Allow you to edit the selected melody. • Add: Allow you to add more ring tone in the selected melody. •... -
Page 52: Schedule Fm Record [Menu 4-0]
Multimedia • Append: Allow you to resume the file you have recorded and continue to record at the same file. • File list: Allow you to listen the radio program you have recorded. ! Note You have to plug-in the earphone in order to use the FM radio. Schedule FM record [Menu 4-0] This phone allows you to pre-schedule programs from FM radio. -
Page 53: Messaging
Messaging Text Messages (SMS) [Menu 5-1] Your phone services voice mail notification messages and text messages. Voice mail and short message service (SMS) are network service. Your phone also allows you to send and receive text messages contain pictures or melodies. A message with pictures was made up of several text messages. - Page 54 Messaging • Chat: Allow you to chat with the one sending message to your phone. • Delete all: Allow you to delete all messages at once. • Copy all: Allow you to copy all messages to your phone at once. •...
- Page 55 Messaging To send a message: 1. In Messaging menu, choose Text message (SMS) and press OK. 2. Choose Write message, press OK to start writing message. 3. After finishing the writing, select Done following by pressing Options. ! Note To use picture message function, your network operator or service provider support is necessary.
- Page 56 Messaging • Delete: Allow you to delete the message in progress. • Copy to phone: Allow you to copy the selected text message to your phone. • Move to phone: Allow you to move the selected text message to your phone.
-
Page 57: Multimedia Message (Mms) [Menu 5-2]
Messaging • Preferred storage: Allow you to change your preferred storage either SIM or phone. • Prefer bearer: Allow you to choose your preferred bearer – GSM or GPRS. Multimedia message (MMS) [Menu 5-2] The feature allows you to send the message that contain text, sound and a picture. - Page 58 Messaging ! Note To use picture message function, your network operator or service provider support is necessary. Your phone provides the following selections for your option when editing the slides: • Done: Allow you to exit the editing page and go back to Edit content page. •...
- Page 59 Messaging ! Note To use picture message function, your network operator or service provider support is necessary. Your phone provides the following selections for your option: • Send only: Allow you send a text message immediately. • Save and send: Allow you to save a message and send immediately. •...
- Page 60 Messaging Your phone provides the following selections for your option: • View: Allow you view a multimedia message immediately. • Properties: Allow you to view the mailing list. • Reply: Allow you to reply the sender. • Reply to all: Allow you to reply the group. •...
- Page 61 Messaging Drafts [Menu 5-2-4] Your phone saves the multimedia messages that have not been sent in the Draft folder of the Multimedia messages menu. To read unsent multimedia messages 1. In Messaging menu, choose Multimedia message and press OK. 2. Select Drafts followed by pressing OK. 3.
- Page 62 Messaging MMS settings [Menu 5-2-6] Before you send the MMS message, you need to finish MMS setting. 1. In Messaging menu, choose Multimedia message and press OK. 2. Select Message settings and press OK. 3. Your phone provides the following selections for your option: •...
-
Page 63: Chat [Menu 5-3]
Messaging • Retrieve: Home network: The option of home network includes Immediate/ Delayed/ Restricted Roaming: the option of roaming network includes As Home/Delayed/ Restricted Read report: The option of read report includes On request/Send/Never send Delivery report: You can turn On or Off this function to request the network to send delivery reports of the past messages. - Page 64 Messaging To start chatting 1. After chat room setting, press Start new. 2. Create a nickname by pressing Edit. 3. Then, you are allowed to write message to the one you wish to chat. 4. After finishing the writing, press Send to start chatting. Your phone provides the following selections when you start to chat.
-
Page 65: Voice Mail Server [Menu 5-4]
Messaging Voice mail server [Menu 5-4] Your phone allows you to access your voice mailbox with a quick way if your operator supports this function. Your voice mail number will be provided by your service provider and showed in the phone. In the Voice Mail submenu, you can choose line 1 or 2 and options list including: 1. -
Page 66: My Stuff
My stuff In this menu, you can manage images, photos, recordings and tones you had. There will be two storages showed: • Memory card You may check files saved in your memory card. • Phone You may check files saved in your phone. To start view/organizing the My stuff 1. -
Page 67: Profiles
Profiles You can set following different profiles to adapt to different environment conditions. Your phone provides 7 different profiles, including: • General: Standard profile as phone defaults setting. • Meeting: Ring volume is set to be low and key tone is switched off. •... -
Page 68: To Edit The Profiles
Profiles To edit the Profiles You can customize General profile settings to meet your preference. 1. In Profiles menu, choose a profile followed by pressing OK. 2. Choose Customize and press OK. Your phone provides the following selections for your personalize option: •... -
Page 69: Contacts
Contacts Your phonebook is saved either in the SIM card’ s memory or Phone’ s memory. You can also choose to save in both memories. Search [Menu 8-1] Allow you to search names and numbers saved in the contacts. To search a number and a name 1. -
Page 70: Caller Group [Menu 8-3]
Contacts To add a phone number and a name in Contacts 1. In Contacts menu, choose New contact, press OK. 2. Choose the storage you wish to save by selecting To SIM or To phone and pressing OK. 3. Key in the name, press OK and use navigation key to number column, key in the number. -
Page 71: Speed Dial [Menu 8-4]
Contacts Your phone provides the following selections for your option: • Group name: Groups includes Friends, Family, VIP, Business and Others. • Ring tone: Allow you to set the profile of ring tone for this particular call group • Pictures: Allow you to set a picture for the group. •... -
Page 72: Copy [Menu 8-6]
Contacts Copy [Menu 8-6] You can copy and transfer your phone data from SIM to your phone (or from phone to SIM). 1. In Contacts menu, select Copy. 2. Choose an item All from SIM, All from phone or One by one, and press Delete [Menu 8-7] Your phone allows you to delete all numbers and names stored in the Contacts. - Page 73 Contacts 3. Caller video: Allow you to use certain video clip for specific person in your contact list. 4. Memory status: You can check what percentage of the phone’ s internal memory is unoccupied and how many name and number entries can still be stored in SIM card’...
-
Page 74: Settings
Settings Time & Date [Menu 9-1] This function allows you to set your home city, view and change the time and date set in your phone. You can also choose to auto update the date and time. Set home city [Menu 9-1-1] 1. -
Page 75: Display [Menu 9-2]
Settings ! Note Auto update of date and time does not change the time you have set for the alarm clock, calendar or the alarm notes. They are in local time. Updating may cause some alarms you have set to expire. Display [Menu 9-2] This feature allows you to personalize your display setting by following options:... -
Page 76: Phone [Menu 9-3]
Settings • Show operator name: Allow you to choose either show or not to show your operator’ s name in the idle screen. Phone [Menu 9-3] Language [Menu 9-3-1] This phone allows you to set a language for the display in this phone. Greeting text [Menu 9-3-2] This function allows you to display the message when you power on the phone. -
Page 77: Call [Menu 9-4]
Settings Call [Menu 9-4] Caller ID [Menu 9-4-1] This function allows you to either send or hide your ID during calling or sending out the message. Your phone is defaulted in Set via network that means your ID is determined by your service provider. Call waiting [Menu 9-4-2] This network service enables you to be informed when someone is trying to reach you during another call. - Page 78 Settings • Divert if no answer: Calls are diverted when the call is not answered. • Divert if busy: Calls are diverted when your phone is engaged on other calls. • Divert all data calls: All data calls are diverted. •...
-
Page 79: Bluetooth [Menu 9-5]
Settings Call reminder [Menu 9-4-6] This function allows you to set a time reminder during a call. 1. In Settings menu, press OK. Then, choose Call, press OK. 2. Choose Call reminder, press OK. 3. Choose an item, press OK. Your phone provides the following time alert selections for your option: •... - Page 80 Settings To start using Bluetooth technology You will need to set up the Bluetooth connectivity with the device when first time using. After setting, you will be allowed to use Bluetooth by connecting with certain device. Whenever your bluetooth connectivity is power on, the status bar will show represents connection on;...
- Page 81 Settings To pair with BT Devices 1. In Settings menu, select Bluetooth by pressing OK. 2. Go to My device and press Options. 3. Select Inquire new device, then your phone will automatically search all BT devices. To connect with BT Device 1.
- Page 82 Settings To send data using Bluetooth connectivity 1. Select object your wish to send. 2. Press Option and select Forward. 3. Choose To Bluetooth, then your phone will search device. 4. Select the device you would like to share following by sending action. To receive data using Bluetooth connectivity When you receive data through Bluetooth, notify message will be pop-up for asking if you are willing to accept.
- Page 83 Settings To listen to stereo music 1. In Settings menu, select Bluetooth by pressing OK. 2. If you have already paired the stereo Bluetooth headset, please goto My device and select the headset you wish to connect. If the Bluetooth headset you never pair before, please pairing the headset first.
-
Page 84: Network [Menu 9-6]
Settings About You may find out your device name, BD address, and supported service information in here. Your phone support Bluetooth profiles include HSP (headset-free), HFP (hands-free), SPP (serial port), DUN (dial-up networking), OPP, FTP (file transfer profile) & A2DP (advanced audio distribution profile)). -
Page 85: Security [Menu 9-7]
Settings Your phone provides the following options: • Add from list: Allow you to add network list selecting from over 300 networks in the worlds. • Create new: Allow you to create new network list by entering MCC/MNC and adjust the priority. •... -
Page 86: Restore Factory Settings [Menu 9-8]
Settings Fixed dial [Menu 9-7-4] This function dials only the numbers in the fixed dialing number (FDN). To save and edit numbers on the list, you need the PIN2 code. Barred dial [Menu 9-7-5] You can switch mode on and off to have a restricted call. However, you need to check if your SIM support this function or not. -
Page 87: Troubleshooting
Charging error – Temperature Make sure the ambient temperature is right, wait out of range for a while, and the then charge again. Charging error – Wrong Only use original LG accessories. charger Charging error – Battery Replace battery. defective Charging error –... - Page 88 If the above guidelines do not Take note of the model number of your mobile help you to solve the problem phone and a clear description of the problem. Contact your phone dealer or LG Service Center for help.
-
Page 89: Accessories
You can connect your phone to PC to exchange the data between them. ! Note • Always use genuine LG accessories. • Failure to do this may invalidate your warranty. • Accessories may be different in different regions; please check with our regional... -
Page 90: Technical Data
Technical data General Product name : KG195 System : GSM 900 / DCS 1800 / PCS 1900 Ambient temperatures Max : +55°C Min : –10°C... - Page 91 S u p p l i e r s D e t a i l s N a m e L G E l e c t r o n i c s I n c A d d r e s s L G T w i n T o w e r 2 0 , Y e o u i d o - d o n g , Y e o n g d e u n g p o - g u S e o u l , K o r e a 1 5 0 - 7 2 1 P r o d u c t D e t a i l s P r o d u c t N a m e...
- Page 92 MEMO...
- Page 93 हं दी KG195 उपयोगकता माग द िश क ा इस मै यु अ ल क कु छ सामी आपके फ़ोन स अलग हो सकती है , यह फ़ोन के सॉटवे य र या आपके स व ा दाता पर िनभ र करता है .
- Page 94 वषय स ू ची सामाय जानकारी ..............6 बै ट री दे ख भाल .................. 6 पहु ँ च कोस ..................6 दे ख भाल और रख-रखाव ..............8 महवप ण सु रा जानकारी ..............9 आपातकालीन कॉस ................12 आपका फ़ोन ..............13 फ़ोन...
- Page 95 वषय स ू ची कॉल इितहास ..............30 सभी कॉल [Menu 2-1] ..............30 छ ू टी कॉस [Menu 2-2] ..............30 डॉयल क ग कॉल [Menu 2-3] .............30 ा कॉस [Menu 2-4] ..............31 कॉल लॉग हटाएँ [Menu 2-5] ............31 कॉल समय [Menu 2-6] ..............31 कॉल...
- Page 96 वषय स ू ची वीडयो ल य र [Menu 4-5] .............46 सं गीत ल य र [Menu 4-6] ..............46 वॉइस रकॉड र [Menu 4-7] .............49 मे ल ोडी क ं पोज़र [Menu 4-8] ............50 FM रे डयो [Menu 4-9] ..............51 FM रकॉड...
- Page 97 वषय स ू ची म ू व [Menu 8-8] ................73 स टं स [Menu 8-9] ..............73 स टं स ................75 समय व दनां क [Menu 9-1] ............75 डल [Menu 9-2] ..............76 फ़ोन [Menu 9-3] .................77 कॉल [Menu 9-4] .................78 ल...
-
Page 98: सामाय जानकार
सामाय जानकारी बै ट री दे ख भाल आपका फ़ोन एक रचाज क जा सकने वाली बै ट री स चलता है . • बै ट री को सै क ड़ बार चाज और डचाज कया जा सकता है फर भी अ... - Page 99 सामाय जानकारी ! नोट आप अपने स व ा दाता स पासवड ा कर सकत ह . ! नोट यद आप लगातार तीन बार गलत PIN कोड दज करत ह , तो आपको PUK कोड दज करना पड़ सकता है . PIN2 कोड...
-
Page 100: दे ख भाल और रख-रखाव
एं टीना वचा के सं पक म आता है , तो हो सकता है वचा कु छ झ ल स जाए. ितत एं टीना को बदलने के िलए क ृ पया LG के कसी अिधक ृ त स व ा क स सं पक कर . -
Page 101: महवप ण सु रा जानकार
कया जाता है . • वै स तो कई LG फ़ोन मॉडल के SAR तर म िभनता हो सकती है , क ं तु उन सभी को रे डयो तरं ग स सं पक के िलए सं ब दशािनद श को प र ा... - Page 102 सामाय जानकारी • नॉन-आयोनाइिज़ ं ग रे डएशन ोटे शन (ICNIRP) पर अ त रा ीय सिमित ारा अन श ि सत SAR सीमा, जो (10) ाम टय स अिधक पर औसतन 2W/ kg है . •...
- Page 103 सामाय जानकारी • हत प क सं भावना को कम करने के िलए पे स मे क र के वपरीत दशा वाल कान का उपयोग कर . • यद आपको कसी भी कारण स यह सं दे ह हो क हत प हो रहा है , तो फ़ोन...
-
Page 104: आपातकालीन कॉस
सामाय जानकारी वाहन चालन जन म आप गाड़ी चलात ह , वहाँ मोबाइल फ़ोन के उपयोग स सं बं िधत कान न और िनयम को जाँ च ल . यद आप वाहन चलात समय अपने फ़ोन का उपयोग... -
Page 105: आपका फ़ोन
आपका फ़ोन फोन का आगे / पीछे का य डल ने वगे श न क बा सॉट क दा सॉट क वाता क/हाँ क पावर चाल / कॉल समा कर * क # क माइोफ़ोन ईयरफ़ोन जै क और िमनी... -
Page 106: मु य फ़ ं शन स ू च
आपका फ़ोन मु य फ़ ं शन स ू ची • साइड क – वॉय म (+, –) कॉल के दौरान, ईयरपीस वॉय म समायोजत करता है . • साइड क – कै म रा Q DSC मोड म साइड क का उपयोग छव कै चर करने के िलए कया जाता है . •... -
Page 107: ट ड बाय मोड
आपका फ़ोन ट ड बाय मोड मु य डल म , आपको िथित पटी पर कई िच दखाई दे सकत ह . िच के अथ नीच बताए गए ह : आप रोिम ग म है . आपके वत म ान थान पर... -
Page 108: रं ि भक जानकार
ारं ि भक जानकारी िसम काड और बै ट री थापत करना फ़ोन का उपयोग करने स पहल िसम काड डालना और बै ट री चाज करना आवयक है . • सभी छोटे िसम कास को नहे बच क पहु ँ च स द र रख . •... -
Page 109: बै ट री चाज करन
ारं ि भक जानकारी बै ट री चाज करना अपने फ़ोन का उपयोग करने के पहल , पहली बार आपको बै ट री प र ी तरह चाज करना होगी. 1. ै व ल एडाटर क लीड स अपने फ़ोन के िनचल... -
Page 110: कॉल फ़ ं श स
कॉल फ़ ं श स यह आपके फ़ोन पर समिथ त कॉिल ग स व ा के बारे म जानकारी दे त ा है . कॉल करना • ट ड बाय मोड म , कोड सहत न ब र दज कर , S क दबाएँ . सं... -
Page 111: कॉल त
कॉल फ़ ं श स कॉल तीा एक कॉल चाल होने पर आप कसी द स री आने वाली कॉल का उर दे सकत ह . 1. कॉल के दौरान, कॉल होड करने के िलए, वकप मे न म वे श करने हे... - Page 112 कॉल फ़ ं श स 4. सं पक : सं पक मे न के िलए शॉट क ट. 5. पाय सं दे श : सं दे श मे न के िलए शॉट क ट. 6. वाइस रकॉड र : कसी सय फ़ोन कॉल के दौरान आपका वाता ल ाप रकॉड...
-
Page 113: इनपु ट वध
इनपु ट वधी आप पारं प रक पित या प व ा भ ास माट इनपु ट का उपयोग करके पाठ दज कर सकत ह . आपका फ़ोन अ ज़ी और हं द ी का समथ न करने के िलए बनाया गया है . इनपु... - Page 114 इनपु ट वधी हं दी क वाल वण ँ ं ः ् ़ 1 ा ि ी ु ू ृ अ आ इ ई उ ऊ ऋ 2 े ै ॅ ो ौ ॉ ए ऐ ऍ ओ औ ऑ 3 क...
- Page 115 इनपु ट वधी मटीटे प Abc (अ े ज़ ी) मटीटे प abc मटीटे प ABC सां ि यक T9अइ T9 माट हं दी (हं दी माट मोड) सां ि यक अआइ मटीटे प हं दी (हं दी) सां ि यक...
-
Page 116: फ़ ं श स क स ू च
फ़ ं श स क स ू ची 4. के वल कं पन ाउज़र [Menu 1] मटीमीडया [Menu 4] 1. वै प 1. खे ल और अन योग 5. हे ड स ट 2. डे ट ा खाता 2. कै म रा 6. -
Page 117: उज़र
ाउज़र नीच बताई गई स व ाएँ स व ा दाता ारा समिथ त ह . यद आप इनम स कसी एक स व ा स कने ट नहीं हो सकत , तो आपको और जानकारी के िलए अपने स... - Page 118 ाउज़र आपका फ़ोन आपके वकप के िलए आपको िनन चयन भी दान करता है : • यहाँ जाएँ : इसस आप वे ब साइट को िल क कर सकत ह . • सं पादत कर : इसस आप URL पता सं पादत कर सकत ह . •...
- Page 119 ाउज़र स टं स [Menu 1-1-6] GPRS (जनरल पै क े ट रे डयो सव स ) एक ऐसी तकनीक है , जसका उपयोग मोबाइल ने ट वक पर डे ट ा भे ज ने या ा करने के िलए कया जाता है . जो अन...
- Page 120 ाउज़र वै प स टं स सय कर सभी वै प स टं ग (वै प स टं स फ़ ं शन दे ख ) प ण करने के बाद, वै प ोफ़ाइल मोड म , क ृ पया ोफ़ाइल सय कर चु न , तब ठक दबाएँ . ाउज़र...
-
Page 121: डे ट ा खाता [Menu 1-2]
ाउज़र डे ट ा खाता [Menu 1-2] इस फ़ोन के िनमा ण के समय मु ख ऑपरे ट स पर आधारत डफ़ॉट डे ट ा खात दान कए जात ह . आप GSM या GPRS के ारा वै प का उपयोग कर सकत ह . •... -
Page 122: कॉल इितहास
कॉल इितहास आपका फ़ोन छ ू टी कॉल, ा कॉल और डायल क गई कॉल व आपक कॉस क अविध तथा कॉल क लागत स सं बं िधत जानकारी रत कर सकता है . ! नोट कॉल स ू ची के मे म ोरी सीमा स अिधक होने पर, सबस पु र ानी कॉल हटा दी जाती है . ! नोट... -
Page 123: कॉस [Menu 2-4]
• रत कर : आपको सं पक म न ब र रत करन क सु वधा दे त ा है . • डायल कर : आपको ीन पर दखाए गए न ब र पर कॉल करने क सु वधा दे त ा है . •... -
Page 124: कॉल लागत [Menu 2-7]
कॉल इितहास • कु ल ा: आपके ारा ा क गई कॉल के कु ल समय का योग करता है . • सभी समय रीस ट कर : समय गणक को श ू य पर स ट करता है . कॉल... -
Page 125: उपकरण
उपकरण कै ल ड र [Menu 3-1] इस फ़ं शन स आप कै ल ड र म रत कए गए अपने शे य ल और काय का ै क रख सकत ह . आप काय के बारे म याद दलाने के िलए अलाम का उपयोग भी कर सकत ह . कै... -
Page 126: करने के िलए [Menu 3-2]
उपकरण क दबा सकत ह . करने के िलए [Menu 3-2] इस फ़ ं शन स आप कै ल ड र वकप स जोड़े गए अपने सभी काय को स ू चीब कर सकत ह . इस सु वधा के तहत आप वकप स काय को दे ख सकत ह , सं... -
Page 127: वव घड़ी [Menu 3-4]
उपकरण वव घड़ी [Menu 3-4] ने वगे ट र क बा या दा क का उपयोग करके आप कोई शहर चु न सकत ह . जब ॉस कोई िनित शहर इं िगत करता है , तब यह थानीय दनां क या समय... -
Page 128: इकाई परवित त र [Menu 3-6]
उपकरण इकाई परवत क [Menu 3-6] यह सु वधा भार या ल ब ाई को विभन इकाइय म परवित त करने म आपक मदद करती है . भार परवत क स , आप पाउं ड या औ स म दी इकाइय को कलो इकाई म परवित... -
Page 129: Stk [Menu 3-9]
उपकरण मािसक च [Menu 3-8-2] यह सु वधा महला के मािसक च क गणना करने और िनन जानकारी दान करने म मदद करती है : • वत म ान दनां क तक गभ व ती होने क सं भावना वह माहवारी •... -
Page 130: मटीमीडय
खे ल [Menu 4-1-1] KG195 के साथ 3 रचनामक खे ल दए गए है ( ू स गो!!, बनी गोफ़ और थ ड र ऑफ़ वज़ाड ) . जन खे ल को को आप खे लना चाहत ह , उनका चयन... - Page 131 मटीमीडया 2. गे म के नाम का चयन कर और गे म लॉच करने के िलए वकप दबाएँ , स टं ग समायोजत कर या जावा गे म क जानकारी दे ख . उपयोगकता , वै प स भी जावा अन योग डाउनलोड कर सकत ह . 1.
-
Page 132: कै म रा [Menu 4-2]
मटीमीडया – वत: आम ण: पु श SMS ारा वत: लॉच होना है या नहीं , यह िनण य ल न े क सु वधा दे त ा है . – सं दे श स व ा: सं दे श कै स ा करना/भे ज ना है , यह िनण य ल न े क सु वधा दे... - Page 133 मटीमीडया कै म रा ल स फ़ोन के पीछे होता है , और फ़ोन का डल य फ़ ाइं डर के प म काय करता है . यद कै म रा के िलए पया मे म ोरी नहीं है , तो नए फ़ोटो ल न े हे...
- Page 134 मटीमीडया वकप स ू ची म यह शािमल है : वीडयो कै म रा ठक दबाकर आप वीडयो कै म रा मोड पर जा मोड सकत ह ठक दबाकर आप िलए गए िच क समीा एबम मोड कर सकत ह छव...
-
Page 135: छव य अ र [Menu 4-3]
मटीमीडया छव य अ र [Menu 4-3] EMS, MMS, WAP और कै म रा क सभी छवय क यहाँ समीा क जा सकती ह और सं हण, फ़ोन या मे म ोरी काड म िथत होता है . आप आपक छवय... - Page 136 मटीमीडया वीडयो रकॉड र का उपयोग ारं भ करने के िलए 1. मटीमीडया मे न म , वीडयो रकॉड र का चयन कर और ठक दबाएँ . 2. रकॉड ग रोकने और जारी रखने के िलए आप E पावर चाल कर या...
- Page 137 मटीमीडया 2. िभन कै म रा स टं स का चयन करने के िलए ने वगे श न क ऊपर और नीच और आपक ाथिमकता का चयन करने के िलए दाएँ व बाएँ क का उपयोग कर . वकप...
-
Page 138: वीडयो ल य र [Menu 4-5]
मटीमीडया वीडयो ल य र [Menu 4-5] यह फ़ोडर फ़ोन स रत कए गए या PC स डाउनलोड कए गए वीडयोज़ रत करता है . यह फ़ोन 176x144 वीडयो आकार वाल .3GP और .MP4 वप का समथ न करता है . वीडयो... - Page 139 मटीमीडया और डफ़ॉट ल ि लट म जोड़े जाने के िलए गान को मे र ा सामान के मे र ा सं गीत फ़ोडर म रत कया जाना चाहए. आप हे ड स ट या लाउडपीकर ारा सं गीत सु न सकत ह . उपयोगकता के िलए इछान स ार सं गीत ल य र िनयं त करना, चलाना, रोकना, और...
-
Page 140: वॉइस रकॉड र [Menu 4-7]
मटीमीडया – वकप स ू ची म , आपको यह िमल ग ा चलाएँ : तु र ं त गाना चलाने क सु वधा दे त ा है . ववरण: चयिनत गाने का चै न ल, गु णवा, आकार और समय दखाता है . रं... -
Page 141: मे लोडी क ं पोज़र [Menu 4-8]
मटीमीडया ! नोट रकॉड ग के दौरान, आप कसी भी समय सॉट क दबाकर वॉइस रकॉड ग रोक सकत ह या बं द कर सकत ह . ! नोट रकॉड ग के बाद, फ़ाइल AMR और WAV वप म रत क जाती है . आपका... - Page 142 मटीमीडया 3. क ं पोज़ कर ल न े के बाद, मे ल ोडी IMY वप म रत क जाएगी. क क परभाषा क क परभाषा कर वत म ान सं गीत नोट क बीट उर ल ब ाई बदल , बै क लाइट और LED के...
-
Page 143: Fm रे डयो [Menu 4-9]
मटीमीडया आपके ारा कई मे ल ोडीज़ सहे ज ने पर आपका फ़ोन आपके वकप के िलए िनन चयन दान करता है . • चलाएँ : आपको आपके ारा बनाई गई मे लोडी सु नने क सु वधा दे त ा है... -
Page 144: Fm रकॉड शे य ल कर [Menu 4-0]
मटीमीडया • स टं ग: प भ ि म ल , FM रे डयो क कन, फ़ाइल वप और सं हण बदलने क सु वधा दे त ा है . आप रकॉड वप के प म AMR या WAV का... -
Page 145: सं दे श स व
सं दे श स व ा SMS (पाय सं दे श ) [Menu 5-1] आपके फ़ोन म वॉइस मे ल स ू चना सं दे श और पाय सं दे श क स व ाएँ ह . वॉइस मे ल और शॉट मै स ज सव स (SMS) ने ट वक स व ाएँ ह . आपका फ़ोन िच या मे... - Page 146 सं दे श स व ा • फ़ोन म ल जाएँ : चयिनत पाय सं दे श को आपके फ़ोन म ल जाने क सु वधा दे त ा है . • चै ट : आपके फ़ोन पर सं दे श भे ज ने वाल के साथ चै ट करने क सु वधा दे त ा है . •...
- Page 147 सं दे श स व ा ! नोट नोट: स ं दे श फ़ ं शन म वरत पहु ँ च के िलए, आप ट ड बाय मोड म ने वगे श न क U का बायाँ ऊपरी भाग दबा सकत ह . ! नोट...
- Page 148 सं दे श स व ा आउटबॉस [Menu 5-1-3] सं दे श भे ज ने के बाद, सं दे श आउटबॉस फ़ोडर म रत कया जाता है . आपको रत करन के िलए चु ने गए सं दे श को िनन वकप के साथ पढ़ने क अन...
-
Page 149: मटीमीडया सदे श (Mms) [Menu 5-2]
सं दे श स व ा आपका फ़ोन िनन स टं स दान करता है : • ोफ़ाइल स टं ग: यद आपक िसम ारा एक स अिधक सं दे श ोफ़ाइल क अन म ित है , तो आप ोफ़ाइल अलग स सं पादत कर सकत ह . •... - Page 150 सं दे श स व ा 1. सं दे श स व ा मे न म , मटीमीडया सं दे श चु न और तब ठक दबाएँ . 2. सं दे श िलख चु न और फर ठक दबाएँ . 3.
- Page 151 सं दे श स व ा कोई MMS भे जने के िलए 1. सं दे श स व ा मे न म , मटीमीडया सं दे श चु न और तब ठक दबाएँ . 2. सं दे श िलख चु न और फर ठक दबाएँ . 3.
- Page 152 सं दे श स व ा इनबॉस [Menu 5-2-2] आपका फ़ोन ा हु ए मटीमीडया सं दे श को मटीमीडया सं दे श मे न के इनबॉस फ़ोडर म रत करता है . ा हु ए मटीमीडया सं दे श पढ़ने के िलए 1.
- Page 153 सं दे श स व ा आपका फ़ोन आपके वकप के िलए िनन चयन दान करता है : • दे ख : तु र ं त मटीमीडया स ं दे श दे ख ने क सु वधा दे त ा है . •...
- Page 154 सं दे श स व ा टे पल स [Menu 5-2-5] यह फ़ोन आपके मटीमीडया सं दे श के िलए वरत व क सु वधा दे त ा है . 1. सं दे श स व ा मे न म , मटीमीडया सं दे श का चयन कर और ठक दबाएँ . 2.
- Page 155 सं दे श स व ा वतरण रपट: यद आप स व ा दाता स वतरण रपट ा करना या नहीं करना चाहत ह तो आप यह फ़ ं शन चाल या बं द कर सकत ह . रपट पढ़ : यद आप स व ा दाता स रपट ा करना चाहत ह तो आप यह...
-
Page 156: चै ट [Menu 5-3]
सं दे श स व ा • मे मोरी िथित: आप यह जाँ च सकत ह क फ़ोन क आ त रक मे म ोरी का कतना ितशत र है और सं दे श अब भी कस कार स िसम काड या फ़ोन... -
Page 157: वॉइस मे ल सव र [Menu 5-4]
सं दे श स व ा • इनपु ट विध: आपक इनपु ट विध बदलने क सु वधा दे त ा है . आपका फ़ोन चै टं ग के दौरान िनन चयन दान करता है , • उर द : उस यि ारा भे जे गए स ं दे श का उर दे न े क सु वधा दे... -
Page 158: सारण सं दे श [Menu 5-5]
सं दे श स व ा ट ड बाय मोड म , आपके वॉइस मे ल सव र तक सीधे पहु ँ चने के िलए कु छ दे र तक 1 दबाएँ . ! नोट इस फ़ ं शन का उपयोग करने के िलए, आपको आपके स व ा दाता स ा वॉइस सव... -
Page 159: मे रा सामान
मे रा सामान इस मे न म , आप आपक छवयाँ , फ़ोटो, रकॉड ग ् स और टोस बं िधत कर सकत ह . दो सं हण दखाए जाएँ गे : • मे मोरी काड आप आपके मे म ोरी काड म रत क ग फ़ाइल जाँ च सकत ह . •... -
Page 160: फ़ाइल
ोफ़ाइल आप अलग-अलग वातावरण क िथितय म लाग ू करने के िलए िनन िभन ोफ़ाइल स ट कर सकत ह . आपका फ़ोन 7 िभन ोफ़ाइल दान करता है , जनम शािमल ह : • सामाय: फ़ोन क डफ़ॉट स टं ग जै स ी मानक ोफ़ाइल. •... -
Page 161: फ़ाइल सं पादत करने के िलए
ोफ़ाइल ोफ़ाइल सं पादत करने के िलए अपनी ाथिमकताएँ प र ी करने के िलए आप सामाय ोफ़ाइल स टग अन क ू िलत कर सकत ह . 1. ोफ़ाइल मे न म , ोफ़ाइल चु न और फर ठक दबाएँ . 2. -
Page 162: सपक
सं पक आपक फ़ोनबु क िसम काड क मे म ोरी या फ़ोन क मे म ोरी म रत क जाती है . आप कसी भी मे म ोरी म रत करना भी चु न सकत ह . खोज [Menu 8-1] सं... -
Page 163: नया सं पक [Menu 8-2]
सं पक नया सं पक [Menu 8-2] सं पक म नया नाम और न ब र जोड़ने क सु वधा दे त ा है . सं पक म कोई फ़ोन न ब र और नाम जोड़ने के िलए 1. सं पक मे न म , नया सं पक चु न , ठक दबाएँ . 2. -
Page 164: पीड डायल [Menu 8-4]
सं पक ! नोट यद आप सं पक को कॉलर सम ू ह फ़ ं शन म जोड़ना चाहत ह तो आपको सं पक फ़ोन म सु रत करने हगे . आपका फ़ोन आपके वकप के िलए िनन चयन दान करता है : •... -
Page 165: कॉपी [Menu 8-6]
सं पक ! नोट आपका स व ा दाता आपक िसम म कु छ वशे ष फ़ोन न ब र ोाम कर सकता है . यद समथ न न हो तो स व ा डायल न ब स को सं ाोिधत करना सं भव नहीं है . कॉपी... - Page 166 सं पक 1. कॉलर िच: कॉल करत समय आपके िम के िच ID के प म उसका फ़ोटो या कोई अय िच उपयोग करने क सु वधा दे त ा है . 2. कॉलर रं ग टोन: आपक सं पक स ू ची के कसी विश यि या कॉलर सम...
-
Page 167: स टं स
स टं स समय व दनां क [Menu 9-1] यह फ़ ं शन आपका ग ह नगर स ट करने , आपके फ़ोन म स ट समय व दनां क दे ख ने और बदलने क सु वधा दे त ा है . आप दनां क व समय ऑटो अपडे ट करना... -
Page 168: डल [Menu 9-2]
स टं स 3. अ त त:, अन र ोध क पु करने के िलए हाँ चु न . ! नोट नोट: दनां क व समय का ऑटो अपडे ट अलाम घड़ी, कै ल ड र या अलाम नोस के िलए... -
Page 169: फ़ोन [Menu 9-3]
स टं स • LCD बै क लाइट: LCD क चमक और बं द होने का समय समायोजत करने क सु वधा दे त ा है . • दनां क व समय दखाएँ : िनय ीन म दनां क व समय दखाने या नहीं दखाने... -
Page 170: कॉल [Menu 9-4]
स टं स • पावर चाल होने पर वे र ी कर : आपके फ़ोन को कभी भी चाल करने पर आपको सामाय या लाइट मोड का चयन करना होगा. िमत स टं ग [Menu 9-3-4] यह फ़ ं शन कोई भी िसग् नल ा होने पर आपको LED स ू चक सम या अम... - Page 171 स टं स कॉल डाइवट [Menu 9-4-3] आप कॉल क िथित स ट कर सकत ह जसस कॉस अय न ब स पर डाइवट कए जात ह . कॉल डाइवट स ट करने के िलए 1. स टं ग मे न म , कॉल चु न , ठक दबाएँ . 2.
- Page 172 स टं स • सभी र कर : सभी कॉल रोधन स टं ग र करने के िलए (आपको रोधन पासवड दज करने क आवयकता होगी). • रोधन PW (पासवड ) बदल : रोधन कॉल स ट करने के िलए, आपस आपका कॉल...
-
Page 173: ल ट ू थ [Menu 9-5]
स टं स कॉल समय दश न [Menu 9-4-7] यह फ़ ं शन आपको डले पर दखाया जाने वाला कॉल समय सम/अम करने क सु वधा दे त ा है . वत: रीडायल [Menu 9-4-8] यह फ़ ं शन आपको वत: रीडायल स ट करने क सु वधा दे त ा है . चाल का चयन... - Page 174 स टं स ऑडयो डवाइस जोड़ना 1. स टं स मे न म , ठक दबाकर ल ट ू थ का चयन कर . 2. पहल आपको आपके उस फ़ोन और डवाइस क ल ट ू थ कने टवटी चाल करनी...
- Page 175 स टं स w/BT डवाइस कने ट करना 1. स टं स मे न म , ठक दबाकर ल ट ू थ का चयन कर . 2. मे र ा डवाइस पर जाएँ और कने ट कए जाने वाल BT हे ड स ट का चयन कर . 3.
- Page 176 स टं स ल ट ू थ कने टवटी के उपयोग स डे ट ा भे जने के िलए 1. भे ज े जाने वाल ऑजे ट का चयन कर 2. वकप दबाएँ और अे षत कर का चयन कर 3.
- Page 177 स टं स 5. तब, आप अपने ह ड स ट पर पीसी स फ़ाइल ाउज़ कर सक ग े और कॉपी कर सक ग े . टीरयो सं गीत सु नना 1. स टं स मे न म , ठक दबाकर ल ट ू थ का चयन कर 2.
-
Page 178: ने ट वक [Menu 9-6]
स टं स ! नोट आपके फ़ोन को अय मोड म ऑपरे ट करना दु भ ा व नाप ण सॉटवे य र स बचने का एक सु रत तरीका है . ऐस ोत स BT कने टवटी वीकार न कर जन पर आपको... -
Page 179: सु रा [Menu 9-7]
स टं स आपके स व ा दाता का ने ट वक डल म दखाया जाएगा. यद आपका स व ा दाता एक स अिधक ने ट वक वकप दान करता है तो यह सु वधा आपके GSM/GPRS ने ट वक का चयन करने म आपक मदद करती है . हालाँ क, क... -
Page 180: फै टरी स टं स पु न था पत कर [Menu 9-8]
स टं स अन र ोध को चाल करने के िलए आपको पासवड दज करना होगा. डफ़ॉट पासवड "0000" है . वत: कपै ड लॉक [Menu 9-7-3] इसस आपको ग ़लती स कोई क दबाने स बचने के िलए फ़ोन का कपै ड लॉक करने... -
Page 181: समया िनवारण
दे र तीा कर , और तब पु न : चाज कर . चाज ग ट — ग ़लत चाज र के वल म ू ल LG सहायक सामी का उपयोग कर . चाज ग ट — बै ट री ख़राब है... - Page 182 आपके मोबाइल फ़ोन का मॉडल न ब र और समया आपक समया हल करने म का प वण न नोट कर ल . मदद के िलए अपने मदद नहीं िमलती है फ़ोन डीलर या LG स व ा क स सं पक कर .
-
Page 183: सहायक उपकरण
को पीसी स कने ट कर सकत ह . ! नोट • हमे श ा असली LG सहायक उपकरण का उपयोग कर . • यह करने म वफल होने स आपक वारं ट ी अमाय हो सकती है . -
Page 184: तकनीक डे ट
तकनीक डे ट ा सामाय उपाद नाम : KG195 िसटम : GSM 900 / DCS 1800 / PCS 1900 आस-पास का तापमान अिध : +55°C य न : –10°C... - Page 185 S u p p l i e r s D e t a i l s N a m e L G E l e c t r o n i c s I n c A d d r e s s L G T w i n T o w e r 2 0 , Y e o u i d o - d o n g , Y e o n g d e u n g p o - g u S e o u l , K o r e a 1 5 0 - 7 2 1 P r o d u c t D e t a i l s P r o d u c t N a m e...
- Page 186 MEMO...
Need help?
Do you have a question about the KG195 and is the answer not in the manual?
Questions and answers