Table of Contents
Advertisement
Quick Links
OWNER'S MANUAL
This Pj-to NetDirector is an optional network product
for the projector. Mount this product to the projector
and connect a network cable. It enables a projector to
display the image data stored in the file server and the
screen image of the computer via the network. In addi-
tion, you can control and set up the projector remotely
by using the web browser.
This product is only used for EIKI projectors that have a
terminal for the Pj-to NetDirector.
This manual explains the installation of the Pj-to
NetDirector and its operation.
Pj-to NetDirector
Model No. PjNET-20
Chapter 1 Preparation
Chapter 2 Installation
Chapter 3 Basic Setting & Operation
Chapter 4 Controlling the Projector
Chapter 5 Network Capture & Viewer
Chapter 6
Controlling the Multi-Projectors
Chapter 7 Use of Serial Port
Chapter 8 Appendix
Advertisement
Table of Contents

Subscribe to Our Youtube Channel
Related Manuals for Eiki PjNET-20


Summary of Contents for Eiki PjNET-20
- Page 1 In addi- tion, you can control and set up the projector remotely by using the web browser. This product is only used for EIKI projectors that have a terminal for the Pj-to NetDirector. This manual explains the installation of the Pj-to NetDirector and its operation.
-
Page 2: Federal Communication Commission Notice
It may cause fire or an accident depending on the change of environment. EIKI International, Inc. assumes no responsibility for the loss or damage of data or damage of the computer caused by use of this product. -
Page 3: Table Of Contents
Check the status of projector ......39 Control the projector ........40 Input . - Page 4 Check IP address and projector name Exclude/Add/Delete a projector ......82 Control ..........83 Load and apply the setting value .
-
Page 5: Chapter 1 Preparation
Chapter 1 Preparation Network Unit OWNER’S MANUAL... -
Page 6: Features
Chapter 1 Preparation Features Network Capture function It enables a projector to project the screen image of the computer on the screen via the network by using an exclusive utility software . Network Viewer function The projector receives the image data stored in the file severs in the network and dis- plays images automatically. -
Page 7: Web Management Function
Web Management function With this function, you can monitor projector functions such as power status, lamp status, input mode, signal condition, lamp-use time, etc. through the network by using the web browser installed on your computer. Turn on PJ2. E-Mail Alert function The projector (Network Unit) sends messages to the registered e-mail addresses when a lamp abnormality or power failure occurs with the projector. - Page 8 Chapter 1 Preparation Multi-control function A single computer can control and set up the multiple computers at the same time. Automatic On/Off using Clock function Automatically turn on or off the projectors at specified date/day and time by using the clock function.
-
Page 9: Operating Environment
Microsoft Internet Explorer version 5.0, 5.5 or 6.0. Netscape Navigator version 6.1, 6.2 or 7.0. * Used to control and set up the projector. The layout of pages in the browser may slightly differ from each type of application or operating system you use. -
Page 10: Before Use
Chapter 1 Preparation The limitation of connection between this product and Hub or Computer Suitable LAN cables are limited by length and type as follows; Connection Network Unit - Hub Network Unit - Computer *1 There may be other limitations depending on your network environment or LAN specifica- tion. -
Page 11: Use Of This Manual
Trademarks Pj-to NetDirector is a trademark of EIKI International, Inc. Ethernet is a registered trademark of Xerox Corporation. Microsoft, Windows, Windows NT are registered trademarks of Microsoft Corporation. Internet Explorer is a registered trademark of Microsoft Corporation. - Page 12 Chapter 1 Preparation...
-
Page 13: Chapter 2 Installation
Chapter 2 Installation Network Unit OWNER’S MANUAL... -
Page 14: Flow Of Installation
The preparation is completed to control the projector connected to the network. At next step, set up and control the projector via the network by using the web browser installed on your computer. Please see chapter 3 “Basic setting and operation”. ( p.22-24) -
Page 15: Name And Function Of Each Part
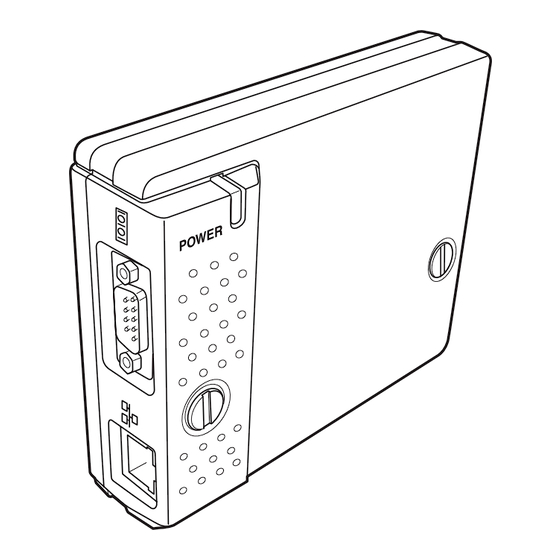
Name and function of each part Power indicator This lights up red when the net- work function is set ON in the projector menu. Serial port This is used when controlling the external equipment via the network. ( p.85) LAN port Connecting the LAN cable. -
Page 16: Installation And Network Configuration
Chapter 2 Installation x Installation and Network configuration Mounting Disconnect the AC plug from the projector. Remove the connector cover and screw covers from the pro- jector and insert plug on this product to the option connector. Tighten two screws by using a coin etc. -
Page 17: Connection Of Lan Cable
Connect the UTP strait cable to the hub. Projector Use the UTP cross cable when you connect the computer and projector directly not using the hub. When you connect the projector into the 10Base-T network, use cable with category 3 or 5. -
Page 18: Network Configuration
Default Gateway Selection of network menu [Network] Turn on the projector and display the menu on the screen. Select the Network setting icon from the main menu using the point buttons (d e 7 8). From the submenu, select Network setting sub icon, then press SELECT button once. Check that the mode is ”On”. - Page 19 Do not turn off the mains switch during this period. Completing of installation Now the installation is completed. The IP address of this projector is set to “192.168.1.201”. * In the network environments not using a Gateway or Router, the Default Gateway address should be set to [0.0.0.0].
-
Page 20: Password Setting
Valid characters for password are only 4 digits numeric numbers 0 to 9. The number “0000” means no password set. This password is not to restrict the use of the projector. This password is to set the security against the use of the projector through the network. -
Page 21: Notice About System Construction
3. When installing other projectors, follow the above steps to change the IP address and connect to the network. In case of installing the projector with Network Unit into the network con- structed with the DHCP/BOOTP server. This Network Unit does not support the DHCP/BOOTP server. The static IP address must be manually configured. -
Page 22: Installing The Software
Chapter 2 Installation c Installing the software It is required to install the software into your computer to use the Network Capture function and Network Viewer function. Please install the software as follows. Note: To install the software into the computer with Windows 2000, Windows XP or Windows NT, you should login with administrator rights. -
Page 23: Installed Software
* To uninstall these software, use “Add/Remove Program” from the control panel. *1 The data which can be projected by the projector is the JPEG format based on the ISO/IEC 10918.ITU-T recommendation T.81. There are several kinds of JPEG formats. To project the... -
Page 24: File Converter 2 Installation
Network Viewer (File Converter 2): This is a kind of the printer driver to convert to the JPEG data optimized to project by the projector from any of the documents created by the application software. * To uninstall this software, just delete the “Network Viewer”... -
Page 25: Chapter 3 Basic Setting And Operation
Chapter 3 Basic Setting and Operation Network Unit OWNER’S MANUAL... -
Page 26: Login The Setting Page Of The Projector
Chapter 3 Basic Setting and Operation This chapter describes basic operations and settings for controlling the projector via a network using this product. It is required that computer and projector be connected to the network and the network address be properly configured. -
Page 27: Display Of Main Setting Page
* This graphic mode display is mainly used through this manual for the setting and control description. Login the setting page of the projector Setting page num- Browses pages by clicking the linked number. - Page 28 - Cannot perform the registration, check or change of the program ( Main menu For selection of control and setting items of the projector. Displays sub menu and status of selected items when clicking the linked text. Setting page number Browses pages by click- ing the linked number.
-
Page 29: Initial Settings
Click Initial Setting on the main menu to display the initial setting page. The Languages, Date/Time, Password and Temperature unit can be set in this page. The model name of the projector on which this product is mounted is displayed on the page. -
Page 30: Password Setting
Only a four-digit numeric number is valid for the password. * If you forget the password to the projector, you can check it by selecting “Password” sub menu from “Network setting” menu on the projector. For further information, please see item “Password Setting”.(... -
Page 31: Date/Time Setting
Date/Time Setting Click on the page number “2” to display the Time Setting page. Type present date onto the date text area (Year/Month/Date) format and type present time onto the time text area (Hour:Minute) format in 24 hours indication. Click Set but- ton and confirm that the data and time are set correctly. -
Page 32: Network Configuration
*3 If you use the DNS server, register the host name registered to the DNS server as a projec- tor name. You can access with this projector name from any computers in your network. If you do not use the DNS server, access with the assigned IP address to the projector. -
Page 33: E-Mail Setting
SMTP server address. * If the network unit sends an alert message due to the abnormality on the projector but the SMTP server is down in some other reason, the message does not be sent. In this case, the message “Unable to connect to server.”... - Page 34 Chapter 3 Basic Setting and Operation Registering and deleting E-mail addresses Type the E-mail address onto the Mail Address text area and click Set button. To check the registered addresses, click on the Mail Address Check & Delete linked text. addresses are listed as the fig- ure on the right.
-
Page 35: Examples: Type And Contents Of Alert Mail
The Network Unit let users know the information which thermal sensor [A], [B] or [C] inside the projector detected the abnormal temperature risen and so the projector was turned off. Please refer to item “Check the status of projector” for the location of the sensors [A], [B] and [C], and temperature ( projector for further details. - Page 36 This alert mail will not be sent when unchecking the mail sending condition "When the life span of lamp is reached".
-
Page 37: Chapter 4 Controlling The Projector
Chapter 4 Controlling the Projector Network Unit OWNER’S MANUAL... -
Page 38: Power On/Off The Projector
Please refer to item “Appendix: Web browser setting/Active Script (JavaScript enable)” ( The projector is not turned on for about 90 seconds after switching into the standby mode. After the power status indicator on the control page changes from “On Cooling down” to “OFF”, then try to turn on the projector with On button. -
Page 39: Check The Status Of Projector
Check the status of projector In the “Power & Status” page, you can control the projector power, and also you can check the status of the projector as follows. To change the page, click on the page number linked text. -
Page 40: Control The Projector
When the projector is in standby, only the timer on the setting menu is effective; others are inactive. -
Page 41: Input
Input This function is to select the input mode and source mode of the projector. Select the input mode with the radio button, and input source mode with the pull-down menu button. Then set the selected input mode and source mode by clicking Set button. -
Page 42: Pc Adjustment
PC Adjustment This function is to adjust the signal from the computer connected to the projector to obtain the proper picture image on the screen. Click on the page number linked texts to change the setting pages. These parameters will appear only when the RGB(Analog) or Network input mode is selected. -
Page 43: Save A Set
The stored setting values will be applied to the each PC adjustment item. The PC adjustment settings can be stored up to 50 sets, 5 sets for Mode1 to Mode 5 are stored into the projector and 45 sets for ExMode6 to ExMode50 are stored into the network unit.. -
Page 44: System Adjustment
System Adjustment This function is to select the color system of video signal or scanning sys- tem of component signal input to the projector. Select a system with the radio buttons to match the color system or scanning system of input source, and then click Set button. -
Page 45: Image Adjustment
Reset button, all of the contents of the pages are reset. * Some control items can not be used depending on the selecting input mode or functions of the projector you use. In this case, the values of those items are indicated with “---”. Control the projector... -
Page 46: Save An Image Adjustment Value
Chapter 4 Controlling the Projector Save an image adjustment value Decide your desired image adjustment value through the image adjustment pages “1” to “3”. Display the page “3” and select the desired image number with the pull- down menu of the Save Adjustment. -
Page 47: Screen
Sound This function is to adjust the sound of the projector. The values in the text box represent the current control value or status. Control the projector... -
Page 48: Setting
Chapter 4 Controlling the Projector Setting This function is to set up the projector. Click on the page number “1” to “6” linked texts to change the setting pages. * The displayed items may differ from the actual depending on the functions of the projector you use. - Page 49 (JavaScript Off) There are various kinds of ways to change the JavaScript preference depending on the web browser's version and application. Please refer to item “Appendix: Web browser setting/Active Script (JavaScript enable)” ( Control the projector Item Description Remote Control ...Sets one of 8 types remote...
-
Page 50: How To Set The Timer
Chapter 4 Controlling the Projector How to set the Timer This function is used to turn the projector off or on at a programmed day/date and time. Follow the below steps for setting. Set a day or date To set the timer event at same time everyday, select “day”... -
Page 51: Check The Timer Events
Timer Check linked text. Getting the current time The displayed time is the value set when the setting page was displayed. This time value is not updated automatically. To update the display time click Refresh button. Control the projector Network Unit OWNER’S MANUAL... -
Page 52: Cancel The Timer
Similarly, when the projector is turned off by event 5, event 6 OFF will not be effective in turning it off again. But these secondary events (event 4 and event 6) will become effective if a person turns off the projector (after event 3 and before event 4) or turns on the projector (after event 5 and before event 6). -
Page 53: Service
Control the projector Service This function sets the cooling fan speed of the projector. Set proper fan speed depending on the installation environment. Select “Normal” or “Maximum” with the pull-down menu button and click Set button. Network Unit OWNER’S MANUAL... -
Page 54: Save Actual Adjustment
Chapter 4 Controlling the Projector Save Actual Adjustment This function is to save and load the control values of the projector. The storable control items are Input, PC, System, Image and Screen controls, and these control items differ from each selected input mode and functions of the projector you use. -
Page 55: Check The Save Items
Control the projector Check the Save items Browse pages by clicking on the page numbers and check each setting status. The pages for the saving items are constructed by 8 pages. The contents of the pages may differ from the actual depending on the selected input mode and the function of the projector. -
Page 56: Load A Control Set
Chapter 4 Controlling the Projector Load a control set Select your desired set number with the pull-down menu button of the Load Setting No. and then click Set button. The setting values of the selected set number are applied to the current settings. -
Page 57: Control The Projector's Menu
Cursor ...Used to select an item or adjust value in on-screen menu by clicking Up, Down, Left and Right button. The same operation with the point buttons on the projector and remote control unit. Used to execute the item selected by clicking Set button. The same operation with SELECT button on the projector and remote control unit. -
Page 58: Make A Memo
Select the Memo setting page by clicking Memo on the main menu. The following setting page is displayed. It is convenient to use as a memo for the simple description where the projector is placed in. This note will be displayed on the login page. -
Page 59: Chapter 5 Network Viewer & Capture
Chapter 5 Network Viewer & Capture Network Unit OWNER’S MANUAL... -
Page 60: Using The Network Capture Function
The Network Capture is a function to project the screen images of the computer by the projector via the network by using the Network Viewer software. Up to 10 com- puters can be registered and the capture images of the computer projected by the projector can be selected by the Network Capture software in the computer, web browser and projector. -
Page 61: Control By The Computer
Click Search button to list up the available IP address assign to the projector and select desired IP address you use, or you can enter the IP address manually if you know that IP address. Set the quality of the image. -
Page 62: Control By The Web Browser
Click Stop button to stop capturing. * You can use the capture function by using the web browser or the projector if the Network Capture software is installed into the computer correctly and its icon stays on the task bar. -
Page 63: Registering The Computers
“Disconnect” in the above window and the press SELECT button. * The projector does not provide the function to register the IP address of the computer and to set the parameter of the capturing. They should be registered by using the web browser previ- ously ( p.62-63). -
Page 64: Advanced Using Example
PC1 by using the wireless mouse function of the remote control sup- plied with the projector. Select a desired file and double click with the remote control . => The application by which the document was created starts and the projector projects the presentation picture on the screen. Start the presentation. -
Page 65: Create The Available Data [File Converter]
Create the available data [File Converter] The image available with this projector is the JPEG format. There are several types of JPEG data. Before using the images with the Network Viewer function, it should be converted to the optimized JPEG data for this projector. -
Page 66: Converting Procedure
Chapter 5 Network Viewer & Capture Converting procedure Select a folder in which the image files are stored by the explorer window. The preview images of the available image data (JPEG file, BMP file) in the select- ed folder are displayed on the preview window. * On the preview window, the preview displayed with the red frame represents a file not optimized JPEG file or BMP file for the projection. -
Page 67: Other Menu Items
Setting of conversion mode When clicking Change button on the confirmation window in the step 3 on the previ- ous page, following option setting window appears. Conversion type: Fit ...Converts as either width or height of the image sets to be the maximum screen width or height. -
Page 68: How To Use The Network Viewer (File Converter 2)
Chapter 5 Network Viewer & Capture [2] How to use the Network Viewer (File Converter 2) The File Converter 2 is a kind of the printer driver software to convert to the opti- mized JPEG data for the projection from the any documents created by the other software such as text editor, spreadsheet or presentation software. -
Page 69: Making A Program File [Program Editor]
These files are called as “Program”. By specifying the program file with the Network Viewer function, you can have the programmed display with the projector . Procedure of making program To launch the Program Editor, click “Network Viewer (Program Editor)”... - Page 70 Chapter 5 Network Viewer & Capture The setting window disappears and then the programs are listed on the window if there are program files at the login directory in the connected ftp server. Click New button. Enter a program name and click Add button. The folder selection window appears and select a folder in which the JPEG data are stored and then click Add button to register into the folder lists.
- Page 71 Use the web browser to access to the control page of the projector. Click Network Viewer on the main menu on the web page, then connect to the file server and select the program name which was made at previous section. The projector starts display- ing the images along the program.
-
Page 72: Using The Network Viewer Function
Chapter 5 Network Viewer & Capture Using the Network Viewer function The Network Viewer is a function to acquire and project the JPEG image data on the screen from the file servers placed in the network. The projected image data are specified with the folder unit. - Page 73 In this page, when clicking on the radio button next to the file name, the selected image is projected on the projector’s screen and set its page as the start- ing page for “Auto Display” function on the next page.
- Page 74 Click Error button to check the details. ‘Connection Error’ ..It may be displayed when the slave projector is using the Network Viewer or capture function during the multi-control. For further error details, please see chapter “Multi Control/Check &...
- Page 75 Program New Registration [4] Click on “New Registration” linked text. Enter a program name and click Select button. On the Folder Selection window, click a folder and click Add button. Repeat the above for adding some another fold- ers. After finishing, click Close button. Check that the folder paths you added are listed on the text area.
- Page 76 Chapter 5 Network Viewer & Capture Program Confirmation & Change [4] Click on “Confirmation & Change” linked text. From “Program Name” pull-down menu button, select the program name you want to confirm or change. * Click Delete button to delete. * Click Select button to confirm or change the program.
- Page 77 * The image data used for this function are the program or folder that the Network Viewer function used last time. The projector cannot specify particular images or file servers itself. * 1 to 255 repeating times can be set. The mark “...
- Page 78 Chapter 5 Network Viewer & Capture...
-
Page 79: Chapter 6 Controlling The Multi-Projectors
Chapter 6 Controlling the Multi-Projectors Network Unit OWNER’S MANUAL... -
Page 80: Multi-Control
Network Units that are connected to the network at the same time. Click Multi Control on the main menu to display the control page. Note: To control the multiple projectors, each projector must has the same password. Example of multi control Internet... -
Page 81: Register Ip Address And Projector Name
*1 Normally, the projector in the network is recognized with the IP address. This product allows you to name the projector instead of the IP address. By registering the projector’s nickname like “MeetingRoom101”, it can be managed and recognized easily. -
Page 82: Exclude/Add/Delete A Projector
Change password of this projector to the common password. File Error ... Not displaying the images. Check if this projector is using the Network Capture func- tion or Network Viewer function individually, or in the stand by mode. -
Page 83: Control
Setting No. with the pull-down menu button and then click Set button. The control values stored with selected set number for each projector will be applied to the indi- vidual projector assigned to that set. The control values will not be applied to all of the projectors under the multi-control. -
Page 84: Control Multi-Projectors At The Same Time
When the control button or setting button is clicked, the registered projectors for the multi-control are controlled at the same time. * These control items differ from each selected input mode and functions of the projector you use. -
Page 85: Chapter 7 Use Of Serial Port
Chapter 7 Use of Serial Port Network Unit OWNER’S MANUAL... -
Page 86: Serial Port Setting
External ...Used to select when the external equipment connected to the serial Projector...Used to select when the projector is controlled by the serial controller Port ...Indicates the port number of TCP/IP. The default number is 23. Use the same port number specified by application. - Page 87 Please consult your local dealer. There are 2 types of RS-232C serial cable, Normal(Straight) and Reverse(Cross) type. Usually, when connecting between this product and a projector or a computer, use Reverse type of serial cable. When connecting DVD player etc., use Normal type.
-
Page 88: Control Examples
Chapter 7 Use of Serial Port Control Examples Example 1 Controlling AV equipment through network Example 2 Controlling a projector which is not on the network function through network. Turn on the projector PJ1. Internet Intranet Turn on the DVD player and start playing. - Page 89 Example 3 Controlling the projector with the serial controller through the serial port (RS-232C). Internet Intranet Use proper serial cable depending on the connected equipment port specification. Please refer to “Port Specification” of the serial port specification of this product (...
-
Page 90: Use Of Telnet
Preparation Turn the projector off with the mains switch and connect an external equipment to the serial port with an RS-232C serial cable. Turn on the projector and external equipment. Display the setting page by clicking on Serial Port on the main menu with the web browser. - Page 91 When communication is established, the word “PASSWORD:” appears on the window. Type the login password* for the projector and then press “Enter” key on the keyboard. If you do not register the login password, just press “Enter” key. When the word “Hello” is replied, login has been succeeded.
-
Page 92: Control The Projector With Telnet
Normally, it is used for controlling the external equipment connected to the serial port and also control the projector itself by specifying the telnet port no.10000. * It is not affected by the serial port setting of the projector when using the telnet appli- cation. -
Page 93: Chapter 8
Chapter 8 Appendix:A Connection examples Web browser setting Technical data Network Unit OWNER’S MANUAL... -
Page 94: Chapter 8 Appendix
Subnet Mask : 255.255.255.0 Default Gateway : 0.0.0.0 : 0.0.0.0 When the projector is connected to the computer directly without hub, the UTP cross cable should be used . * UTP cross cable Computer Name: PC05 IP Address : 192.168.0.5 Subnet Mask : 255.255.255.0... -
Page 95: The Gateway (Router) Installed In The Network
The gateway (Router) installed in the network Connecting the projector (PJ01) to the control computer (PC05) via the gateway. Meeting Room Projector Name: PJ01 IP Address : 192.168.200.15 Subnet Mask : 255.255.255.0 Default Gateway : 192.168.200.1 : 192.201.1.5 Network Group: 192.168.200.0... -
Page 96: Web Browser Setting
Chapter 8 Appendix Web browser setting This product is designed to enable the projector to be set up and controlled from an Internet web browser. Depending on the preference settings of the web browser, some control functions may not be available. Please make sure that the following functions are set up properly in the web browser. -
Page 97: Windows Xp Professional
Web browser setting Examples: OS/Browsers Windows XP Professional Internet Explorer v.6.0 ActiveScript setting Select the Internet Options menu from the Tool menu on the web browser and then select Security tab and click Customize Level… button. On the security setting win- dow, scroll down and find the Scripting item, make sure that “Enable”... - Page 98 For further instruction please consult your network administrator. - Not using proxy server Uncheck the item Use a proxy server. If you connect the projector to the computer directly with UTP cross cable, this must be unchecked. To designate proxy settings that will not use...
-
Page 99: Netscape Navigator
Web browser setting Netscape Navigator v.7.0 JavaScript Setting Select the Preference menu from the Edit menu on the web browser and then select the item Advanced/Scripts & Plugins in the Category column. Make sure that the Enable JavaScript for Navigator is checked. Network Unit OWNER’S MANUAL... - Page 100 - Not using proxy server Select the item Direct connection to the Internet in the proxy setting window. If you connect the projector to the computer directly with UTP cross cable, this must be selected. To designate proxy settings that will not use...
-
Page 101: Product Specification
Baud rate Flow control Parity check Terminal Power source ...Supplied from the projector Power consumption ...3.0 watts Dimensions (W x H x D)...5.20” x 1.32” x 4.13” (132 x 33.6 x 105mm) Weight ...0.35 lbs (158 g) Built-in battery ...Lithium battery, Type CR2032, 3.0V Operating temperature...41˚F ~ 95 ˚F (5˚C ~ 35 ˚C) -
Page 102: Port Specification
Chapter 8 Appendix Port Specification LAN port specification 8-pin modular connector (RJ-45) 1 2 3 4 5 6 7 8 pin No. Serial port specification D sub 9-pin connector (RS-232C) Pin No. Signal (not used) (not used) (not used) (not used) Signal Ground (not used) - Page 103 Appendix:B Network Unit OWNER’S MANUAL...
-
Page 104: Faq
7. The computer does not provide TCP/IP protocol. No setting page in my web browser? Is the problem in the network or in the projector? I would like to find out the problem whether it is in the network or in the projector Check it by the following steps 1. - Page 105 Can I access the projector installed on the company’s local area net- work from a remote location? There are some ways to access to the projector in the LAN, but you must con- sult your network administrator. Use of modem (Connect to the company’s network from your home or some other places...
- Page 106 What should I do when I forget the password? Select the “Password” icon from the “Network setting” menu by using the point buttons on the projector and then press SELECT button. The current password will appear on the screen ( Can I register the setting page as a web browser “Favorites”...
-
Page 107: Operation
Why can't I change the controls in the setting page with web browser? Please make sure the projector is turned on. If it is in the standby mode, the setting is not effective to the projector. To control the projector with a web browser, the projector must be in the powered-on condition. - Page 108 Telnet application installed on your computer. Please see chapter “Use of telnet” ( Can I control the projector by using the telnet application? Possible. Please refer to the item “Control the projector with telnet“ p.92). p.33).
- Page 109 Can I update the firmware of the Network Unit. It is possible to update the firmware through the network. It is required to have a special tool for the updat- ing. For further information please consult your local dealer. The ver- sion number of the firmware is indi- cated on the lower part of the“Initial Setting”...
- Page 110 Chapter 8 Appendix What are the rules for IP address assignment? If the network is constructed with TCP/IP protocol, a unique IP address is required for each piece of network equipment. The following are basic rules of the assignment. Rule1 Do not configure the same IP address to the network equipment in the same network group.
-
Page 111: Network Viewer
In this case, use another port numbers. 4. Check the IP address of the projector is registered to the computer correctly p. 63). 5. Make sure that your computer is not using the firewall function. The net- work unit may not be able to use the port due to this firewall function. - Page 112 Chapter 8 Appendix File Converter 1 What kind of image formats can I convert? The File Converter 1 enables to convert to the JPEG format from the following image format. Bitmap format (.bmp) JPEG format (.jpeg .jpg) File Converter 2 Sometime I have the white frame images converted by the File Converter 2.
- Page 113 Network Unit OWNER’S MANUAL...
- Page 114 E-Mail : japan@eiki.com WorldWide Website http://www.eiki.com Printed in Japan 1AA6P1P4299-- IDNC Canada EIKI CANADA - Eiki International, Inc. P.O. Box 156, 310 First St. - Unit 2, Midland, ON, L4R 4K8, Canada Tel : 800-563-3454 (705)-527-4084 Fax : 800-567-4069 (705)-527-4087 E-Mail : canada@eiki.com...
Need help?
Do you have a question about the PjNET-20 and is the answer not in the manual?
Questions and answers