Advertisement
Available languages
Available languages
Quick Links
Advertisement

Related Manuals for Bushnell ImageView 11-0832


Summary of Contents for Bushnell ImageView 11-0832
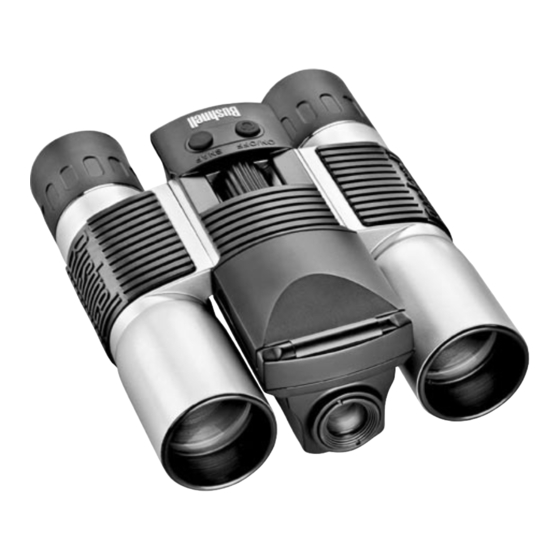
- Page 1 Model: 11-0832 LIT. #: 98-0429/07-04...
-
Page 2: Table Of Contents
CONTENTS ENGLISH ................1 FRANÇAIS................16 ESPAÑOL .................34 DEUTSCH.................52 ITALIANO ................70 PORTUGUÊS..............88... - Page 3 QUICK GUIDE: BUSHNELL IMAGEVIEW 11-0832 INSTALL BATTERIES AND (OPTIONAL) SD CARD • Insert 2 AAA alkaline batteries in compartment on the bottom of the Imageview. If you will be taking a large number of photos at high quality settings, you may want to install an SD (Secure Digital) memory card with 32 MB or greater capacity (not included).
- Page 4 Congratulations on your purchase of a Bushnell ImageView binocular. Before using the product, please read these instructions and take time to familiarize yourelf with the different parts and features of the TAKE A PHOTO • Holding the Imageview as steadily as possible with both hands, confirm that the image product.
- Page 5 you will see the “Clock Set” screen. Follow the directions on arrows to change the value as desired. Press “MENU” to confirm and return to the settings menu. Pull Up LCD Here pg. 6 (SETUP>Clock Set) to set the date and time. Pushing The following settings are provided: the “Display”...
- Page 6 5. IMAGE QUALITY affects overall photo quality and maximum # of photos that can be stored in the TO USE SPECIAL CAPTURE MODES internal memory, by changing the amount of file compression. The actual photo capacity you get will With the camera on and displaying the “live” image (ready to take a new photo), press the right side of vary with the content of the photos.
- Page 7 Once zoomed in on a picture, you are also able to navigate around the picture by pressing the display FORMAT: Formats a new or previously used SD card to enable storing photo files. Select OK and press button. A yellow 4-way symbol appears in the corner of the LCD next to the magnification number, MENU after inserting a card for the first time.
- Page 8 SOFTWARE INSTALLATION: REVIEW 1) Photo number / Total Photos: Displays number of review photo / Total photos currently stored 2) Image Resolution: Indicates resolution of review photo A. DRIVER SOFTWARE INSTALLATION (ONLY NECESSARY FOR WINDOWS 98/98SE) LED/SOUND INDICATIONS If the CD-ROM does not automatically launch the install screen, LED (Red) double click “...
- Page 9 B. PHOTO SUITE 5 INSTALLATION single photo and copy, then paste or simply drag them to the folder of your choice (for example, “My Pictures”) on your local hard drive. Once transferred, the photos may be opened, viewed, edited and From the opening CD-ROM screen, select “Photo Suite 5.0”, then follow the on-screen directions, resaved using the included PhotoSuite software or any compatible photo editing program.
- Page 10 If you wear sun/eyeglasses, roll As individual eyesight varies from one person to another, Bushnell binoculars have a diopter setting feature which allows you to fine-tune the binocular to your vision. Follow the focusing instructions below for your down the eyecups.
- Page 11 Non-waterproof models should not be exposed to excessive moisture. Your Bushnell® product is warranted to be free of defects in materials and workmanship for two years after the date of purchase. In the event of a defect under this warranty, we will, at our option, repair or replace the product, provided that you return the product postage prepaid.
-
Page 12: Français
GUIDE RAPIDE : IMAGEVIEW BUSHNELL 11-0832 INSTALLATION DES PILES ET DE LA CARTE SD (OPTIONNELLE) • Introduisez 2 piles alcalines type AAA dans le compartiment situé au bas de l’Imageview. Si vous prévoyez de prendre un grand nombre de photos aux réglages de haute qualité, il est souhaitable d’installer une carte mémoire SD (Secure Digital/sécurité... - Page 13 BUSHNELL IMAGEVIEW FRANÇAIS Félicitations et merci d’avoir acheté les jumelles ImageView de Bushnell. Avant d’utiliser cet instrument, PRISE D’UNE PHOTO veuillez lire les instructions de ce manuel et prendre quelques instants pour vous familiariser avec les • Tout en tenant l’Imageview des deux mains, aussi immobile que possible, confirmez que l’image est nette sur l’écran LCD (si elle ne l’est pas, vous êtes probablement trop près, car au...
- Page 14 d’installer des piles neuves, vous verrez l’écran « Clock Set » MENU (la valeur en cours apparaît en surbrillance) et utilisez les flèches vers la gauche/droite pour (réglage horloge). Suivez les directives de la page 6 (SETUP>Clock changer la valeur selon le besoin. Appuyez sur MENU pour confirmer et retourner au menu des réglages. Set) (CONFIGURATION>réglage horloge) pour régler la date et Réglages disponibles : l’heure.
- Page 15 UTILISATION DES MODES SPÉCIAUX DE PRISE DE VUES • Réglages : “Best” (le mieux) est la qualité la meilleure (le moins de compression) et permet d’enregistrer jusqu’à 22 photos dans la mémoire interne ; “Better” (mieux) permet d’enregistrer jusqu’à 41 photos, L’appareil photo étant sous tension avec l’image actuelle affichée (prêt à...
- Page 16 Avec le zoom avant sur une photo, vous pouvez aussi naviguer sur l’image en appuyant sur le bouton carte avec le coin à encoche du côté gauche, comme indiqué sous la fente de la carte. Notez que le formatage d’affichage. Un symbole jaune à 4 positions apparaît dans le coin de l’écran LCD, près du chiffre du d’une carte effacera toutes les photos précédemment enregistrées sur la carte.
- Page 17 PLAY (LECTURE) INSTALLATION DU LOGICIEL : 1) Numéro de photo / nombre total de photos : Affiche le numéro de la photo visionnée / le nombre total de photos en mémoire A. INSTALLATION DU LOGICIEL PILOTE 2) Résolution d’image : Indique la résolution de la photo visionnée (NÉCESSAIRE SEULEMENT POUR WINDOWS 98/98SE) CD-ROM lance...
- Page 18 collez ou traînez simplement vers le dossier de votre choix (par exemple, “Mes photos”) sur le disque dur local. B. INSTALLATION DE PHOTO SUITE 5 Une fois transférées, les photos peuvent être ouvertes, visionnées, éditées et resauvegardées à l’aide du logiciel Sur l’écran d’ouverture du CD-ROM, sélectionnez “Photo Suite 5.0”...
- Page 19 1. Réglez la distance interpupillaire. (figure 1) Fig. 2 Les jumelles Bushnell sont un instrument de précision conçu pour fournir de nombreuses années de service 2. Placez le réglage dioptrique (figure 2) sur zéro et observez un objet éloigné. agréable. Cette partie du livret vous permettra d’en obtenir les performances optimales car il explique comment 3.
- Page 20 Vos jumelles Bushnell vous rendront des années de service sans problème si elles sont entretenues avec soin, Votre produit Bushnell® est garanti exempt de défauts de matériaux et de fabrication pendant deux ans après la date comme tout instrument optique de qualité. Les modèles non étanches à l’eau ne doivent pas être exposés à...
-
Page 21: Español
GUÍA RÁPIDA DEL IMAGEVIEW 11-0832 DE BUSHNELL INSTALAR LAS PILAS Y LA TARJETA SD (OPCIONAL) • Inserte 2 pilas alcalinas AAA en el compartimiento de la parte inferior del Imageview. Si va a sacar un número grande de fotos en una configuración de alta calidad, es mejor que instale una tarjeta de memoria SD (Secure Digital) con una capacidad de 32 MB o mayor (no incluida). - Page 22 BUSHNELL IMAGEVIEW ESPAÑOL Felicidades por haber comprado unos binoculares ImageView de Bushnell. Antes de usar este producto, lea SACAR UNA FOTOGRAFÍA las instrucciones y tómese el tiempo necesario para familiarizarse con las diferentes partes y características del • Sujete el Imageview tan firme como sea posible con ambas manos, observe si la imagen producto.
- Page 23 apagará para conservar las pilas. Si ha instalado pilas nuevas, verá Pulse “MENÚ” para confirmar y volver al menú de configuración. la pantalla de “Clock Set”(Poner Reloj). Siga las instrucciones de Se ofrecen las siguientes configuraciones: la página (SETUP>Clock Set) [CONFIGURAR>Poner Reloj] 1.
- Page 24 PARA USAR MODALIDADES ESPECIALES DE DISPARO 5. IMAGE QUALITY (CALIDAD DE IMAGEN) afecta la calidad general de la foto y el número máximo de fotografías que se pueden guardar en la memoria interna, cambiando la cantidad de compresión del Con la cámara encendida y visualizando la imagen “en vivo” (listo para tomar una nueva foto), pulse el lado archivo.
- Page 25 Una vez que amplía una foto con zoom, también puede navegar alrededor de la foto pulsando el botón de fotos. Seleccione OK y pulse MENÚ después de insertar una tarjeta pro primera vez. Cerciórese de que de visualización. Aparecerá un símbolo amarillo de 4 posiciones en la esquina de la pantalla LCD junto al la tarjeta se inserte con la esquina muescada a la izquierda, como se indica debajo de la ranura de la tarjeta.
- Page 26 PLAY (REPRODUCIR) INSTALACIÓN DEL SOFTWARE : 1) Nº de Foto / Total de Fotos: Indica el número de la foto que se está viendo / Total de fotografías guardadas actualmente A. INSTALACIÓN DEL CONTROLADOR DEL SOFTWARE 2) Resolución de Imagen: Indica la resolución de las fotos que se está viendo (SÓLO NECESARIO PARA WINDOWS 98/98SE) INDICACIONS DE LUZ LED/SONIDO Si el CD-ROM no lanza automáticamente la pantalla de...
- Page 27 foto y copie, pegue o arrastre simplemente las mismas a la carpeta que desee (por ejemplo, “Mis Fotografías”) B. INSTALACIÓN DE PHOTO SUITE 5 en su unidad de disco local. Una vez transferidas, las fotos pueden abrirse, verse, editarse y volver a guardarse Desde la apertura de la pantalla del CD-ROM, seleccione “Photo Suite 5.0”, luego siga las instrucciones de usando el software PhotoSuite incluido o cualquier programa compatible de edición de fotografías.
- Page 28 Cómo ajustarlos a la agudeza visual individual hacerse girando simplemente la rueda de enfoque central. Tome nota del ajuste dióptrico de sus ojos Como la vista individual varía de una persona a otra, los binoculares de Bushnell tienen un ajuste dióptrico como referencia futura.
- Page 29 Los binoculares de Bushnell le ofrecerán muchos años de servicio sin problemas si reciben el cuidado normal Su producto Bushnell® está garantizado contra defectos de material y fabricación durante dos años a partir de la fecha que se tiene con cualquier instrumento óptico de precisión. Los modelos que no son impermeables no deben de compra.
-
Page 30: Deutsch
KURZER LEITFADEN: BUSHNELL IMAGEVIEW 11-0832 BATTERIEN UND (ALS OPTION) DIE SD KARTE EINLEGEN • 2 AAA Batterien in das Batteriefach am Boden der Imageview einsetzen. Wenn Sie viele Fotos mit hochwertigen Einstellungen aufnehmen wollen, können Sie eine SD (Secure Digital) Speicherkarte mit 32 MB oder größerer Kapazität einsetzen (wird nicht mitgeliefert). - Page 31 BUSHNELL IMAGEVIEW DEUTSCH Wir gratulieren Ihnen zu Ihrem Kauf einer Bushnell ImageView Stereokamera. Bitte vor der Benutzung EIN FOTO AUFNEHMEN diese Anleitung lesen und sich die Zeit nehmen, sich mit den einzelnen Teilen und Merkmalen des Produkts • Die Imageview mit beiden Händen so ruhig wie möglich halten, bestätigen, daß das Bild auf vertraut zu machen.
- Page 32 dann aus, um Batterieenergie zu sparen. Wenn Sie neue Batterien Wert wird hervorgehoben), dann mit den Pfeiltasten rechts/links den Wert nach Wunsch ändern. Zur eingesetzt haben, werden Sie den „Clock Set“ Bildschirm sehen. Bestätigung „MENU“ drücken und zum Einstellungsmenü zurückkehren. Für die Datums- und Uhrzeiteinstellung die Anweisungen auf Folgende Einstellungen sind vorhanden: Seite 6 (SETUP>Clock Set) befolgen.
- Page 33 5. BILDQUALITÄT betrifft die Fotoqualität insgesamt und eine maximale Anzahl Fotos, die im internen 6. EXIT (Ausstieg): Verläßt das SETUP Untermenü und kehrt zum Hauptmenü für Einstellungen zurück. Speicher abgelegt werden können, indem die Dateikomprimierung geändert wird. Die erzielte tatsächliche 7.
- Page 34 oder Details des Fotos zu prüfen. Der zusätzliche Umfang der Vergrößerung wird unter der Fotonummer in daß die Karte mit der Eckkerbe nach links wie unter dem Aufnahmeschlitz angegeben eingeschoben wurde. der Ecke links oben im LCD Display gezeigt. Das Formatieren einer Karte löscht alle vorher auf der Karte gespeicherten Fotos. Hinweis: „MMC“ Karten Nach dem Einzoomen auf einem Bild können Sie mit Drücken des Displayknopfes auch im Bild navigieren.
- Page 35 PLAY (ABSPIELEN) EINE INSTALLATION DER SOFTWARE MIT TREIBER 1) Fotonummer / Fotoanzahl: Zeigt die Nummer des kontrollierten Fotos / von insgesamt im Moment (NUR BEI WINDOWS 98/98SE ERFORDERLICH) gespeicherten Fotos Wenn CD-ROM Installationsbildschirm nicht 2) Bildauflösung: Gibt die Auflösung des Kontrollfotos an automatisch startet, „SETUP.EXE“...
- Page 36 B. INSTALLATION VON PHOTO SUITE 5 kopieren und dann einfügen oder es einfach in den Ordner ihrer Wahl auf der örtlichen Festplatte ziehen Im offenen CD-ROM Bildschirm „Photo Suite 5.0“ wählen, dann die Anleitungen am Bildschirm befolgen, (zum Beispiel „Meine Bilder“). Die Fotos können nach dem Transfer mit der mitgelieferten PhotoSuite die mit der Wahl Ihrer bevorzugten Sprache für die nachfolgenden Dialogfenster zur Installation beginnen.
- Page 37 1. Den Pupillenabstand einstellen (Abbildung 1) Fig. 2 Ihr Bushnell Fernglas ist ein Präzisionsinstrument und so ausgelegt, daß es Ihnen für viele Jahre angenehmes 2. Die „Dioptrieneinstellung“ (Abbildung 2) auf Null setzen und ein entferntes Betrachten zusichert. Dieser Teil der Gebrauchsanweisung wird Ihnen dabei helfen, optimale Leistung zu Objekt betrachten.
- Page 38 ZWEIJÄHRIGE BESCHRÄNKTE GARANTIE ANLEITUNG FÜR DIE PFLEGE VON FERNGLÄSERN Sie erhalten für Ihr Bushnell®-Produkt eine Garantie für einen Zeitraum von zwei Jahren ab dem Kaufdatum. Die Das Bushnell Fernglas bietet jahrlangen störungsfreien Service, wenn Sie es normal pflegen, wie Sie es bei Garantie erstreckt sich auf Material- und Herstellungsfehler.
-
Page 39: Italiano
GUIDA DI CONSULTAZIONE RAPIDA: BUSHNELL IMAGEVIEW 11-0832 INSTALLAZIONE DELLE PILE E (FACOLTATIVAMENTE) DELLA SCHEDA SD • Inserite due pile alcaline ministilo AAA nel vano sulla parte inferiore dell’Imageview. Se scatterete un gran numero di foto ad alta qualità, vi suggeriamo di installare una scheda di memoria SD (Secure Digital) con capacità... - Page 40 BUSHNELL IMAGEVIEW ITALIANO Grazie per avere scelto un binocolo Bushnell ImageView. Prima di usare il prodotto, leggete queste istruzioni SCATTO DI UNA FOTO • Mantenendo l’Imageview quanto più fermo possibile con entrambe le mani, verificate che e familiarizzatevi con le sue varie parti e caratteristiche.
- Page 41 delle pile. Se avete installato pile nuove, compare la schermata 1. EV (valore di esposizione) serve a impostare la sovra- (+) o sottoesposizione (-) per escludere l’esposizione di impostazione dell’orologio (“Clock Set”). Seguite le istruzioni automatica. Se esaminate una foto appena scattata ed essa sembra troppo scura o chiara, provate a regolare a pagina 6 (SETUP>Clock Set) per impostare la data e l’ora.
- Page 42 (“normale”) corrisponde alla capacità massima, circa 113 foto. È possibile espandere la capacità della Timer automatico (icona di un orologio): imposta un ritardo di 10 secondi memoria con una scheda SD, che consente di memorizzare più foto con la qualità più alta. prima dello scatto di una foto dopo che si preme il pulsante SNAP.
- Page 43 Per visualizzare in miniatura più foto memorizzate nella fotocamera mentre state esaminando una foto seleziona alternativamente PROTECTED e UNPROTECTED. Una volta protetta una foto, per cancellarla (modalità Revisione [Review]), premete il pulsante Display. Si possono visualizzare sino a nove foto alla occorre prima annullare la protezione selezionando UNPROTECTED.
- Page 44 MODALITÀ RIPRODUZIONE (PLAY) INSTALLAZIONE DEL SOFTWARE 1) N. di foto / Totale foto: indica il numero di foto in modalità Revisione / il numero complessivo di foto memorizzate. A. INSTALLAZIONE DEL DRIVER 2) Risoluzione dell’immagine: indica la risoluzione della foto sotto esame. (NECESSARIA SOLO PER WINDOWS 98/98SE) SPIE/SEGNALI ACUSTICI Se non si avvia automaticamente la schermata di installazione dal CD,...
- Page 45 state scattate. Facendo clic su ciascuna foto se ne visualizza un’anteprima in dimensioni ridotte. Adoperate B. INSTALLAZIONE DI PHOTO SUITE 5 “Modifica>Seleziona tutto” o fate clic su una delle foto per copiarla e incollarla o semplicemente trascinatela Dalla schermata iniziale del CD selezionate “Photo Suite 5.0” e poi seguite le istruzioni sullo schermo, nella cartella prescelta (ad esempio, “Immagini”) dell’unità...
- Page 46 1. Regolate la distanza interpupillare (Figura 1). Fig. 2 I binocoli Bushnell sono strumenti di precisione, costruiti per durare anni e anni. Le sezioni che seguono 2. Portate su zero l’anello di regolazione diottrica (Figura 2) e osservate un spiegano come dovete regolare il binocolo per adattarlo agli occhi e come averne cura. Leggete attentamente oggetto lontano.
- Page 47 COME AVERE CURA DEL BINOCOLO GARANZIA LIMITATA PER DUE ANNI Ogni binocolo Bushnell assicura anni e anni di servizio senza problemi purché se ne abbia la stessa cura che si dedicherebbe a qualsiasi strumento ottico di precisione. I modelli non impermeabili all’acqua non vanno Si garantisce che questo prodotto Bushnell®...
-
Page 48: Português
GUIA DE CONSULTA RÁPIDA: BUSHNELL IMAGEVIEW 11-0832 INSTALE AS PILHAS E O CARTÃO DE MEMÓRIA SD (OPCIONAL) • Insira as duas pilhas alcalinas AAA no compartimento que se encontra na parte inferior do Imageview. Se você planeja tirar um grande número de fotografias nas configurações de alta qualidade, recomenda-se instalar um cartão de memória SD (Secure Digital) com capacidade... - Page 49 BUSHNELL IMAGEVIEW PORTUGUÊS Parabéns pela aquisição de um binóculo Bushnell ImageView. Antes de usar o produto, leia essas instruções TIRE UMA FOTOGRAFIA e dedique algum tempo para familiarizar-se com as diferentes peças e recursos do produto. • Segurando o Imageview com as duas mãos e em uma posição estável, verifique se a imagem no display de LCD está...
- Page 50 instalado novas pilhas, aparecerá a tela “Clock Set” (Ajuste valor atual será destacado); após use as setas para a esquerda/para a direita para alterar o valor, do relógio). Siga as instruções na pág. 6 (SETUP>Clock Set) conforme desejado. Pressione “MENU” para confirmar e voltar ao menu de configurações. (CONFIGURAÇÃO>Ajuste do relógio) para configurar a data e As seguintes configurações são fornecidas: a hora.
- Page 51 PARA USAR OS MODOS ESPECIAIS AO TIRAR FOTOGRAFIAS 5. A IMAGE QUALITY (QUALIDADE DE IMAGEM) afeta a qualidade geral e o número máximo de fotografias que pode ser armazenado na memória interna, alterando a quantidade de compressão do Com a câmara ligada e exibindo as imagens “ao vivo” (pronta para tirar uma nova fotografia), pressione o arquivo.
- Page 52 pressionando-se o botão do display. Aparecerá um símbolo amarelo de 4 posições no canto do LCD Observação: os cartões “MMC” não são compatíveis e não devem ser usados. próximo ao número da ampliação, que então pode ser usado para movimentar-se para cima, para baixo, para PROTECT (PROTEGER): protege a foto atualmente exibida para que não seja apagada acidentalmente.
- Page 53 PLAY (REPRODUÇÃO) INSTALAÇÃO DO SOFTWARE: 1) Número da foto/ total de fotografias: Exibe o número da fotografia / Número total de fotografias atualmente armazenadas A. INSTALAÇÃO DO SOFTWARE DO DRIVER 2) Resolução de imagem: Indica a resolução da fotografia (NECESSÁRIO APENAS PARA OS SISTEMAS OPERACIONAIS INDICAÇÕES DE LED/SOM WINDOWS 98/98SE) LED (vermelho)
- Page 54 mesma. Use “Edit>Select All” (Edita>Selecionar Tudo) ou clique em uma única fotografia e copie, e em B. INSTALAÇÃO DO PHOTO SUITE 5 seguida cole ou simplesmente arraste a(s) fotografia(s) para a pasta de sua preferência (por exemplo, “Minhas Selecione “Photo Suite 5.0” na tela de abertura do CD-ROM e após siga as instruções da tela, começando figuras”) no disco rígido local.
- Page 55 Caso você Como a visão varia de uma pessoa para outra, os binóculos Bushnell apresentam um recurso de ajuste esteja usando óculos ou óculos para sol, abaixe as viseiras. Isso fará com que seus de dioptria que permite ajustar o binóculo à...
- Page 56 O seu binóculo Bushnell proporcionará muitos anos de serviço sem problemas se receber os cuidados usuais Garantimos que seu produto Bushnell® estará isento de defeitos materiais e de fabricação. por dois anos após a data de que devem ser dados a qualquer instrumento óptico delicado. Os modelos que não são à prova d’água nunca aquisição.
- Page 57 ©2004 Bushnell Performance Optics...
Need help?
Do you have a question about the ImageView 11-0832 and is the answer not in the manual?
Questions and answers