Table of Contents
Advertisement
Before connecting, operating or adjusting this product, please read the
instructions completely. Please keep this manual for future reference.
Your unit may not look exactly the same as illustrated.
The player plays DVD-Video marked with labels containing
the region number "2" or "ALL".
Example:
2
USB connection for MP3 players
EB
DVD Home Theater Sound System
2
3
ALL
5
page
Operating Instructions
Model No.
32
SC-PT160
RQTX0122-B
Advertisement
Table of Contents

Related Manuals for Panasonic SC-PT160


Summary of Contents for Panasonic SC-PT160
-
Page 1: Operating Instructions
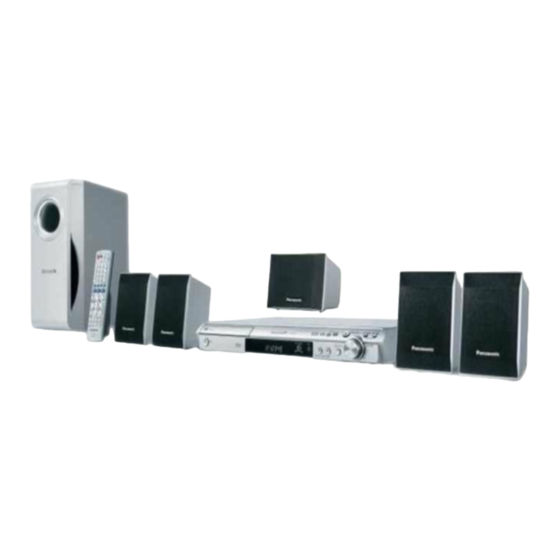
Operating Instructions DVD Home Theater Sound System SC-PT160 Model No. Before connecting, operating or adjusting this product, please read the instructions completely. Please keep this manual for future reference. Your unit may not look exactly the same as illustrated. The player plays DVD-Video marked with labels containing the region number “2”... - Page 2 For optimum performance and safety, please read these instructions carefully. Operations in these instructions are described mainly with the remote control, but you can perform the operations on the main unit if the controls are the same. System SC-PT160 Main unit SA-PT160 Front speakers...
-
Page 3: Caution For Ac Mains Lead
Caution for AC Mains Lead For your safety, please read the following text WARNING: DO NOT CONNECT EITHER WIRE TO carefully. THE EARTH TERMINAL WHICH IS MARKED WITH THE LETTER E, BY THE EARTH SYMBOL This appliance is supplied with a moulded three pin COLOURED GREEN OR GREEN/YELLOW. -
Page 4: Safety Precautions
-If you see this symbol- Safety precautions Information on Disposal for Users of Waste Electrical & Electronic Equipment Placement (private households) Set the unit up on an even surface This symbol on the products and/or away from direct sunlight, high accompanying documents means that temperatures, high humidity, and used electrical and electronic products... -
Page 5: Table Of Contents
Table of contents GETTING STARTED Caution for AC Mains Lead ................3 Safety precautions ..................4 Accessories ....................6 QUICK START GUIDE QUICK START GUIDE Preparing the remote control .................6 Placement of speakers .................7 Simple setup ....................8 Making the connections ......................8 Other speaker setup options ....................10 Optional antenna connections .....................10 Performing QUICK SETUP ................ -
Page 6: Accessories
Accessories Please check and identify the supplied accessories. 1 Remote control 1 FM indoor antenna 1 Antenna plug (N2QAYB000091) (RSA0007-M) adaptor (K1YZ02000013) 1 Sheet of speaker cable stickers 2 Remote control batteries 1 AC mains lead (K2CT3CA00004) Preparing the remote control Do not: 1 Insert so the poles •... -
Page 7: Placement Of Speakers
Placement of speakers How you set up your speakers can affect the bass and the sound fi eld. Note the following points: • Place speakers on fl at secure bases. • Placing speakers too close to fl oors, walls, and corners can result in excessive bass. Cover walls and windows with thick curtains. -
Page 8: Simple Setup
Simple setup Making the connections Making the connections Connect the AC mains lead only after all other connections have been made. • Ensure that you have the complete accessories before making the connections. Conserving power The main unit consumes a small amount of power, even when it is in standby mode (approx. 1 W). To save power when the unit is not to be used for a long time, unplug it from the household mains socket. - Page 9 Connect to the antenna. 7 FM indoor antenna Adhesive tape Tape the antenna where reception is the best. Connect to the television’s SCART terminal. • Do not connect the unit through a video cassette recorder. • Due to copy guard protection, the picture may not be displayed correctly. •...
-
Page 10: Other Speaker Setup Options
Simple setup (continued) Other speaker setup options Other speaker setup options 7 Attaching to a wall You can attach the front, surround and center speakers to the wall. • The wall or pillar on which the speakers are to be attached should be capable of supporting 10 kg per screw. -
Page 11: Performing Quick Setup
Performing QUICK SETUP The QUICK SETUP screen assists you to make necessary settings. To display the picture from this main unit, switch on the television and change the television’s input mode which is connected to this main unit (example : VIDEO 1, AV 1, etc.). To change your television’s input mode, refer to its operating instructions. -
Page 12: Disc Information
Disc information Discs that can be played Discs that can be played 7 Commercial discs Indicated in these Disc Logo Remarks instructions DVD- High quality movie and music discs. Video Video Music discs with video. Including SVCD (Conforming to IEC62107). Music discs. - Page 13 This unit can play CD-R/RW recorded with CD-DA or Video CD format. Discs recorded on DVD video recorders or DVD video cameras, etc. using Version 1.1 of the Video Recording Format (a unifi ed video recording standard). Discs recorded on DVD video recorders or DVD video cameras using Version 1.2 of the Video Recording Format (a unifi...
-
Page 14: Overview Of Controls
Overview of controls Main unit Main unit Standby/on switch [y/I] (16) 4/1, ¡/¢ / 4 TUNING 3 Press to switch the unit from on to standby Skipping or slow-search play, mode or vice versa. In standby mode, the unit Select the radio stations (28) is still consuming a small amount of power. -
Page 15: Remote Control
Remote control Remote control Television operations (33) Adjust the television volume (33) Switch the main unit on or off (11) Select the source DVD: DVD/CD (11) FM (28) EXT-IN: AV (33), AUX (31), Change the television’s video USB (32) input mode (33) Show the current disc’s playback condition (18) Select disc’s title numbers and etc.,... -
Page 16: Disc - Basic Play
Disc — Basic play Using the main unit Using the main unit Load a disc in the tray. Select “DVD/CD”. • Load double-sided discs so the label for the side you want to play is facing up. • For DVD-RAM, remove the disc from its cartridge before use. - Page 17 Stop Enter numbers The position is memorised while (while stopped) “RESUME” is on the display. • Press [3, PLAY] to resume. Example: To select 12, • Press [7, STOP] again to clear the position. with Playback control (PBC) Press [7, STOP] and then press Pause the numeric buttons to cancel the PBC functions.
-
Page 18: Advanced Play
Advanced play Displaying current playback condition Example: VD V PROGR AM S E L E C T T I T L E T I T L T I T L E 1 T I T L E 2 (during play) T I T L E 3 T I T L E 4 T I T L E 5... -
Page 19: Playing Data Discs Using Navigation Menus
Playing data discs using navigation menus Playing data discs Playing RAM and DVD-R/-RW (DVD-VR) discs Select “DATA” in “OTHERS” tab (\ page 25) to play WMA, MP3 or JPEG content. • Titles appear only if the titles are recorded on the disc. -
Page 20: Using On-Screen Menus
Using on-screen menus Select the item. Make the settings. Select Confi rm Select Confi rm Select Display the functions Press to exit. screen. Items shown differ depending on the type of disc as well as the recording format. Functions menu TRACK SEARCH To start from a specifi... - Page 21 Functions menu (continued) Example: T 2 C 1 1: ENG x 1 . 0 OF F AUD IO To select audio soundtrack To select “L”, “R” , “L+R” or “L R” (Karaoke disc) To select “ON” or “OFF” for vocals To select “OFF”, “V2”, “V1”...
- Page 22 • On +R/+RW, a subtitle number may be shown for subtitles that are not displayed. • “ON” or “OFF” appears only with discs that contain subtitle on/off information (Subtitle on/off information cannot be recorded using Panasonic DVD Recorders). (with multiple angles) To select a video angle Example: ANGLE 1 : ✱✱✱...
-
Page 23: Changing The Player Settings
Changing the player settings Display the MAIN Make the settings. menu. Select (Press and hold) Confi rm Select the tab. Select Confi rm Press to exit. Select the item. Confi rm Select (Press and hold) Select A I N I SC D I SC S E T T I NG S T AT E V I DEO... - Page 24 Changing the player settings (continued) QUICK SETUP enables successive settings of the items in the shaded area. MAIN menu (continued) MENUS • ENGLISH • FRENCH • SPANISH • GERMAN Choose the language for disc • ITALIAN • SWEDISH • DUTCH •...
- Page 25 QUICK SETUP enables successive settings of the items in the shaded area. MAIN menu (continued) NTSC DISC OUT • NTSC: When connected to a NTSC television. Choose PAL 60 or NTSC output • PAL60: When connected to a PAL television. when playing NTSC discs (\ page 13, Video systems).
-
Page 26: Changing The Delay Time Of The Speakers
Changing the player settings (continued) Changing the delay time of the speakers 7 To enter the speaker setting Effective when playing multi-channel audio (Center and surround speakers only) To select the speaker. For optimum listening with 5.1-channel sound, all the speakers, except for the subwoofer, should be the same distance from the seating position. - Page 27 Naming folders and fi les Files are treated as contents and folders are treated as groups on this unit. At the time of recording, prefi x folder and fi le names. This should be with numbers that have an equal number of digits, and should be done in the order you want to play them (this may not work at times).
-
Page 28: Using The Radio
Using the radio Manual tuning Automatic presetting To select “FM”. To select “FM”. (main unit) (remote control) (main unit) (remote control) To select “MANUAL”. Press and hold. Release the button when (main unit) “FM AUTO” is (main unit) (remote displayed. control) To select the frequency. -
Page 29: Using Sound Effects
Using sound effects Note Changing the sound quality: • The following sound effects may not be available Equalizer Mode (EQ) or have no effect depending on the type of source. • You may experience a reduction in sound quality SOFT : For background music. -
Page 30: Adjusting The Volume Of Each Speaker: Speaker Level Adjustments
Using sound effects (continued) Adjusting the volume of each speaker: To adjust speaker level during play (Effective when playing multi-channel audio or Speaker level adjustments when Dolby Pro Logic II is on.) This is one of the ways to get appropriate 1. -
Page 31: Operating Other Equipment
Operating other equipment Optional audio connection for video cassette recorder Optional audio connection for video cassette recorder This audio connection will enable you to play audio from your video cassette recorder through your home theater system. Press [EXT-IN] (\ page 15) to select “AUX” as the source to operate the audio input. Video cassette Rear panel of recorder... -
Page 32: Optional Usb Connection And Operation
Operating other equipment (continued) Optional USB connection and operation Optional USB connection and operation The USB connectivity enables you to connect and Begin playback by selecting the track from the play tracks or fi les from USB mass storage class USB mass storage device. -
Page 33: Operating The Television
Operating the television Operating the television You can use the remote control to operate a To play audio from your television through your Panasonic television. home theater system Aim the remote control at the television. Preparation To switch the television on or off Connect your equipment referring to “Connect to the... -
Page 34: Troubleshooting Guide
Troubleshooting guide Before requesting service, make the following checks. If you are in doubt about some of the check points, or if the solutions indicated in the chart do not solve the problem, consult your dealer for instructions. 7 Power Page No power. - Page 35 7 Sound abnormal or improper Page Sound is distorted. • Noise may occur when playing WMA. — Effects do not work. • Some audio effects do not work or have less effect with some discs. — • Dolby Pro Logic II does not work if you have changed the play speed. —...
-
Page 36: Language Code List
Troubleshooting guide (continued) 7 Television displays “ ” • The operation is prohibited by the unit or disc. — “ERROR” • You are trying to display an incompatible group or content. — • You are trying to play a protected group or content. You cannot —... -
Page 37: Glossary
Glossary Decoder I/P/B A decoder restores the coded audio signals on DVDs MPEG 2, the video compression standard adopted to normal. This is called decoding. for use with DVD-Video, codes frames using these 3 picture types. I: Intra coded picture Dolby Digital This picture has the best quality and is the best to This is a method of coding digital signals developed... -
Page 38: Specifi Cations
Specifi cations AMPLIFIER SECTION Pick up Wavelength (DVD/CD) 662/785 nm RMS Output Power: Dolby Digital Mode Laser power (DVD/CD) CLASS 1/CLASS 1M Front Ch Audio output (Disc) 55 W per channel (5 ), 1 kHz, 10 % THD Number of channels Surround Ch 5.1ch (FL, FR, C, SL, SR, SW) 55 W per channel (5 ), 1 kHz, 10 % THD... -
Page 39: Maintenance
Subwoofer SB-HW150 Surround speakers SB-HS151 Type 1 way, 1 speaker system (Bass refl ex) Type 1 way, 1 speaker system (Bass refl ex) Speaker unit(s) Impedance 5 Speaker unit(s) Impedance 5 Full range 6.5 cm Cone type Woofer 12 cm Cone type Input power (IEC) 55 W (Max) - Page 40 • All enquiries transactions and distribution by Macrovision, and is intended for home and facilities are provided directly by Panasonic UK other limited viewing uses only unless otherwise Ltd. authorized by Macrovision. Reverse engineering or •...