Table of Contents
Advertisement
Advertisement
Table of Contents

Related Manuals for Eagle Accura 240


Summary of Contents for Eagle Accura 240
- Page 1 Accura 240 Accura 240 Accura 240 Accura 240 Accura 240 INST INST ALLA ALLA TION AND OPERA TION AND OPERA INST ALLA ALLA TION AND OPERA TION AND OPERA TION INST INST ALLA TION AND OPERA INSTR INSTR INSTR UCTIONS...
-
Page 2: Table Of Contents
WINDOWS SUMMARY ... 25 TROUBLESHOOTING ... 26 WARRANTY ... 29 INTERNATIONAL SERVICE INFORMATION ... INSIDE BACK COVER Copyright All features and specifications subject to change without notice. All screens in this manual are simulated. © 2000, Eagle Electronics All rights reserved. -
Page 3: Introduction
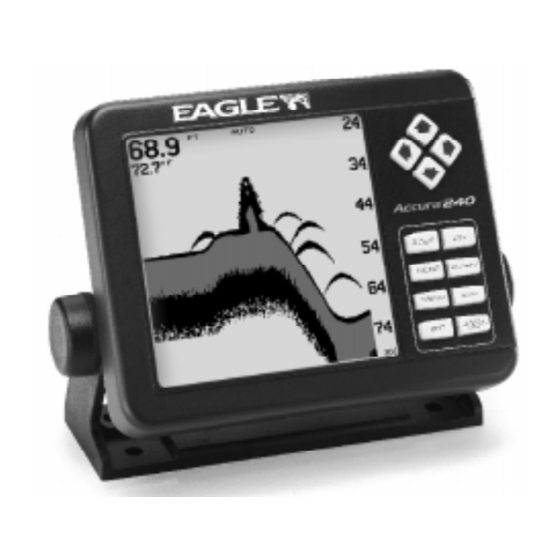
INTRODUCTION The Accura 240 is the latest member of the Eagle family that combines a high performance sonar with a wide, high definition screen. Using menu features and “soft-key” operation, the Accura 240 is also easy to use. The wide screen shows the underwater world with high resolution and detail. -
Page 4: Power Connections
This will protect both the unit and the power cable in the event of a short. The Accura 240 requires a 3-amp fuse. IMPORTANT! Do not use this product without a 3-amp fuse wired into the power cable! Failure to use a 3-amp fuse will void your warranty. -
Page 5: Speed/Temperature Sensors
OR TEMP SENSORS (Not included) SPEED/TEMPERATURE SENSORS The Accura 240 accepts up to three temperature sensors which can monitor surface water, live well, air, and virtually any other temperature. You do need to be careful when purchasing the temperature sensors, however. - Page 6 TS-1BK + TS-2BK = 2 temperature sensors TS-12BK + TS-3BK = 3 temperature sensors TS-1BK + TS-2BK +TS-3BK = 3 temperature sensors Here's some sample wiring diagrams: Two Temperature Sensors (Water and T-2) Sensor Chart TS-12 BK Accura 240 POWER CABLE...
- Page 7 TS-12 BK TS-3 BK Three Temperature Sensors (Water, T-2, and T-3) Accura 240 POWER CABLE ST-TBK TS-2 BK TS-3 BK Three Temperature Sensors plus Speed (Water, T-2, T-3, and Speed) Accura 240 POWER CABLE...
-
Page 8: Keyboard Basics
ZOUT, ZIN - These keys let you zoom the screen in and out to see detail. ALARM - Press this key to activate any of the sonar alarms. PWR - This key turns the Accura 240 and it's lights on and off. ENT, EXIT - These keys let you enter or erase values. -
Page 9: Operation
Release the PWR key. MENUS The Accura 240 uses menus extensively to guide you through the functions and features of the unit. To use the menus, simply press the MENU key. The options on the menus let you to customize the unit to your particular needs and water conditions. - Page 10 Full Chart This is the default mode used when the Accura 240 is first turned on. The bottom signal scrolls across the screen from right to left. Depth scales on the right side of the screen makes it easy to determine the depth of fish, struc- ture, and other objects.
- Page 11 Window Groups You can change the displays on the Accura 240 by using the windows fea- ture. This lets you use different displays for your own fishing or boating situa- tions. This feature gives you 8 different display screens in the window groups alone.
-
Page 12: Automatic
AUTOMATIC When the Accura 240 is first turned on, the Automatic feature is enabled. This is indicated by the word “AUTO” at the top of the screen. The Automatic fea- ture adjusts the sensitivity and range so the bottom signal is displayed in the lower half of the screen at all times. -
Page 13: Range
To change the range, first make cer- tain the Accura 240 is in the manual mode. Next, press the MENU key and the up or down arrow keys until the... -
Page 14: Zoom
ZOOM “Zooming” the picture is a common method used to enlarge small detail and fish signals. The Accura 240 gives you two different zoom sizes, plus a split screen zoom option. The zoom operation and adjustment is different in the automatic and manual modes. -
Page 15: Manual Operation
GRAYLINE is adjustable. Since GRAYLINE shows the difference between strong and weak signals, adjusting the sensitivity may require a different GRAYLINE level, also. The level chosen by the Accura 240 at power on is usually adequate for most conditions. Experiment with your unit to find the GRAYLINE setting that’s best for you. -
Page 16: Chart Speed
down arrow keys until the GRAYLINE menu appears. A screen similar to the one at right appears. Press the left arrow key to decrease the gray level or the right arrow key to increase it. The percentage of GRAYLINE in use changes as the arrow keys are pressed. -
Page 17: Fish Id
Remember, the Fish ID feature can’t be used when the Accura 240 is in the manual mode. If you turn the Fish ID feature on when the Accura 240 is in manual, the microcomputer will turn the automatic feature on. If you turn automatic off when the Fish ID feature is on, the Fish ID feature will be turned off also. -
Page 18: Chart Setup
CHART CURSOR The Accura 240 has a chart cursor that allows you to pinpoint a target’s depth. The cursor is simply a horizontal line that extends across the display from left to right. A depth box at the end of the line on the right side shows the line’s depth. -
Page 19: Display Zoom Bar
DIGITAL SONAR When the Accura 240 is first turned on, the digital depth display is located at the top left corner of the screen. This display comes from a separate digital sonar built into the unit. It displays only the bottom depth. If it loses the bottom, the last known depth will flash on the display. -
Page 20: Alarms
ALARMS The Accura 240 has three different types of sonar alarms. The first is the Fish Alarm. It sounds when the Fish I.D. feature determines an echo or group of echoes is a fish. Another alarm is the Zone Alarm which consists of a bar. -
Page 21: Zone Alarm
"1" at the end of the number to a "0". The depth now shows 10 feet. Press the ENT key to accept this set- ting. The Accura 240 returns to the alarms menu, showing a shallow depth of 10 feet. Now you can activate the alarm by highlighting the "Shallow Alm"... -
Page 22: Adjust Chart Surface Clarity
When you're finished, press the EXIT key to erase the SCC menu. ASP (Advanced Signal Processing) The ASP feature is a noise rejection system built into the Accura 240 that constantly evaluates the effects of boat speed, water conditions, and interference. This automatic feature gives you the best display possible under most conditions. -
Page 23: System Setup
The ASP feature has two levels - Nor- mal and High. If you have high noise levels, try using the “High” ASP set- ting. However, if you are having trouble with noise, we suggest that you take steps to find the interference source and fix it, rather than continually using the unit with the high ASP setting. -
Page 24: System Information
Reset Distance Log If you have a speed sensor attached to the Accura 240, the unit starts counting the distance you've travelled each time you turn it on. You can reset this distance to zero by turning the unit off and on again, however, it's easier to highlight the "Reset Distance Log"... -
Page 25: Simulator
Simulator The Accura 240 has a simulator built in that lets you use it as if you are on the water. All features and functions of the unit are usable. A message appears occasionally to remind you that the simulator is on. -
Page 26: Calibrate Speed
Accura 240 will add one foot to the depth, since the transducer is one foot below the surface. Press the right arrow key, then the up or down arrow keys until 1.0 appears in the "Adj Keel" box, as shown at right, then press the ENT key. -
Page 27: Windows Summary
WINDOWS SUMMARY GROUP "A" GROUP "C" GROUP "E" GROUP "G" GROUP "B" GROUP "D" GROUP "F" GROUP "H"... -
Page 28: Troubleshooting
TROUBLESHOOTING If your unit is not working, or if you need technical help, please use the following troubleshooting section before contacting the factory customer service department. It may save you the trouble of returning your unit. Unit won’t turn on: 1. - Page 29 3. The water may be deeper than the sonar’s ability to find the bottom. If the sonar can’t find the bottom signal while it’s in the automatic mode, the digital will flash continuously. It may change the range to limits far greater than the water you are in.
- Page 30 With the boat at rest in the water, the first thing you should do is turn all electrical equipment on the boat off. Make certain the engine is off, also. Turn your Accura 240 on, then turn off ASP (Advanced Signal Processing). There should be a steady bottom signal on the display. Now turn on each piece of electrical equipment on the boat and view the effect on the sonar’s display.
-
Page 31: Warranty
EAGLE ELECTRONICS FULL ONE-YEAR WARRANTY “We", “our”, or “us” refers to EAGLE ELECTRONICS, a division of LEI, the manufacturer of this product. “You” or “your” refers to the first person who purchases this product as a consumer item for personal, family, or household use. - Page 32 Notes:...
-
Page 33: Accessory Ordering Information
How to Obtain Service (Canadian Customers Only) We back your investment in quality products with quick, expert service and genuine Eagle replacement parts. If you need service or repairs, contact the Eagle Factory Customer Service Department at the toll-free number listed below. A technician may be able to solve the problem and save you the inconvenience of returning your unit. - Page 34 180 days rather than one year. For further details, please call us at the above number. Eagle Electronics may find it necessary to change or end our shipping policies, regulations, and special offers at any time. We reserve the right to do so without notice.
Need help?
Do you have a question about the Accura 240 and is the answer not in the manual?
Questions and answers