Table of Contents
Advertisement
Advertisement
Table of Contents

Related Manuals for Dymo Rhino 4200 Industrial Label Printer


Summary of Contents for Dymo Rhino 4200 Industrial Label Printer
- Page 1 User Guide Rhino ™ 4200...
- Page 2 No part of this document or the software may be reproduced or transmitted in any form or by any means or translated into another language without the prior written consent of Sanford, L.P. Trademarks DYMO and RHINO are registered marks in the US and other countries. All other trademarks are the property of their respective holders.
-
Page 3: Table Of Contents
Contents About Your New Printer ............5 Warranty Registration . - Page 4 Deleting a Term from the Library ..............13 Using My Labels .
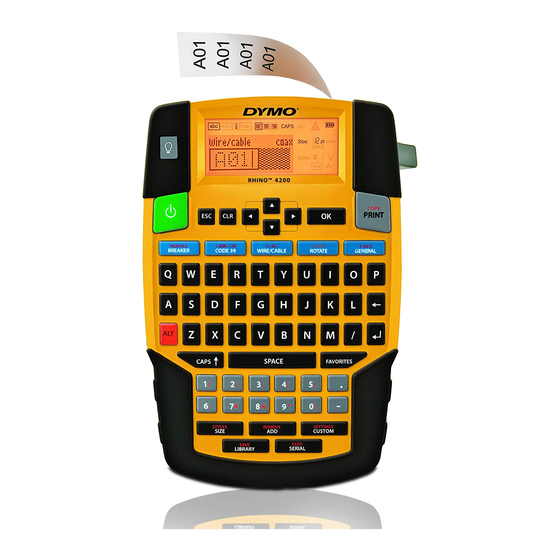
- Page 5 Figure 1 RHINO 4200 Label Printer 1 Power connector 9 Return 17 Space bar 2 Label exit slot 10 Favorites 18 Alt 3 LCD Display 11 Add/Remove 19 Hot Keys 20 Escape 4 Cutter button 12 Custom/Settings 21 Clear 5 Print 13 Serial/Feed 6 OK 14 Library/Save...
-
Page 6: About Your New Printer
Visit www.dymo.com for information on the full line of labels and accessories for your printer. Warranty Registration Visit www.dymo.com/register to register your label... -
Page 7: Inserting The Optional Battery Pack
To insert the label cartridge The printer can operate using an optional rechargeable, Gently lift the label cartridge door on the back of Lithium-ion battery pack (DYMO Li-ion Battery 7.4V the printer. 1400mAh). Make sure the label and ribbon are taut across the... -
Page 8: Selecting A Language
Selecting a Language When the text you have entered will not fit on the label as currently defined, the portion of the text that will not fit is The first time you turn on the power, you are prompted to shaded. -
Page 9: Escape Key
ALT Key Creating a Label key is used to select the function or symbol The printer remembers the last label that you were printed above a key. For example, when you press working on when the power was turned off. You need to the number 9 appears in the display;... -
Page 10: Printing Labels
Printing Labels Rotating Text When you print a group of labels, you choose whether to You can print the text on your label in one of four print all of the labels or only the current label in the group. rotations: horizontal, vertical, 90-degree, and mirror (the text appears in inverse order as it would in a mirror). -
Page 11: Using International Characters
Using International Characters You can manually enter the diameter of the cable you are creating a label for, or you can select from a number of The printer supports the extended Latin character set predefined wire gauges and cable types. If you choose a using RACE technology. -
Page 12: Creating Breaker Labels
Creating Breaker Labels Press Each module is separated by a line in the display. A breaker label is a multi-cell label used to label a row of breakers. You select Enter the text for each module. the breaker height and number of Press to move from module breakers, enter the text for each... -
Page 13: Editing A Barcode
Select whether or not to show the barcode text and Make any desired adjustments to the settings for the press label type and press If necessary, select the location for the barcode text Do one of the following: and press •... -
Page 14: Using The Library
Using the Library To add a term to the library Enter text to save to the library. The library includes a set of default symbols and terms to use on your labels. In addition, you can save your own If your label contains a barcode, place the cursor custom terms and frequently-used labels to the library. -
Page 15: Recalling Labels
Recalling Labels Deleting Items from the Favorites list Once a label is saved to the library, you can recall the When you no longer need an item in the Favorites list, you label to print or edit. Recalling a label replaces the can delete the item from the Favorites list. -
Page 16: Printing Separator Lines Between Cells
Cleaning Your Printer Select one of the following: • Yes to print collated. Your printer is designed to give you long and trouble-free • No to print normally. service, while requiring very little maintenance. Press to begin printing. Clean your printer from time to time to keep it working properly. -
Page 17: Symbols
Symbols The following tables show the commonly used symbols by category. Arrows and Brackets Currency Electrical Hazard and Warning Pro AV and Security Numbers... -
Page 18: Terms
Terms The following lists the commonly used terms by category. Audio Security ANALOG RIGHT BACK SPKR BACK DOOR HIGH WATER RIGHT FRONT SPKR CAMERA HORN CENT FRONT SPKR RIGHT OUTD SPKR CARBON MONOXIDE LOW TEMP CENTER BACK SPKR RIGHT SIDE SPKR CCTV MOTION SENSOR DIGITAL... -
Page 19: Troubleshooting
Locate the split on the label backing. Gently pinch the label lengthwise, folding toward the printed side of the label. The label backing will separate. Carefully peel away the backing from the label. If you need further assistance, visit the DYMO Web site at www.dymo.com. - Page 20 We also welcome your suggestions about additional topics you would like to see covered in the documentation. Send email messages to: documentation@dymo.com Please keep in mind that this email address is only for documentation feedback. If you have a technical question, please contact Customer Support.
- Page 21 The crossed-bin symbol marked on your device indicates you should use these systems. If you need more information on the collection, reuse, and recycling of this product, please contact your local or regional waste administration. You can also contact DYMO for more information on the environmental performance of our products.
Need help?
Do you have a question about the Rhino 4200 Industrial Label Printer and is the answer not in the manual?
Questions and answers