Dymo Rhino 5200 Industrial Label Printer User Manual
Professional labeling tool
Hide thumbs
Also See for Rhino 5200 Industrial Label Printer:
- User manual ,
- Quick start manual (68 pages) ,
- Quick reference manual (16 pages)
Table of Contents
Advertisement
Quick Links
Advertisement
Table of Contents

Subscribe to Our Youtube Channel
Related Manuals for Dymo Rhino 5200 Industrial Label Printer


Summary of Contents for Dymo Rhino 5200 Industrial Label Printer
- Page 1 User Guide...
-
Page 2: Table Of Contents
Contents About Your New Printer ............... . .5 Getting Started . - Page 3 Creating Module Labels ................13 Using Fuse Multipliers .
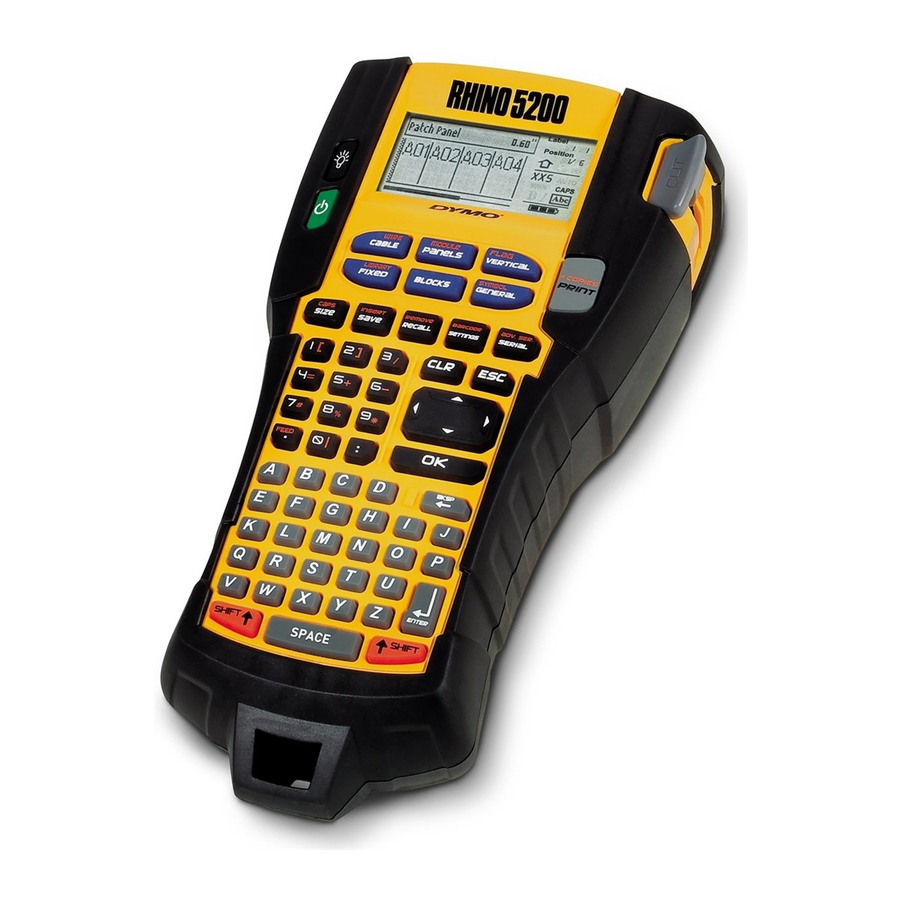
- Page 4 Power connector Label exit Backlight LCD display Power Print/# of copies Hot Keys Serialization Size/CAPS Save/Insert Settings/Barcode Recall/Remove Escape Clear Feed Navigation keys BKSP Backspace Shift Enter Space bar Figure 1 RHINO 5200 Label Printer...
-
Page 5: About Your New Printer
Visit www.dymo.com for information on the full line of labels and accessories for your printer. Figure 2 2. Plug the other end of the power adapter into a Warranty Registration power outlet. -
Page 6: Recharging The Battery Pack
Some of the features you use to design labels Your printer comes with a starter label cartridge. depend on the width of the label. Visit www.dymo.com for information about However, to create a label for a label width different purchasing additional label cartridges. -
Page 7: Selecting A Language
Selecting a Language LCD Display The first time you turn on the power, you are The LCD display includes a caption bar across the prompted to select your desired language. By top showing the current label type, and feature default, the language is set to English. indicators on the right side showing which features Several language-related features on the printer are currently selected. -
Page 8: Caps Mode
CAPS Mode Cutter Button key toggles capitalization on and off. The Cut button cuts the label. When printing When CAPS mode is turned on, the CAPS indicator multiple labels, the printer pauses after printing is shown on the display and all letters that you each label so that you can cut the label. -
Page 9: Removing Labels From A File
Removing Labels from a File You can also select Auto as the text size. When Auto is selected, the best text size is automatically You can remove one or more labels from a label file. determined for the height and width of the label To remove a label you are creating. -
Page 10: Using International Characters
Using International Characters Creating Wire Labels A Wire label is placed The printer supports the extended Latin character horizontally along the set using RACE technology. Similar to using a length of a wire or cable. mobile phone keypad, holding down a letter key The label text is repeated will scroll through variations of that letter. -
Page 11: Creating Panel Labels
To set the label length Creating Electrical Panel Labels 1. Press An Electrical Panel label allows you to label a row of 2. Enter or select the length of the label and breakers on an electrical press panel. You select the Any text that does not fit within the fixed length breaker size and number appears shaded in the display and will be cut off... -
Page 12: Printing Empty Breakers
To adjust the size of an individual breaker 4. Enter or select the block width and press 1. Create an Electrical Panel label as described in The default block width is 17.5 mm. Creating Electrical Panel Labels. Each block is separated by a solid black line on 2. -
Page 13: Creating Module Labels
Creating Module Labels Printing Empty Modules By default, empty modules at the end of a Module A Module label allows you label are not printed. You can choose whether or to label a row of fuses of not to print empty modules at the end of a label. varying widths. -
Page 14: Changing The Label Settings
Changing the Label Settings Adding a Barcode Once you create a specific label, you can change The barcode text appears on the label in the the settings without starting all over again. display just like any other text. However, if the cursor is positioned within the barcode text, To change the label settings Barcode and the type of barcode are displayed in... -
Page 15: Hiding Barcode Text
Hiding Barcode Text To add custom text 1. Press You can choose to hide the human-readable text 2. Select Add new text and press for the barcode. To hide barcode text 3. Enter the text you want and press The text is added to My Library. 1. -
Page 16: Using Simple Serialization
Using Simple Serialization Using Advanced Serialization Simple serialization creates a series of labels by Advanced serialization creates a series of labels by incrementing one alphanumeric character in the allowing you to select two sequences in the pattern pattern. For example, 101, 102, 103, 104, and so on. and increment them consecutively. -
Page 17: Collating Multiple Copies
Collating Multiple Copies Adjusting Print Contrast When printing multiple copies of a label file Depending on the label material you choose, containing more than one label, all the copies you may need to lighten or darken the print on of a label are printed before the next label the label. -
Page 18: Deleting A Label File From Memory
Deleting a Label File from Memory When you no longer need a stored label file, you can delete the file from memory. To delete a label from memory 1. Press The saved label files are displayed. 2. Select the label file you want to delete. 3. -
Page 19: Symbols
Symbols The following tables show the default symbols by category. Electrical Brackets Arrows Numbers Home Electrical Voice/Data Warning Punctuation Currency... -
Page 20: Troubleshooting
2. Gently pinch the label length-wise, folding toward the printed side of the label. The label backing will separate. 3. Carefully peel away the backing from the label. If you still need assistance, visit the DYMO Web site at www.dymo.com. - Page 21 Safety Precautions for Lithium-Ion Rechargeable Battery Pack Inaccurate handling of a Lithium-ion rechargeable battery may cause leakage, heat, smoke, an explosion, or fire. This could cause deterioration of performance or failure. This may also damage the protection device installed in the battery pack. This could damage equipment or injure users. Thoroughly follow the instructions below.
-
Page 22: Environmental Information
The crossed-bin symbol marked in your device invites you to use those systems. If you need more information on the collection, reuse and recycling systems, please contact your local or regional waste administration. You can also contact DYMO for more information on the environmental performances of our products. -
Page 23: Documentation Feedback
We also welcome your suggestions about additional topics you would like to see covered in the documentation. Send email messages to: documentation@dymo.com Please keep in mind that this email address is only for documentation feedback. If you have a technical... - Page 24 No part of this document may be reproduced or transmitted in any form or by any means or translated into another language without the prior written consent of Sanford, L.P. DYMO and RHINO are trademarks or registered trademarks of Sanford, L.P. All other trademarks are the property of their respective holders.
Need help?
Do you have a question about the Rhino 5200 Industrial Label Printer and is the answer not in the manual?
Questions and answers