Edirol FA-66 Owner's Manual
Firewire audiocapture
Hide thumbs
Also See for FA-66:
- Attachment manual (2 pages) ,
- Owner's manual (68 pages) ,
- Quick start manual (9 pages)
Table of Contents
Advertisement
OWNER'S MANUAL
201a
Before using this unit, carefully read the sections entitled: "USING THE UNIT
SAFELY" and "IMPORTANT NOTES" (p. 3–p. 6). These sections provide important
information concerning the proper operation of the unit. Additionally, in order to
feel assured that you have gained a good grasp of every feature provided by your
new unit, OWNER'S MANUAL should be read in its entirety. The manual should be
saved and kept on hand as a convenient reference.
Copyright © 2005 ROLAND CORPORATION
All rights reserved. No part of this publication may be reproduced in any form
without the written permission of ROLAND CORPORATION.
Advertisement
Table of Contents

Subscribe to Our Youtube Channel
Related Manuals for Edirol FA-66


Summary of Contents for Edirol FA-66
- Page 1 OWNER’S MANUAL 201a Before using this unit, carefully read the sections entitled: “USING THE UNIT SAFELY” and “IMPORTANT NOTES” (p. 3–p. 6). These sections provide important information concerning the proper operation of the unit. Additionally, in order to feel assured that you have gained a good grasp of every feature provided by your new unit, OWNER’S MANUAL should be read in its entirety.
- Page 2 Cet appareil numérique de la classe B respecte toutes les exigences du Règlement sur le matériel brouilleur du Canada. For the USA DECLARATION OF CONFORMITY Compliance Information Statement Model Name : FA-66 Type of Equipment : FireWire Audio Interface Responsible Party : Roland Corporation U.S.
- Page 3 USING THE UNIT SAFELY symbol alerts the user to important instructions Used for instructions intended to alert or warnings.The specific meaning of the symbol is the user to the risk of death or severe determined by the design contained within the injury should unit...
- Page 4 012d 101b • Immediately turn the power off, and • The unit and the AC adaptor should be request servicing by your retailer, the located so their location or position does not nearest Roland Service Center, or an autho- interfere with their proper ventilation. rized Roland distributor, as listed on the “Infor- ........................
- Page 5 IMPORTANT NOTES 291a In addition to the items listed under “USING THE UNIT SAFELY” on page 3, please read and observe the following: Power Supply 355b • When moved from one location to another where the temperature and/or humidity is •...
- Page 6 IMPORTANT NOTES Copyright 559a • When you need to transport the unit, package it in the box (including padding) that it came • Unauthorized recording, distribution, sale, in, if possible. Otherwise, you will need to use lending, public performance, broadcasting, or equivalent packaging materials.
-
Page 7: Table Of Contents
Troubleshooting ..................48 Driver-related problems (Windows)................48 No sound..........................51 Noise or pops are heard when recording/playing on your computer.....55 Noise or distortion occurs when the FA-66 is not connected to your computer..59 The sound is too weak......................59 Others ..........................61 Main specifications ..................62... -
Page 8: Contents Of The Package
Contents of the package ■ FA-66 fig.FA-66 ■ AC adaptor This is the dedicated AC adaptor for the FA-66. Use only the supplied AC adaptor. ■ FireWire (IEEE 1394) cables (one 6-pin ↔ 6-pin cable, one 6-pin ↔ 4-pin cable) Use one of these cables to connect the FA-66 to the IEEE 1394 connector (FireWire connector, iLink connector, DV connector) of your computer. - Page 9 FA-66 and the cables you’ll need to connect these items are not included. Nor is a mic included, which you will need to connect to the FA-66 in order to input audio. You will need to obtain these items yourself.
-
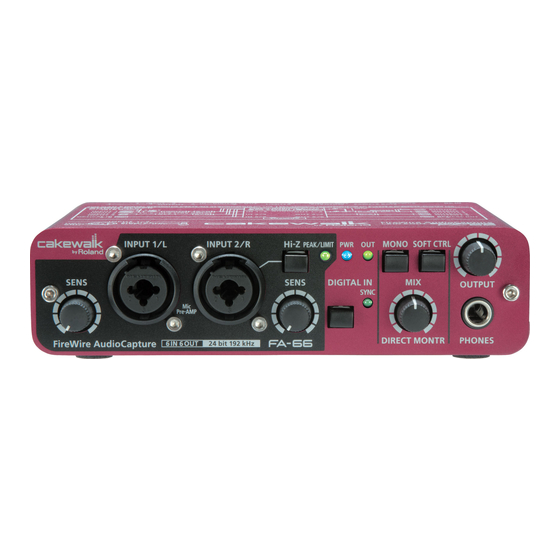
Page 10: Front And Rear Panel
Front and rear panel Front panel fig.front.eps_60 fig.jack-type_70 Combo input jacks These are analog audio input jacks with mic preamps. They accommodate either XLR or phone plugs, allowing you to connect a variety of equipment. Either balanced or unbalanced XLR plug signals may be connected. - Page 11 (see block diagram ➔ front cover) Digital input switch If you want to record a digital input, turn this on ( pressed inward). This lets the FA-66 synchronize to an external digital device connected to the digital input connector (25) Sync indicator...
- Page 12 Front and rear panel fig.front.eps_60 STEREO/MONO select switch (direct monitor section) This selects whether the input signal is to be monitored in stereo (STEREO) or in monaural (MONO). Turn this on ( pressed inward) if you want to monitor in monaural.
- Page 13 This jack outputs the mixed sound being input via the input jacks and the sound being output from the computer (WAVE OUT 1/2 (in the case of WDM, EDIROL FA-66 Out 1➔ see p. 31)). The balance of these two is adjusted by the direct monitor volume (11).
-
Page 14: Rear Panel
* With some computers, the FA-66 may not operate on bus power. If so, connect the included AC adaptor to an AC outlet and use it to supply power to the FA-66. In this case, the power will be on when you set the power switch to the DC IN position. - Page 15 Use a FireWire (IEEE 1394) cable to connect these to your computer. We recommend that you use a 6-pin cable to connect the FA-66 to your computer, and a 4-pin cable to connect the FA-66 to any peripheral device you may be using. fig.6-pin •...
- Page 16 Use this when you want to digitally connect an audio device, such as an MD or DAT unit. The signals sent from OUTPUT 5 and 6 (if using WDM, EDIROL FA-66 OUT 3 ➔ see p. 31) are output to the digital output connector.
- Page 17 The signal input to the digital input connector is input as INPUT 5 and 6 (in the case of WDM, EDIROL FA-66 In 3 ➔ see p. 31). If you want to record this digital input signal, turn on the digital input switch (7).
-
Page 18: Before You Begin Using The Fa-66 With Your Macintosh (Mac Os X Users)
(Mac OS X users) If you are using the FA-66 with Windows, please read “Installing the driver (Windows)” (p. 24). If you’re using the FA-66 with Mac OS X, you don’t need to Once the connections have install a driver. -
Page 19: Audio And Midi Settings
• Close your software before you switch off the FA-66’s power. • Turn off the Sleep setting of your Macintosh. • The FA-66 will not work in the Classic environment of Mac OS X. Use it when the Classic environment is not running. - Page 20 Before you begin using the FA-66 with your Macintosh (Mac OS X users) * Depending on the model of Macintosh you are using, starting up the Macintosh when the FA-66 is connected may cause operation to become unstable. In this case, start up the Macintosh and then connect the FA-66.
- Page 21 Before you begin using the FA-66 with your Macintosh (Mac OS X users) MIDI settings Open the Applications folder of your Macintosh hard disk. In the Utilities folder, double-click Audio MIDI Setup to open the Audio MIDI Setup. fig.audio-midi.eps Click MIDI Devices...
- Page 22 Before you begin using the FA-66 with your Macintosh (Mac OS X users) Checking that you hear sound Use of the song data supplied Now, let’s play back the sample data to verify that the with this product for any connections and settings are correct.
-
Page 23: Software Settings
Please copy the demo songs to the hard disk of your Macintosh before listening to them. * The demo songs were produced at 48 kHz. You must set the FA-66’s sample rate to 48 kHz. You’ll need to cycle the power to the FA-66 after changing the sampling rate. -
Page 24: Installing The Driver (Windows)
What is a driver? A driver is software that allows data to be transferred between the FA-66 and application software running on your computer when the FA-66 is connected to your Depending on your system, computer via a FireWire (IEEE 1394) cable. - Page 25 (Drive name): \Driver\XP_ENG\setup.exe * The drive name is “D:” in the example shown here, but this may be different on your system. Specify the drive name for your CD-ROM drive. The EDIROL FA-66 Driver Setup dialog box appears. Click [Install].
- Page 26 Once the connections have drivers” appears. been completed, turn on power to your various devices Use a FireWire (IEEE 1394) cable to connect the FA-66 to in the order specified. By your computer. turning on devices in the wrong order, you risk causing...
- Page 27 Hardware Wizard” appears. Click [Finish]. The “Found New Hardware” message appears near the taskbar. In the EDIROL FA-66 Driver Setup dialog box that is already displayed, click [I Completed the Above Steps]. The “Found New Hardware” message appears near the taskbar.
- Page 28 Installing the driver (Windows) If you changed the “Driver Signing Options” setting (p. 24, step 4), restore the setting to its previous state after restarting Windows. Log on to Windows using the same user account as the one used when the driver was installed. From the Windows start menu, choose Control Panel.
-
Page 29: Giving Priority To Background Services
Installing the driver (Windows) Giving priority to background services Crackling may occur in the sound if you omit making this setting. To ensure that audio and MIDI are processed Depending on your system, smoothly, make the setting as follows. the System icon may be displayed directly in the Control Panel (Classic view). -
Page 30: Driver Settings
“Software settings” (p. 40). * If you are unable to select the FA-66 in the device settings of your software, it is possible that the FA-66 driver was not installed correctly. Please re-install the driver. - Page 31 Cubase. In the ASIO settings of your application, choose “EDIROL FA-66.” You will be able to use ten inputs and ten outputs. * When using the FA-66 with ASIO, we recommend that you not set your application to use the Microsoft GS Wavetable SW Synth. (This will decrease the processing load, and make it easier to change the driver buffer size.)
- Page 32 Depending on your system, If you will be using the Windows Media Player application the System icon may be displayed directly in the with the FA-66, specify the input/output devices as Control Panel (Classic view). follows. If so, double-click the System The method in which you make device settings will icon.
- Page 33 Please copy the demo songs to the hard disk of your computer before listening to them. * The demo songs were produced at 48 kHz. You must set the FA-66’s sample rate to 48 kHz. You’ll need to cycle the power to the FA-66 after changing the sampling rate.
- Page 34 Installing the driver (Windows) Software settings Before you start up your software, use a FireWire (IEEE 1394) cable to connect the FA-66 to your computer, and turn on the power of the FA-66. For the latest information, please visit If your software allows you to specify MIDI and audio http://www.edirol.com/...
-
Page 35: Basic Connections And Settings
Roland PCS series. Basic connections Use a FireWire (IEEE 1394) cable to connect the FA-66 to your computer. MIDI data and audio data are transferred in both directions via the FireWire (IEEE 1394) cable. -
Page 36: Recording A Mic Or Guitar
Sample rate select switch Set this to the same sample rate as selected in your recording software. If you switch the FA-66’s sample rate, you must turn the power of the FA-66 off, then on again to get the setting to take effect. - Page 37 Basic connections and settings Direct monitor soft control switch Turn this on if you want to control input monitoring from ASIO 2.0 compatible software. Direct monitor volume This adjusts the balance between the monitor volume and the audio playback volume from your computer. Adjusting the direct monitor volume will not affect the recording level.
-
Page 38: Recording A Digital Signal
Set this to match the sample rate of your digital playback device and the sample rate of your recording software. If you switch the FA-66’s sample rate, you must turn the power of the FA-66 off, then on again to get the setting to take effect. -
Page 39: Connecting Various Types Of Equipment
Basic connections and settings Connecting various types of equipment fig.send-return Guitar/Bass Amplified speakers Mixer, DJ Mixer, etc. Adjust the level of the input from a synthesizer or other device connected to FireWire cable the INPUT 1/2 jacks. Computer IEEE1394 connector (FireWire connector, CD/MD/cassette player, iLink connector,... -
Page 40: Software Settings
In this example we are using SONAR 4 Producer Edition. You must make the following settings if you have switched the FA- 66’s sample rate or have changed the buffer size in the FA-66 Driver settings dialog box. Power up the FA-66, and then start up SONAR. - Page 41 EDIROL FA-66 IN. fig.sonar-3.eps Click the Driver Profiles tab. Select EDIROL FA-66 (3 in, 3 out) as the setting for “Show Profile for,” and then select “32 bit PCM, left-justified” as the setting for “Stream > 16 bit data as.”...
- Page 42 Click [OK] to close the Audio Options dialog box. From SONAR’s Options menu, choose MIDI Devices to open the MIDI Devices dialog box. In the MIDI Devices dialog box, choose the FA-66 in the Inputs area and the Outputs area. fig.sonar-5.eps Restart SONAR.
-
Page 43: Digital Performer
Software settings Digital Performer In this example we are using Digital Performer 4.5. fig.digiperf.eps Power up the FA-66, and then start up Digital Performer. From Digital Performer’s Setup menu, choose Audio System, and verify that MOTU Audio System is checked. -
Page 44: Logic
Software settings Logic Here is an example using Logic Pro 7.0.1. Power up the FA-66, and then start up Logic. From the Logic Pro menu, choose Preferences - Audio to open the Preferences dialog box. Click the Drivers tab. In the Core Audio section, select (add a check mark to) the checkbox located at the left of Core Audio. -
Page 45: Cubase Sx/Sl
In the Devices list at the left side of the dialog box, choose VST Multitrack. Select the Setup tab in the right side of the dialog box. From the drop-down list for ASIO Driver, choose EDIROL FA-66. Click [OK] to close the Device Setup dialog box. -
Page 46: Driver Settings Dialog Box (Windows)
Turn the power of the FA-66 off, then on again. At this time, be sure to close all software before you turn the FA-66’s power off. * If you power of the FA-66 off while using your software, it may not operate correctly. - Page 47 Smaller smaller buffer than Normal (shorter latency) ASIO When using the FA-66 with ASIO-compatible software such as Cubase • Conventional software such as Media Player • When using an application such as SONAR in WDM driver mode • When using DirectSound software...
-
Page 48: Troubleshooting
FA-66 to the FireWire (IEEE 1394) connector of your computer. Is the FA-66 powered up? Make sure that the FA-66’s power is on. Make sure that the POWER switch is on. Could the FA-66’s power switch be set to BUS? - Page 49 Does your computer or FireWire (IEEE 1394) repeater hub have a sufficient power supply? If you are using bus power, the FA-66 cannot be connected if insufficient power is being supplied to it. Check whether the following cases might apply.
- Page 50 If your computer or FireWire (IEEE 1394) hub has two or more FireWire (IEEE 1394) connectors, and you connect the FA-66 to a FireWire (IEEE 1394) connector to which you have not previously connected it, this dialog box may appear even though you have already installed the driver.
-
Page 51: No Sound
Have you specified the audio and MIDI data output destination in the operating system? Depending on the software you are using, you may need to specify the FA-66 as the audio data output destination for your computer. For details on this setting, refer to “Audio and MIDI settings”... - Page 52 MIDI settings” (p. 19) or “Driver settings” (p. 30). If you are using the 192 kHz sample rate on Windows XP, the FA-66 may not appear in the Sounds tab of the Sounds and Audio Devices Properties dialog box. If so, please update your system to Windows XP Service Pack 1.
- Page 53 Have you specified the audio data output destination in your playback software? You need to make settings in your software to select the FA-66 as the destination for the output of audio data. For details on how to make this setting, refer to the owner’s manual for the software you are using.
- Page 54 Set the sample rate to the same setting. If you switch the FA-66’s sample rate, you must turn the power of the FA-66 off, then on again to get the setting to take effect.
-
Page 55: Noise Or Pops Are Heard When Recording/Playing On Your Computer
Troubleshooting Noise or pops are heard when recording/ playing on your computer Noise is heard during audio playback Pops/clicks occur during audio playback Noise is heard in the recorded sound In Windows, did you make the setting described in “Giving priority to background services”? In order to ensure that audio/MIDI processing occurs smoothly, make the setting described in “Giving priority to background services.”... - Page 56 Adjust the buffer size as described in “FA-66 Driver Settings dialog box (Windows)” (p. 46). After changing the buffer size, you must restart any software that uses the FA-66. If your software has an audio device test function, execute the test function.
- Page 57 Set your software and the FA-66 to the same sample rate. If you switch the FA-66’s sample rate, you must turn the power of the FA-66 off, then on again to get the setting to take effect.
- Page 58 If a MIDI sound module with a FireWire (IEEE 1394) connector is connected via FireWire (IEEE 1394) to the same computer as the FA-66, and the output of the MIDI sound module is connected to the input jacks of the FA-66, noise from the computer may be heard via the MIDI sound module from the FA-66.
-
Page 59: Noise Or Distortion Occurs When The Fa-66 Is Not Connected To Your Computer
Noise is heard in the sound Has a mic or guitar been left connected? If a mic or guitar is connected to the FA-66, disconnect the mic or guitar and turn the input sensitivity knob all the way toward the left (lowering the input level). - Page 60 Troubleshooting A substantial amount of noise is present in the guitar sound Does the noise decrease when you turn down the volume of your guitar? If the noise decreases when you turn down the volume of your guitar, the guitar pickup may be affected by noise from your computer or display.
-
Page 61: Others
Others Can’t start the Cubase The first time you use the FA-66 with Cubase, turn on the power with the FA-66’s sample rate select switch at the 44.1 kHz position. If this switch is not set to 44.1 kHz, it may be impossible to start Cubase. -
Page 62: Main Specifications
Main specifications ● Number of Audio Record/Playback Channels <44.1/48/96 kHz> Record: 6 channels Playback: 6 channels (Full duplex) <192 kHz> Record: 4 channels Playback: 4 channels (Full duplex) * Depending on the computer you are using, you may be unable to obtain sufficient performance. - Page 63 Main specifications ● Interface Firewire (IEEE1394) Digital input/output Optical type (conforms to IEC60958) MIDI IN/OUT ● Connectors <Front Panel> Input Jack 1–2 (XLR type / 1/4 inch TRS phone type) XLR type (balanced / phantom power +48 V) 1/4 inch TRS phone type (balanced) * Input jack 2 supports high impedance Headphones Jack (Stereo 1/4 inch phone type) <Rear Panel>...
-
Page 64: Index
Direct monitor volume ......12, 37–39 Phantom power switch ......16, 37 Power indicator ..........11 Power switch ............. 14 EDIROL FA-66 Driver settings ......46 Sample rate select switch ..... 15, 36, 38 FireWire (IEEE 1394) cables ........ 8 SONAR ............... 40 FireWire (IEEE 1394) connectors ..... - Page 65 MEMO...
- Page 66 MEMO...
- Page 67 MEMO...
- Page 68 Information When you need repair service, call your nearest EDIROL/Roland Service Center or authorized EDIROL/Roland distributor in your country as shown below. IRELAND HONG KONG BARBADOS PERU CYPRUS Roland Ireland Parsons Music Ltd. A&B Music Supplies LTD Audionet Radex Sound Equipment Ltd.
Need help?
Do you have a question about the FA-66 and is the answer not in the manual?
Questions and answers