Table of Contents
Advertisement
Available languages
Available languages
Quick Links
G
E B R U I K S A A N W I J Z I N G
N
'
O TI CE
D
EM PLOI
O
P E R A T I N G I N S T R U C TI O N S
B
EDI EN UN GSAN LEI TUN G
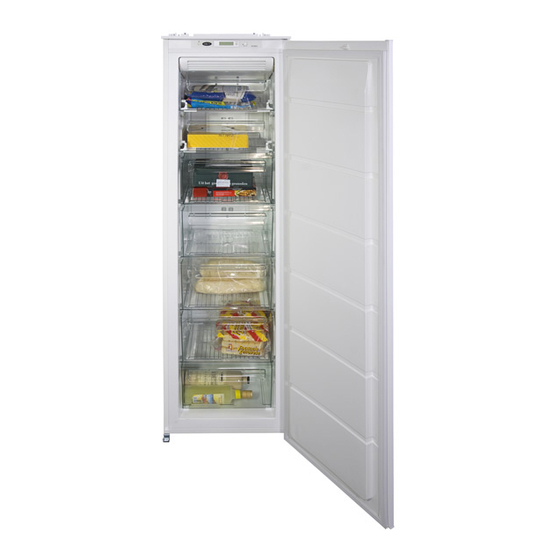
BV178
G
N
O
B
© B o r et t i B . V.
E B R U I K S A A N W I J Z I N G
'
O TI CE
D
EM PLOI
P E R A T I N G I N S T R U C TI O N S
EDI EN UN GSAN LEI TUN G
NL
FR
EN
DE
2223 419-71
Advertisement
Table of Contents

Related Manuals for BORETTI BV178


Summary of Contents for BORETTI BV178
- Page 1 P E R A T I N G I N S T R U C TI O N S EDI EN UN GSAN LEI TUN G BV178 E B R U I K S A A N W I J Z I N G ’...
-
Page 2: Waarschuwingen En Belangrijke Adviezen
WAARSCHUWINGEN EN BELANGRIJKE ADVIEZEN Het is uiterst belangrijk dat het bij het apparaat behorende instructieboekje bewaard blijft. Zou het apparaat door u aan iemand anders gegeven of verkocht worden, of zou het apparaat in het huis van waaruit u verhuist achterblijven, dan dient de nieuwe gebruik(st)er over het instructieboekje en de daarin opgenomen waarschuwingen te kunnen beschikken. -
Page 3: Weggooien Van Oude Apparaten
bederf van de levensmiddelen veroorzaakt. stopcontact te steken, zodat de olie terug kan SCHRAAP EVENMIN MET SCHERPE vloeien naar de compressor. VOORWERPEN rijp of ijs af Rijp kan verwijderd • Er zijn werkende delen die warm worden. Zorg worden met een kunststof spatel. Verwijder ijs altijd voor een goede ventilatie, omdat anders niet met geweld. -
Page 4: Het Gebruik
INHOUD Waarschuwingen en Belangrijke adviezen ..........2 Aanwijzingzn voor het wegwerpen van verpakkingsmateriaal . -
Page 5: Het Uitschakelen
DISPLAY Alarmindicator open deur Indicator positieve of negatieve temperatuur Temperatuurindicator Als deze brandt, betekent dit dat de snelvriesfunctie werkt Werking De functies inschakelen Druk op toets (A) om de apparatuur in te schakelen, Iedere keer dat op toets C gedrukt wordt, worden met als het display niet brandt nadat de stekker in het de klok mee de volgende functies ingeschakeld: stopcontact gedaan is. - Page 6 Verse voedingsmiddelen invriezen Het ontdooien van ingevroren produkten Het vriesvak is geschikt om verse voedingsmiddelen in te vriezen en bevroren- en diepvriesproducten over De diepvriesprodukten moet u vóór gebruik in de lange tijd te bewaren. koelkast of bij kamertemperatuur laten ontdooien, al De maximum hoeveelheid voedingsmiddelen die in 24 naar gelang de beschikbare tijd.
-
Page 7: Tips Het Invriezen
Jslaatjes Koude accu’s Bij het apparaat worden 1 of meerdere ijslaatjes De vriezer is twee thermische accu’s (eutektische voor het maken van ijsblokjes geleverd. massa) voorzien,die de bewaartijd verlengt in geval Vul ze met drinkwater en plaats ze in het vriesvak. van stroomuitval of storing. - Page 8 ONDERHOUD Geprolongeerd stilstand Neem vóór iedere handeling altijd eerst de Wij adviseren u vóór de periode dat de koelkast niet steker uit de wandkontaktdoos. gebruikt wordt de volgende handelingen uit te Belangrijk: Dit apparaat bevat koolwaterstoffen in de voeren: koudekringloop; het onderhoud en het bijvullen dient •...
-
Page 9: Plaats Van Opstelling
INSTALLATIE Plaats van opstelling Plaats het apparaat uit de buurt van Attentie warmtebronnen: centrale verwarming, kachels, felle Het apparaat moet van het elektriciteitsnet zonnestralen enz. afgehaald kunnen worden; de stekker moet dus ook na de installatie bereikbaar blijven. Zie voor inbouw de betreffende aanwijzingen. Elektrische aansluiting Overtuig u ervan dat de netspanning en de netfrekwentie, welke op het typeplaatje in de kast... -
Page 10: Aanwijzingen Voor De Geïntegreerde Inbouw
Aanwijzingen voor de geïntegreerde inbouw Nismaten Hoogte 1780 mm Diepte 550 mm Breedte 560 mm Om veiligheidsredenen moet de ventilatie zodanig zijn als aangegeven in Fig. Attentie: zorg ervoor dat de ventilatie openingen tijdens gebruik niet worden afgedekt. De nis moet tevens voorzien zijn van een luchtkanaal met de volgende afmetningen: diepte 50 mm... - Page 11 Bevestig het apparaat met de vier rneegeleverde schrm even. Breng, onder lichte druk, de voegafdichting tussen apparaat en meubel aan. U moet het gedeelte van het kunststof deksel (E), dat gebruikt wordt om het scharnier af te dekken, verwijderen, zoals aangegeven op de tekening. Deze handeling wordt vergemakkelijkt omdat er aan de binnenkant van het scharnierdeksel een groef is aangebracht, waardoor u dit onderdeel makkelijker...
- Page 12 Plaats de geleider (Ha) zoals op de tekening staat aangeven tegen de binnenkant van de kastdeur en teken de positie van de buitenste gaten af. Nadat u de gaten geboord heeft, kunt u de geleider met de bijgeleverde schroeven vastzetten. Afdekking (Hc) op geleider (Ha) vastklikken.
-
Page 13: Avertissements Et Conseils Importants
AVERTISSEMENTS ET CONSEILS IMPORTANTS Il est très important que cette notice d’utilisation soit gardée avec l’appareil pour toute future consultation. Si cet appareil devait être vendu ou transféré à une autre personne, assurez-vous que la notice d’utilisation suive l’appareil, de façon à ce que le nouvel utilisateur puisse être informé du fonctionnement de celui-ci et des avertissements relatifs. -
Page 14: Protection De L'environnement
ATTENTION: En dehors des températures ambiantes indiquées par la classe climatique Protection de l’environnement d’appartenance de ce produit, il est obligatoire de respecter les indications suivantes: lorsque la Cet appareil ne contient pas, dans son circuit de température ambiante descend sous la valeur réfrigérant et ses matières isolantes, de gaz minimum, la température de conservation du réfrigérant nocif à... - Page 15 SOMMAIRE Avertissements et conseils importants ..........13 Renseignements pour l’élimination des matériaux d’emballage .
-
Page 16: Utilisation Du Compartiment Congélateur
DISPLAY Indicateur d’allarme d’ ouverture de la porte Indicateur de température positive or negative Indicateur de température Si en fonction, indique que la fonction de congélation est active Fonctionnement Activation des fonctions Après avoir branché la prise de courant au secteur, si A chaque pression de la touche C, les fonctions l'afficheur LCD ne s'illumine pas, presser la touche (A), suivantes s'activent en sens horaire :... -
Page 17: Conservation Des Produits Surgelés
Après une période de pré-refroidissement de 24 Alarme Surchauffe heures, introduire les aliments dans le congélateur. Une augmentation de la température dans le Le processus de congélation dure 24 heures. Pendant compartiment congélateur (par ex. à cause d'un ce temps, ne pas introduire d'autres aliments à manque de courant) est signalée par : congeler. -
Page 18: Conseils Pour La Congélation
Accumulateurs thermiques Dans le congelateur se trouvent deux accumulateurs de froid qui permettent d’augmenter la durée de conservation des aliments stockés en cas de coupure de courant ou d’anomalie de fonctionnement. Pour des raisons de sécurité liées au transport de l’appareil, ces accumulateurs sont mis, à... -
Page 19: Entretien
ENTRETIEN Arrêt prolongé Débranchez l’appareil avant toute Lorsque l'appareil doit rester à l'arrêt pendant un opération. certain temps, prenez les précautions suivantes: Attention: Cet appareil contient des hydrocarbures débranchez la prise de courant; dans son circuit de réfrigérant; I’entretien et la videz l'appareil;... -
Page 20: Installation
INSTALLATION Emplacement Important: Placez de préférence votre appareil loin d’une source de chaleur (chauffage, cuisson ou rayons L’appareil doit pouvoir être débranché du secteur; il solaires trop intenses). est donc nécessaire que la fiche reste accessible Pour l’encastrement rapportez-vous aux instructions une fois que l’installation est terminée. -
Page 21: Instructions Pour L'encastrement
Instructions pour l’encastrement Dimensions de la niche Hauteur 1780 mm Profondeur 550 mm Breite 560 mm Pour des raisons de sécurité, la ventilation doit être prévue comme indiqué dans le Fig. Attention: veillez à ne pas obstruer les ouvertures de ventilation. Il est également nécessaire que la niche soit équipée d’un conduit d’areation ayant les mesures suivantes:... - Page 22 Fixez l’appareil à l’aide des 4 vis livrées à cet effet. Appliquez le joint à pression, entre l’appareil et le meuble. Sur le cache plastique (E), qui sert à recouvrir la charnière et le pivot, retirez la pièce indiquée, comme illustré. Cette opération est facilitée par la présence d'une rainure, à...
- Page 23 Poser la glissière (Ha) sur la partie interne de la porte du meuble comme l’indique la figure et marquer la position des trous externes. Après avoir pratiqué les trous, fixer la glissière avec les vis fournies. Fixer par encliquetage le couvercle (Hc) sur la glissière (Ha).
-
Page 24: General Safety
WARNINGS It is most important that this instruction book should be retained with the appliance for future reference. Should the appliance be sold or transferred to another owner, or should you move house and leave the appliance, always ensure that the book is supplied with the appliance in order that the new owner can be acquainted with the functioning of the appliance and the relevant warnings. -
Page 25: Environment Protection
• Do not place carbonated or fizzy drinks in the Environment Protection freezer as it creates pressure on the container, which may cause it to explode, resulting in This appliance does not contain gasses which damage to the appliance. could damage the ozone layer, in either its refrigerant circuit or insulation materials. -
Page 26: Cleaning The Interior
Cleaning the interior Do not use detergents or abrasive powders, as these will damage the finish. Before using the appliance for the first time, wash the interior and all internal accessories with luke- warm water and some neutral soap so as to remove the typical smell of a brand-new product, then dry thoroughly. -
Page 27: Operation
Operation Activation of functions Each time key C is pressed, the following functions are After plugging the plug into the power outlet, if the activated in a clockwise direction: display is not illuminated, press key (A), appliance on. Symbol 4 : rapid freezing function. As soon as the appliance is turned on, the following signals will appear on the control panel: No Symbol: Normal operation... -
Page 28: Excessive Temperature Alarm
Excessive temperature alarm Door open acoustic alarm An increase in the temperature in the freezer An acoustic alarm will sound when the door is left compartment (for example due to an electricity open for more than 1 minute. outage) is indicated by: The door open alarm conditions are indicated by: - flashing temperature;... -
Page 29: Hints For Freezing
HINTS Hints for freezing Hints for storage of frozen food To help you make the most of the freezing process, To obtain the best performance from this appliance, here are some important hints: you should: • the maximum quantity of food which can be •... -
Page 30: Maintenance
MAINTENANCE Unplug the appliance before carrying out Periodic cleaning any maintenance operation. Many proprietary kitchen surface cleaners Warning contain chemicals that can attack/damage the This appliance contains hydrocarbons in its cooling plastics used in this appliance. For this reason it unit;... -
Page 31: Electrical Connection
INSTALLATION Location Attention The appliance should be installed well away from sources of heat such as radiators, boilers, direct It must be possible to disconnect the appliance from sunlight etc. the mains power supply; the plug must therefore be easily accessible after installation. For building into kitchen units follow the special “... -
Page 32: Instructions For Totally Built-In Appliances
Instructions for totally built-in appliances Dimensions of the recess Height 1780 mm Depth 550 mm Width 560 mm For safety reasons, minimum ventilation must be as shown in Fig. Attention: keep ventilation openings clear of ob- struction. Furthermore, it is necessary that the niche is provid with a conduct of ventilation having the following dimensions: depth... - Page 33 Fasten the appliance with 4 screws provided in the kit included with the appliance. Press in the joint covers between the appliance and the kitchen unit. From the plastic cover (E), which is used to cover the hinge with the pivot pin, you must take away the part as indicated in the drawing.
- Page 34 Place guide (Ha) on the inside part of the furniture door, as shown in the figure and mark the position of external holes. After having drilled holes, fix the guide with the screws supplied. Fix cover (Hc) on guide (Ha) until it clips into place. Open the appliance door and the furniture door at 90°.
-
Page 35: Warnungen Und Wichtige Hinweise
WARNUNGEN UND WICHTIGE HINWEISE Es ist sehr wichtig, daß diese Bedienungsanleitung mit dem betreffenden Gerät aufbewahrt wird. Sollte dieses Gerät verkauft bzw. einer anderen Person gegeben werden, so ist es nötig, die Anleitung beizufügen, damit der neue Besitzer über den Betrieb des Gerätes bzw. die entsprechenden Warnungen. -
Page 36: Entsorgung Von Altgeräten
Std. warten, bevor das Gerät in Betrieb Dazu nur einen Plastikschaber verwenden. genommen wird, damit das Öl in den Kompressor • Zum Lösen der festgefrorenen Eisschalen keine zurückströmen scharfkantigen oder spitzn Gegenstände benutzen. Gebrauch • Es sollten keine kohlensäurehaltigen Getränke in das Gefrier- bzw. -
Page 37: Reinigung Der Innenteile
INHALT Warnungen und wichtige Hinweise......................35 Hinweise zur Verpackungsentsorgung ....................36 Gebrauch - Reinigung der Innenteile - Bedienungsblende - Display ............37 Gebrauch - Betrieb - Aktivierung der funktionen - Gerät abschalten - Temperaturregelung ......Einfrieren von frischen Lebensmittel ......................38 Gebrauch - Aufbewahrung der Tiefkühlkost - Kälteakkus - Eiswürfelbereitung - Auftauen ......Alarm Übertemperatur - Hörbarer Alarm bei offner Tür - ................39 Tips - Tips für das Einfrieren - Tips für Tiefkühlkost - Gefrierkalender .............40 Wartung - Regelmäßige Reinigung - Stillstandzeiten - Abtauen - Störungen .........41... -
Page 38: Betrieb
GEBRAUCH Betrieb Aktivierung der Funktionen Bei jedem Drücken der Taste C aktivieren sich im Falls nach dem Inserieren des Steckers in die Uhrzeigersinn folgende Funktionen: Stromsteckdose das Display nicht beleuchtet ist, die Taste (A) zum Einschalten des Gerätes drücken. Symbol 4: die Funktion Schnellgefrierung Sofort nach Einschalten des Gerätes sind folgende Kein Symbol: normaler Betrieb Zeichen auf der Bedientafel zu sehen:... -
Page 39: Aufbewahrung Der Tiefkühlkost
Alarm Übertemperatur Aufbewahrung der Tiefkühlkost Ein Temperaturanstieg im Gefrierfach (z.B. Nach einem längeren Stillstand oder bei der ersten Stromausfall) wird angezeigt durch: Inbetriebnahme des Gerätes, vor Unterbringung der - die Temperatur blinkt; Lebensmittel mindestens 12 Stunden warten. - Gefrierfach blinkt (Symbol 3); Um optimale Leistungen des Gerätes zu erhalten, - Display rot beleuchtet;... -
Page 40: Tips Für Das Einfrieren
TIPS Tips für das Einfrieren Tips für Tiefkühlkost Für ein einwandfreies Einfrieren der Lebensmittel Um optimale Leistungen des Gerätes zu erhalten, geben wir folgende Ratschläge: sich vergewissern, • Das Gefriervermögen des Gefrierabteils (in 24 • daß die Tiefkühlkost beim Verkäufer gut Std.) kann auf dem Typenschild abgelesen aufbewahrt wurde werden. -
Page 41: Wartung
WARTUNG Regelmäßige Reinigung Vor jeder Reinigungsarbeit immer den Benutzen Sie nie Metallgegenstände um das Gerät Netzstecker aus der Steckdose ziehen. zu reinigen, da es beschädigt werden könnte. Den Achtung: Dieses Gerät enthält im Kältekreislauf Innenraum mit lauwarmem Wasser und Natron Kohlenwasserstoff. -
Page 42: Elektrischer Anschluß
INSTALLATION Aufstellung Wichtig Das Gerät sollte nicht in der Nähe von Es muß möglich sein, das Gerät vom Netz zu Wärmequellen wie Heizkörpern oder Öfen trennenn; Nach der Installation muß die Steckdose aufgestellt und vor direkter Sonneneinstrahlung daher zugänglich bleiben. geschützt werden. -
Page 43: Montageanleitung Für Den Integrierten Einbau
Montageanleitung für den integrierten Einbau Nischenmaße Höhe 1780 mm Tiefe 550 mm Breite (3) 560 mm Aus Gründen der Sicherheit muß eine Mindestbelüftung gesichert sein, wie aus der Abb.hervorgeht. Achtung: Die Ventilations - Öffnungen müssenimmer saubergehalten werden. Ferner ist auch am hinteren Einbauschrankteil ein Lüftungskamin mit filgenden Massen notwendig: Tiefe 50 mm... - Page 44 Gerät mit den 4 beiliegenden Schrauben befestigen. Fugenabdeckprofiloben um die Winkeldicke ausschneiden und zwischen Gerät und Möbelseitenwand eindrücken. Brechen Sie aus der Plastikabdeckung (E), die das Scharnier mit Stift bedeckt, die in der Abbildung gekennzeichneten Teile heraus. Dies wird durch die vorgestanzten Ausbruchlinien erleichtert.
- Page 45 Die Schiene (Ha) auf der Innenseite der Möbeltür auflegen (siehe Abb.) und die Position der äußeren Bohrlöcher anzeichnen. Nachdem die Löcher gebohrt wurden, die Schiene mit den mitgelieferten Schrauben befestigen. Die Abdeckung (Hc) in die Schiene (Ha) eindrücken, bis sie einrastet. Gerätetür und Möbeltür auf ca.
- Page 48 BORETTI B.V. De Dollard 17 1454 AT Watergang T + 31(0)20-4363439 F + 31(0)20-4361326 S 0900-2352673 (service) E info@boretti.com The Netherlands N.V. BORETTI S.A. Ruperlweg 16 2850 Boom T + 32(0)3-4508180 F + 32(0)3-4586847 E info@boretti.com Belgium...
Need help?
Do you have a question about the BV178 and is the answer not in the manual?
Questions and answers