Table of Contents
Advertisement
Available languages
Available languages
Quick Links
Advertisement
Chapters
Table of Contents

Related Manuals for BORETTI BV88


Summary of Contents for BORETTI BV88
- Page 1 P E R A T I N G I N S T R U C TI O N S EDI EN UN GSAN LEI TUN G BV88 E B R U I K S A A N W I J Z I N G ’...
-
Page 2: Veiligheid
Aanwijzing voor het gebruik van het instructieboekje Met de waarschuwingsdriehoek en/of door signaalwoorden wordt de aandacht gevestigd op aanwijzingen die belangrijk zijn voor uw veiligheid of voor het juist functioneren van het apparaat. Na dit symbool wordt uitleg gegeven over de bediening en het praktisch gebruik van het apparaat. -
Page 3: Table Of Contents
Gebruik • Plaats geen zware voorwerpen koel/vriesapparaat zelf op het aansluitsnoer. • Huishoudelijke koel- en/of vriesapparaten zijn - Daardoor bestaat kans op kortsluiting en brand. uitsluitend bedoeld voor het bewaren en/of • Trek de stekker niet uit het stopcontact door aan invriezen van eet- of drinkbare producten. -
Page 4: Weggooien
Weggooien Informatie over de verpakking van het apparaat • De materialen in dit apparaat die voorzien zijn van het symbool zijn geschikt voor recycling. >PE<=polyethyleen >PS<=schuimpolystyrol >PP<=polypropyleen Alle gebruikte materialen zijn niet schadelijk voor het milieu! Weggooien van oude apparaten Het symbool op het product of op de verpakking wijst erop dat dit product niet als huishoudafval mag worden behandeld. -
Page 5: Bedieningspaneel / In Bedrijf Stellen / Instellen Van De Temperatuur / Snelvriezen / Controlelampje Te Warm
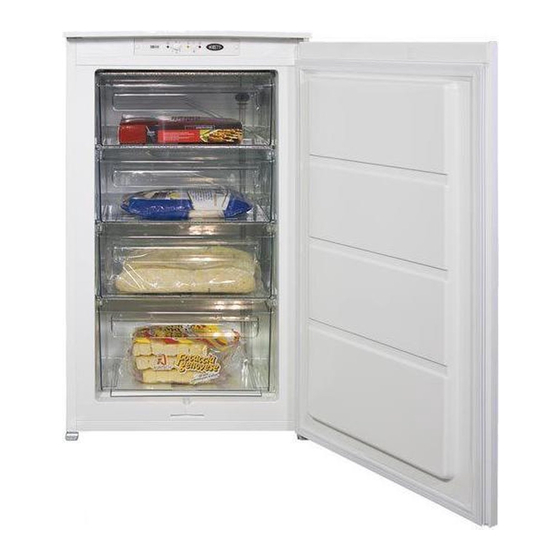
Bedieningspaneel ➀ ➀ ➁ ➁ ➂ ➂ ➃ ➃ ➄ ➄ Snelvriesschakelaar / alarmreset Groen controlelampje «in bedrijf» Rood alarmlampje (“te warm”) Thermostaat Geel controlelampje voor snelvriezen In bedrijf stellen gehouden, waarbij veilig bewaren gegarandeerd wordt. • Steek de stekker in het stopcontact. •... -
Page 6: Temperatuur Alarm / Interieur / Diepvrieskalender
Temperatuur alarm Diepvrieskalender Als uw diepvrieskast met een akoestisch symbolen geven diverse soorten diepvriesproducten aan. temperatuursignaal is uitgerust, klinkt tegelijk met het oplichten van het rode lampje een akoestisch signaal, dat aangeeft dat de bewaartemperatuur te hoog resp. te warm is (-12°C). Het akoestische signaal blijft hoorbaar, totdat het rode lampje uitgaat of u door inschakelen van de De getallen geven voor iedere soort diepvriesproduct... -
Page 7: Tips
leeg vriezen. Is de vriezer reeds in gebruik, dan is Tips deze handeling niet nodig. Plaats na 2 uur de diepvriesartikelen in de vriezer en zet de schakelaar in de stand voor bewaren. Energie besparen • De in te vriezen levensmiddelen in de twee bovenste laden van het apparaat plaatsen;... -
Page 8: Onderhoud Ontdooien / Schoonmaken
Onderhoud Belangrijk Neem voor iedere handeling altijd eerst de stekker uit het stopcontact. Gebruik voor het verwijderen van de rijp nooit metalen voorwerpen; u zou uw Belangrijk vrieskast kunnen beschadigen. Dit apparaat bevat koolwaterstoffen in het Geen voorwerpen of methodes gebruiken koelcircuit;... -
Page 9: Storingen
Storingen Indien de koelkast niet functioneert, controleer dan onderstaande punten, voordat u contact opneemt met onze service-afdeling: Storing Oplossing Temperatuur in het apparaat is te hoog Temperatuur is niet juist ingesteld. Zie hoofdstuk “Instellen van de temperatuur”. Plaats de levensmiddelen zo, dat de lucht vrij eromheen kan circuleren. Omgevingstemperatuur te hoog. -
Page 10: Wijzigen Van De Deurdraairichting
Wijzigen van de deurdraairichting De apparatuur wordt geleverd met deuren die naar rechts opengaan. Om de deur naar de tegenovergestelde kant te laten openen, dient men de volgende handelingen te verrichten alvorens de installatie uit te voeren. 1. Draai de bovenste stift uit en verwijder de afstandshouder. -
Page 11: Elektrische Aansluiting
Elektrische aansluiting Overtuig u ervan dat de netspanning en de Dit apparaat voldoet aan de volgende EU-richtlijnen: netfrequentie, op het typeplaatje in de kast staan - 73/23 EG-richtlijn 19/02/73 aangegeven, overeenkomen met de netspanning en (Laagspanning) opeenvolgende de netfrequentie in uw woning. wijzigingen;... - Page 12 6. Onderdelen Ha, Hb, Hc, Hd scheiden zoals u in 3. Bevestig het apparaat aan de nis met de vier de tekening ziet. meegeleverde schroeven (I). 7. Geleider tegen de binnenkant van de kastdeur aan 4 U moet het gedeelte van het kunststof deksel (E), de boven- en onderkant houden volgens de dat gebruikt wordt om het scharnier af te dekken, tekening en de plaats van de buitenste gaten...
- Page 13 12. Afdekking (Hd) op ijzer (Hb) vastklikken. 9. De deur van het apparaat en die van de kast met een hoek van ongeveer 90° openen. IJzer (Hb) in geleider (Ha) aanbrengen. De deuren samen vasthouden en de gaten aangeven zoals in de tekening.
-
Page 14: Avertissements Importants
Comment lire votre notice d’emploi Les symboles ci-dessous vous guideront au long de la lecture de votre notice: Instructions liées à la sécurité lors de l’utilisation de l’appareil. Conseils pour une utilisation correcte de l’appareil afin d’obtenir les meilleures performances. Informations liées à... -
Page 15: Elimination
Sommaire Avertissements importants ............. . .14 Elimination . -
Page 16: Tableau De Commande /Mise En Service /Réglage De La Température /Congélation Rapide /Voyant D'alarm
Tableau de commande ➀ ➀ ➂ ➂ ➃ ➃ ➄ ➄ ➁ ➁ 1 Voyant de fonctionnement (vert) 4 Touche super congélation / arrêt alarme 2 Thermostat 5 Voyant alarme (rouge) 3 Voyant de super congélation (jaune) Mise en service •... -
Page 17: Dispositif D'alarme De La Température / Calendrier De Congélation / Equipement Intérieur
Dispositif d'alarme de la température Votre congélateur est équipé d'un dispositif sonore d'alarme qui signale que la température à l'intérieur du congélateur est remontée à un niveau qui ne garantit plus la bonne conservation des aliments (plus chaud que -12°C). Le signal sonore est émis jusqu'à... -
Page 18: Conseils
Tiroirs Congélation et surgélation Les tiroirs stables sont antibasculants et bloqués • Appuyez sur la touche super congélation 3 heures dans la position extrême. Ceci garantit un stockage avant d’introduire les denrées fraîches si l’appareil sûr et commode et facilite l’accès aux aliments est vide (mise en service ou après dégivrage par congelés. -
Page 19: Entretien Dégivrage / Nettoyage
Entretien Nettoyage Débranchez l’appareil avant toute opération. N’utilisez jamais de produits abrasifs ou caustiques ni d’éponges avec grattoir pour Attention procéder au nettoyage de votre appareil. Cet appareil contient des hydrocarbures dans son circuit réfrigérant; l’entretien et la N'utilisez jamais des objets métalliques recharge ne doivent donc être effectués pour nettoyer l'appareil;... -
Page 20: Si Quelque Chose Ne Va Pas
Si quelque chose ne va pas ... Si l'appareil marche mal, il faut contrôler: Dérangement Remède La température à l’intérieur de l’appareil est La température est mal réglée. Veuillez consulter la partie "Réglage de la température". trop chaude. Placez les denrées de façon à ce que l'air puisse circuler tout autour. Vérifiez que la porte soit bien fermée. -
Page 21: Réversibilité De La Porte
Réversibilité de la porte L’appareil est livré avec l’ouverture à droite. Pour changer le sens d’ouverture de la porte suivez les indications ci-dessous avant l’installation. 1. Dévissez le pivot supérieur et enlevez l’entretoise 2. Dégagez la porte 3. Dévissez le pivot inférieur avec une clé et repositionnez-le sur le côté... -
Page 22: Branchement Électrique
Le tableau ci-dessous vous permet de repérer les Important différentes classes climatiques existantes et les Vérifiez si la prise de courant murale est en températures ambiantes correspondantes: bon état et apte à recevoir la fiche du cordon d'alimentation du congélateur. Cette dernière pour une température Classe est conforme aux normes en vigueur et... - Page 23 2. Appliquez le joint à pression, entre l'appareil et le 5. Appliquez les caches (C-D) sur les ailettes des meuble (Fig.). butées et dans les trous des charnières (Fig.). Appliquez la grille d'aération (B) et le couvres charnière (E- Fig.). 3.
- Page 24 8. Fixez par encliquetage le cache (Hc) sur la 11. Remettre l’équerre en place sur la glissière et glissière (Ha). fixer avec les vis fournies. Pour effectuer l’éventuel alignement de la porte du meuble, utiliser le jeu des trous ovales. A la fin des opérations, il est nécessaire de contrôler que la porte de l’appareil se ferme parfaitement.
-
Page 25: Safety Instructions
Instructions for the use of the instructions booklet Notes which are important for your safety or for the proper functioning of the appliance Supplementary information regarding operation and practical applications of the appliance. Tips and notes concerning economical and environmentally sound use of the appliance Safety Instructions This information has been provided in the interests of your safety. -
Page 26: Use And Control Before Use
Disposal of old appliances The symbol on the product or on its packaging indicates that this product may not be treated as household waste. Instead it shall be handed over to the applicable collection point for the recycling of electrical and electronic equipment. -
Page 27: Acoustic Alarm
Control panel ➀ ➀ ➂ ➂ ➃ ➃ ➄ ➄ ➁ ➁ 4 Fast freeze switch and for stopping the acoustic 1 Pilot light (green) alarm (warning light on) 2 Thermostat control knob 5 Warning light (red) 3 Fast freeze light (yellow) Starting-up Quick freezing Insert the plug into the wall socket. -
Page 28: Freezer Calendar / Interior Accessories
Freezing Calendar Drawers The freezer has stops to prevent the drawers from The following symbols show different types of frozen falling out when fully extended. goods. To remove the drawers, proceed as follows: pull the drawer out until it comes to a stop, then tilt it upwards (see figure). -
Page 29: Hints
• Not open the door frequently or leave it open Hints longer than absolutely necessary. • Wrap up the food in aluminium foil or polythene and make sure that the packages are airtight. Saving Energy • Do not allow fresh, unfrozen food to touch food •... -
Page 30: Maintenance Defrosting / Cleaning
Maintenance Cleaning Unplug the appliance before carrying out any maintenance operation. Never use metal objects for cleaning your Warning appliance as it may get damaged. This appliance contains hydrocarbons in its NEVER use detergents, abrasive powders, cooling unit maintenance and recharging must highly perfumed cleaning products or wax therefore only be carried out by authorised polishes to clean the interior as these will... -
Page 31: Something Not Working
Something not Working Problems may be due to causes which can easily be solved before calling the Technical Service. Please follow these instructions: SYMPTOM SOLUTION Door does not close Weight surpasses the storage limit of the door shelf so spread weight more evenly or take some products out. -
Page 32: Door Reversal
Door reversal The appliance is supplied with the door opening to the right. For door opening in the opposite direction, perform the following actions prior to installation Warning! When changing the side at which the door opens, the appliance may not be connected to the mains. -
Page 33: Electrical Connection
Electrical connection Before plugging in, ensure that the voltage and This appliance complies with the following E.E.C. frequency shown on the serial number plate Directives: correspond to your domestic power supply. - 87/308 EEC of 2/6/87 relative to radio Voltage can vary by ±6% of the rated voltage. interference suppression. - Page 34 3. Fasten the appliance with 4 screws provided in 6. Separate parts Ha, Hb, Hc, Hd as shown in the the kit included with the appliance. figure. 4. From the plastic cover (E), which is used to cover the hinge with the pivot pin, you must take away the part as indicated in the drawing.
- Page 35 12. Fix cover (Hd) on the small square (Hb) until it 9. Open the appliance door and the furniture door at clips into place. 90°. Insert the small square (Hb) into guide (Ha). Put together the appliance door and the furniture door and mark the holes as indicated in the figure.
-
Page 36: Sicherheitshinweise
Hinweise zur Benutzung der Gebrauchsanweisung Die folgenden Symbole erleichtern das Lesen der Gebrauchanweisung: Sicherheitshinweise bezüglich der Benutzung des Gerätes Ratschläge für den korrekten Gebrauch und die optimale Ausnutzung des Gerätes. Informationen zum Umweltschutz Sicherheitshinweise Bevor Sie Ihr neues Kältegerät in Betrieb •... -
Page 37: Entsorgung
Inhalt Sicherheitshinweise ..............36 Entsorgung . -
Page 38: Gebrauch Vor Inbetriebnahme
Bedienungsblende ➀ ➀ ➂ ➂ ➃ ➃ ➄ ➄ ➁ ➁ 1 Netz-Kontrollleuchte 4 Schnellgefrier-Taste/Temperaturwarnsignal- Löschtaste 2 Thermostatregler 5 Temperaturalarm-Kontrollleuchte 3 Schnellgefrier-Kontrollleuchte Inbetriebnahme Temperaturregelung Den Stecker in die Steckdose einsetzen. • Thermostatknopf (2) über die Stellung «O», drehen. Wir empfehlen, den Schalter (2) auf eine Temperaturregler (2) von der Stellung «O»... -
Page 39: Bedienungsblende / Inbetriebnhame / Temperatureinstellung
Gefrierabteilausstattung Schnellgefriervorgang Zur Durchführung des Schnellgefriervorganges die Eiswürfelbereitung Schnellgefriertaste (4) drücken. Die Kontrollampe (3) leuchtet auf. Das Gerät hat Eiswürfelschalen, welche mit Wasser aufgefüllt in das Gefrierfach gestellt werden. Die Wird die Schnellgefrier-Funktion nicht manuell Eiswürfel können herausgenommen werden, indem beendet, schaltet die Elektronik des Gerätes diese die Eiswürfelschale kurz unter Leitungswasser Funktion nach 52 Stunden ab . -
Page 40: Tipps
Einfrieren und Tiefkühllagern Tipps • Um den Schnellgefriervorgang durchzuführen, muss das Gerät, falls es nicht in Betrieb ist, wenigstens drei Stunden vor der Einlagerung der Energie-Einsparung einzufrierenden Lebensmittel • Das Gerät nicht in der Nähe von Herden, Schnellgefriervorgang gestellt werden. Läuft jedoch Heizkörpern oder anderen Wärmequellen das Gerät bereits, wird empfohlen, den aufstellen. -
Page 41: Wartung Abtauen / Reinigung
Wartung Reinigung Vor jeder Reinigungsarbeit immer den Netzstecker aus der Steckdose ziehen. Bitte keine Reinigungs- bzw. Scheuermittel Dieses Gerät erhält im Kaltekreislauf verwenden, die das Gerät beschädigen Kohlenwasserstoff. Aus diesem Grund darf könnten. Wartung Nachfüllen Benutzen Sie nie Metallgegenstände um ausschließlich autorisierten das Gerät zu reinigen, da es beschädigt... -
Page 42: Wenn Etwas Nicht Funktioniert / Kundendienst Und Ersatzteile / Technische Angabe
Wenn etwas nicht funktioniert Falls das Gerät Störungen aufweisen sollte, bevor Sie den Kundendienst verständigen, überprüfen Sie zuerst folgendes: Störung Abhilfe Im Gerät wird es nicht kalt genug Der Drehknopf auf kältere Temperatur drehen. Die Lebensmittel müssen so eingelagert werden, dass die Kälte um sie frei zirkulieren kann. -
Page 43: Türanschlag Wechseln
Türanschlag wechseln Das Gerät wird mit Türanschlag von rechts geliefert. Falls einen gegenüberliegenden Türanschlag erfordert wird; gehen Sie wie folgt vor bevor Sie das Gerät einbauen. Warnung! Während des Türanschlagwechsels darf Gerät nicht Stromnetz angeschlossen sein. Vorher Netzstecker ziehen. 1.Obere Scharnierstift abschrauben und Kunstoffteil entfernen. -
Page 44: Elektrischer Anschluss
Nachstehende Tabelle zeigt, welche Wichtig Umgebungstemperatur welcher Klimaklasse Gerät muss unbedingt zugeordnet ist: vorschriftsmäßig geerdet werden. Zu diesem Zweck ist der Stecker des Klimaklasse für Umgebungstemperatur von Anschlusskabels mit dem dafür vorgesehenen Kontakt versehen. Sollte die Netzleitung im +10 bis +32°C Haus nicht mit einer Erdleitung versehen sein, so muss das Gerät an eine getrennte +16 bis +32°C... - Page 45 1. Vergewissern Sie sich, dass unten zwischen dem 4. Brechen Sie aus der Plastikabdeckung (E), die Küchenmöbel und dem Rand des Geräts ein Abstand das Scharnier mit Stift bedeckt, die in der von 44 mm besteht. Abbildung gekennzeichneten Teile heraus. Die untere Scharnierabdeckung (im Zubehörbeutel) Dies wird durch die vorgestanzten Ausbruchlinien dient...
- Page 46 7 Die Schiene (Ha) auf der Innenseite der Möbeltür 10. Die Winkeleisen entfernen und 8 mm vom oben und unten auflegen (siehe Abb.) und die äusseren Rand der Tür mit dem Nagel (K) Position der äußeren Bohrlöcher anzeichnen. kennzeichnen. Nachdem die Löcher gebohrt wurden, die Schiene mit den mitgelieferten Schrauben befestigen.
- Page 48 BORETTI B.V. De Dollard 17 1454 AT Watergang T + 31(0)20-4363439 F + 31(0)20-4361326 S 0900-2352673 (service) E info@boretti.com The Netherlands N.V. BORETTI S.A. Ruperlweg 16 2850 Boom T + 32(0)3-4508180 F + 32(0)3-4586847 E info@boretti.com Belgium...
Need help?
Do you have a question about the BV88 and is the answer not in the manual?
Questions and answers