Table of Contents
Advertisement
Quick Links
Advertisement
Table of Contents

Related Manuals for Fishman AFX REVERB


Summary of Contents for Fishman AFX REVERB
- Page 1 AFX • USER GUIDE ACOUSTIC REVERB PEDAL...
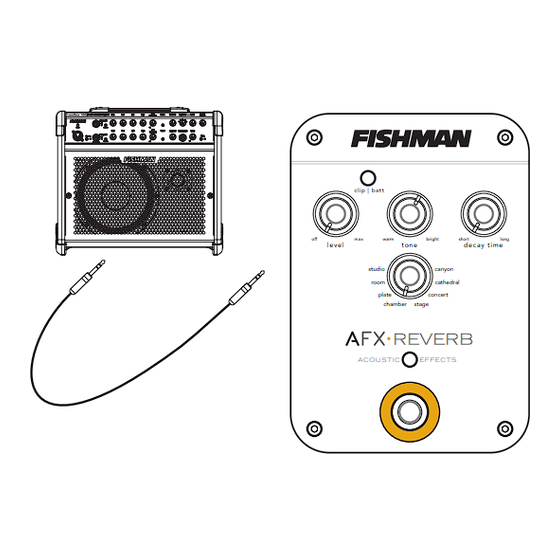
- Page 2 clip | batt warm bright short long l e v e l t o n e d ec ay t im e studio canyon room cathedral plate concert chamber stage REVERB A C OU S T I C E F F E C T S...
-
Page 3: Quick Start
Quick start Power – Install a 9V alkaline or lithium battery (not included). Plug in – Use standard ¼-inch shielded instrument cables. Set input gain – Play hard and try both normal and boost modes. The clip/batt LED may fl ash occasionally. Select an effect –... - Page 4 Using other effects When using multiple pedals, we recommend connecting them in this order, however feel free to experiment. clip | batt c lip | ba t t c l i p | b a t t warm bright short long warm bright...
-
Page 5: Right Side Panel
Or, for stereo operation, connect the outputs from another stereo effects pedal to both the left and right inputs. Note: The input for all Fishman AFX pedals is ideal for active pickups and all soundhole pickups. For passive piezo pickups (no preamp built into the instrument) we recommend plugging directly into an impedance-matching preamp fi... - Page 6 Right side panel (continued) Input gain This switch lets you quickly set the best operating level for your pickup. Start with the input gain switch set to normal. When you play hard, the clip/batt LED should fl ash only occasionally. If the LED does not fl ash with hard playing, select boost.
-
Page 7: Left Side Panel
Left Side Panel Output Use a standard guitar cable to connect either the left or right output to another pedal, amplifi er or mixing board. For stereo operation, connect both left and right outputs. 9vdc See Power section on next page. 9 v dc rig ht o utput... - Page 8 To conserve the battery, remove the plug(s) from the input jack(s) when not in use. For AC power, use the Fishman 910-R (for 110V) or other suitable 9V adapter. The adapter must be fi ltered, regulated and rated for at least 200mA. It must also accept AC power appropriate for your country.
- Page 9 Controls Level The level control mixes the selected effect in parallel, adding as much or as little reverb as you want in addition to your direct sound. This means that your tone is preserved while the effect is blended into it. Tone Use this to add brightness or warmth to the sound of the effect without altering your direct sound.
- Page 10 Controls (continued) Effect Select Knob AFX • Reverb offers eight popular reverbs, chosen and voiced especially for acoustic instruments. Studio The smallest space in the set, this effect mimcs the sounds of a tightly tuned recording studio space. Room The early refl ections and short decay time bring to mind the feel of a small room. Plate Classic warm analog plate reverb used throughout the 50’s, 60’s and 70’s.
- Page 11 Controls (continued) Chamber Before digital reverbs were available, chambers were built in major recording studios. A speaker and one or more microphones were placed in these oddly shaped rooms which created a very live reverberant sound that could be mixed into studio recordings.
- Page 12 Controls (continued) Cathedral Slightly boomy and very large, this hall reverb exhibits very late refl ections and long decay time. Canyon Extremely late refl ections (echo) and a very long resonant, decay.
- Page 13 Footswitch When the green light above the footswitch is on, the effect is active. Step on the footswitch to bypass the AFX • Reverb. When the effect is bypassed, your in- strument signal passes through an all-analog buffered signal path. This buffered path provides an incredibly low-noise output useful for driving long cable runs, such as to a mixing console.
-
Page 14: Battery Replacement
Battery Replacement The clip/batt indicator will light steadily when it is time to change the battery. Open the battery door underneath the pedal and install a fresh 9V alkaline or lithium battery. When the clip/batt LED comes on you have approximately one hour of remaining battery life. -
Page 15: Specifications
9V alkaline battery or 9VDC adapter Typical in-use current consumption: 24.7mA Typical 9V alkaline battery life: 20 hours 9V adapter: Fishman 910-R (for 110V) or suitable fi ltered and regulated, 200mA type, tip = negative Input impedance: 1M Ohm Nominal output impedance:... - Page 16 www.fi shman.com 513-300-131 Rev B 10-07...
Need help?
Do you have a question about the AFX REVERB and is the answer not in the manual?
Questions and answers