Advertisement
- 1 BEFORE YOUR FIRST BREW
- 2 HERE'S WHAT'S IN THE BOX
- 3 FILLING THE WATER RESERVOIR
- 4 POSITIONING THE WATER RESERVOIR
- 5 CUP, MUG, OR CARAFE
- 6 BREW BASKET AND NINJA POD ADAPTER ASSEMBLY
- 7 LOCKING AND REMOVING THE NINJA POD ADAPTER
- 8 SLIDING LID
- 9 NINJA SMART SCOOP
- 10 CHOOSE A METHOD
- 11 CHOOSE A SIZE
- 12 CHOOSE A BREW
- 13 BREW
- 14 DRIP STOP
- 15 FROTHING
- 16 CAPPUCCINO-STYLE COFFEE
- 17 ICED NUTTY COCOA LATTE
- 18 GUIDE TO KEEPING COFFEE HOT
- 19 Documents / Resources
BEFORE YOUR FIRST BREW
To prime your brewer:
- Plug it into the wall and turn it on.
- Fill the water reservoir to the Full line with fresh water and place it on the base.
- Remove the Ninja Pod Adapter and slide the Sliding Lid into the closed position.
- Place the empty carafe under the brew basket and run a Full Carafe, Classic Brew.
Once the brew is complete, discard the water and you're ready to brew.
If you live in a high-altitude area, running a calibration brew is required. Not running a high-altitude calibration brew in a high-altitude area will result in excessive steaming during brewing. Refer to the Owner's Guide for instructions on running a high-altitude calibration brew.
For how-to videos and more, visit ninjakitchen.com
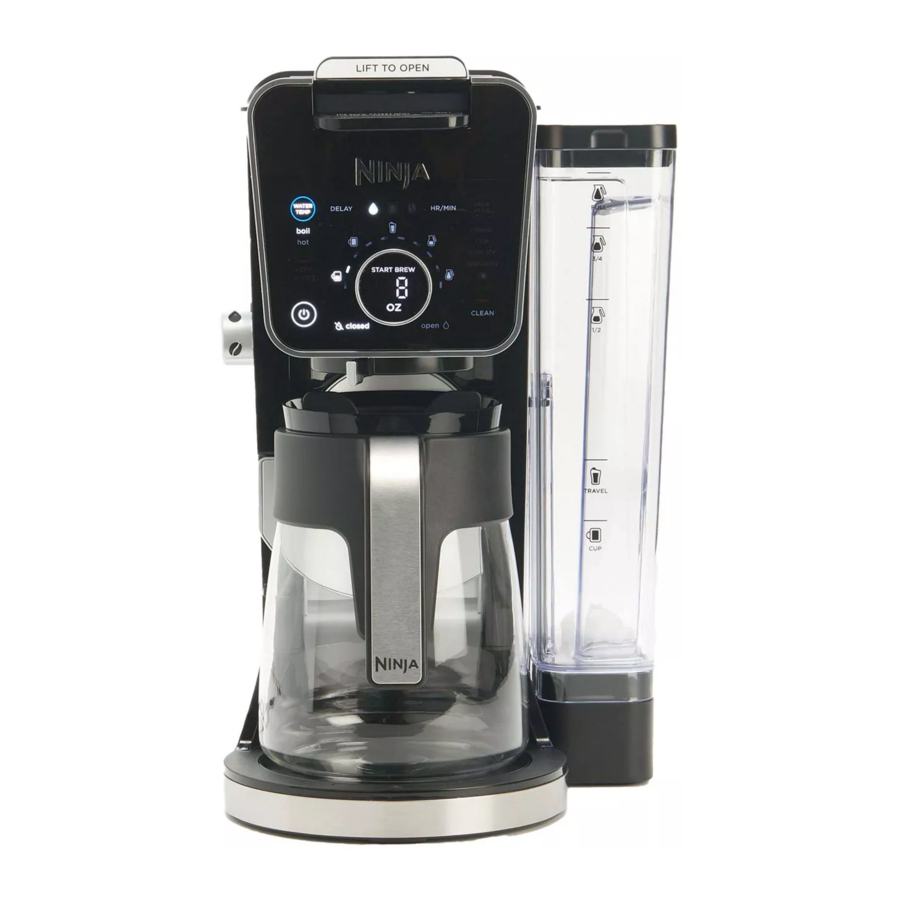
HERE'S WHAT'S IN THE BOX

NINJA DUALBREW

NINJA POD ADAPTER
Comes fully installed in the brewer. Always ensure to insert it over the brew basket when brewing pods.

BREW BASKET
Comes fully installed in the brewer. It must always be inserted when brewing pods or grounds.

60 OZ. THERMAL CARAFE
Keeps coffee hot, no warming plate required.
![]()
FROTHER WHISK
![]()
60 OZ. REMOVABLE WATER RESERVOIR

NINJA SMART SCOOP™
Use this to measure coffee grounds.

PAPER FILTER KIT
Fold along the seams before inserting firmly into brew basket.
FILLING THE WATER RESERVOIR

FILL TO THE FULL LINE
Fill up to, but do not exceed, the Full line.
POSITIONING THE WATER RESERVOIR
The water reservoir can be positioned to the right or along the back of the brewer to optimize counter space.
STEP 1. Remove the reservoir from the base. Remove the removable latch from the back of the brewer.

STEP 2. Swing the reservoir base around the brewer until it clicks into place. You may feel some resistance. Then, rotate the removable latch 180 degrees and reinsert it in the new gap where the base was previously positioned.

CUP, MUG, OR CARAFE

CUP
Pull down the cup platform to set a mug on it.

TRAVEL MUG & XL SIZES
Place an XL Cup, Travel Mug, or XL Tumbler on the base of the brewer.

CARAFE
Place the carafe on the base of the brewer.
BREW BASKET AND NINJA POD ADAPTER ASSEMBLY
BREW BASKET MUST BE INSERTED WHEN USING GROUNDS OR PODS.
 GROUNDS BREW BASKET Must always be inserted when brewing grounds or pods.  INSERT FILTER Fold the #4 paper cone filter along the seams, open the top fully, then insert filter firmly into the brew basket.  | OR |  PODS BREW BASKET Must always be inserted when brewing pods or grounds. Do not insert a filter.  NINJA POD ADAPTER Ensure adapter is in the REMOVE position before installing. Always insert over the brew basket when brewing pods.  |
LOCKING AND REMOVING THE NINJA POD ADAPTER
The Ninja DualBrew Pro Coffee System comes with a unique Ninja Pod Adapter already installed on the brewer. Always ensure the adapter is installed over the brew basket.

|
|
 NOTE: The Ninja Pod Adapter is compatible only with K-Cup pods. It is not compatible with reusable K-Cup filters. If using ground coffee, use the Grounds mode with a paper or permanent filter (sold separately) to brew a single-serve size.
SLIDING LID
The sliding lid is used only when brewing loose coffee grounds. To use it, first remove the Ninja Pod Adapter. Then, using the handle on top of the brewer, slide the lid toward you until it firmly clicks into place.

NINJA SMART SCOOP™
The Ninja Smart Scoop is used for accurately measuring coffee grounds. The numbers beside the icons show the number of level scoops recommended for each brew size.

| SERVING SIZE | NINJA SMART SCOOP |
| GROUND COFFEE | |
 | 2–3 small scoops |
 | 3–5 small scoops |
 | 3–5 big scoops |
 | 4–7 big scoops |
| Specialty 4 oz. | 2 big scoops |
CHOOSE A METHOD
GROUNDS

Ensure the brew basket is installed and the Ninja Pod Adapter is removed. Then, insert a paper filter in the basket.

Use the Ninja Smart Scoop™ to add your desired amount of coffee grounds (refer to the Smart Scoop section).

Slide the sliding lid forward, ensuring it is completely closed.
PODS

Ensure the brew basket and Ninja Pod Adapter are installed in the brewer.

Lift adapter handle to reveal pod holder and insert a pod.

Firmly push down on the handle to pierce the pod. Some noise and resistance is normal.
HOT WATER
The water outlet is completely separate from the coffee outlet to ensure clean water is dispensed every time.
To enter hot water mode, turn the dial on the left side of the brewer to the water droplet icon, aligning it with the marker. You will see a change in the display.

The hot water will dispense next to the coffee outlet.


Close the drip stop before brewing hot water to ensure no excessive coffee drips into the vessel (refer to the drip stop section).
CHOOSE A SIZE

*Approximate brew volumes based on Classic brew. Rich brew will produce slightly less output. Refer to the Approximate Brew Volumes chart in the Owner's Guide for more information.


Pods cannot brew in carafe sizes.
*Approximate brew volumes based on Classic brew. Rich brew will produce slightly less output. Refer to the Approximate Brew Volumes chart in the Owner's Guide for more information.


17 size options ranging from 2 oz. to 60 oz.
NOTE: Make sure to use a vessel that is big enough for the brew size you select.
CHOOSE A BREW

Smooth, wellbalanced flavor.

Specially designed to brew hot over ice for freshly brewed iced coffee that is not watered down. Always fill your vessel to the top with ice cubes before brewing Over Ice.

Richer than classic, with more intense flavor that stands up to milk, cream, or flavoring.

A super-rich concentrate that allows you to make coffee-based drinks like cappuccinos and lattes. Will only brew 4 oz.
HOT WATER MODE ONLY

Two water temperatures for a variety of different foods and beverages.

NOTE: DO NOT use glassware on any brew setting.
BREW

Press the START BREW button to start brewing. There will be an illuminating progress bar on the display to track the status of your brew.
THE BREW MAY PAUSE ONCE OR MULTIPLE TIMES DURING THE BREW CYCLE. THAT'S OK. Pausing allows the coffee grounds to fully extract and unlock the full flavor of the brew style.
NOTE: Ensure the drip stop is open before starting your coffee brew.
DRIP STOP
The drip stop is used to close off the brew basket to prevent any coffee from dispensing. You will need to manually open and close the drip stop by moving the handle to your desired position. The drip stop can be closed and reopened at any point before, during, or after a brew.

| CAN'T WAIT FOR THAT FIRST CUP? Close the drip stop to pause the brew cycle, and pour yourself a cup. Then, reopen the drip stop to continue the brew. | STOP THE DRIPS AFTER A BREW At the end of a brew, close the drip stop to prevent coffee dripping from the brew basket and Ninja® Pod Adapter. |
FROTHING
THE INTEGRATED FROTHER DOES NOT HEAT MILK.
- Add milk to your cup until it is about 1⁄3 full.

![]() For cold froth, go to Step 3.
For cold froth, go to Step 3.
![]() For hot froth, microwave for 45–60 seconds.
For hot froth, microwave for 45–60 seconds. - Swing the arm of the frother toward the front of the brewer. Install the frother whisk by twisting it to the right.

- Hold the cup under the frother and submerge the whisk just below the surface of the milk. Press and hold the button on top of the frother and froth for 30–45 seconds.

- Remove the frother whisk by twisting it to the left. Keep your cup below the whisk while you carry it to your sink or dishwasher for easy cleaning.

 For cold froth, go to Step 3.
  For hot froth, microwave for 45–60 seconds.

 To avoid contact with steam and hot surfaces, DO NOT reach across top of brewer to froth. |
CAPPUCCINO-STYLE COFFEE

Brew: Specialty
Makes: 1 serving (12-ounce cup)
INGREDIENTS
2 Ninja Big Scoops (4 tablespoons) ground coffee
1⁄2 cup milk
Sweetener, as desired
Ground cinnamon, for garnish
DIRECTIONS
- Following the measurement provided, place the ground coffee into the filter.
- Pour milk into a 12-ounce mug. Microwave for 45–60 seconds, then froth for 30 seconds.
- S et the mug containing frothed milk in place to brew.
- Press the BREW STYLE button to select SPECIALTY, then press the START BREW button to begin the brew.
- When brew is complete, sweeten and garnish as desired.
ICED NUTTY COCOA LATTE
Brew: Specialty
Makes: 1 serving (18-ounce cup)
INGREDIENTS
2 Ninja Big Scoops (4 tablespoons) ground coffee
2 tablespoons chocolate syrup, plus more for garnish
1 tablespoon caramel syrup, plus more for garnish
2 cups ice
1⁄2 cup milk
1 tablespoon peanut butter
DIRECTIONS
- Following the measurement provided, place the ground coffee into the filter.
- Add chocolate syrup, caramel syrup, and ice to an 18-ounce cup and set in place to brew.
- Press the BREW STYLE button to select SPECIALTY, then press the START BREW button to begin the brew.
- While coffee is brewing, place milk and peanut butter in a large mug, stir to combine, then microwave for 45–60 seconds.
- When brew is complete, stir to combine.
- Froth milk mixture for 30 seconds, then gently pour over coffee. Garnish as desired.
GUIDE TO KEEPING COFFEE HOT
The type of cup you brew into can greatly influence the drinking temperature of your coffee. For a hotter cup, use the hot water mode on BOIL to conveniently pre-warm the cup.
| CERAMIC CUP | PAPER CUP | |||
| Cup Temperature | Room temperature | Pre-warmed with hot water | Pre-warmed in microwave with milk | Room temperature |
| Drinking Temperature | Hot | Hotter | Hotter | Hottest |
| Why is there a difference? | A cold ceramic mug will steal heat from the coffee as it warms itself up. | If the mug is already warm, it will not steal as much heat from the coffee. | Just like your cold mug, cold milk lowers the temperature of your coffee. | Unlike a ceramic mug, a thinner paper cup does not steal substantial heat from the coffee. |
NOTE: DO NOT put the carafe in the microwave.
For questions or to register your product, contact us at 1-877-646-5288 or visit us online at ninjakitchen.com

@ninjakitchen
Documents / Resources
References
Download manual
Here you can download full pdf version of manual, it may contain additional safety instructions, warranty information, FCC rules, etc.
Advertisement


Need help?
Do you have a question about the DUALBREW PRO and is the answer not in the manual?
Questions and answers